background image

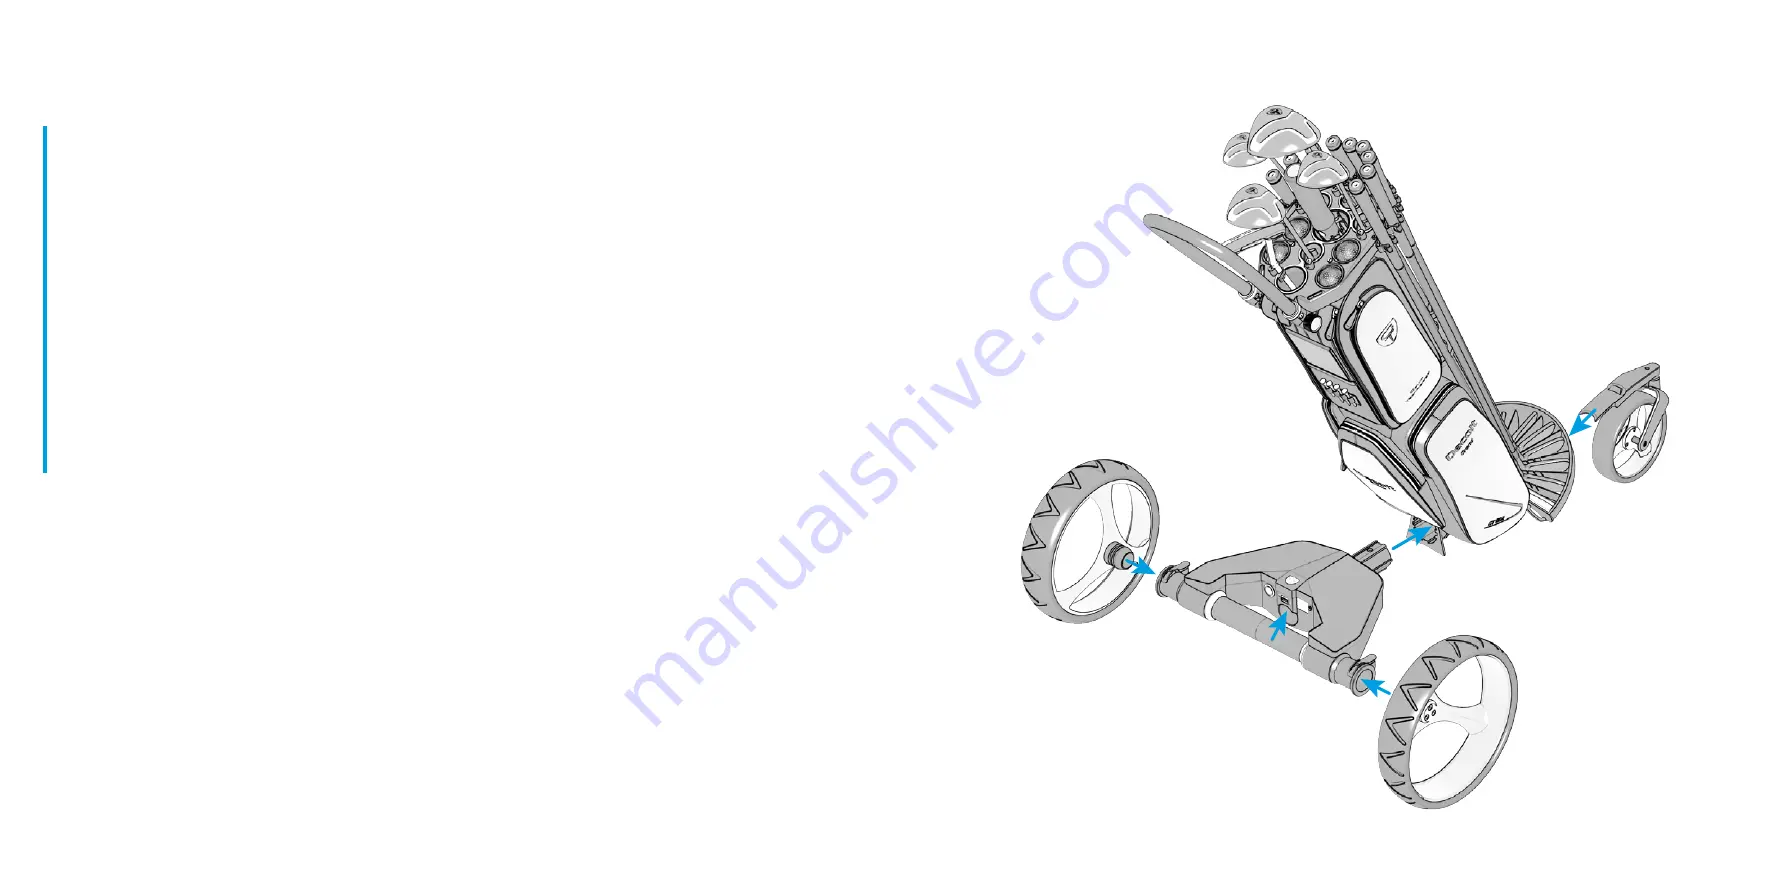
electric drive – assembly

20

Attach wheels to the electric drive. Wheel lock is in the engaged position.

Wheels will latch into the first free-wheel position.

Prepare the bag without the front wheel.

Hold the bag with one hand so that you can reach axle lock with your fingers.
Using your other hand, hold the electric drive by inserting 2 fingers in the ope

-

ning on the drive unit. Your palm should face GT logo.
Insert the electric drive into the opening for the shaft until you feel that the shaft

touched the pin of the axle lock.
At this moment, unlatch axle lock and keep pushing the electric drive inside while

releasing the lever of the lock.
Continue pushing the electric drive inside until you hear that the lock pin fully 

clicks in. 

Verify that the electric drive is firmly attached to the bag.

Содержание EDM01

Страница 1: ...EN Model EDM01 Electric drive module User manual...

Страница 2: ...DECOLT GRAND Inspired by logic...

Страница 3: ...can be maintained and never steer the trolley towards people or use in confined spaces Use free wheel mode or power off mode when around the club house or in confined spaces The EDM is tolerant of lig...

Страница 4: ...ON OFF switch Wheel lock USB connector for charging of remote control Opening for holding the electric drive Charging connector for electric drive Battery charge indicator Wheel lock DESCRIPTION OF E...

Страница 5: ...rging and signal transmission Pre set distance of 10 20 and 30 meters Main ON OFF switch Micro USB connector for charging from EDM Right turn Battery charge indicator Green charged Red discharged Magn...

Страница 6: ...le mounting onto EDM or after mounted It is recommended that free wheel mode is used while manoeuvring the trolley around clubhouse Release both main drive wheels slightly outward and re lock Check wh...

Страница 7: ...he time you want to turn right Turn left press LEFT button and hold for the time you want to turn left A second press increases reverse speed To reverse trolley press Reverse button To stop trolley pr...

Страница 8: ...n the trolley is ready to use If green light comes on the pairing process was successful Disconnect Once green or red light is flashing release both buttons On remote control press and hold both ON OF...

Страница 9: ...green and red light flash in alternate sequence Wait until calibration is confirmed this is displayed by multiple red or green light signals Once red or green light is flashing release both buttons I...

Страница 10: ...ELECTRIC DRIVE ASSEMBLY 18...

Страница 11: ...ld the electric drive by inserting 2 fingers in the ope ning on the drive unit Your palm should face GT logo Insert the electric drive into the opening for the shaft until you feel that the shaft touc...

Страница 12: ...n assembly Now the trolley is still in manual version as the wheels are locked in the first free wheel position and therefore are not connected to the electric drive You can use this setup to manually...

Страница 13: ...tric drive Put the wheel lock lever back down and verify that the wheels are fully latched in this position In order to fully lock them into the drive you need to turn the wheels slightly while pushin...

Страница 14: ...ry to recalibrate the gyroscopic sensor see instructions on page 9 If the trolley continues to fail to maintain a straight line on sloped surface even after repeated calibration process please refer t...

Страница 15: ...n ON EDM01 Turn OFF EDM01 Trolley may be pushed manually with drive mode engagedand EDM01 turned OFF or engage free wheel mode Turned OFF or engage free wheel mode Turn ON EDM01 Check behaviour of tro...

Страница 16: ...0 Graphic by Golf Geum Technology s r o 2018 01 web www golfgeum com tel 420 774 127 877 e mail info golfgeum com facebook https www facebook com golfgeum Quote serial number on base of EDM01 HELP DES...

Страница 17: ...32 www golfgeum com...

Отзывы:

Похожие инструкции для EDM01