background image

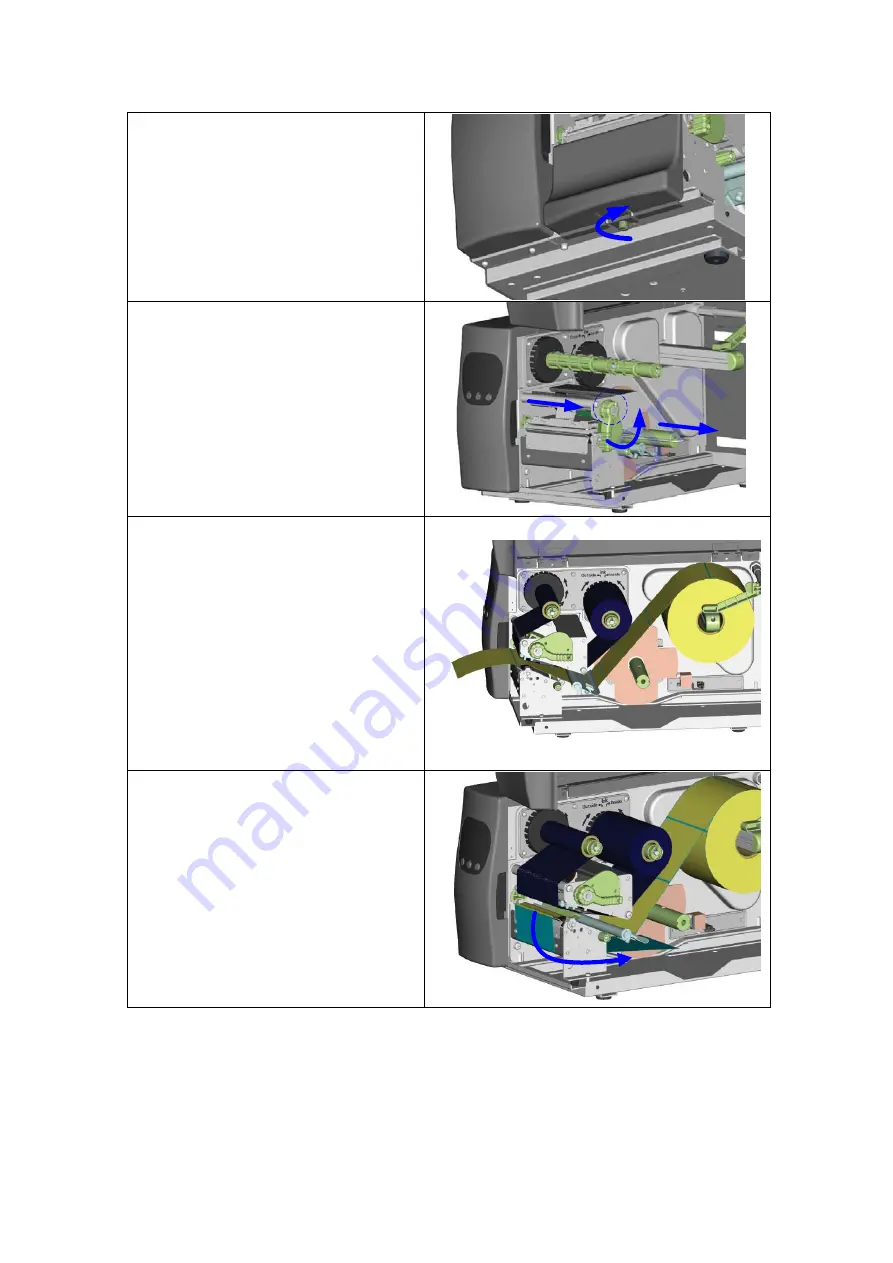
3-3. Stripper Installation for EZ-2000Plus (with rewinder) 

1. 

Face the printer front, and unscrew 
clockwise the bottom front cover 
screw. 

 
2. 

Remove the bottom front cover. 


Note


Before the installation, please power   
off the printer first. 


3. 

After Rewinder installation complete, 
face the printer sideways. 

 
4. 

Pull the print head lever out and flip it 
upward to the right. 

 
5. 

Remove the Paper Clip. 

1

2

3


6. 

Install the media into the printer. 


Note1

  Label liner thickness 

is recommended to be 0.06mm 

±

  10% with basic weight   

65g/

 ± 6%.  


Note2

  The label that used for stripping 

is suggested to be at least 20mm in 
height. 
 

Suggestion

When printing with stripper 

module, it is suggested to set the stop 
position (^E) to 11.


7. 

Peel off a few labels from the liner 
(about 400mm of liner), and then 
feed the liner through the Printer 
Mechanism and around the Label 
Feed Guide. 

EZ-2000+/6000+ User’s Manual 
 

27

Содержание EZ-2000 PLUS

Страница 1: ...User s Manual EZ 2000Plus EZ 6000Plus P N 920 011911 02 Rev C 06 2009 ...

Страница 2: ...ed with the requirements relating to electromagnetic compatibility based on the standards EN 55022 1998 A1 2000 A2 2003 CISPR 22 Class A EN 55024 1998 A1 2001 A2 2003 IEC 61000 4 Series EN 61000 3 2 2000 EN 61000 3 3 1995 The equipment also tested and passed in accordance with the European Standard EN55022 for the both Radiated and Conducted emissions limits EZ PLUS SERIES TO WHICH THIS DECLARATIO...

Страница 3: ...keit in das Gerät gelangen so ziehen sofort den Netzstecker Anderenfalls besteht die Gefahr eines lebensgefährlichen elektrischen Schlags 5 Wartungs und Reparaturarbeiten dürfen aus Sicherheitsgründen nur von autorisierten Personen durchgeführt werden 6 Bei Wartungs und Reparaturarbeiten müssen die Sicherheitsvorschriften der zuständigen Berufsverbände und Behörden unbedingt eingehalten werden 7 B...

Страница 4: ...sible transient over voltage damage 4 Don t pour any liquid to the equipment to avoid electrical shock 5 ONLY qualified service personnel for safety reason should open equipment 6 Don t repair or adjust energized equipment alone under any circumstances Someone capable of providing first aid must always be present for your safety 7 Always obtain first aid or medical attention immediately after an i...

Страница 5: ...nder 34 3 6 Cutter Installation 36 3 7 Parallel PS2 Adapter Installation 38 3 8 Applicator Interface Installation 40 3 9 WLAN Module Installation 42 4 CONTROL PANEL 45 4 1 Control Panel Introduction 45 4 2 Control Keys Introduction 46 4 3 Setting mode 48 4 4 Self Test 53 4 5 Dump Mode 54 4 6 Auto Sensing 54 4 7 Keyboard Mode 55 4 8 Error Messages 58 5 MAINTENANCE AND ADJUSTMENT 60 5 1 Print Head M...

Страница 6: ...APPENDIX 68 1 EZ 2000Plus Certifications 68 2 EZ 6000Plus Certifications 73 EZ 2000 6000 User s Manual 5 ...

Страница 7: ...0 39 10 mm Max 85 2159 mm Memory 4MB Flash 2MB for user storage 16MB SDRAM Sensor Type Adjustable reflective sensor and transmissive sensor left aligned Media Types Continuous form gap labels black mark sensing and punched hole label length set by auto sensing or programming Width Tear 1 25 4 mm Min 4 64 118 mm Max Width Cutter 4 61 117 mm Max Width Stripper Rewind 4 64 118 mm Max Thickness 0 003 ...

Страница 8: ...aces Serial port RS 232 DB 9 USB port default on CF Card socket Serial port RS 232 DB 9 USB port default on CF Card socket Ethernet 10 100Mbps print server default off disables USB when in use Control Panel Three mono color status LEDs Power on Ribbon out Media out Control keys FEED PAUSE and CANCEL Backlit graphics LCD display 128 x 64 dots or 4 lines x 16 characters Three mono color status LEDs ...

Страница 9: ... fonts 90 180 270 rotatable single characters 90 180 270 rotatable Bitmap fonts 8 times expandable in horizontal and vertical directions Scalable fonts 90 180 270 rotatable Download Fonts Bitmap fonts 90 180 270 rotatable single characters 90 180 270 rotatable Asian fonts 90 180 270 rotatable and 8 times expandable in horizontal and vertical directions Scalable fonts 90 180 270 rotatable 1 D Bar c...

Страница 10: ...es Options Cutter Module Stripper sensor with internal rewinder Parallel port Centronics 36 pin and PS2 port Applicator Interface 1 input 3 outputs power 500mA 5V 802 11 b g wireless print server Default off disables USB when in use Must remove Ethernet card to install External label roll holder for 10 250 mm O D label rolls External label rewinder Specifications are subject to change without noti...

Страница 11: ...Signal Gnd Initialize Error Signal Ground N C Select in host printer host printer printer printer printer host printer host host printer printer host printer Serial Interface Serial Default Setting 9600 baud rate no parity 8 data bits 1 stop bit XON XOFF protocol and RTS CTS RS232 HOUSING 9 pin to 9 pin DB9 SOCKET DB9 PLUG 1 1 5V max 500mA RXD 2 2 TXD TXD 3 3 RXD DTR 4 4 N C GND 5 5 GND DSR 6 6 DT...

Страница 12: ...4 VCC CLOCK 5 5 CLOCK N C 6 6 N C Internal Interface UART1 wafer Ethernet module N C 1 1 N C TXD 2 2 RXD RXD 3 3 TXD CTS 4 4 RTS GND 5 5 GND RTS 6 6 CTS E_MD 7 7 E_MD RTS 8 8 CTS E_RST 9 9 E_RST 5V 10 10 5V GND 11 11 GND 5V 12 12 5V UART2 wafer Expansion module N C 1 1 N C TXD 2 2 RXD RXD 3 3 TXD CTS 4 4 RTS GND 5 5 GND RTS 6 6 CTS N C 7 7 N C RTS 8 8 CTS N C 9 9 N C 5V 10 10 5V GND 11 11 GND 5V 1...

Страница 13: ...afer Applicator module 5V 1 1 5V 24V 2 2 24V Printing out 3 3 Printing Print error out 4 4 Print error Printed out 5 5 Printed Print in 6 6 Print GND 7 7 GND N C 8 8 GND 9 9 N C 10 10 EZ 2000 6000 User s Manual 12 ...

Страница 14: ... 12 3 4 5 9 7 1 Fan Fold Label Insert 2 CF Card Slot 3 Serial Port Socket Optional 4 Antenna Socket for WLAN Module Optional 5 Ethernet Port 6 RS 232 Port DB 9 7 PS2 Port Socket Optional 8 Applicator Interface Socket Optional 9 USB Port 10 Power Switch 11 Power Socket 12 Rewound Label Exit EZ 2000 6000 User s Manual 13 ...

Страница 15: ...haft 2 Ribbon Supply Shaft 3 Printing Mechanism 4 Platen 5 Tear off Bar 6 Print Head Lever 7 Sensor Knob 8 Label Guide 9 Label Tension Plate 10 Label Roll Bar 11 Label Supply Guide 12 Label Alignment Guide 1 1 Movable sensor EZ 2000 6000 User s Manual 14 ...

Страница 16: ...7 5 9 10 8 1 MEDIA LED 2 RIBBON LED 3 POWER LED 4 LCD Product type dependent 5 CANCEL Key 6 PAUSE Key 7 FEED Key 8 MINUS Key In setting mode 9 MENU Key In setting mode 10 PLUS Key In setting mode EZ 2000 6000 User s Manual 15 ...

Страница 17: ...eck the specific print mode and then go into the Setting Mode after power on the printer 2 1 Label Installation 1 Place the printer on a horizontal surface and open the top cover 2 Follow the sequence and direction as the figure shows pull the Print Head Lever out and flip it upward to the right 2 1 3 Pull the Label Alignment Guide to the direction as the blue arrow 1 indicates 4 Flip the Label Su...

Страница 18: ...e edge of label roll Note Please always hold the bottom of the Label Alignment Guide when moving 7 Follow the direction as the figure shows to feed the label 8 Put the label under the Moveable Sensor and stretch it to the Tear Off Bar Note Moveable Sensor should be aligned to the position of label gap black mark and punch hole You can adjust the position with Moveable Sensor Lever 1 2 3 EZ 2000 60...

Страница 19: ...l Guide Adjust the Label Guide with the label Note The Label should be put within Label Feed Guide as the figure shows 10 Flip the Print Head Lever back to its original position 11 Close the top cover to complete the label installation EZ 2000 6000 User s Manual 18 ...

Страница 20: ... flip it upward to the right 2 1 3 Place a new ribbon roll onto the Ribbon Supply Shaft and place the empty ribbon roll onto the Ribbon Rewind Shaft 4 The right bottom figure shows two different installing directions according to different types of ribbons Ribbon outside installation ink outside the roll Ribbon inside installation ink inside the roll EZ 2000 6000 User s Manual 19 ...

Страница 21: ...from the Ribbon Supply Shaft under the print head Wrap the ribbon around the Ribbon Rewind Shaft and stick it onto the empty ribbon roll Note DO NOT feed the ribbon under the Moveable Sensor EZ 2000 6000 User s Manual 20 ...

Страница 22: ...e cable switch to the power socket and then connect the other end of the cable to the printer power socket 3 Connect the cable to the USB parallel port on both side of printer and PC 4 Power on the printer the LCD display would show the printer model and F W version EZ 2000 6000 User s Manual 21 ...

Страница 23: ...ind the Windows Drives folder 2 Select the icon of driver file and click it to start the installation 3 Follow the instruction on screen to keep the installation going 4 Select the printer port that is used to connect the printer 5 Select printer model EZ 2000 6000 User s Manual 22 ...

Страница 24: ...9 Check if all printer settings are correct and then press Finish to start copying driver files 10 When a reminder message pops up just click Continue Anyway to keep on the installation 11 Wait for file copying finished and complete the installation 12 After the driver installation is complete there should be a new printer model on Windows Printer and Faxes setting EZ 2000 6000 User s Manual 23 ...

Страница 25: ...mm 0 25mm 1 2 3 4 1 Place the printer onto a smooth surface open the top cover and face the printer sideways Note Before the installation please power off the printer first 2 Turn the printer sideways and remove the Rewinder module cover plate 3 Take off the Paper Clip from the Liner Rewind Shaft 4 Secure the Rewinder unit onto the printer 1 2 EZ 2000 6000 User s Manual 24 ...

Страница 26: ...led plug the Rewinder Cable Connector onto the Rewinder Connector 6 Rewinder Installation completes Note The maximum length of rewound label is the total length of a label roll that with 8 OD and 3 core EZ 2000 6000 User s Manual 25 ...

Страница 27: ...l the media into the printer 6 Feed the label through the Printer Mechanism and around the Label Feed Guide 7 Wrap the label around the Liner Rewinder Shaft and use the Paper Clip to secure the liner Note Make sure the label rewind is in correct direction 8 Close the top cover to complete Label rewind bracket and Rewinder installation Note1 Before starting to rewind labels please make sure the pri...

Страница 28: ...flip it upward to the right 5 Remove the Paper Clip 1 2 3 6 Install the media into the printer Note1 Label liner thickness is recommended to be 0 06mm 10 with basic weight 65g 6 Note2 The label that used for stripping is suggested to be at least 20mm in height Suggestion When printing with stripper module it is suggested to set the stop position E to 11 7 Peel off a few labels from the liner about...

Страница 29: ...ack to the original position Note Make sure the liner rewind is in correct direction 2 3 1 10 Screw the bottom front cover back onto the printer 11 Press lower part of the stripper sensor to flip it open 12 Flip the stripper sensor to the sensor detects position 13 Close the top cover to complete stripper installation EZ 2000 6000 User s Manual 28 ...

Страница 30: ...n the Top Cover 2 Unscrew all screws that marked in square as indicated in figure Remove Top Cover and Left Cover of the printer Note Before the installation please power off the printer and unplug the power cord 3 Remove connectors on both sides of Power Module 4 Unscrew the two screws on bottom of Power Module and remove the Power Module 5 Remove the connection wire between main board and Standa...

Страница 31: ... Connector Plate into the socket of main board as indicated in figure 9 Unscrew the screws to remove the Rewinder Module Cover Plate 10 Take off the Paper Clip from the Liner Rewind Shaft 11 Secure the Rewinder Module onto the printer Note Before tightening screws move the connection wires of Rewinder Module to inside of printer 1 2 12 After the Rewinder Module is installed plug the Rewinder Full ...

Страница 32: ...o 4 screw holes 15 Tighten but don t fully tighten the screws to save space for adjustment when installing the belt 16 Adjust the position of Motor Module to install the belt between Motor Module and Rewinder Module Fully tighten the screws after the belt is installed correctly EZ 2000 6000 User s Manual 31 ...

Страница 33: ... marked with STRIP Plug the motor connector on top of Motor Module 19 Tie the Motor wire and Rewinder Full Sensor wire with binder on Motor Module bracket Note The Rewinder Full Sensor wire should be put under the belt to avoid the interference 20 Install the Power Module and plug the connectors on both sides of Power Module 21 Install the Left Cover of printer and secure it with screws EZ 2000 60...

Страница 34: ...e sure the label rewind is in correct direction 28 Close the Top cover to complete Label Rewind Bracket and Rewinder installation Note1 Before starting to rewind labels please make sure the printer s Label Rewind Bracket is installed properly as instructed Note2 Before starting to rewind labels please send XSET REWINDER 1 command to printer through QLabel or Hyper Terminal for turning on the rewin...

Страница 35: ...ont Cover 2 Unscrew the two screws to remove the Tear Off Bar 3 Hold the Stripper Module and secure it onto the printer 4 Plug the Stripper Connector into the socket on the bottom of the Rewinder Module 5 Tie the cables with the Cable Tie Mounts and stick it onto the Bottom Plate 6 Pull the Print Head Lever out and flip it upward to the right EZ 2000 6000 User s Manual 34 ...

Страница 36: ... the Paper Clip to secure the liner 12 Flip the Print Head Lever downward and then push it back to the original position Note The label that used for stripping is suggested to be at least 20mm in height Suggestion When printing with stripper module it is suggested to set the stop position E to 25 1 2 13 Close the Top Cover and complete the Stripper Module installation Note Before starting to strip...

Страница 37: ...0 Cutter is 500 000 cuts with paper weights 160g and 250 000 cuts with paper weights 200g Note3 The service life of EZ 6000 Cutter is 500 000 cuts 1 2 3 4 5 1 Face the printer and unscrew the screw to remove the bottom front cover Note Please power off the printer before installing the cutter module 2 Open the top cover and unscrew the two screws in the front to remove the tear off bar 3 Hold the ...

Страница 38: ...l the media into the printer Close the Top Cover to complete the cutter installation Note1 Make sure the printer is set to activate cutter function on Note2 The label paper that used for cutting is suggested to be at least 30mm in height Suggestion When printing with cutter module it is suggested to set the stop position E to 26 for EZ 2000Plus or 27 for EZ 6000Plus EZ 2000Plus EZ6000Plus EZ 2000 ...

Страница 39: ... 3 4 1 Make sure the power is off and the power cable is unplugged Place the printer onto a smooth surface and open the top cover 2 Unscrew two screws as indicated in figure and remove the left top cover from the printer 3 Unscrew the screws of parallel port cover and remove the cover EZ 2000 6000 User s Manual 38 ...

Страница 40: ...onnector cable to the main board and the other end to the Parallel PS2 module Note Please check the direction of pin and socket before plugging the connector cable Plugging the connector in wrong direction will cause Parallel PS2 module not working 6 The Parallel PS2 module installation is complete EZ 2000 6000 User s Manual 39 ...

Страница 41: ... about applicator products please visit http www tharo com 1 2 1 Make sure the power is off and the power cable is unplugged Place the printer onto a smooth surface and open the top cover 2 Unscrew two screws as indicated in figure and remove the left top cover from the printer 3 Unscrew the screws of Applicator Interface cover and remove the cover EZ 2000 6000 User s Manual 40 ...

Страница 42: ...inborad that marked with APP 5 Align the Applicator Interface to the hole and hold the position 6 Tighten the screws to fix the Applicator Interface 7 Assemble the left top cover and close it to complete the installation EZ 2000 6000 User s Manual 41 ...

Страница 43: ... Antenna Bracket 1 Make sure the power is off and the power cable is unplugged Place the printer onto a smooth surface and open the top cover 2 Remove the Left Top Cover from the printer 3 Remove the covers of Ethernet port and Antenna port from the back plate of the printer 4 Secure the WLAN module onto the bracket 5 Plug the connector into the socket on WLAN module EZ 2000 6000 User s Manual 42 ...

Страница 44: ...oard 7 Mount the WLAN module and secure it onto the back plate 8 Thread Antenna Connection Wire through the hole on the Antenna Bracket 9 Mount the Antenna Connection Wire and Antenna Bracket on the back plate and secure it with screws EZ 2000 6000 User s Manual 43 ...

Страница 45: ...Top Cover to complete the installation Note 1 After the WLAN module installation is completed please send the XSET USBETHERNET 1 printer command to printer for activating the Ethernet connection function Please mind that USB port will be deactivated once the Ethernet connection function is activated Note 2 The first time setting operation must be performed with Ethernet wired connection before you...

Страница 46: ...ternately until the completion of initialization Ribbon Ribbon status indication Media Media status indication With LCD monitor Control keys FEED PAUSE CANCEL LED indicators Power Power on Ready Power After turning on the power the Ribbon and Media lights will flash alternately until the completion of initialization Ribbon Ribbon status indication Media Media status indication EZ 2000 6000 User s ...

Страница 47: ...sh the printing of the remaining 8 labels Cancel Key Pressing the Cancel key while printing the LCD Display will show Print job is cancelled it means the printer cancels the current print job For example if the print job contains 10 labels press the Cancel key after 2 labels are printed the remaining 8 labels won t be printed and the printer goes back to standby mode With different combinations of...

Страница 48: ...ress and hold key and turn on the printer until the buzzer beeps 3 times Go to default Power on 2 beeps twice Go to default Press and hold keys and turn on the printer until the buzzer beeps 2 times The printer setting will go to default Download mode Power on 1 beep DL MODE Vx xx Press and hold key and turn on the printer until the buzzer beeps once This mode is only for firmware downloading Sett...

Страница 49: ...onse on whether do or do not save the settings printer will return to standby mode Without LCD monitor Press and hold key about 3 to 4 seconds until the buzzer beep 3 times Blinking Steady Ribbon Media Description Setting mode Exit without saving Save exit Ribbon Media lights flash simultaneously Darkness Ribbon light flashes and then blinks for each pressing The buzzer will beep when the adjustme...

Страница 50: ...the speed of printing Adjust Stop Position Default 0 Set the stop position of printing The setting value is from 0 to 10 Note When printing with label format that is created based on old series printers please change this setting to achieve the compatibility Set the value to 3 when printing with cutter set the value to 4 when printing with stripper or doing normal printing Printhead Position Defau...

Страница 51: ...s Default 1 bit 1 bits 2 bits Auto Sensor Default Auto Mode Auto Mode auto sense the label type black mark gap plain Mpaper and length Gap Mode detects gap paper Black Mark Mode detects black mark label LCD Language Default English English Simplified Chinese Traditional Chinese Spanish Italian Deutsch French Turkish Code Page Default Code Page 850 Code Page850 Code Page852 Code Page437 Code Page86...

Страница 52: ...d for function OFF Password Default OFF ON When password protect enable the password is required for entering Setting Mode OFF Top of Form Default ON ON Start each printing from the Top of Form position OFF USB Ethernet Default USB USB Set the USB port as active port Ethernet Set the Ethernet port as active port Preview Preview and check all settings Note 1 Default Setting is the original settings...

Страница 53: ...Fran çais Türk çe Continuous Parity Data Bits Stop Bits Auto Mode Gap Mode Black Mark Mode English Simplified Chinese Traditional Chinese Code Page 850 Code page 852 US UK French German Spanish Italian Finnish Dutch Belgian Recall Label Keyboard Setup Code page setup Printing Option Clock Setup ON OFF Smart Backfeed ON OFF Password ON OFF D D Exit KB Mode Code Page 850 Code page 852 Darkness 0 19 ...

Страница 54: ...ext USB 1 DRAM installed Image buffer size 4020K 000 FORM S IN MEMORY 000 GRAPHIC S IN MEMORY 000 FONT S IN MEMORY 000 ASIAN FONT S IN MEMORY 000 DATABASE S IN MEMORY 000 TTF S IN MEMORY 1308K BYTES FREE MEMORY S4 H10 R000 R200 W100 Q89 3 Option D0 O0 AD Gap Sensor AD 129 162 195 3 Code Page 850 Keyboard Layout US International Top of Form ON Max Print Length mm 4572 Model Version Serial port setu...

Страница 55: ...he print result matches the commands sent To cancel get out of the Dump Mode press the FEED key this time printer will automatically print out OUT OF DUMP MODE This indicates that printer is back in the standby mode Or power off to exit the Dump Mode 4 6 Auto Sensing Printer can automatically detect label black mark paper length and record it By this way without setting the print length the printe...

Страница 56: ... printer or select the Keyboard mode function in setting mode To change the keyboard setting please refer to the Setting Mode diagram in Chapter 4 3 Print a label with stored form in Keyboard Mode FTEST1 Q100 3 W100 H10 P1 S2 AD C1 R0 Q 0 O0 D0 E12 R200 L Dy2 me dd Th m s C0 00001 1 Serial Number V00 16 Product Name jc0 V01 16 Price jc0 AF 330 566 1 1 0 0 C0 AH 212 168 1 1 0 0 V00 AG 308 396 1 1 0...

Страница 57: ... 00001 8 LCD will show the first Variable Prompt 9 Key in the variable data Example Apple 10 LCD will show the second Variable Prompt 11 Key in the variable data Example 199 12 LCD shows the Print quantity 13 Key in the print quantity Example 3 EZ 2000 6000 User s Manual 56 ...

Страница 58: ...14 The printer will print out 3 labels that include user defined variables and serial number EZ 2000 6000 User s Manual 57 ...

Страница 59: ...ure the printer is in the Direct Thermal mode Out of ribbon or check ribbon sensor 3 beeps twice Ribbons used up or ribbon supply shaft not moving Replace with new ribbon roll Unable to detect paper Make sure the movable sensor mark is at the correct position if the sensor is still unable to detect paper and then go through Auto Sensing again Out of media or check media gap sensor 1 beep twice Lab...

Страница 60: ...nder is full Remove the labels on rewinder Filename can not be found 2 beeps twice Can t find the file Use X4 command to print out all the files then check whether the file exist and the names are correct Filename repeated 2 beeps twice File name is repeated Change the file name and download again EZ 2000 6000 User s Manual 59 ...

Страница 61: ...utter first 2 1 3 To remove the print head module hold on the front of the print head module and pull it out 4 If user cannot successfully remove the print head by hand the screwdriver can be used for assistant as the figure shows 5 To install the print head module hold on the front of the print head module and slide down along the track Align the male end with protruding pins with the female end ...

Страница 62: ...er and turn the screws A clockwise to move the TPH forward TPH position adjustment for the left and right screws A need to be identical to make sure that the print line and the roller platen are parallel to each other Turning the screws A one circle the TPH will move 0 5mm It is recommended to adjust by a quarter of a circle each time to fully control the printing quality and status If the adjustm...

Страница 63: ...rt to turn If the ribbon wrinkles occurs during printing due to the differences of ribbon materials please increase the tension by turning Ribbon Rewind Shaft Knob clockwise For more detail about the ribbon wrinkle problem please refer to Chapter5 6 If a narrower ribbon is used especially when ribbon width is less than 2 the printer might have problem to pull the labels In this case please decreas...

Страница 64: ...t head life Print head cleaning instructions are as follows 1 Power off the printer 2 Open the top cover 3 Take out the ribbon 4 Open the print head by lifting the Print Head Lever 5 If there are label pieces or other stain on the print head see blue arrow please use a soft cloth with industrial use alcohol to wipe away the stain Note 1 Weekly cleaning on the print head is recommended Note 2 When ...

Страница 65: ...sary to adjust the position or pressure of TPH Spring Box 3 Move the TPH Spring Box as showed on the figure to change the print position Normally the wider the paper the right TPH Spring Box is farther to the right out the narrower the paper the right TPH Spring Box is farther to the left in If the problem is still not solved please move to next step to adjust the pressure of TPH Spring Box EZ 600...

Страница 66: ... b 2 It is recommended to adjust by a half of a circle each time to fully control the printing quality and status Perform the printing test after adjustment and if a ribbon wrinkle has not been removed please perform the adjustment one more time Each adjustment on the screw can not be turned more than two circles Note If the screws are turned more than acceptable range then paper feed may not be s...

Страница 67: ...e memory space When using the CF card please follow the instruction as below 1 Please power off the print before installing or removing CF Card from the card slot 2 The CF Card cannot be used for printer s external memory until it is formatted in FAT16 When the printer has detected that the CF card is not formatted in FAT16 the LCD will show the message of CF card not formatted press FEED to forma...

Страница 68: ...If the platen roller needs to be replaced please contact your reseller for more information Check if power supply is correct When printing part of the label wasn t printed completely Check if Thermal Print Head is stained or dusted Use internal command T to check Thermal Print Head can print completely Check the media quality The printout is not in desired position Check if sensor is covered by pa...

Страница 69: ...Appendix 1 EZ 2000Plus Certifications EZ 2000 6000 User s Manual 68 ...

Страница 70: ...EZ 2000 6000 User s Manual 69 ...

Страница 71: ...EZ 2000 6000 User s Manual 70 ...

Страница 72: ...EZ 2000 6000 User s Manual 71 ...

Страница 73: ...EZ 2000 6000 User s Manual 72 ...

Страница 74: ...2 EZ 6000Plus Certifications EZ 2000 6000 User s Manual 73 ...

Страница 75: ...EZ 2000 6000 User s Manual 74 ...

Страница 76: ...EZ 2000 6000 User s Manual 75 ...

Страница 77: ...EZ 2000 6000 User s Manual 76 ...

Страница 78: ...EZ 2000 6000 User s Manual 77 ...

Отзывы: