18
Installation and maintenance instructions EASICOM 3 0020239562_04
7
Installation
7.1
Preparing for installation
▶
Make sure that the existing gas meter is capable of
passing the rate of gas supply required.
▶
Consider the maximum heat output given in DHW mode.
▶
Install a system separator (to be provided on-site) directly
on the cold water connection for the combi boiler.
▶
Install the following components:
–
Draining cocks at the lowest points in the heating
installation (
→
current version of "BS 2879")
–
A stopcock on the cold water connection
–
A stopcock in the gas pipe
▶
Check that the volumetric capacity of the expansion ves-
sel is sufficient for the system volume.
▽
If the volume of the expansion vessel is insufficient
for the installation.
▶
Install an additional expansion vessel in the heat-
ing return, as close to the product as possible.
▶
Install a non-return flap at the product's outlet
(heating flow).
▶
Install the connection pipes such that they are free from
mechanical stress.
▶
If you use non-diffusion-tight plastic pipes in the heating
installation, ensure that no air gets into the heat gener-
ator circuit.
▶
Only solder connectors if the connectors are not yet
screwed to the service valves.
▶
Only bend connection pipes if they have not yet been
connected to the product.
▶
Flush the heating installation thoroughly before installing
the product.
▶
Check the leak-tightness of the gas valve assembly using
a pressure of
≤
11 kPa (110 mbar).
7.2
Descaling the water
Scale deposition increases as the water temperature in-
creases.
▶
Descale the water as required.
7.3
Check compliance with the local gas group
The product's combustion has been factory tested and is
preset for operation with the gas group indicated on the data
plate.
The product is only authorised to be operated with natural
gas.
▶
Check the information about the gas type indicated on
the data plate and compare this with the gas type avail-
able at the installation site.
Condition
: The product design
is not compatible
with the local gas group
▶
Do not start up the product.
Condition
: The product design
is compatible
with the local gas group
▶
Proceed as described below.
7.4
Gas and water connections
Note
Apply heat insulation to the water pipes to the
boiler outlet and to the installation.
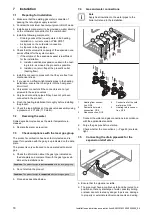
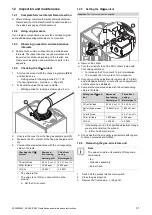
1
2
3
4
5
1
Heating flow connec-
tion, G3/4
2
Domestic hot water
connection, G3/4
3
Gas connection, G1/2
4
Connection for the cold
water pipe, G3/4
5
Heating return connec-
tion, G3/4
1.
Connect the water and gas connections in accordance
with the applicable standards.
2.
Purge the gas pipe before start-up.
3.
Check whether the connections (
Page 29) are leak-
tight.
7.5
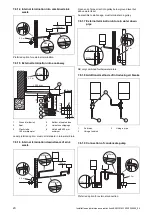
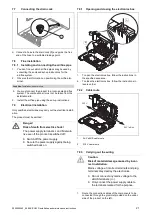
Connecting the drain pipework for the
expansion relief valve
1
▶
Ensure that the pipeline is visible.
▶
The pipe must have a continuous fall and be routed to a
position so that any discharge of water, possibly boiling,
or steam cannot create any danger to persons, damage
to property or external electrical components and wiring.
Содержание EASICOM 3 24c
Страница 1: ...en Installation and maintenance instructions EASICOM 3 24c 28c 0020239562_04 31 07 2020 ...
Страница 54: ......
Страница 55: ......

