background image

4

IMPORTANT SAFEGUARDS

SPECIFICATIONS

PRECAUTIONS/SPECIFICATIONS

 5


IMPORTANT SAFEGUARDS

 4

 5


SPECIFICATIONS

Ginnys.com • 1.800.544.1590

No user-serviceable parts inside. A short cord is provided to 

reduce the hazards resulting from entanglement or tripping over a 

long cord. An extension cord may be used with care; however, the 

marked electrical rating should be at least as great as the electrical 

rating of this appliance. The extension cord should not be allowed

to drape over the counter or tabletop where it can be pulled on by 

children or tripped over.

SAVE THESE INSTRUCTIONS


FOR HOUSEHOLD USE ONLY

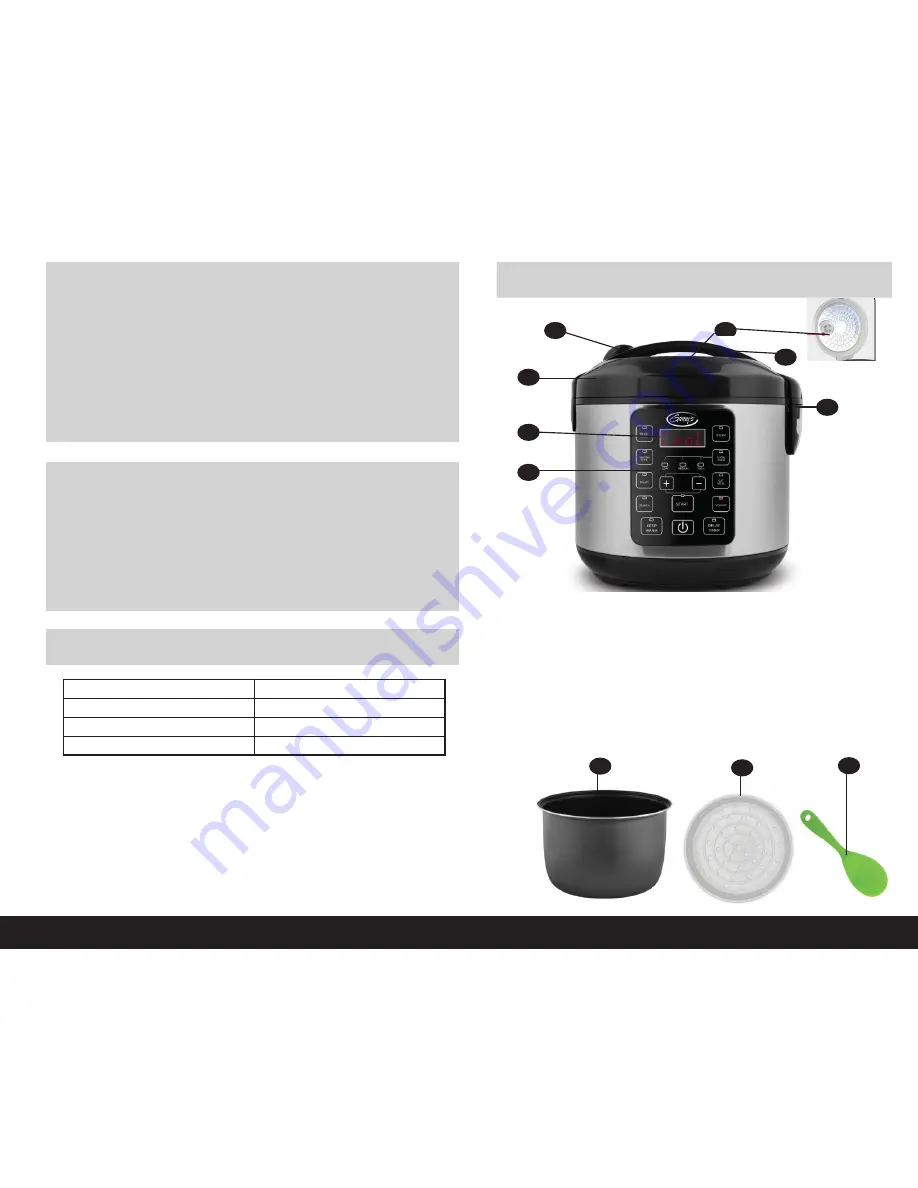
  PART NAMES

7

C

 E

 B

 A

 D

A. Control Panel

B. Digital Display

C. Lid

D. Lid Release

E. Steam Vent (Includes

    Silicone Gasket)

F.  Handle

G. Condensation Collector

H. Cooking Pot

I.   Steam Tray

J.  Rice Paddle

K.  Measuring Cup

     (not shown)

 F

 G

 H

 I


   J

Under the lid

To reduce the risk of electrical shock, this cord is equipped

with a polarized plug, in which one prong is wider than the other.

This plug is intended to fit into a polarized outlet only

in one direction. If the plug does not fit fully into the outlet, reverse

the plug. If it still does not fit, contact a qualified electrician. Do not

attempt to modify the plug in any way.

Power Rating:

900 watts/120 volts

Capacity:

4 quarts

Cord Length:

42”

Model:

GMC-1010

READ CAREFULLY BEFORE USING & SAVE THESE INSTRUCTIONS

Содержание 733060

Страница 1: ...8 in 1 Multicooker Instruction Manual Ginnys com 1 800 544 1590 BRAND ITEM 733060 ...

Страница 2: ...ree Ginny s Customer Service for return or replacement 800 544 1590 6 The use of accessories or attachments not recommended by Ginny s may cause injuries or damage to the appliance 7 Do not use outdoors 8 Do not let cord hang over the edge of the table or counter or touch hot surfaces including the stove 9 Do not place on or near a hot gas or electric burner or in a heated oven 10 Extreme caution ...

Страница 3: ...ped over SAVE THESE INSTRUCTIONS FOR HOUSEHOLD USE ONLY PART NAMES 7 C E B A D A Control Panel B Digital Display C Lid D Lid Release E Steam Vent Includes Silicone Gasket F Handle G Condensation Collector H Cooking Pot I Steam Tray J Rice Paddle K Measuring Cup not shown F G H I J Under the lid To reduce the risk of electrical shock this cord is equipped with a polarized plug in which one prong is...

Страница 4: ...is attached If it s not snap into place Check that the Steam Vent and Silicone Gasket are in place on the underside of the lid as well 3 Once the ingredients are all added to the Cooking Pot put the Cooking Pot into the Multicooker 4 Close the lid so it snaps securely shut 5 Turn the cooker on by pressing the Power button It will beep Select one of the functions HOW TO OPERATE NOTE This Multicooke...

Страница 5: ...d the machine will beep and the display will change to ADD It is now time to add the water G Add water There s a measurement chart on page 9 H Close the lid and press the START button to begin cooking The digital display will show a chasing pattern 4 The digital display will countdown the final 10 minutes of cook time 5 When your rice or quinoa is ready the Multicooker will beep and automatically ...

Страница 6: ...ill start counting up in minutes how long KEEP WARM has been on 9 Remove the food as soon as possible and serve Turn off the Multicooker by pressing the POWER button and unplug it STEAMING SUGGESTIONS VEGETABLES Portions must fit completely in Steam Tray Meat Cook Time Safe Temp Beef 25 30 min 160 F Chicken 20 25 min 165 F Fish 15 20 min 140 F Pork 20 25 min 160 F STEAMING SUGGESTIONS MEAT Portion...

Страница 7: ...e Multicooker will beep The display will change to cool and the milk will begin to cool To speed cooling open the lid YOGURT 12 13 HOW TO OPERATE cont 6 Once the milk has properly cooled the machine will beep and the display will show add It is now time to add the yogurt culture The machine will continue to beep until the culture is added 7 The easiest way to add live yogurt culture is by mixing i...

Страница 8: ... to allow the Multicooker and all parts to cool completely before cleaning 1 Remove the Steam Vent by twisting it to the left Clean the Silicone Gasket carefully and make sure it is reassembled and installed prior to next use NOTE DO NOT REMOVE THE LARGE SILICONE GASKET FROM LID 2 Remove the Condensation Collector Discard any water and rinse thoroughly 3 Wash the Cooking Pot Condensation Collector...

Страница 9: ...or fur ther instructions 800 544 1590 16 17 Ginny s warrants this product free from defects in material and workmanship for one year from provable date of purchase Within this warranty period Ginny s will repair or replace at its option defective parts at no charge provided the product is returned freight prepaid with proof of purchase to Ginny s Allow 2 4 weeks for return shipping This warranty d...

Отзывы: