background image

MDE-5386D Hybrid Card Reader S (HCRS) Kit (M13940KXXX) Installation Instructions (Canada) · June 2020

Page 31

Installing HCRS Kit in Husky OPT Units

Installing HCRS Kit in Husky OPT Units

Before you begin, read and understand all safety information found in 

MDE-4778 Outdoor 

Payment Terminal - Model FPCA Installation and Service Manual

.

1

Inform the manager that the power must be removed to the dispenser.

2

Block off the unit from customers.

3

Upgrade software per the 

“Loading the Latest SPOT Software”

 on 

page 3

.

4

A properly grounded ESD wrist strap must be worn while servicing any electronic 
devices or components. Failure to use electrostatic precautions may damage 
electronic components and void warranty.

      CAUTION

Failure to turn off the unit during the installation of the kit may cause injury or bodily harm 
from electrical shock. Ensure that all power to the unit is switched off before opening the 
door to the unit and during installation of the kit.

WARNING 

Remove all power supplied to the unit at the breaker located in the building. Follow OSHA 
lockout/tagout procedures.

Removing Existing Card Reader

To remove the existing card reader, proceed as follows:

Note: Read all instructions before beginning and observe all safety precautions.

1

Remove the rear panel.

2

Disconnect and completely remove the cable harness from the existing card reader.

Note: Unused cables left connected can cause noise issues in a unit.

3

Remove and discard the card reader ground cable.

4

Remove the screw on the activation switch if a TCR is being removed.

5

Remove the four nuts on the existing card reader.

6

Remove the card reader (and bracket) from the unit.

Содержание M13940K Series

Страница 1: ...Installing the HCRS Kit in The Advantage Series Units 21 Installing HCRS Kit in Husky OPT Units 31 Appendix A Configuring Activating FlexPay EMV CRIND Keypad 36 Appendix B HCRS Card Reader LED Matrix 40 Appendix C Troubleshooting HCRS 41 Required Tools and Materials The following tools and materials are required to install the HCRS Kit in Gilbarco dispensers Nut Drivers 1 4 inch and 5 16 inch Note...

Страница 2: ... mm Stl Zn Pl Q12845 57 2 2 10 Standoff Suprt Ckt Bd Locking Q10651 03 4 4 11 Standoff Suprt Ckt Bd 375 Lg Plastic Q10651 46 2 2 12 M3 5 Screw Torx Head 10 Long M14757B001 4 4 4 13 Cable Ground M14084A001 1 1 1 14 Gasket Card Reader Universal M13127B006 1 1 1 15 Screw Metric M5 X 10 Thread Former Comments M00417B101 1 1 1 16 Nut Metric Flange M00414B005 4 17 Card Cardreader Cleaner Single W Miracl...

Страница 3: ...lable version proceed as follows 1 Remove the CRIND two wire or CAT5 from the SPOT For specific software instructions refer to MDE 4771 Encore S Enhanced FlexPay CRIND Start up Service Manual or MDE 5062 FlexPay Maintenance Tool for FlexPay SPOT CRIND System Note In the case of certain third party Point of Sale POS systems the CRIND two wire may be connected Confirm the correct setup when using a ...

Страница 4: ...d on the SPOT with the FlexPay Maintenance Tool Comply with the following software minimum requirements and supported configurations Any side with an HCRS must have a minimum of 50 7 21 for PCI 1 3 or 6X 7 21 for PCI 2 installations Verify with the customer for appropriate approved version PCI 1 3 units can have an HCRS on one side and a TCR on the other side PCI 2 units can have an HCRS on one si...

Страница 5: ...roller Assembly GCM Global Contactless Module GOLD Gilbarco Online Documentation HCR Hybrid Card Reader LED Light Emitting Diode LOTO Lockout Tagout MCU Microcontroller Unit NEC National Electrical Code NFPA 70 National Fire Protection Association OPT Outdoor Payment Terminal OSHA Occupational Safety and Health Administration PCB Printed Circuit Board PCBA Printed Circuit Board Assembly PCI Paymen...

Страница 6: ...t be followed Failure to install inspect maintain or service this equipment in accordance with these codes regulations and standards may lead to legal citations with penalties or affect the safe use and operation of the equipment Replacement Parts Use only genuine Gilbarco replacement parts and retrofit kits on your pump dispenser Using parts other than genuine Gilbarco replacement parts could cre...

Страница 7: ...urns and so on Age of victim for example baby teenager middle age elderly Whether or not victim has received first aid for example stopped bleeding by pressure and so on Whether or not a victim has vomited for example if swallowed or inhaled something and so on IMPORTANT Oxygen may be needed at scene if gasoline has been ingested or inhaled Seek medical advice immediately Lockout Tagout Lockout Ta...

Страница 8: ...the kit WARNING A properly grounded Electrostatic Discharge ESD wrist strap must be worn while servicing any electronic devices or components Failure to use electrostatic precautions may damage electronic components and void warranty CAUTION Remove all power supplied to the unit at the breaker located in the building Follow OSHA lockout tagout procedures Removing Existing Card Reader To remove the...

Страница 9: ...ket 7 Carefully remove the old card reader gasket from the option door Use a putty knife if required 8 Ensure that the door surface where the card reader is installed is smooth and free of debris Installing the HCRS M13940BXXX To install the HCRS in Encore 300 500 units proceed as follows A properly grounded ESD wrist strap must be worn while servicing any electronic devices or components Failure ...

Страница 10: ...Good Boss Stripped Boss 3 Place the non adhesive gasket over the front of the card reader and ensure that the gasket is seated on the flange and covers the dismount buttons as shown in Figure 3 Note Installing this non adhesive gasket is different from previous gasket installation It is laid over the card reader snout first and then the card reader is inserted into the card reader opening on the d...

Страница 11: ...installing the card reader bracket onto the HCRS the lip on the bottom of the card reader bracket must face toward you toward the data power connector Figure 4 HCRS Mounted on Encore 300 500 Units P206 Connector on the SIP board Cable from the HCRS is connected here HCRS Connector on the HCRS HCRS cable is connected to the SPOT SIP and door node or display board SPOT Display Unit Cable from the HC...

Страница 12: ...l be shipped with the ground connected to the card reader The other end must be adhered to the chassis 3 If a Global Contactless Module GCM is installed ensure there are no unit ground wires running across the back of the GCM This will help prevent any noise interference 8 Connect the card reader cable to the card reader port on the SPOT display and P206 on the SIP board see Figure 4 on page 11 Th...

Страница 13: ...ensure that there are no pinched wires and the cables are routed securely 2 Cable routing is critical It is very important to route and dress the cables properly Exercise care in routing the cables keeping in mind that the door s opens and closes for service The cables must be dressed neatly Ensure that there is no interference after the cables are connected and routed IMPORTANT INFORMATION Ensure...

Страница 14: ...he kit WARNING A properly grounded ESD wrist strap must be worn while servicing any electronic devices or components Failure to use electrostatic precautions may damage electronic components and void warranty CAUTION Remove all power supplied to the unit at the breaker located in the building Follow OSHA lockout tagout procedures Removing Existing Card Reader To remove the existing card reader pro...

Страница 15: ...er Bracket ESD Ground Cable 7 Remove the old card reader gasket from the option door Use a putty knife if required Removing the existing card reader is now complete Installing HCRS To install the HCRS in Encore S E CIM units proceed as follows A properly grounded ESD wrist strap must be worn while servicing any electronic devices or components Failure to use electrostatic precautions may damage el...

Страница 16: ...or Boss Repair Kit M07450K999 Installation Instructions Figure 8 Examples of Metal Non metal and Stripped Bosses ii iii Non metal Boss Stripped Boss i Metal Boss iv M14757B001 Screw v Q11677 24 Screw 3 Place the gasket over the front of the card reader making sure the gasket is seated on the flange and covers the dismount buttons as shown in Figure 9 Note Installing this non adhesive gasket is dif...

Страница 17: ...ovided in the kit in the four holes looking from the back of the HCRS Note When installing the card reader bracket onto the HCRS the lip on the bottom of the card reader bracket must face toward you toward the data power connector It is located in the base of the HCRS Figure 10 SPOT Display Unit on Encore S E CIM Units SPOT Display Unit Cable from the HCRS is connected to the card reader port on t...

Страница 18: ...S is connected to the card reader port on the SPOT Card Reader Bracket Notes 1 The image shown is sample only SIP may be located in different location 2 Ensure that the card reader cable is installed onto the card reader before mounting the card reader to the dispenser 5 Align the HCRS and card reader bracket Securely tighten the four mounting screws in stages in a diagonal pattern with a torque w...

Страница 19: ...ssis ground connection that must be connected to the chassis The HCRS will be shipped with the ground connected to the card reader The other end must be adhered to the chassis Figure 12 Connecting Ground Cable to Chassis Ground Cable U channel 8 Connect the card reader cable to the card reader port on the SPOT and P206 on the SIP see Figure 11 on page 18 9 Connect the J2125 to P2125 on the door no...

Страница 20: ...that there is no interference after the cables are connected and routed IMPORTANT INFORMATION Dress the cables neatly Inspect the work performed for example ensure that there are no pinched wires and the cables are routed securely 2 Close and secure the main doors using the security latch and main door lock Reinstall and lock the lower panel door 3 Ensure that the HCRS is activated before it is us...

Страница 21: ...stomers 3 Upgrade software per the Loading the Latest SPOT Software on page 3 4 Failure to turn off the unit during the installation of the kit may cause injury or bodily harm from electrical shock Ensure that all power to the unit is switched off before opening the door to the unit and during installation of the kit WARNING A properly grounded ESD wrist strap must be worn while servicing any elec...

Страница 22: ...the main access door hinge bracket pin into the end slot lock position This locks into a maximum 90 degree angle 4 Remove the SIP bracket Disconnect the M07947A004 M07948A004 M07946A004 and M07702A023 cables from the SIP board and card reader Note Unused cables left connected can cause noise issues in a unit 5 Remove the SIP board bracket by removing the two upper and lower right nuts of the M3 SP...

Страница 23: ...rd Reader Bracket ESD Ground Cable 11 Remove the old card reader gasket from the option door Use a putty knife if required Removing the existing card reader TCR is now complete Installing HCRS To install the HCRS in The Advantage Series units proceed as follows A properly grounded ESD wrist strap must be worn while servicing any electronic devices or components Failure to use electrostatic precaut...

Страница 24: ...ader Figure 15 HCRS in The Advantage Series Units i Front View ii Side View Gasket Card Reader 3 From the rear of the main door position the HCRS and then the card reader bracket on the front panel so that the card reader slot is positioned on the top Loosely secure the card reader bracket and HCRS to the main door using the four screws provided in the kit in the four holes looking from the back o...

Страница 25: ... Bracket M17116A001 see Figure 16 Figure 16 SIP Bracket Kit Screws M4 Q12845 57 Standoffs Q10651 03 Standoffs Q10651 46 Screws 6 20 Q11677 24 SIP Support Bracket M17116A001 SIP PCB Cover Bracket M17118B001 6 Using two Q11677 24 screws install the SIP Support Bracket M17116A001 on top of the right side of the SPOT display bracket Figure 17 Installing SIP Support Bracket Screws 6 20 Q11677 24 SIP Su...

Страница 26: ...e SIP Support Bracket M17116A001 using two Q12845 57 screws Figure 18 Mounting SIP Cover Bracket Screws M4 Q12845 57 SIP PCB Cover Bracket M17118B001 HCRS SPOT Display 8 Plug four Q10651 03 standoffs into the pre drilled holes in four corners and plug two Q10651 46 standoffs above the cutout on the cover bracket see Figure 19 Figure 19 Mounting Stand offs on Bracket Standoff Q10651 03 Standoff Q10...

Страница 27: ...g the SIP PCBA Top Flange of Cover Bracket SIP PCBA Power Cable 10 Reconnect all the cables as needed 11 Remove the protective foam block from the HCRS with power off connect the 7 pin Power Data Cable to the 7 pin power data connector Note The HCRS is equipped with a chassis ground connection that must be connected to the chassis The HCRS will be shipped with the ground connected to the card read...

Страница 28: ...ct the card reader cable to the card reader port on the SPOT and P206 on the SIP Figure 21 SPOT Display Unit on The Advantage Series Units SPOT Display Unit Cable from the HCRS is connected to the card reader port on the SPOT 13 Connect the J2125 to P2125 on the display board 14 Reconnect and route cables through the card reader bracket s flat cable plastic clamp ...

Страница 29: ...ace as the printer s ground cable Figure 22 Routing the Ground Cable Ground Cable 16 Ensure that the power data cables are secured to the unit with sufficient slack to prevent cable pull and pinching when opening closing door 17 Proceed to Completing Installation Completing Installation To complete the installation proceed as follows 1 Dress the cables neatly Inspect the work performed For example...

Страница 30: ...he HCRS Kit in The Advantage Series Units 2 Using a multimeter ensure that you have a good chassis ground where the card reader s ground cable is connected to the chassis Figure 24 Checking Chassis Ground 3 Double check all wires and connections and then remove LOTO kit 4 Apply power to the unit 5 Ensure that the HCRS is activated before it is used For more information refer to Appendix A Configur...

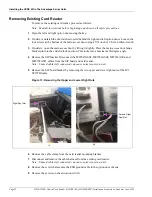
Страница 31: ... to turn off the unit during the installation of the kit may cause injury or bodily harm from electrical shock Ensure that all power to the unit is switched off before opening the door to the unit and during installation of the kit WARNING Remove all power supplied to the unit at the breaker located in the building Follow OSHA lockout tagout procedures Removing Existing Card Reader To remove the e...

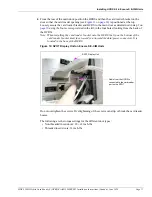
Страница 32: ...ot shown Screw securing the Activation Switch Card Reader Bracket Card Reader TCR Installing the HCRS To install the HCRS in Husky OPT units proceed as follows A properly grounded ESD wrist strap must be worn while servicing any electronic devices or components Failure to use electrostatic precautions may damage electronic components and void warranty CAUTION 1 Obtain the HCRS card reader bracket ...

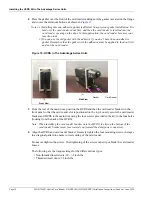
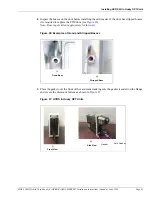
Страница 33: ...tripped bosses it is required to replace the CIM door see Figure 26 Note Boss repair kit not appropriate for this unit Figure 26 Examples of Good and Stripped Bosses i ii Good Boss Stripped Boss 3 Place the gasket over the front of the card reader making sure the gasket is seated on the flange and covers the dismount buttons as shown in Figure 27 Figure 27 HCRS in Husky OPT Units i Front View ii S...

Страница 34: ...break the card reader bosses The following are the torque settings for the different door types Non threaded insert doors 18 2 inch lbs Threaded insert doors 12 inch lbs 6 Remove the protective foam block and with power off connect the 7 pin Power Data Cable to the 7 pin power data connector on the HCRS Note 1 Hold the card reader with one hand while seating the cable onto the card reader with oth...

Страница 35: ...d closes for service Ensure that there is no interference after the cables are connected and routed IMPORTANT INFORMATION Dress the cables neatly Inspect the work performed for example ensure that there are no pinched wires and the cables are routed securely 2 Close and secure the rear panel 3 Ensure that the HCRS is activated before using For more information refer to Appendix A Configuring Activ...

Страница 36: ... is smooth and free of any debris or old gasket material The gasket is installed properly The card reader is installed and tightened in a diagonal pattern To activate a secure component you must enter the Service Menu To enter the Service Menu and perform the activation proceed as follows 1 Power up the FlexPay EMV CRIND The Product Part Number PPN is displayed on the screen see Figure 29 Note the...

Страница 37: ...go and software package versions are displayed momentarily see Figure 31 Figure 31 Software Packages Screen 1 enter setup is displayed at start up and also when the FlexPay card reader requires activation 2 Press 1 The Service Menu is displayed Figure 32 Service Menu Screen 3 Enter the right most six digits of the PPN and press ENTER OK The Service Menu Main Menu is displayed Note If you do not en...

Страница 38: ...e until the unit s mounting sensors are activated The menu displays the following UNIT SERIAL NUMBER PPN shown at start up UNIT CHALLENGE NUMBER Variable code generated when the FlexPay EMV CRIND starts ENTER MATCHING PASSWORD Matching password is the answer to the challenge number Note Gilbarco Call Center provides the matching password by a secure process that uses the serial number and challeng...

Страница 39: ...LL DISMOUNTING SENSORS ENABLED UNIT ACTIVATED is displayed Press OK to exit the menu and press CANCEL to restart the FlexPay EMV CRIND Figure 37 Activation Screen Activation enables all the connected secure modules Note It is not possible to enable only one component and retain the other components in an inactive state Contrary to activation the deactivation procedure does not require keypad entri...

Страница 40: ...by calling 866 606 8966 9 OFF Flashing OFF Dismount flag on and communicating with its host Check dismount switch If it is fully engaged reactivate using the online activation tool or by calling 866 606 8966 10 OFF OFF Solid Reader has no communication with its host and the crypto driver is not functioning Crypto Microcontroller Unit MCU is lost or certificates are invalid may be tampered Reboot I...

Страница 41: ...e Boss Repair Kit M07450K999 If the card reader still does not activate When testing the dismount sensors use the dismount sensor clamp shown in Figure 38 Figure 38 Dismount Sensor Clamp To install the dismount sensor clamp apply pressure with both the thumb and the fingers to bend the clamp to fit the HCRS into the clamp as shown in Figure 38 To remove the HCRS from the clamp again apply pressure...

Страница 42: ...k of Industrial Fasteners Inc E CIM and FlexPay are trademarks of Gilbarco Inc EMV is a registered trademark of EMVCo LLC Ethernet is a registered trademark of Xerox Corporation Europay and MasterCard are registered trademarks of MasterCard International Inc GOLDSM is a service mark of Gilbarco Inc Husky is a registered trademark of Aviat Aircraft Inc MagTek is a registered trademark of MagTek Inc...

Отзывы: