background image


THE ADVANCED SWITCHING SYSTEM


THE GIGRIG G3 ATOM USER MANUAL 


2.4. PROGRAMMING 

1.


Choose the preset that you wish to programme by pressing a PRESET FOOTSWITCH. It will light up and 
the corresponding number will also appear on the LCD screen. 

2.


Select the EFFECTS LOOPS and CONTROL FUNCTIONS you wish to use with that preset.  

3.


Repeat for the other presets you wish to programme.  

4.


There is no store button. The G3 Atom remembers every time you press a button and automatically 
saves after each step. 

2.5. STOMPBOX MODE 

This enables you to add any LOOP or combination of LOOPS and CONTROL FUNCTIONS on top of any standard 
preset. This gives you the ability to create and build sounds on the fly without being tied to traditional presets.


1.


Choose the PRESET you want to turn into a STOMPBOX Mode preset, ie: using PRESET 6.  

2.


Select the LOOP(s) you want to turn on. In this example I want to add a delay that is in LOOP 6 

3.


Now make sure everything else is turned off, including OUTPUTS and PHASE OUT2. 

4.


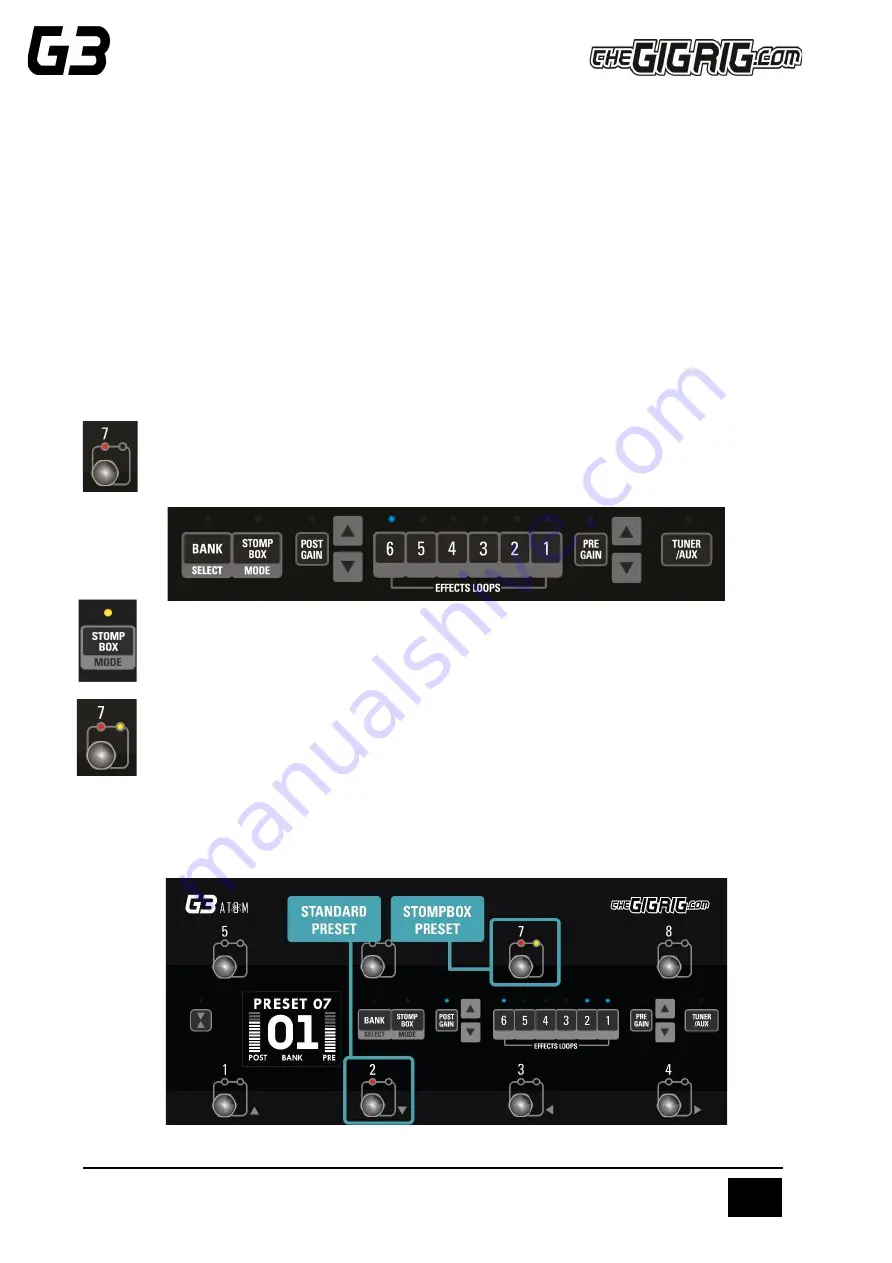
Now press the STOMPBOX MODE button. A yellow LED will turn on next to the main preset 

LED.  
 

5.


Preset 7 is now in STOMPBOX Mode and will add the delay in LOOP 6, ON TOP of any other 

preset. 


You can add as many STOMPBOX MODE presets as you like. All Stompbox Mode presets will clear when you 
press any normal preset. This can, however, be changed in the DEEP EDIT MENU, by selecting either Sticky 
Stomp or Flash. 


Содержание 2815

Страница 1: ...ATOM THE ADVANCED SWITCHING SYSTEM USER MANUAL ...

Страница 2: ...REMOTE SWITCH 8 3 7 MIDI IN OUT 8 3 8 POWER 8 3 9 EXPRESSION PEDALS 8 3 10 CONNECTION EXAMPLES 9 4 BASIC PROGRAMMING 11 4 1 PRE SET PROGRAMMING 11 4 2 STOMP BOX MODE 11 4 3 CHANGING BANKS 13 5 DEEP EDIT 14 5 1 INTRO TO THE DEEP EDIT FUNCTIONS 14 5 2 NAVIGATING DEEP EDIT 14 5 2 1 ATOM STUFF 15 5 2 2 NAME 15 5 2 3 MIDI 15 5 2 4 EXPRESSION 17 5 2 5 LOOP ORDER 17 5 2 6 STOMPBOX 17 5 2 7 TRAILS 18 5 2 ...

Страница 3: ... NUMBER OF BANKS 22 6 3 BANK EXT SWITCH 22 6 4 BANK PRESET 22 6 5 BLUETOOTH 22 6 6 UPDATE 22 6 7 HIDDEN PRESET 22 6 8 GLOBAL PHASE 22 6 9 BACKLIGHT 22 6 10 BANK RESET 22 6 11 FACTORY RESET 22 6 12 VERSION 22 7 THE G3 APP AND BLUETOOTH 23 8 TECH SPECS 24 9 WARRANTY 25 ...

Страница 4: ... is an expression of our passion we compromised on nothing After years of design and testing G3 with every scenario imaginable I can honestly say I m so excited for you to dive in and explore its possibilities Using a mix of the fully movable loops phase reversible parallel blend programable stereo output voltage controlled amplifiers and stereo trails I ve been achieving some of the most inspirat...

Страница 5: ... 3 Connect your amp s PLEASE NOTE if you are only using one amplifier DAW you MUST use OUT1 as this is your earth ground Connect to your second amplifier or channel DAW using OUT2 as this is isolated and phase reversible 4 Connect your tuner to the TUNER AUX Output 5 Connect any MIDI enabled pedals using the MIDI INPUT OUTPUT 6 Connect your Remote Switch controllable devices i e Amp channel Remote...

Страница 6: ... top of any standard preset This gives you the ability to create and build sounds on the fly without being tied to traditional presets 1 Choose the PRESET you want to turn into a STOMPBOX Mode preset ie using PRESET 6 2 Select the LOOP s you want to turn on In this example I want to add a delay that is in LOOP 6 3 Now make sure everything else is turned off including OUTPUTS and PHASE OUT2 4 Now p...

Страница 7: ... hand side of the LCD screen to access the DEEP EDIT MENU Use footswitches 1 2 3 4 labelled to navigate through the menu to edit the following OUTPUTS PHASE REMOTE SWITCHES MIDI PARALLEL WET DRY SIGNAL PATHS DELAY REVERB TRAILS PRESET NAMES BLUETOOTH SOFTWARE UPDATES STOMPBOX MODES PRESET BANK COPY PASTE SCREEN BRIGHTNESS etc ...

Страница 8: ...our second amp If you are only using one amp you MUST connect to Output 1 3 5 REMOTE SWITCHES The G3 Atom features four remote switches configured into two TRS remote switch sockets which are programmable via the Deep Edit Menu These can be used to change channels in your amplifier tap tempo control to control a Remote Loopy in fact they can be used for anything that uses isolated latching or mome...

Страница 9: ...n CONNECTING STEREO EFFECTS If you want to use stereo effects with the G3 Atom you can pair two mono loops together into a single stereo loop G3 Atoms loops are paired as follows Each of G3 Atoms loops can be configured into stereo loops using TRS to Dual Mono connectors To activate this functionality enter the DEEP EDIT Menu then select GLOBAL then select STEREO Then set the loops to stereo as re...

Страница 10: ...and power amp a First select a G3 Atom loop to connect with your amps FX loop In the diagram above loops 1 2 are placed before the pre amp loop 3 contains the preamp and loops 4 6 are placed inside the FX loop note any loop can be selected b Connect the SEND from the chosen G3 Atom effects loop to the input of the amplifier The connections needed to achieve this are c G3 Atom Loop 3 SEND to AMP IN...

Страница 11: ...tswitch as necessary d You can now switch between your programmed presets There are 8 standard pre sets plus up to 8 hidden presets in each of G3 Atom s 99 banks 4 2 STOMP BOX MODE STOMPBOX MODE allows you to add any function or loop s on top of a G3 Atom preset In DEEP EDIT mode you can choose between 3 different types of STOMPBOX MODE STANDARD STICKY and FLASH To programme a STOMPBOX MODE enable...

Страница 12: ...wo modes you will need to enter the DEEP EDIT MENU scroll down to STOMPBOX and select the stompbox mode you want BEFORE you create your stompbox mode preset A normal preset will clear any standard Stompbox mode presets Sticky Stomp Once you turn on a Sticky Stomp preset it will NOT be cleared by pressing a normal preset the same way a standard STOMPBOX mode preset does It will stay active until yo...

Страница 13: ...ank Manager or any momentary switch to the back panel bank socket to access the Atom s banks this needs to be activated in the Deep Edit Menu under Global Settings Again press the Bank switch once to go up press and hold to go down 3 Footswitch Assign assign your bank control to a G3 Atom footswitch In the Deep Edit Menu in Global Settings you have the option to assign the Bank Select switch to a ...

Страница 14: ...se the button footswitch 2 to access more of the Deep Edit menu Including the following sub menus 1 ATOM STUFF OUTPUTS REMOTE SWITCHES and OUT 2 PHASE 2 NAME This is where we edit the name of the preset 3 MIDI This is where we edit of the G3 s powerful MIDI functionality 4 EXPRESSION Assign your Expression Pedal parameters here 5 LOOP ORDER Change the order of your effect s loops 6 STOMPBOX Determ...

Страница 15: ...o send up to 15 individual MIDI messages on each preset These can be PC Program Change CC Control Change or EXP Expression Pedal MIDI messages The G3 Atom also has a MIDI Clock and a separate MIDI Tap Tempo feature MIDI Menu screen to edit scroll down to each of the 15 available MIDI messages Scroll right to edit the selected MIDI command Scroll right again to select between PC Programme Change CC...

Страница 16: ...ted b b Scroll right to set Type to CC c c Scroll right again to set VALUE and NUMBER EXPRESSION PEDAL MIDI This is the same procedure as the above Select Expression Pedal from the MIDI Type list Choose the CHANNEL number and the CONTROL number Scroll right and choose the HEEL down position number and the TOE down position number There are two expression pedal inputs in the G3 Atom so you have the...

Страница 17: ... pedal will now control Pre and or Post Gain levels Remember you must have your Pre or Post Gain selected on this preset to be able to control the levels with your Expression Pedal 5 2 5 LOOP ORDER With the G3 Atom you can reorder your effects loops in any way you like a Go to LOOP ORDER on the Deep Edit menu b Scroll right and you will see Loops 1 6 which correspond to your effects loops As the A...

Страница 18: ...at you have come from 5 2 8 PARALLEL The G3 Atom s PARALLEL FUNCTION enables you to split your signal path in two meaning you can set up effects in Parallel Wet Dry and even send different effects to different amplifiers The G3 Atom allows you to flip the phase of the parallel signal chain This is important for resolving phase cancellation between the two signal paths If the effect is out of phase...

Страница 19: ...T 2 f Next you need to select the loops you want to add to your Parallel Signal Path using the PARALLEL LOOPS option g Use PHASE SETTINGS to resolve any phase cancellation EXAMPLE 1 PUTTING AN OVERDRIVE AND DISTORTION IN PARALLEL Here s how you would set up this signal path a Enter Deep Edit Menu and scroll down to Parallel b Select Parallel Enable then Parallel Start and set to after Loop 1 c Now...

Страница 20: ...To set up this Wet Dry signal path a Scroll down to Parallel and select Parallel Enable b Select Parallel Start and select after Loop 3 c Select Parallel End and Select NO JOIN d Select parallel Loops and select Loops 5 6 EXAMPLE 3 PARALLEL WITH STEREO This is basically the same as your Wet Dry rig where you do not have a join after you split the signal Any stereo effects that you add from this wi...

Страница 21: ...you choose CC for Tap Tempo this will happen alongside any other MIDI commands sent at the same time from the MIDI menu The difference here is that your Tap Tempo information is sent every time you press the preset whereas the MIDI information from the preset is sent with the FIRST PRESS ONLY 5 2 10 COPY RESET 5 2 11 HIDDEN PRESET How it works The G3 Atom enables you to have a secondary preset for...

Страница 22: ...s not receive any information from your iOS device it will turn off after 2 minutes to ensure no unwanted connectivity UPDATE in conjunction with the G3 iOS app Update enables you to update to the latest G3 Atom software HIDDEN PRESET This is a master Hidden Preset button If you turn this off it will disable all your hidden presets This feature must be turned on to use hidden presets GLOBAL PHASE ...

Страница 23: ...hich will be the file you have just downloaded This will launch the G3 Atom app g In the G3 Atom app press CONNECT h Choose G3 Atom from the list of available devices i When it says CONNECTED click on the DISMISS button on the bottom right hand side of the screen j This will take you back to the main menu Press UPDATE which will take you the UPDATE page on the G3 Atom app k Press TRANSMIT The file...

Страница 24: ... impedance 1M Ohm Out 1 Signal path with input and output amps OFF True Bypass Out 1 is earthed and must always be connected to ground Out 2 Signal path with input and output amps OFF Buffered and Isolated Out 2 is transformer isolated and phase reversible Input signal handling Maximum 16 5V dBV peak to peak in true bypass Signal Bandwidth 4Hz to 150KHz Pre Gain Buffer and Post Gain Stereo VCA Out...

Страница 25: ...ts lost savings damage to other equipment and incidental or consequential damages arising from the use or inability to use this product In no event will The GigRig be liable for more than the amount of the purchase price not to exceed the current retail price of the product The GigRig disclaims any other warranties express or implied By using the product the user accepts all terms herein Disposal ...

Отзывы: