- 25 -
System Hardware Installation
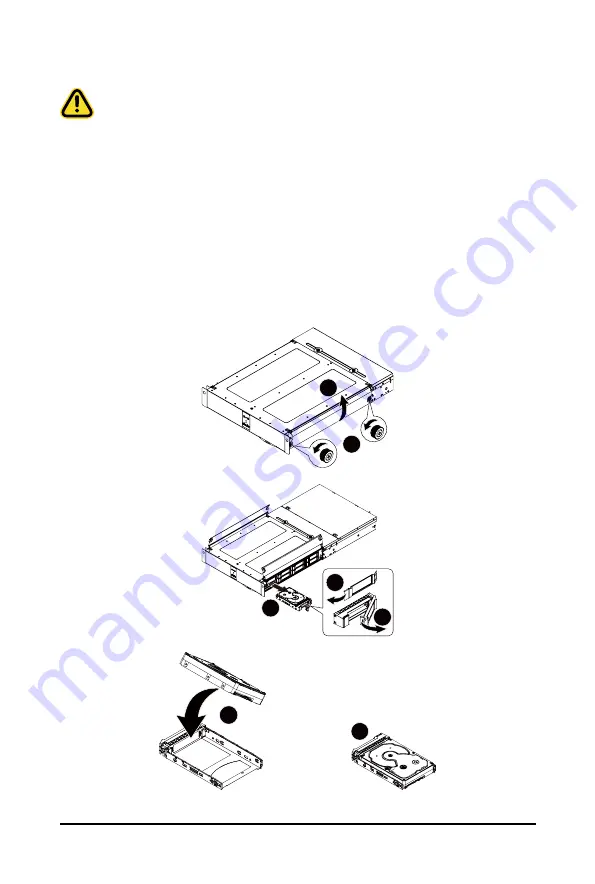
3-6 Installing the Hard Disk Drive
Read the following guidelines before you begin to install the Hard disk drive:
• Take note of the drive tray orientation before sliding it out.
• The tray will not fit back into the bay if inserted incorrectly.
• Make sure that the HDD is connected to the HDD connector on the backplane.
Follow these instructions to install a 3.5" hard disk drive:
1. Loosen the thumbscrew securing the left/right side chassis cover.
2. Open the left/right side cover.
3. Press the release button on the HDD tray.
4. Extend the locking lever.
5. Pull the locking lever in the direction indicated to remove the HDD tray.
6. Align the hard disk drive with the positioning stud on the HDD tray.
7. Slide the hard disk drive into the HDD tray.
8. Reinsert the HDD tray into the slot and close the locking lever.
1
2
3
4
5
6
7
Содержание S251-3O0
Страница 1: ...S251 3O0 Intel Xeon Scalable UP Server System 2U 26 Bay User Manual Rev 1 0...
Страница 10: ...10 This page intentionally left blank...
Страница 15: ...15 Hardware Installation 1 3 System Block Diagram...
Страница 16: ...Hardware Installation 16 This page intentionally left blank...
Страница 24: ...System Appearance 24 This page intentionally left blank...
Страница 39: ...25 System Hardware Installation HDD Backplane Board Signal Cable PSU Front Rear PSU Front Rear...
Страница 43: ...25 System Hardware Installation On Board SATA PSU Front Rear SATA1 SGPIO SATA0 Mini SAS HD PSU Front Rear...
Страница 44: ...System Hardware Installation 26 This page intentionally left blank...
Страница 48: ...Motherboard Components 48 This page left intentionally blankThis...
Страница 68: ...BIOS Setup 68 5 2 11 Intel R I210 Gigabit Network Connection...
Страница 70: ...BIOS Setup 70 5 2 12 VLAN Configuration...
Страница 77: ...77 BIOS Setup 5 3 3 UPI Configuration...


