


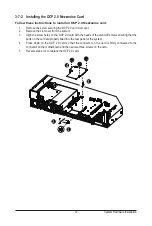

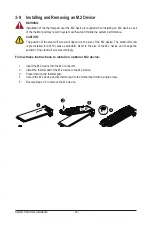

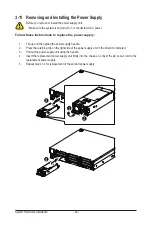
System Hardware Installation
- 38 -
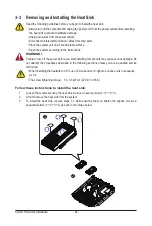
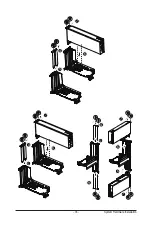
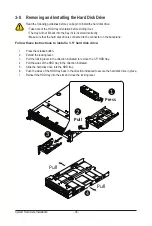
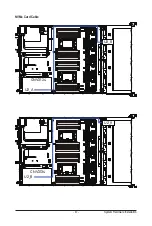
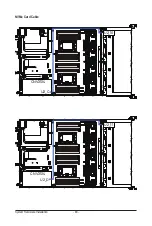
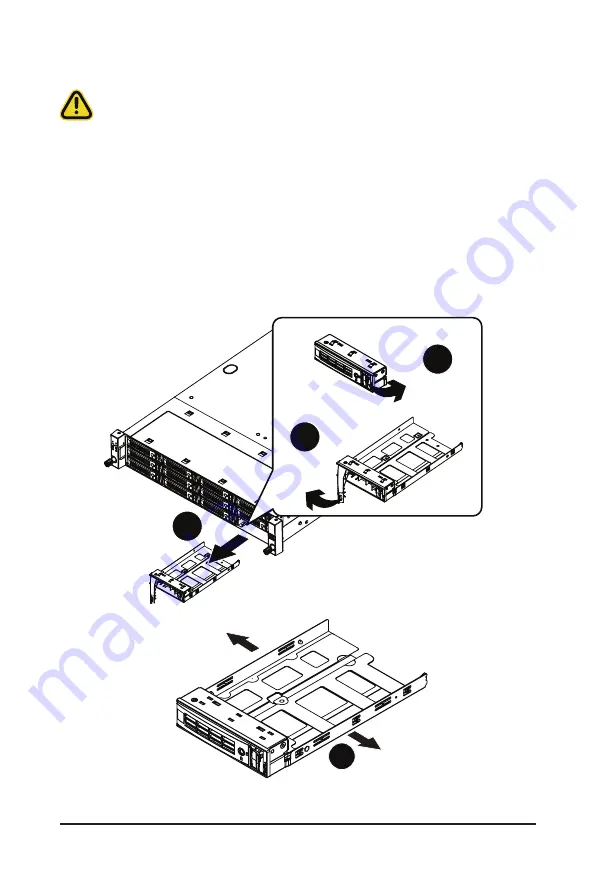
3-8 Removing and Installing the Hard Disk Drive
Read the following guidelines before you begin to install the hard disk drive:
• Take note of the HDD tray orientation before sliding it out.
• The tray will not fit back into the bay if it is inserted incorrectly.
• Make sure that the hard disk drive is connected to the connector on the backplane.
Follow these instructions to install a 3.5" hard disk drive:
1. Press the release button.
2. Extend the locking lever.
3. Pull the locking lever in the direction indicated to remove the 3.5" HDD tray.
4. Pull the sides of the HDD tray in the direction indicated.
5. Slide the hard disk drive into the HDD tray.
6. Push the sides of the HDD tray back in the direction indicated to secure the hard disk drive in place.
7. Reinsert the HDD tray into the slot and close the locking lever.
Press
Pull
2
3
1
Pull
Pull
4
Содержание R282-Z96
Страница 1: ...R282 Z96 AMD EPYC 7002 DP Server System 2U 12 Bay GPU NVMe sku User Manual Rev 1 0 ...
Страница 10: ... 10 This page intentionally left blank ...
Страница 14: ...Hardware Installation 14 ...
Страница 16: ...Hardware Installation 16 1 3 System Block Diagram ...
Страница 24: ...System Appearance 24 This page intentionally left blank ...
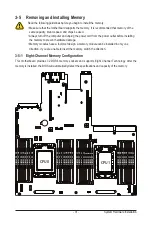
Страница 35: ... 35 System Hardware Installation 4 5 6 7 4 5 6 7 5 6 6 7 7 9 4 ...
Страница 39: ... 39 System Hardware Installation 5 Push Push 6 ...
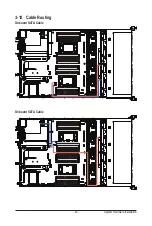
Страница 43: ... 43 System Hardware Installation Onboard SATA Cable Onboard SATA Cable 3 12 Cable Routing ...
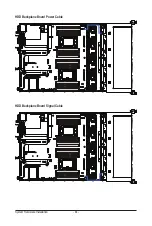
Страница 44: ...System Hardware Installation 44 HDD Backplane Board Power Cable HDD Backplane Board Signal Cable ...
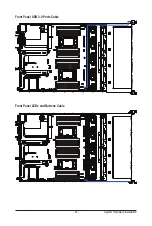
Страница 45: ... 45 System Hardware Installation Front Panel USB 3 0 Ports Cable Front Panel LEDs and Buttons Cable ...
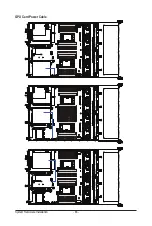
Страница 46: ...System Hardware Installation 46 GPU Card Power Cable ...
Страница 47: ... 47 System Hardware Installation NVMe Card Cable CNV3134 U2_A U2_8 CNV3134 U2_B U2_9 ...
Страница 48: ...System Hardware Installation 48 NVMe Card Cable CNV3134 U2_C U2_10 CNV3134 U2_D U2_11 ...
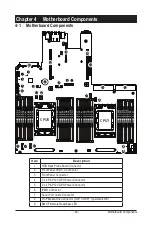
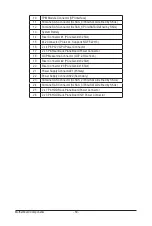
Страница 52: ...Motherboard Components 52 This page intentionally left blank ...
Страница 74: ...BIOS Setup 74 5 2 11 SATA Configuration ...
Страница 79: ... 79 BIOS Setup 5 2 16 Intel R I350 Gigabit Network Connection ...
Страница 81: ... 81 BIOS Setup 5 2 17 VLAN Configuration ...


