background image

8


OSD Selection 


After you press the 

MENU

 button to enter the OSD menu, use 

,

,

,

 to select the items you want 

to adjust. Then press the 

SET AUTO

 button. After the screen fonts turn from black to blue you may 

start to make the adjustments. Just use 

,

,

,

 to adjust the screen parameters as required. If no 

action is taken for 45 seconds after the setting, the system will automatically save your settings and exit 
the OSD.   


OSD Menu 


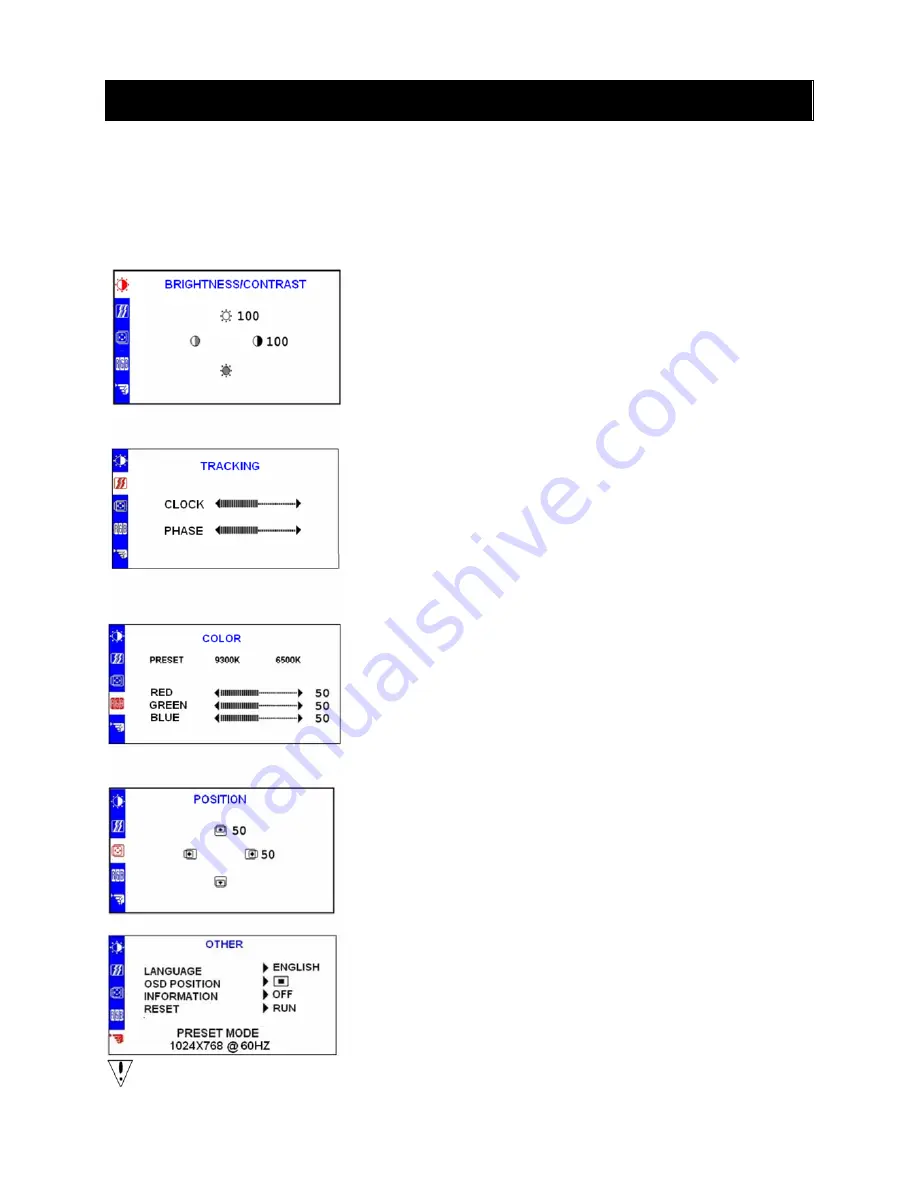
Brightness/Contrast 
Brightness

: Press

 or 

 (

6

and

5

in figure 4) to adjust the brightness 

of the screen.   

Contrast

: Press

or

 (

4

and

3

in figure 4) to adjust the contrast of the 

screen. 


Image Control: 

Auto Adjustment: Use the 

MENU 

button (X in figure 4) to automatically 

optimize the image parameters (such as image position and phase). 
Horizontal Position Adjustment: Adjust horizontal position of the image. 
Vertical Position Adjustment: Adjust vertical position of the image. 
Clock: Set up the internal clock. Increase or decrease the value allows 
adjusting the image width.   
Phase: Adjust the time offset of the internal clock. It is used to optimize 
the screen image. 


Color Temperature:   

In the OSD, press

or

 (

4

and

3

  in figure 4). This option allows you to 

select a default color temperature (

9300K

 or 

6500K

). Color temperature 

changes will take effect immediately on the display. To adjust a color 
independently, select the “User Adjustment” item and then press 

MENU


(X in figure 4) to select red, green or blue. In the OSD, press 

 or 

 (

6

and

5

  in figure 4) to select the required values. When you return to the 

menu of previous level or exit the OSD menu, current settings will be 
saved automatically.   

 
OSD Control

OSD

 horizontal position adjustment: Adjust the horizontal position of the 

OSD menu.   

OSD

 vertical position adjustment: Adjust the vertical position of the OSD 

menu.  

OSD timeout

: Set the time duration (in seconds) when the OSD menu 

disappears from the screen if no action is taken. 


Other 

Language: English, Simplified Chinese, Traditional Chinese 
Input Signal: Control the selection of input signals. The display allows 
you to connect to an analog video card via 15-pin mini D-Sub interface. 
Volume: Adjust the output volume of the display speaker.   
Information: This OSD screen is optional (On/Off). It displays the latest 
screen resolution settings.


Note:

 Do not adjust the screen settings when animation is displayed and make sure to adjust the 

settings in full screen mode.   

Содержание GD-2018BP

Страница 1: ......

Страница 2: ... Accessories 4 Installation Instructions 5 Installing the Display 5 Packaging Procedures 5 Adjusting the Viewing Angle 5 Connection Instructions 6 Using the Display 7 Turning On the Display 7 Function Controls 7 OSD Selection 8 OSD Menu 8 Troubleshooting 9 Product Specifications 10 Appendix 11 ...

Страница 3: ...hed avoid touching the surface with nail or pen point Make sure to unplug the product from the power outlet before cleaning Use a soft lint free cloth instead of a tissue to wipe the screen You may use a glass cleaner to clean the product if required However never spray the cleaner directly onto the display surface Do not attempt to service this product yourself Improper disassembly of the product...

Страница 4: ...on to recycle this product United State http newyork earth911 org Asia http recycle epa gov tw public public4_2 htm Europe Ireland Company McGrath Environmental Consultants Ltd Contact Person Ms McGrath Clodagh Add ress 20 Lower John Street Cork Ireland Tel 021 4554833 Fax 021 4505805 Norway Company Bergfald Co as Contact Person Mr Solevåg Øystein Address Solavågsvegen 90 EIDSNES NORWAY Post Code ...

Страница 5: ...missing please contact your local dealer for technical support or customer service Remark Please keep the original box and packing materials for future transportation or shipment of the display LCD Display Power Cord Audio Cable Signal Cable VGA User Manual ...

Страница 6: ...ady turned off 2 Push forward the four latches inside the base and hold the latches 3 Unplug the display panel from the base and then put them into an outer box Important Before you start place a clean tower or cloth on a flat surface so that you can lay the display panel on a clean flat place without being damaged Slightly lift the display when unplugging it from the base Adjusting the Viewing An...

Страница 7: ...one end of the signal cable is already attached to the display just connect the other end to the output jack on your PC s video card and then fasten the screws 3 Audio Cable Connect one end of the audio cable to the audio in socket on the display and the other end to the audio out jack on your PC Warning 1 Please verify the video card you are using and use appropriate signal cable 2 Pay attention ...

Страница 8: ...witch Power On Off Green Operation mode Orange Power saving mode 2 SELECT AUTO Auto Adjustment Button OSD Off Executes auto adjustment function OSD On Confirms an OSD selection 3 and Left Right Button Decrease Increase Button OSD Off Press or can directly adjust the volume OSD On Use these buttons to adjust the values of a selected function 4 and Left Right Button Decrease Increase Button OSD On U...

Страница 9: ...perature In the OSD press or 4 and 3 in figure 4 This option allows you to select a default color temperature 9300K or 6500K Color temperature changes will take effect immediately on the display To adjust a color independently select the User Adjustment item and then press MENU X in figure 4 to select red green or blue In the OSD press or 6 and 5 in figure 4 to select the required values When you ...

Страница 10: ...see if the image resumes Abnormal colors are present Please refer to the Color Temperature section to adjust the RGB color or select a color temperature The image bounces or a wave pattern is present Remove any electrical device that may be causing electrical interference Check the signal cable and make sure the pins are not bent The screen image is not centered or the size is incorrect Press the ...

Страница 11: ...Horizontal 31 83 kHz Vertical 56 75 Hz Max Resolution 1400 x 1050 Volume Output Output power per channel 1W 8 ohm Power Supply AC 100 240V 50 60 Hz Power Consumption Display Mode Max 50 W LED Color Green Sleeping Mode Less than 4 W LED Color Orange Size Width 475 9 mm Height 451 5 mm Depth 64 9 mm Weight 8 2 Kg net Environment Conditions Operating Temperature Humidity 0 40 Relative Humidity 20 80 ...

Страница 12: ...T 15 Pin Color Display Signal Cable 1 5 6 10 11 15 PIN NO DESCRIPTION PIN NO DESCRIPTION 1 Red 9 5V 2 Green 10 Ground 3 Blue 11 Ground 4 Ground 12 DDC Serial Data 5 Ground 13 H Sync 6 R Ground 14 V Sync 7 G Ground 15 DDC Serial Clock 8 B Ground ...

Отзывы: