background image

When you installing AGP card, please make sure the following

notice is fully understood and practiced.  If your AGP card has
"AGP 4X/8X (1.5V) notch"(show below), please make sure your
AGP card is AGP 4X/8X (1.5V).

Caution: AGP 2X card is not supported by Intel

®

 845(GE/PE) / 845(E/

G) / 850(E) / E7205 / 865(G/PE/PL/P) / 875P / 848P. You might
experiencesystem unable to boot up normally. Please insert an AGP
4X/8X card.

Example 1: Diamond Vipper V770 golden finger is compatible with 2X/4X
mode AGP slot. It can be switched between AGP 2X(3.3V) or 4X(1.5V)
mode by adjusting the jumper. The factory default for this card is
2X(3.3V). The GA-8I865P(-G) (or any AGP 4X/8X only) motherboards
might not function properly, if you install this card without switching the
jumper to 4X(1.5V) mode in it.

Example 2: Some ATi Rage 128 Pro graphics cards made by "Power Color",
the graphics card manufacturer & some SiS 305 cards, their golden finger
is compatible with 2X(3.3V)/4X(1.5V) mode AGP slot, but they support 2X
(3.3V) only. The GA-8I865P(-G) (or any AGP 4X/8X only) motherboards
might not function properly, If you install this card in it.

Note: Although Gigabyte's AG32S(G) graphics card is based on ATi Rage
128 Pro chip, the design of AG32S(G) is compliance with AGP 4X(1.5V)
specification. Therefore, AG32S(G) will work fine with Intel

®

 845(GE/PE) /

845(E/G) / 850(E) / E7205 / 865(G/PE/PL/P) / 875P / 848P


based

motherboards.

AGP 4X/8X notch

Содержание GA-8I865P

Страница 1: ...this card is 2X 3 3V The GA 8I865P G or any AGP 4X 8X only motherboards might not function properly if you install this card without switching the jumper to 4X 1 5V mode in it Example 2 SomeATi Rage128 Prographics cards made by Power Color the graphics card manufacturer some SiS 305 cards their golden finger is compatible with 2X 3 3V 4X 1 5V modeAGP slot but they support 2X 3 3V only The GA 8I865...

Страница 2: ...ent to update the information contained herein M Third party brands and names are the property of their respective owners M Please do not remove any labels on motherboard this may void the warranty of this motherboard M Due to rapid change in technology some of the specifications might be out of date before publication of this booklet ...

Страница 3: ...Jun 04 2004 Mother Board GA 8I865P G GA 8I865P ...

Страница 4: ...ons This device complies with part 15 of the FCC Rules Operation is subject to the following two conditions 1 This device may not causeharmful and 2 thisdevicemust accept anyinferencereceived including that maycause undesired operation Representative Person s Name Signature Eric Lu Supplementary Information Model Number 17358 Railroad Street City of Industry CA 91748 G B T INC U S A 818 854 9338 8...

Страница 5: ...USER S MANUAL GA 8I865P G P4 Titan Series Motherboard Pentium 4 ProcessorMotherboard Rev 1001 12ME 8I865PG 1001 ...

Страница 6: ...PU 12 Step 1 1 CPU Installation 12 Step 1 2 CPU Cooling Fan Installation 13 Step 2 Install memory modules 14 Step 3 Install expansion cards 17 Step 4 Install I O Peripherals Cables 18 Step 4 1 I O Back Panel Introduction 18 Step 4 2 Connectors Jumper Setting Introduction 20 Chapter 3 BIOS Setup 31 The Main Menu For example BIOS Ver E3 32 Standard CMOS Features 34 Advanced BIOS Features 37 Integrat...

Страница 7: ... Defaults 49 Load Optimized Defaults 49 Set Supervisor User Password 50 Save Exit Setup 51 Exit Without Saving 51 Chapter 4 Technical Reference 53 Flash BIOS Method Introduction 53 2 4 6 8 Channel Audio Function Introduction 64 Jack Sensing and UAJ Introduction 70 Xpress Recovery Introduction 72 Chapter 5 Appendix 75 ...

Страница 8: ...eparated fromthe system 5 Ensure thattheATXpower supplyis switched offbefore you plug in orremove theATX powerconnectoron themotherboard Ifthe motherboard has mountingholes buttheydon tline upwith the holes on the base and there are no slots to attach the spacers do notbecome alarmed you can still attach the spacers to the mounting holes Justcutthe bottom portion ofthe spacers the spacermaybe a li...

Страница 9: ... with 360K 720K 1 2M 1 44M and 2 88M bytes On BoardPeripherals 1 Parallel portsupports Normal EPP ECP mode 2 Serial ports COMA COMB 8 USB 2 0 1 1 ports 4 x Rear 4 x Frontby cable 1 IrDA connector for IR CIR 1 FrontAudio connector 1 PS 2 keyboard 1 PS 2 mouse Due to chipset Intel 865P architecture limitation a FSB 533 Pentium 4 processor will support DDR333 and DDR266 memory module A FSB 400 Pentiu...

Страница 10: ...onnector Serial ATA 2 SerialATAconnectors SATA0 SATA1 Controlled by ICH5 Hardware Monitor CPU System Fan Revolution detect CPU System Fan Fail Warning CPUOverheatWarning System Voltage Detect I O Control IT8712 PS 2 Connector PS 2 Keyboard interface and PS 2 Mouse interface BIOS Licensed AWARD BIOS SupportsQ Flash AdditionalFeatures Supports EasyTune Supports BIOS Overclocking Over Voltage DDR AGP...

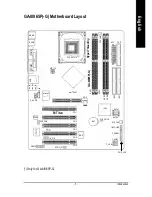
Страница 11: ...ading SPDIF_IO IR_CIR PCI5 F_U SB1 F_U SB2 GAME PWR_LED CODEC IT8712 F_PANEL BAT PCI3 PCI4 BIOS CI P4 Titan SYS_FAN INFO_LINK CLR_CMOS ICH5 PCI2 SUR_CEN PCI1 SATA1 SATA0 GA 8I865P G COMB ATX_12V SOC KET478 LPT IDE1 IDE2 MIC_IN USB L A N F_AUDIO DDR3 DDR1 DDR2 CD_IN Intel 865P AGP Marv ell 8 0 0 1 LINE_IN LINE_OUT DDR4 ...

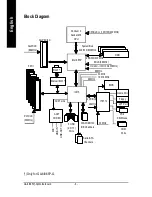
Страница 12: ...CPUCLK 100 133 200MHz System Bus 400 533 800MHz 266 333 400MHz ZCLK 66MHz HCLK 100 133 200MHz 66MHz 33MHz 14 318MHz 48MHz 24MHz 33MHz LPC BUS AGP 8X 4X AGPCLK 66MHz 5 PCI PCICLK 33MHz AC97Link MIC LINE IN LINE OUT 8 USB 2 0 1 1 Ports ATA33 66 100 IDE Channels Floppy LPT Port PS 2 KB Mouse COM Ports IT8712 GamePort BIOS DDR Marvell8001 RJ45 ...

Страница 13: ...Introduction 9 English ...

Страница 14: ... 10 GA 8I865P G Motherboard English ...

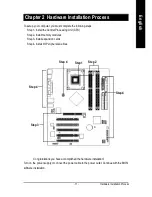
Страница 15: ...p 2 Install memory modules Step 3 Installexpansion cards Step 4 Install I O Peripherals Cables Chapter 2 Hardware Installation Process Congratulations you have accomplished the hardware installation Turn on the power supplyor connectthe power cable to the poweroutlet Continue with the BIOS software installation Step 2 Step 4 Step 1 Step 4 Step 4 Step 3 ...

Страница 16: ... required standards for the peripherals If you wish to set the frequency beyond the proper specifications please do so according to your hardware specifications including the CPU graphics card memory hard drive etc HT functionality requirementcontent Enabling the functionality ofHyper Threading Technology for your computer system requires all ofthe following platform components CPU An Intel Pentiu...

Страница 17: ...uction between yourCPU and cooling fan The CPU cooling fan might stick to the CPU due to the hardening ofthe thermal paste During this condition ifyou try to remove the cooling fan you mightpull the processor out ofthe CPU socket alone with the cooling fan and mightdamage the processor To avoid this from happening we suggestyou to either use thermal tape instead of thermalpaste or remove the cooli...

Страница 18: ...DDR memory module is installed The motherboard supports DDRmemorymodules wherebyBIOSwillautomatically detectmemory capacity and specifications Memory modules are designed so thatthey can be inserted only in one direction The memory capacity used can differwith each slot Before installing the memory modules please comply with the following conditions 1 Please make sure thatthe memory used is suppor...

Страница 19: ...ules are installed part of them will notbe detected 4 Four DDR memory modules are installed Ifyou install four memory modules at the same time the Dual Channel Technology will operate only when those modules have the same memory size and type We ll strongly recommend our user to slot two DDR memory modules into the DIMMs with the same colorin order forDual Channel Technologyto work The following t...

Страница 20: ... memory is a high performance and cost effective solution thatallows easy adoption for memory vendors OEMs and system integrators DDR memory is a greatevolutionary solution for the PC industry that builds on the existing SDRAM architecture yetmake the awesome advances in solving the system performance bottleneck by doubling the memory bandwidth Nowadays with the highestbandwidth of3 2GB s ofDDR400...

Страница 21: ...tacts on the card are indeed seated in the slot 5 Replace thescrew to secure the slotbracketofthe expansion card 6 Replaceyourcomputer s chassiscover 7 Power on the computer ifnecessary setup BIOS utility ofexpansion card from BIOS 8 Install related driver from the operating system AGPCard Please carefully pull outthe small white drawablebar at the end of the AGP slot when you try to install Unins...

Страница 22: ...AN Connector Before you connect your device s into USB connector s please make sure your device s such as USBkeyboard mouse scanner zip speaker etc Have a standard USB interface Also make sure your OS supports USB controller If your OS does not supportUSB controller please contactOSvendor forpossible patch or driverupgrade Formore information please contactyourOSordevice s vendors LAN connector is...

Страница 23: ...se and modem etc can be connected to Serial ports Serial Port 9 pin Male Parallel Port 25 pin Female COMA COMB After install onboard audio driver you may connectspeakerto Line Out jack microphone to MICIn jack Devices like CD ROM walkman etc can be connected to Line In jack Please note You are able to use 2 4 6 8 channelaudio feature by S W selection Ifyou wantto enable 8 channelfunction you can r...

Страница 24: ...ng Introduction 1 ATX_12V 11 SUR_CEN 2 ATX 12 CD_IN 3 CPU_FAN 13 SPDIF_IO 4 SYS_FAN 14 IR_CIR 5 FDD 15 F_USB1 F_USB2 6 IDE1 IDE2 16 GAME 7 SATA0 SATA1 17 INFO_LINK 8 PWR_LED 18 CI 9 F_PANEL 19 CLR_CMOS 10 F_AUDIO 20 BAT 1 3 2 8 9 19 16 17 11 13 4 18 15 7 6 5 14 10 20 12 ...

Страница 25: ...CPU If theATX_12V power connector is not connected the system will not start Caution Please use a power supply that is able to handle the system voltage requirements It is recommended that a power supply that can withstand high power consumption be used 300W or greater Ifa power supply is used thatdoes not provide the required power the result can lead to an unstable system or a system that is una...

Страница 26: ...The black connector wire is the ground wire GND Please remember to connect the power to the cooler to preventsystem overheating and failure Caution Please remember to connectthe power to the CPU fan to preventCPU overheating and failure PinNo Definition 1 GND 2 12V 3 Sense 1 1 CPU_FAN SYS_FAN 5 FDD Floppy Connector The FDD connector is used to connect the FDD cable while the other end of the cable...

Страница 27: ... IDE hard drive with the computer It is recommended thatthe firsthard drive be connected to the IDE1 connector while the disk drive be connected to the IDE2 connector IDE1 IDE2 1 39 2 40 7 SATA0 SATA1 Serial ATAConnector You can connect the SerialATA device to this connector PinNo Definition 1 GND 2 TXP 3 TXN 4 GND 5 RXN 6 RXP 7 GND 7 1 ...

Страница 28: ...h etc ofyour chassisfront panel to theF_PANEL connector according to the pin assignmentbelow HD IDEHard DiskActive LED Pin1 LEDanode Blue Pin2 LEDcathode SPEAK SpeakerConnector Pin1 VCC Amber Pin2 Pin3 NC Pin4 Data RES ResetSwitch Open Normal Operation Green Close Reset HardwareSystem PW Power Switch Red Open Normal Operation Close PowerOn Off MSG MessageLED Power Pin1 LEDanode SleepLED Yellow Pin...

Страница 29: ...eader To find out ifthe chassis youare buyingsupport frontaudio connector please contact yourdealer Please note you can have the alternative ofusing front audio connector or of using rear audio connector to play sound 10 9 1 2 11 SUR_CEN Pleasecontact your nearest dealer for optional SUR_CEN cable 7 8 1 2 PinNo Definition 1 MIC 2 GND 3 MIC_BIAS 4 POWER 5 FrontAudio R 6 RearAudio R 7 Reserved 8 NoP...

Страница 30: ...system has digital input function Use SPDIF IN feature only when your device has digital output function Be careful with the polarity of the SPDIF_IO connector Check the pin assignment carefully while you connect the SPDIF cable incorrect connection between the cable and connector will make the device unable to work or even damage it For optional SPDIF cable please contact your local dealer 1 6 2 ...

Страница 31: ...n between the cable and connector will make the device unable to work or even damage it For optional IR CIR cable please contact your local dealer 5 10 1 6 2 10 1 9 15 F_ USB1 F_USB2 Front USB Connector Be careful with the polarity ofthe front USB connector Check the pin assignment carefully while you connectthe front USB cable incorrect connection between the cable and connector will make the dev...

Страница 32: ...LINK This connector allows you to connectsome external devices to provide you extra function 16 2 1 15 10 2 1 9 Pin No Definition 1 VCC 2 GRX1_R 3 GND 4 GPSA2 5 VCC 6 GPX2_R 7 GPY2_R 8 MSI_R 9 GPSA1 10 GND 11 GPY1_R 12 VCC 13 GPSB1 14 MSO_R 15 GPSB2 16 NoPin PinNo Definition 1 SMBCLK 2 VCC 3 SMBDATA 4 GPIO 5 GND 6 GND 7 NoPin 8 NC 9 12V 10 12V ...

Страница 33: ...sable the case open item in BIOS if the system casebegin remove PinNo Definition 1 Signal 2 GND 1 19 CLR_CMOS Clear CMOS You may clear the CMOS data to its defaultvalues by this jumper To clear CMOS temporarily short1 2 pin Default doesn tinclude the Shunter to prevent from improper use this jumper 1 1 Open Normal Short Clear CMOS ...

Страница 34: ...nly with the same or equivalent type recommended by the manufacturer v Dispose of used batteries according to the manufacturer s instructions If you want to erase CMOS 1 Turn OFF the computer and unplug the power cord 2 Remove the battery wait for 30 second 3 Re install the battery 4 Plug the power cord and turn ON the computer ...

Страница 35: ...nput andOutputSystem includes aCMOS SETUP utility which allows userto configure required settings or to activate certain system features The CMOS SETUP saves the configuration in the CMOS SRAM of the motherboard When thepower is turnedoff the battery onthemotherboard supplies thenecessary power tothe CMOS SRAM When thepower is turnedon pushing the Del buttonduring the BIOSPOST Power On SelfTest wi...

Страница 36: ...o use and the possible selections for the highlighted item To exit the Help Window press Esc The Main Menu For example BIOS Ver E3 Once you enterAward BIOS CMOS SetupUtility the Main Menuwill appear on thescreen The Main Menu allows y ou to select from eight setup functions and two exit choices Use arrow keys to select among the items and press Enter to accept or enter the sub menu GETTING HELP CM...

Страница 37: ...ail Safe Defaults indicates the value of the system parameters which the system would be in safe configuration l Load Optimized Defaults Optimized Defaults indicates the value of the system parameters which the system would be in best performance configuration l Set Supervisor password Change set or disable password It allows you to limit access to the system and Setup or just to Setup l Set User ...

Страница 38: ...p Utility Copyright C 1984 2004 Aw ard Software Standard CMOS Features Date mm dd yy Fri May 15 2004 Time hh mm ss 22 31 24 IDE Channel 0 Master None IDE Channel 0 Slave None IDE Channel 1 Master None IDE Channel 1 Slave None Drive A 1 44M 3 5 Drive B None Floppy 3 Mode Suport Disa bled Holt On All But Keyboard Base Memory 640K Exte nded Me mory 127M Total Memory 128M higf Move Enter Select PU PD ...

Страница 39: ...rge Auto default Auto Hard drive information should be labeled on the outside driv e casing Enter the appropriate option based on this information Cylinder Number of cylinders Head Number of heads Precomp Write precomp Landing Zone Landing zone Sector Number of sectors If a hard disk has not been installed select NONE and press Enter Drive A Drive B The category identifies the types of floppy disk...

Страница 40: ...ll errors except a keyboard error Default value All But Diskette The system boot will not stop for all errors except a disk error All But Disk Key The system boot will not stop for all errors except keyboard and disk errors Memory The category is display only which is determined by POST Power On Self Test of the BIOS Base Memory The POST of the BIOS will determine the amount of base or conventiona...

Страница 41: ...vice priority by LAN Disabled Select your boot device priority by Disabled Password Check Setup The system will boot but will not access to Setup page if the correct passw ord is not entered at the prompt Default v alue System The system will not boot and will not access to Setup page if the correct passw ord is not entered at the prompt System will detectautomatically and show up when you install...

Страница 42: ... SATA Port0 Configur e as SATA Port0 SATA Port1 Configur e as SATA Port1 USB Controller Enabled USB 2 0 Contr oller Enabled USB K eyboard Support Disa bled USB Mouse Support Disa bled AC97 Audio Auto O n b o a r d H W L A N Enabled Onboar d Serial P ort 1 3F8 IRQ4 Onboar d Serial P ort 2 2F8 IRQ3 UART Mode Se lect Nor mal x UR2 Duplex Mode Half Onboar d Parallel Port 378 IRQ7 Parallel Port Mode SP...

Страница 43: ... Remap SATA Port 0 to IDE Pri Slave IDE Sec Master Remap SATA Port 0 to IDE Sec Master IDE Sec Slave Remap SATA Port 0 to IDE Sec Slave SATA Port0 SATA controller set to SATA port0 As this mode it support by WinXP or later OS only Default v alue SATA Port1 SATA controller set to SATA port1 As this mode it support by WinXP or later OS only SATA Port1 Configure as The values depend on SATA Port0 USB...

Страница 44: ... address is 2E8 Disabled Disable onboard Serial port 1 Onboard Serial Port 2 Auto BIOS will automatically setup the port 2 address 3F8 IRQ4 Enable onboard Serial port 2 and address is 3F8 2F8 IRQ3 Enable onboard Serial port 2 and address is 2F8 Default v alue 3E8 IRQ4 Enable onboard Serial port 2 and address is 3E8 2E8 IRQ3 Enable onboard Serial port 2 and address is 2E8 Disabled Disable onboard S...

Страница 45: ...ies Port ECP EPP Using Parallel port as ECP EPP mode ECP Mode Use DMA This feature allows you to selectDirect Memory Access DMA channel if the ECP mode selected This function w ill available when Parallel Port Mode set at ECP or ECP EPP 3 Set ECP Mode Use DMA to 3 Default v alue 1 Set ECP Mode Use DMA to 1 Game Port Address 201 Set Game Port Address to 201 Default v alue 209 Set Game Port Address ...

Страница 46: ...mized Defa ults Item Help Me n uLe v e l S1 Set suspend ty pe to Powe r On Suspend under ACPI OS S3 Set suspend ty pe to Suspe nd to RAM under ACPI OS ACPI Suspend Type S1 POS Set ACPI suspend type to S1 POS Power On Suspend Default v alue S3 STR Set ACPI suspend type to S3 STR Suspend To RAM Power LED in S1 state Blinking In standby mode S1 pow er LED will blink Default v alue Dual OFF In standby...

Страница 47: ...e sy stem Power On By Keyboard This feature allows you to set the method for powering on the sy stem The option Password allows you to set up to 5 alphanumeric characters to power on the system The option Keyboard 98 allows you to use the standard key board 98 to power on the sy stem Password Enter from 1 to 5 characters to set the Key board Pow er On Password Disabled Disabled this function Defau...

Страница 48: ...n IRQ to PCI 3 Default value 3 4 5 7 9 10 11 12 14 15 Set IRQ 3 4 5 7 9 10 11 12 14 15 to PCI 3 PCI 4 IRQ Assignment Auto Auto assign IRQ to PCI 4 Default value 3 4 5 7 9 10 11 12 14 15 Set IRQ 3 4 5 7 9 10 11 12 14 15 to PCI 4 CMOS Setup Utility Copyright C 1984 2004 Aw ard Software PnP PCI Configurations PCI 1 PCI 5 I RQ Assignment Auto PCI 2 IRQ Assignment Auto PCI 3 IRQ Assignment Auto PCI 4 I...

Страница 49: ...mp at 60o C 140o F 70o C 158o F Monitor CPU Temp at 70o C 158o F 80o C 176o F Monitor CPU Temp at 80o C 176o F 90o C 194o F Monitor CPU Temp at 90o C 194o F Disabled Disable this function Default v alue PC Health Status CMOS Setup Utility Copyright C 1984 2004 Aw ard Software PC H ealth Status Rese t Case Open Status Disa bled Case O pened Yes Vcore OK DDR25V OK 3 3V OK 5V OK 12V OK Curr ent CPU T...

Страница 50: ...ur system is overclocked and cannot restart please wait 20secs for automatic system restart or clear the CMOS setup data and perform a safe restart Disabled Disable CPU Host Clock Control Default v alue Enabled Enable CPU Host Clock Control CMOS Setup Utility Copyright C 1984 2004 Aw ard Software Frequency Voltage Control CPU ClockRatio 15X CPU Host ClockControl Disa bled x CPU Host Frequency Mhz ...

Страница 51: ...ck SRC over clock may make Serial ATA device function can t work properly Adjust AGP PCI SRC clock asychrohous with CPU Memory Frequency For for FSB Front Side Bus frequency 400MHz 2 66 Memory Frequency Host clock X 2 66 Auto Set Memory frequency by DRAM SPD data Default v alue for FSB Front Side Bus frequency 533MHz 2 0 Memory Frequency Host clock X 2 0 2 5 Memory Frequency Host clock X 2 5 Auto ...

Страница 52: ...t may damage to DRAM module when enable this feature AGP OverVoltage Control Normal Set AGP OverVoltage Control to Normal Default value 0 1V Set AGP OverVoltage Control to 0 1V 0 2V Set AGP OverVoltage Control to 0 2V 0 3V Set AGP OverVoltage Control to 0 3V Increase AGP voltage may get stable for Over_Clock But it may damage to AGP Card when enable this feature CPU Voltage Control Supports adjust...

Страница 53: ... appropriate v alues of the system parameters that allow minimum system performance Load Fail Sa fe Defaults Y N N CMOS Setup Utility Copyright C 1984 2004 Aw ard Software Standard CMOS Features Advanced BI OS Features Inte grated Periphe rals Powe r Management Setup PnP PCI Configurations PC H ealth Status Frequency Voltage Control ESC Quit higf Selec t Item F8 Q Flash F10 Save Exit Setup Load Op...

Страница 54: ...y access all BIOS Setup program function When enabled the Supervisor passw ord is required for entering the BIOS Setup program and having full configuration fields the User passw ord is required to access only basic items If you select System at Password Check in Advance BIOS Features Menu you will be prompted for the password every time the system is rebooted or any time you try to enter Setup Me...

Страница 55: ...d Defa ults Set Supervisor Password Set U ser Password Save Exit Setup Exit Without Saving Save to CMOS and EXIT Y N Y Exit Without Saving Type Y will quit the Setup Utility without saving to RTC CMOS Type N will return to Setup Utility CMOS Setup Utility Copyright C 1984 2004 Aw ard Software Standard CMOS Features Advanced BI OS Features Inte grated Periphe rals Powe r Management Setup PnP PCI Co...

Страница 56: ... 52 GA 8I865P G Motherboard English ...

Страница 57: ...y Co Ltd is notresponsible for damages ofsystem becauseofincorrectmanipulation ofupdatingBIOSto avoidanyclaims from end users Before You Begin Before you startupdating BIOS with the Q FlashTM utility please follow the steps belowfirst 1 Download the latestBIOS foryour motherboard from Gigabyte s website 2 Extractthe BIOS file downloaded and save the BIOS file the one with modelname Fxx For example...

Страница 58: ...dul ar BIOS v6 00PG An Energy Star Al ly Copyri ght C 1984 2003 Award Softw are Inc Intel i875P AGPset BIOS for 8KNXP Ultra Fa3 Check SystemHealth OK VCore 1 5250 Main Processor Intel Pentium R 4 1 6GHz 133x12 CPUID 0F27 Patch ID 0027 Memory Testing 131072K OK Memory Frequency 266 MHz in Single Channel Primary Master FUJITSU MPE3170AT ED 03 08 Primary Slave None Secondary Master CREATIVEDVD RM DVD...

Страница 59: ... keyboard to enable execution of the task Taskmenu for Q Flash utility Contains the names of four tasks Blocking a task and pressing Enter key on your keyboard to enable execution of the task Actionbar Contains the names of four actions needed to operate the Q Flash Dual BIOS utility Pressing the buttons mentioned on your keyboards to perform these actions Using the Q FlashTM utility This section ...

Страница 60: ... Turn Off Power Or Reset System 2 Move to the BIOS file you want to flash and press Enter In this example we only download one BIOS file to the floppy disk so only one BIOS file 8KNXPU Fba is listed Dual BIOS Utility Boot From Main Bios Main ROM Type Size SST 49LF003A 512K Backup ROM Type Size SST 49LF003A 512K Wide Range Protection Disable Boot From Main Bios Auto Recovery Enable Halt On Error Di...

Страница 61: ...Type Size SST 49LF003A 512K Wide Range Protection Disable Boot From Main Bios Auto Recovery Enable Halt On Error Disable Copy Main ROM Data to Backup Load Default Settings Sav e Settings to C MOS Q Flash Utility Load M ain BIOS from Floppy Load Backup BIOS from Floppy Save Main BIOS to Floppy Save Backup BIOS to Floppy Enter Run hi Mov e ESC Reset F10 Power Off Are you sure to RESET Enter to conti...

Страница 62: ...d Save Exit Setup Exit Without Saving CM OS Setup Utility Cop yright C 1984 2003 Award Software Standard CM OS Features Advanced BIOS Features Integrated Perip herals Power Management Setup PnP PCI Configurations PC Health Status Frequency Voltage Control ESC Quit higf Select Item F8 Dual BIOS Q Flash F10 Save Exit Setup Top Performance Load Fail Safe Defaults Load Optimized Defaults Set Superviso...

Страница 63: ...ecution of the task Actionbar Contains the names of four actions needed to operate the Q Flash utility Pressing the buttons mentioned on your keyboards to perform these actions Q Flash Utility V1 30 Flash Type Size SST 49LF003A 256K Keep DM I Data Enable U pdate BIOS from Floppy Save BIOS to Floppy Enter Run hi Mov e ESC Reset F10 Power Off Q FlashTM utility bar Action bar Task menu for Q Flash TM...

Страница 64: ...Please confirm again you have the correct BIOS file for your motherboard 2 Move to the BIOS file you want to flash and press Enter In this example we only download one BIOS file to the floppy disk so only one BIOS file 8GE800 F4 is listed Q Flash Utility V1 30 Flash Type Size SST 49LF003A 256K Keep DM I Data Enable U pdate BIOS from Floppy Save BIOS to Floppy Enter Run hi Mov e ESC Reset F10 Power...

Страница 65: ...ll restart automatically after you exit Q Flash The BIOS file becomes Fab after updating After system reboots you may find the BIOS version on your boot screen becomes the one you flashed Q Flash Utility V1 30 Flash Type Size SST 49LF003A 256K Keep DM I Data Enable U pdate BIOS from Floppy Save BIOS to Floppy Enter Run hi Mov e ESC Reset F10 Power Off Are you sure to RESET Enter to continure or Es...

Страница 66: ...dsandsteps I Update BIOS through Internet a Click InternetUpdate icon b Click Update New BIOS icon c Select BIOSTM sever d Selectthe exactmodelnameonyourmotherboard e System willautomatically download and update the BIOS 3 1 4 2 1 Click BIOS Presshere 2 Click Start Programs GIGABYTE BIOS 3 Click P 4 Click here 5 Please select BIOS sever site then Click OK ...

Страница 67: ...OM Intheverybeginning thereis Aboutthis program icon shownin dialog box Itcan help you check outwhichkindofmotherboardandwhich brandofFlashROMaresupported Note a Inmethod I ifitshows twoormore motherboard s modelnames to be selected please make sure yourmotherboard smodelnameagain Selectingwrong modelname willcause the systemunbooted b Inmethod II be surethatmotherboard s modelname in BIOS unzip f...

Страница 68: ...t STEP 2 Following installation of the audio driver you find a icon a Sound Effect icon on the lower right hand taskbar Click the icon to select the function The installation of windows 98SE 2K ME XP is very simple Please follow next step to install the function 2 4 6 8 Channel Audio Function Introduction STEP 3 Click Speaker Configuration then click on the left selection bar and select 2CH Speake...

Страница 69: ...In Line Out Line In STEP 2 Following installation of the audio driver you find a icon a Sound Effect icon on the lower right hand taskbar Click the icon to select the function STEP 3 Click Speaker Configuration and select the UAJ Function Then click on the left selection bar and select 4CH Speaker to complete 4 channel audio configuration ...

Страница 70: ...ubwoofer channels to MIC In Basic 6 Channel Analog Audio Output Mode STEP 2 Following installation of the audio driver you find a icon a Sound Effect icon on the lower right hand taskbar Click the icon to select the function Line Out Line In MIC In STEP 3 Click Speaker Configuration and select the UAJ Function Then click on the left selection bar and select 6CH Speaker to complete 6 channel audio ...

Страница 71: ...s R L surround center subwoofer output and rear surround STEP 2 Connect the Surround Kit to the SUR_CEN connector located on the motherboard STEP 3 There are two methods of 8 channel audio configuration Method 1 Connect the front channels to the LINE OUT port located on the audio panel and the rear chan nels to the Surround Kit REAR R L port Con nect the center subwoofer channels to the Sur round ...

Страница 72: ... on the left selection bar and select 8CH Speaker to complete 8 channel audio configuration Sound Effect Configuration At the sound effect menu users can adjust sound option settings as desired Method 2 Connect the front channels to the LINE OUT port located on the audio panel and the rear chan nels to the LINE IN port Connect the center subwoofer channels to the MIC IN port located on the audio p...

Страница 73: ...t device to the rear bracket of PC and fix it with screw 2 Connect SPDIF device to the motherboard A SPDIF output device is available on the motherboard Cable withrearbracketis provided andcould link to the SPDIFoutput connector As picture For the further linkage to decoder rear bracketprovides coaxialcableandFiber connectingport ...

Страница 74: ...to Line In jack speakers ear phone or others output devices to Line Out jack and microphone to MIC In jack Jack Sensing includes 2 parts AUTO and MANUAL Following is an example for 2 channels Windows XP Auto detecting Jack Sensingprovidesaudioconnectorserror detectionfunction Please connect the devices to the right jacks as above A window will appear as right pic ture if you setup the devices prop...

Страница 75: ... right picture UAJ Introduction UAJ Universal Audio Jack has a very smart feature It will switch signal automatically when user plugs his audio device to the wrong jack Line in Line out That means users do not need to worry the audio device should be plug in Line in or Line out jack the device will work perfectly after UAJ is activated You can click UAJ Automatic button to enable UAJ function Enab...

Страница 76: ...toreturnbootmanagerto NTFS format Howto use the Xpress Recovery 1 Boot from CD ROM BMP Mode Enterthe BIOS menu select Advanced BIOS Feature and setto bootfrom CD ROM Insertthe provided driverCDinto your CD drive then save and exitthe BIOS menu Once the computer has restarted thephrase BootfromCD willappearatthebottomleft handcornerofthescreen When Boot from CD appears press any keyto enterXpress R...

Страница 77: ...tis recommended thatXpress Recoverybe immediatelyinstalled afterOS andall required driverandsoftware installationsarecomplete Award ModularBIOS v6 00 PG An Energy Star Ally Copyright C 1984 2002 Award Software Inc Intel865PE AGPSetBIOSfor 8IPE1000MTF1 CheckSystemHealth OK PressDEL to enter SETUP Q Flash F9 ForXpressRecovery 08 16 2002 I845GE 6A69YG01C 00 F9 ForXpress Recovery XpressRecoveryV1 0 C ...

Страница 78: ...r system back to factory default or press Esc to exit Restoresbackupimagetooriginalstate 3 Remove Backup Image Remove backup image Are you sure Y N Removethebackupimage 4 Set Password Please input a 4 16 character long password a z or 0 9 or press Esc to exit You canseta password to enterXpress Recoveryto protectyourharddisk data Once thisisdone password inputwillbe required toenterXpressRecovery ...

Страница 79: ...age shows the drivers that need to be installed for the system Click each item to install the driver manually or switch to the to install the drivers automatically Massage Some device drivers will restart your system automatically After restarting your system the Xpress Install will continue to install other drivers The Xpress Install uses the Click and Go technology to install the drivers automat...

Страница 80: ...Driver For Intel R ICH ICH2 ICH4 ICH5 AC97 audio n Intel USB 2 0 Driver It is recommended that you use the Microsoft Windows update for the most updated driver Item Description Driver install finished you have to reboot system For USB2 0 driver support under Windows XP operating system please use Windows Service Pack After install Windows Service Pack it will show a question mark in Universal Seri...

Страница 81: ...ws based utility which is used to browse the DMI SMBIOS information of the system n Face Wizard New utility for adding BIOS logo n BIOS Gigabyte windows flash BIOS utility n Acrobat e Book Useful utility from Adobe n Acrobat Reader Popular utility from Adobe for reading PDF file format documents n Norton Internet Security NIS Integrated utility which includes anti virus ad control etc n DirectX 9 ...

Страница 82: ...rd English SOFTWARE INFORMATION This page list the contects of softwares and drivers in this CD title HARDWARE INFORMATION This page lists all device you have for this motherboard CONTACT US Please see the last page for details ...

Страница 83: ...tall RAID and ATA drivers under Win 2000 and XP on boards that support RAID function after I connect the boot HDD to IDE3 or IDE4 Answer First of all you need to save some files in the CD ROM to a floppy disk before installing drivers You also need to gothrough some rather different steps in the installation process Therefore we suggest that you refer to the installation steps in the RAID manual a...

Страница 84: ... user manual and check whether you have connected any cable that is not provided with the motherboard package to the USB Over Current pin in the Front USB Panel If the cable is your own cable please remove it from this pin and do not connect any of your own cables to it Question 10 Sometimes I hear different continuous beeps from computer after system boots up What do these beeps usually stand for...

Страница 85: ...mode Answer Please set in the BIOS as follow 1 Advanced BIOS features SATA RAID SCSI boot order SATA 2 Advanced BIOS features First boot device SCSI 3 Integrated Peripherals Onboard H W ATA RAID enable Then it depends on the RAID mode that you need to set RAID to RAID mode or ATA to normal ATA mode in the item named RAID controller function Question 12 How to set in the BIOS to bootup from the IDE...

Страница 86: ...eed frequency ratio voltage and etc are set properly Failure has been excluded Check if the CPU cooling fan attached to CPU properly ls CPU cooling fan power connected to CPU_FAN properly Plug the CPU cooling fan power in the CPU fan connector Plug in the AC power connector Check if the memory install properly into the DIMM slot Yes No Yes Insert and push the memory module vertically into the DIMM...

Страница 87: ...m tw The appropriate response will be provided ASAP Is memory LED on and CPU fan running The problem could be caused by power supply CPU memory or CPU memory socket itself Check if there is display Perhaps your VGA card VGA slot or monitor is defective Turn off the system Reboot after keyboard and mouse have been plugged in Check if keyboard is working properly It is possible that your keyboard or...

Страница 88: ... Phone No Contact Person E mail Add Model name Lot Number PCB revision BIOS version O S A S Hardware Mfs Model name Size Driver Utility Configuration CPU Memory Brand Video Card Audio Card HDD CD ROM DVD ROM Modem Network AMR CNR Keyboard Mouse Power supply Other Device Problem Description ...

Страница 89: ...ation and Networking Riser DMA Direct Memory Access DMI Desktop Management Interface DIMM Dual Inline Memory Module DRM Dual Retention Mechanism DRAM Dynamic Random Access Memory DDR Double Data Rate ECP Extended Capabilities Port ESCD Extended System Configuration Data ECC Error Checking and Correcting EMC Electromagnetic Compatibility EPP Enhanced Parallel Port ESD Electrostatic Discharge FDD Fl...

Страница 90: ...ing Diode MHz Megahertz MIDI Musical Instrument Digital Interface MTH Memory Translator Hub MPT Memory Protocol Translator NIC Network Interface Card OS Operating System OEM Original Equipment Manufacturer PAC PCI A G P Controller POST Power On Self Test PCI Peripheral Component Interconnect RIMM Rambus in line Memory Module SCI Special Circumstance Instructions SECC Single Edge Contact Cartridge ...

Страница 91: ... 87 English Memo ...

Страница 92: ... 88 GA 8I865P G Motherboard English ...

Страница 93: ... 89 English Memo ...

Страница 94: ... 90 GA 8I865P G Motherboard English ...

Страница 95: ... 91 English Memo ...

Страница 96: ...0 Fax 44 1908 362709 Tech Support http uk giga byte com TechSupport ServiceCenter htm Non Tech Support Sales Marketing issues http ggts gigabyte com tw nontech asp Website http uk giga byte com The Netherlands Giga Byte Technology B V Address Verdunplein 8 5627 SZ Eindhoven The Netherlands Tel 31 40 290 2088 NLTech Support 0900 GIGABYTE 0900 44422983 0 2 M BE Tech Support 0900 84034 0 4 M Fax 31 4...

Отзывы: