


- 47 -
BIOS Setup
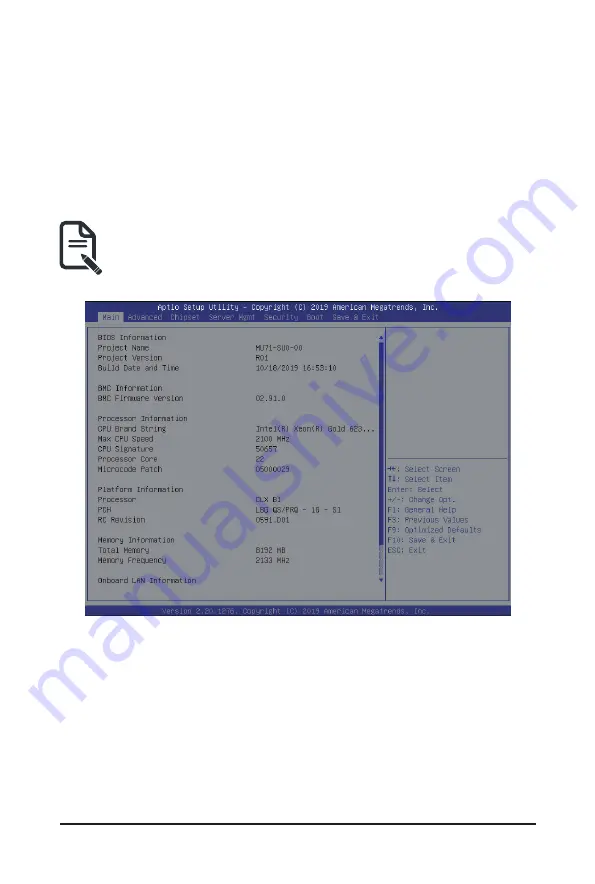
5-1 The Main Menu
Once you enter the BIOS Setup program, the Main Menu (as shown below) appears on the screen. Use
arrow keys to move among the items and press <Enter> to accept or enter other sub-menu.
Main Menu Help
The on-screen description of a highlighted setup option is displayed on the bottom line of the Main Menu.
Submenu Help
While in a submenu, press <F1> to display a help screen (General Help) of function keys available for the
menu. Press <Esc> to exit the help screen. Help for each item is in the Item Help block on the right side of
the submenu.
• When the system is not stable as usual, select the
Restore Defaults
item to set your system to
its defaults.
• The BIOS Setup menus described in this chapter are for reference only and may differ by BIOS
version.
Содержание E251-U70
Страница 1: ...E251 U70 E251 U71 Edge Server 2U Intel Xeon Scalable server system User Manual Rev 1 0 ...
Страница 10: ... 10 This page intentionally left blank ...
Страница 15: ... 15 Hardware Installation 1 3 System Block Diagram ...
Страница 16: ...Hardware Installation 16 This page intentionally left blank ...
Страница 28: ...System Hardware Installation 24 1 2 4 3 ...
Страница 37: ... 23 System Hardware Installation HDD Backplane Board Signal Cable HDD Backplane Board Power Cable ...
Страница 38: ...System Hardware Installation 24 12V Power Cable CPU Power Cable ...
Страница 39: ... 23 System Hardware Installation GPU Card Power Cable RIser Card Power Cable ...
Страница 40: ...System Hardware Installation 24 SlimLine to Mini SAS HD Cable CH02 CH01 JP02 SlimLine SAS Cable CB1 ...
Страница 44: ...Motherboard Components 44 This page left intentionally blankThis ...
Страница 64: ...BIOS Setup 64 5 2 11 Intel R I210 Gigabit Network Connection ...
Страница 66: ...BIOS Setup 66 5 2 12 VLAN Configuration ...
Страница 73: ... 73 BIOS Setup 5 3 3 UPI Configuration ...