background image


21 


3-1-8.    Settings Menu 


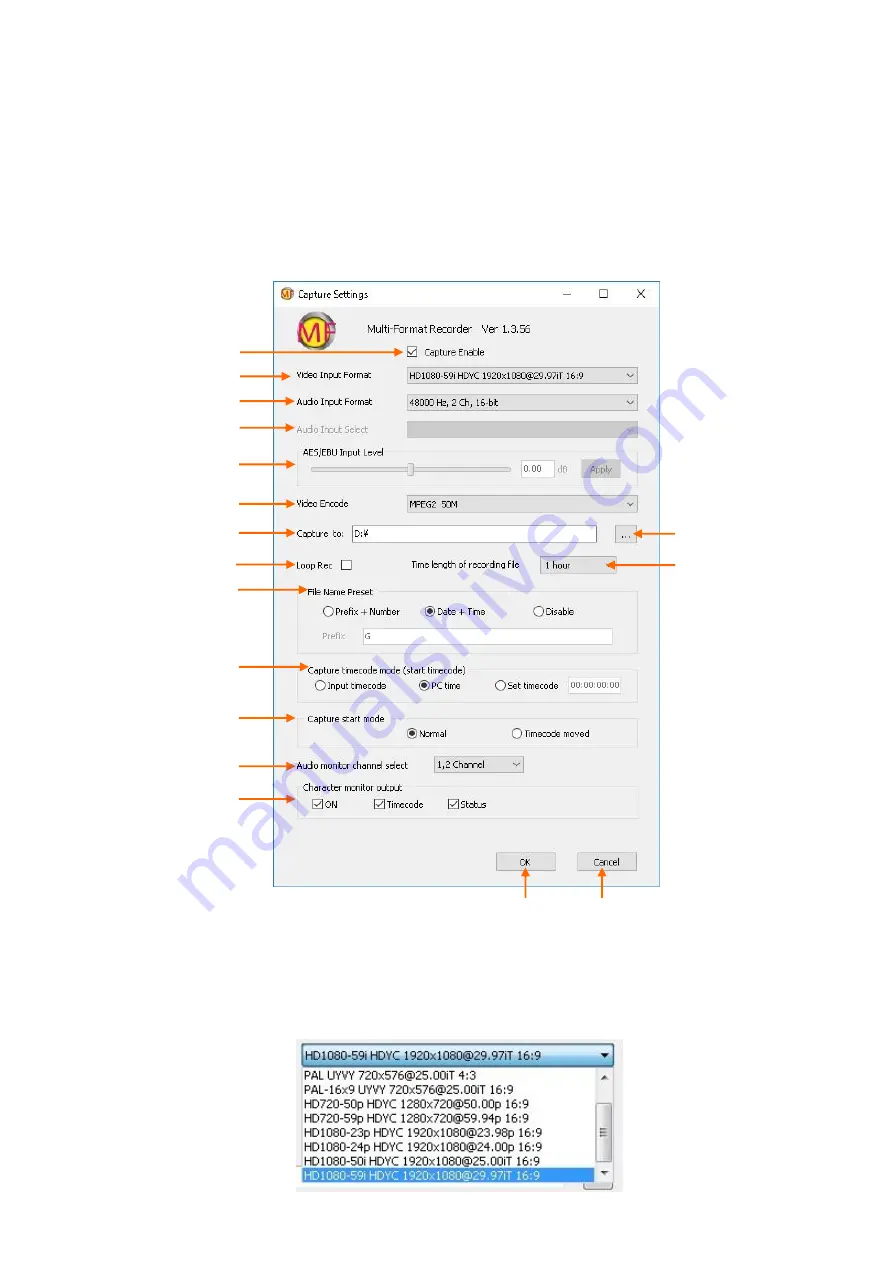
3-1-8-1 Capture Settings menu 


You cannot open this menu during record mode. You should stop recording to open this 

menu. 


Capture Enable:


Puts check mark when you use Capture control part. If you remove the 

check, only playback part can be displayed and used.   


Video Input Format:


Selects a video input format. 


Содержание MFPR-3100

Страница 1: ...Multi format Video Server MFPR 3100 INSTRUCTION MANUAL REV 1 1 ...

Страница 2: ...he power code To avoid electric shock the grounding conductor must be connected to earth ground Before connecting the input or output cables ensure that the product is properly grounded Do Not Operate Without Covers To avoid electric shock or fire hazard do not operate this product with covers or panels removed Do Not Operate in Wet Conditions To avoid electric shock do not operate this product in...

Страница 3: ...uring operation Do Not Operate with Suspected Failures If you suspect there is damage to this product have it inspected by qualified service personnel Repair and Maintenance Only qualified service personnel should perform repairs and maintenances Contact the sales office in those cases Recommended Replacement Period The following parts of this product are recommended to replace within the specifie...

Страница 4: ...l part details 15 3 1 3 Material List part details 16 3 1 4 Monitor OUT Switching and Setting Status part details 17 3 1 5 Recorder control part 18 3 1 6 Clip Edit part details 19 3 1 7 Clip list part details 20 3 1 8 Settings Menu 21 3 1 9 Files menu 26 3 1 10 Loading Material files from the Explorer 28 3 2 Operating the Simultaneous RECORD PLAY 29 3 2 1 Preparations 29 3 2 2 Start Recording 29 3...

Страница 5: ... 4 9 pin Compatible VTR control command format 41 4 2 5 Disk Control Protocol Command Format 42 4 2 6 Communication Protocol 43 4 2 7 Command List 44 4 3 RS 422 Remote Controller OPTION 45 4 3 1 Outline 45 4 3 2 Architecture of the serial transmission data 47 4 3 3 Command Format 47 4 3 4 Connector Pin Assignment エラー ブックマークが定義されていません 4 3 5 Communication Protocol 49 4 3 6 RS 422A Command List 50 5 ...

Страница 6: ...two playback machines of the linear editing system by connecting through the two RS 422 remote connectors option Also you can control this machine through Ethernet connection with UDP protocol Almost all file formats can be played back like MXF MOV and MPEG2 TS etc Features Independent one record channel and two playback channels Endless LOOP recording mode Motion JPEG MPEG2 MXF OP1a HD422 MOV DNx...

Страница 7: ...nnels to be recorded The following table shows typical examples that are the TV standard of 1080i 59 94 the encoding scheme of MPEG2 LONG GOP 20Mbps MJPEG INTRA and MXF HD422 50Mbps The audio is uncompressed PCM 8 channels NOTE MJPEG is VBR variable bit rate so the output data rate changes due to the input picture complexity In a result the recording time changes TV standard Encoding Recording tim...

Страница 8: ... and the rear of this product 1 2 Assurance of Mains Voltage Assure that the mains AC voltage to this product is within the range of 90 264V 50 60 Hz 1 3 Connection of Power Cable and Power ON The power cable must be connected properly to the AC IN connector on the rear panel In default the system automatically power on by connecting the AC power Also the system power is fed by pushing the front p...

Страница 9: ...een LED is lit or blinked when the system accesses the SSDs NIC indicator The orange LED is lit or blinked when there is a network access USB 2 0 connector These connectors can be used to connect a MOUSE a KEYBOARD or memory devices It conforms to the USB2 0 specification and the maximum transfer rate is 480 Mbps Head phone jack 3 5 mm head phone can be connected USB3 0 connector This connector ca...

Страница 10: ...wer The voltage range is within 90 264V 50 60Hz RS 422 A and RS 422 B OPTION This D Sub 9 pin female connector is for the RS 422 Remote control by editors or slow motion controllers is possible by using RS 422 SONY protocol Two connectors are responsible for controlling Recorder and Player CH A The assignment of connectors can be changed to Player CH A and Player CH B if needed USB3 0 connectorx2 ...

Страница 11: ...output INPUT OUT A or OUT B This output can be used as second Line out when the characters removed REF IN connector This connector is the EXTERNAL REFERENCE INPUT Tri level HDTV sync or BB can be connected as a GEN LOCK source The reference signal must be needed for synchronizing the OUT A and OUT B NOTE 1 The reference signal of the same TV standard for the video signal must be connected 2 The ex...

Страница 12: ...d in the MFPR 3100 This section explains the usage of this utility software Please connect the PC monitor mouse and keyboard to the MFPR 3100 if necessary Another choice is a remote control from external PC using the Windows REMOTE DESKTOP feature via the LAN connection ...

Страница 13: ... Material list part Shows list of the material files to be played back Playback Preview part Monitors playback video audio and time code of CH A and CH B Deck control part Controls playback mode playback direction and speed Clip edit part Making clips by designating IN point OUT point and clip name Clip list or Play list part Shows list of the clips to be played back Files menu Menu for adding del...

Страница 14: ... contents quickly by dragging the button Selected list Indicates which list is selected for playback Material Clip list or Playlist Time Code Shows current time code value in the playback file File Start Shows the start time code of the file or clip Duration Shows duration length of the file or clip File End Shows the end time code of the file or clip Audio mute check box Muting audio output ...

Страница 15: ...e by each click FF button Runs forward direction with maximum speed STOP button Releases the playback mode PLAY button Starts normal playback x1 speed Variable Speed bar Selects variable speeds TC input field for search Types time code value for GOTO function Stop mode Selects the output during the STOP mode PB Playback picture sound and timecode are output EE INPUT picture sound and timecode are ...

Страница 16: ...ial list that is previously saved The extension of the saved material list is glm Save button Saves current material list for future use Remove button Removes the selected file from the material list The file itself on the storage device SSD is not deleted by this procedure Channel selection button Decides which channels the selected file will be loaded There are two selections Ch A and Ch B In th...

Страница 17: ... Indicates current setting mode Operation mode Indicates selected operation mode Single file or Playlist Playback mode Indicates playback mode Normal or Repeat If the Pause is selected in the Playlist mode the indication changes to Pause END or Pause NEXT Capture mode Indicates the capture mode LOOP or Normal Gen Lock Indicates the Gen lock condition If locked indication is stable green color The ...

Страница 18: ...terminated REC STOP button Stops recording mode Time Code Indicates the current Timecode value The time code to be used can be selected in the Capture Settings menu One of the Input TC PC Time or Preset can be selected REC button Starts recording Directory Indicates directory path that the recording file is stored This directory can be changed in the Capture Settings menu File Name Indicates the n...

Страница 19: ... current time code on the recording side to the IN point P Mark In Injects the current time code on the playback side to the IN point R Mark Out Injects the current time code on the recording side to the OUT point P Mark Out Injects the current time code on the playback side to the OUT point Reset Resets the IN point and the OUT point of the clip The TC values of the IN point and OUT point changes...

Страница 20: ...s the saved Clip list or Play list After clicking dialog like Explorer opens Selects the file The file extension is glp and click OPEN Save button Saves contents of the current Clip list or the Playlist After clicking dialog like Explorer opens Selects the folder and put the file name then click the SAVE button Up button Moves the selected clip upward You can use drag and drop also Down button Mov...

Страница 21: ...ot open this menu during record mode You should stop recording to open this menu Capture Enable Puts check mark when you use Capture control part If you remove the check only playback part can be displayed and used Video Input Format Selects a video input format ...

Страница 22: ...x Number The word which is typed in the window plus numbering becomes the file name Date Time The current date and time becomes the file name Disable You can type a file name on the Capture part of GUI Capture Timecode Mode Selects time code source to be used for the recording file ます Input Timecode Use the input time code embedded in the SDI signal Caution Do not select the Input TC if the LTC or...

Страница 23: ...deo Output Format Selects video format to be output from SDI connector CAUTION You should stop the playback for changing the output format Audio Output Format This menu is not available The audio output format is fixed to the default of AUTO Not Specified ...

Страница 24: ...er insertion Timecode Timecode can be displayed Status Deck status REC PLAY STOP etc can be displayed MJPEG interlace mode Selects interlace mode when playback the Motion JPEG file The default mode is the TOP but there is a case that the ODD EVEN relationship becomes abnormal for some MJPEG files In this case you can select the other mode Audio monitor channel select Selects channel pair 1 2 3 4 5...

Страница 25: ...yback plural clips continuously The original Timecode value is used when the check box is empty The continuous time code from 00 00 00 00 is applied for plural clips when the box is checked Pause Selects the playback mode of the Playlist OFF Playbacks all clips seamlessly Next Stops at the beginning of the next clip after playing back the previous clip End Stops at the end of the clip ...

Страница 26: ...2 Loading material list This menu readouts the saved Material list After clicking dialog like Explorer opens Selects the file The file extension is glm and click OPEN button This menu is equivalent to the Load button of the Material list 3 1 9 3 Save the material list This menu saves contents of the current Material list After clicking dialog like Explorer opens Selects the folder and put the file...

Страница 27: ...f the Clip list or Playlist 3 1 9 6 Save the play list This menu saves contents of the current Clip list or Playlist After clicking dialog like Explorer opens Selects the folder and put the file name then click the SAVE button This menu is equivalent to the Save button of the Clip list 3 1 9 7 Clear play list Clicking this menu clears all clips on the Clip list or Playlist 3 1 9 8 Exit Clicking th...

Страница 28: ...By clicking the Explorer icon the Explorer dialog opens Open the folder that includes recorded files the default is D drive Select the file you want to load then Drag and Drop the file to the material list part You can select plural files by using the Shift key or the Ctrl key Drag and Drop Explorer dialog Selected files Material list ...

Страница 29: ...l 2 Connect the SDI OUT on the rear panel to the external equipment like HD monitor 3 Connect HDMI OUT on the rear panel to the PC monitor 4 Connect MOUSE and KEYBOARD to the USB connector on the front panel or rear panel 5 Open settings menu and select Capture settings Set desirable settings Refer to the 3 1 8 1 paragraph for details CAUTION Do not select the encoding mode of ProRes422 for the Si...

Страница 30: ... RS 422 4 The new file is added on the Material list and loaded to the CH A Playback part automatically Now you can start playback of the CH A Simultaneous RECORD PLAY CAUTION 1 If there is no input signal on the SDI input the No video input message is displayed on the preview monitor and this signal is recorded during the recording 2 The possible maximum recording time is 19 hours If the duration...

Страница 31: ... A or B 3 On the Material list double click the desirable file to be playback 4 Click PLAY button or push the SPACE key for starting playback 5 For stopping click the STOP button or push the SPACE key again You can change the playback mode to FF REW VARIABLE by manipulating the Deck control buttons Please refer to the paragraph 3 1 2 for more information Added files Thumbnail picture ...

Страница 32: ...oint timecode box 5 As the same manner pause at the scene that you want to set as the OUT point 6 Click the P Mark Out button to take the timecode value for the OUT point You can also directly type the timecode value in the OUT point timecode box If the Time code value of the OUT point is smaller than the IN point value the character color becomes red and the clip edit is prohibited 7 By clicking ...

Страница 33: ... OUT point Click the R Mark Out button to take the timecode value for the OUT point You can also directly type the timecode value in the OUT point timecode box 4 By clicking the Goto In button or the Goto Out button you can cue up to the IN point or the OUT point respectively 5 By clicking the Prev button you can preview the clip playback from the IN point to the OUT point When the Repeat is set o...

Страница 34: ... the clips on the Clip list to enable the play back from the Clip list For example the clip marked shows the clip selected by double click 2 Select the clip that you want to playback by the Page Up key or the Page Down key The starting picture is displayed on the preview screen by this action Double click the Clip is equivalent 3 Push the SPACE key for playback or stop It works alternately ...

Страница 35: ... command at the end of the current clip 4 Check the Override timecode box for continuous time code count from 00 00 00 00 If you prefer to use original time code value Uncheck the box Please note that the time code value changes clip by clip in this case 5 When just after registering clips in the paragraph 3 3 you can make playback at once If Playlists are saved recall the playlist referring to th...

Страница 36: ...hat you want to start 8 Click the PLAY button or push the Space key to start the sequence playback CAUTION The sequence playback will not be smooth when you use the clips from low speed external devices Registered clips Starting clip ...

Страница 37: ...lip list 2 Click the Clip Export button 3 A dialog like Explorer opens Choose the directory and put the file name then click the Save button The clip export starts and an orange color indicator on the Status Indicator part blinks during export You should keep waiting until the orange blinking stops Clip Export button Clip list part ...

Страница 38: ...te Time and the Capture timecode mode changes to the PC Time automatically 3 Select the Time length of recording file from 5 min 10 min 30 min or 1 hour The recording file is automatically switched and divided with this duration time value CAUTION In case that you are using the small capacity recording media less than 1TB don t select 30 min or 1 hour The loop recording accidentally stops at the e...

Страница 39: ... Click the Tab at the Video Output Format to observe the output TV standards 3 Select the TV standard that you want to output 4 Click the OK button to close the settings dialog CAUTION If converting to the TV standard with different field frequency it will be lost smooth picture movement 3 7 Deleting Files Use Explorer for deleting files This application does not have the delete function Tab ...

Страница 40: ... To terminate the Remote Desktop Connection You must execute the following procedure 1 Change the size of GUI on the Host MFPR 3100 to smaller size and observe the Desktop 2 Click the rdtexit icon on the top left of the Desktop then right click this icon 3 On the context menu click the Run as administrator The Remote Desktop connection will end rdtexit icon ...

Страница 41: ...mmand format Communication between control systems and this product uses the following command telegram format CMD 1 Data count CMD 2 and data checksum CHECKSUM If Data count is zero no data is transmitted If it is not zero the data corresponding to the existing values are inserted between CMD2 and CHECKSUM CMD 1 Data length CMD 2 DATA 1 DATA N N 15max CHECKSUM CMD 1 CMD 1 assigns the command to t...

Страница 42: ...the data corresponding to the existing values are inserted between CMD2 and CHECKSUM 0x3E Data length CMD 1 CMD 2 DATA1 DATA N N Max255 CHECKSUM CMD 1 CMD 1 assigns the command to the following main function groups that serve to define the function and the transfer direction of the data words that follows CMD 1 Function Transfer Direction Controller Recorder 0x32 System control 0x33 System control...

Страница 43: ...d a corresponding response to the previous command The control system must not interrupt the transmission of a command for more than 10 ms As soon as the recorder detected such a break longer than 10 ms it proceeds with a time out error sequence The recorder ignores the command received and transmits a NAK time out As soon as the recorder receives a command from the control system it sends a retur...

Страница 44: ...1 PLAY 10 01 3E 00 34 02 REC 10 01 3E 00 34 04 STANDBY OFF 10 01 3E 00 34 05 STANDBY ON 10 01 3E 00 34 10 FAST FWD 10 01 3E 01 34 11 JOG FWD Speed 10 01 3E 01 34 12 VAR FWD Speed 10 01 3E 01 34 13 SHUTTLE FWD Speed 10 01 3E 00 34 14 STEP FWD 10 01 3E 00 34 20 REWIND 10 01 3E 01 34 21 JOG REV Speed 10 01 3E 01 34 22 VAR RVS Speed 10 01 3E 01 34 23 SHUTTLE REV Speed 10 01 3E 00 34 24 STEP REV 10 01 ...

Страница 45: ...otocol Most of controllers with the same control protocol can remotely control this product Default Configuration For achieving the Simultaneous RECORD PLAY function from the remote controllers two RS 422 connectors are assigned as RS 422 A Recorder port Only REC command and REC STOP command are valid RS 422 B Player port All commands excluding REC and REC STOP are valid ...

Страница 46: ...f the connectors The pin assignment of the D SUB 9 pin female connector is shown below Pin number Signal 1 GND 2 TX A 3 RX B 4 GND 5 NC 6 GND 7 TX B D SUB 9 pin 8 RX A Female 9 GND The A and B is defined as follows B A 1 5 6 9 ...

Страница 47: ...gram format CMD 1 Data count CMD 2 and data checksum CHECKSUM If Data count is zero no data is transmitted If it is not zero the data corresponding to the existing values are inserted between CMD2 and CHECKSUM CMD 1 Data count CMD 2 DATA 1 DATA N N 15max CHECKSUM CMD 1 CMD 1 assigns the command to the following main function groups that serve to define the function and the transfer direction of th...

Страница 48: ...pecific command to the recorder or the command return message from the recorder respectively DATA The number of data words and their contents are defined by the CMD2 command CHECKSUM The sum of the data D0 D7 contained in each data word from CDM 1 DATA COUNT to the last data word before the checksum ...

Страница 49: ...d a corresponding response to the previous command The control system must not interrupt the transmission of a command for more than 10 ms As soon as the recorder detected such a break longer than 10 ms it proceeds with a time out error sequence The recorder ignores the command received and transmits a NAK time out As soon as the recorder receives a command from the control system it sends a retur...

Страница 50: ...1 20 20 REWIND Max speed reverse 10 01 21 21 JOG REV Slow motion 10 01 1 2 22 21 JOG REV high reso Slow motion 10 01 1 4 21 22 VAR RVS Variable 10 01 1 2 22 22 VAR REV high reso Variable 10 01 1 4 21 23 SHUTTLE REV 10 01 2 22 23 SHUTTLE REV high reso 10 01 4 20 24 STEP REV Field step 10 01 20 30 PREROLL Cue up 10 01 5 24 31 CUE UP WITH DATA TC search 10 01 5 6 20 40 PREVIEW Edit simulation 10 01 8...

Страница 51: ...01 40 25 OUT RECALL Recall OUT point 10 01 41 30 EDIT PRESET 10 01 13 42 30 EDIT PRESET high r 10 01 13 44 31 PREROLL TIME PRESET Set pre roll time 10 01 6 41 32 TAPE AUTO SELECT Select automatic EE 10 01 14 41 33 REF SELECT Select reference signal 10 01 15 41 3A EDIT FIELD SELECT Select field as edit point 10 01 16 41 3B FREEZE MODE SELECT 10 01 17 40 40 AUTO MODE OFF 10 01 40 41 AUTO MODE ON 10 ...

Страница 52: ... calculate the tape speed refer to the foot note 2 5 The parking accuracy is 0 frame 6 The time code data consists of four bytes coded BCD Binary coded decimal Data 1 Frames Data 2 Seconds Data 3 Minutes Data 4 Hours 8 The time base for this operation can be set with the TAPE CODE SELECT command 9 This operation is done with the selected tracks and the record mode of the EDIT PRESET command 10 The...

Страница 53: ...s locally selected 15 The REFERENCE SELECT data is defined as 01h PB EXT REF 02h INPUT VIDEO FFh as locally selected 16 The EDIT FIELD SELECT data is defined as 00h edit starts every field depending on a receipt of edit command 01h edit starts in field 1 02h edit starts in field 2 FFh as selected locally 17 The FREEZE MODE SELECT data is defined as 00h Field freeze 11h Frame freeze 18 The TC GENE ...

Страница 54: ...bit 74h 15h 4 bytes User bit 11h Request Time code User bit 78h 04h 8 bytes BCD Time code User bit 20 There is a field ID in the time code data 60Hz DATA2 50Hz DATA4 Field MSB MSB Selection 0 0 Field 1 1 1 Field 2 21 There is a DROP FRAME ID in the time code data DATA 1 Drop Frame Bit 6 0 OFF 1 ON ...

Страница 55: ...ORD Bit 2 FAST FWD Bit 3 REWIND Bit 5 STOP Bit 7 STANDBY Byte 2 Bit 0 CUE UP Bit 1 STILL Bit 2 DIRECTION Bit 3 VAR Bit 4 JOG Bit 5 SHUTTLE Bit 7 SERVO LOCK Byte 3 Bit 0 IN DATA SET Bit 1 OUT DATA SET Bit 6 FREEZE Bit 7 AUTO MODE Byte 4 Bit 0 PREROLL Bit 1 PREVIEW Bit 2 AUTO EDIT Bit 3 REVIEW Bit 4 EDIT Bit 6 FULL EE ON Bit 7 SELECT EE ON Byte 5 Bit 0 A1 Bit 1 A2 Bit 2 A3 Bit 3 A4 Bit 4 VIDEO Bit 5...

Страница 56: ...emperature increases resulting malfunctions and failure Please make a cleaning 1 Clean with a vacuum cleaner at the air intake below 2 Clean with a vacuum cleaner at the air exhaust port below 5 2 In case of failure When there is something wrong with the operation of the unit please ask for the service window Air Intake part Exhaust port Exhaust port ...

Страница 57: ...1 2 4 10 20 40 When moving rev direction by the L key decelerates gradually to zero speed then accelerate to forward To use this Scrub mode you must press the K key to enter the variable mode key Frame advance Each time you press advances one frame key Frame rewind Each time you press rewinds one frame key Moves to the start point of the file or the clip key Moves to the end point of the file or t...

Страница 58: ...key Reverse x 2 speed Ctrl 6 key Reverse x 4 speed Ctrl 7 key Reverse x 10 speed Ctrl 8 key Reverse x 20 speed Ctrl 9 key Reverse x 40 speed F3 Clip Reset F4 Clip Add Set F5 Rewind S Stop P Play F7 Pause F9 FF F10 GOTO IN F11 GOTO OUT Shift F10 MARK IN Shift F11 MARK OUT ...

Отзывы: