background image

TR610 User's Manual

22

© 2010 GIGA-TMS Inc.

3.1

Web-based Setup and Administration

To access the web-based menu system, run a web browser (Internet Explorer or Mozilla Firefox), and
enter the terminal's IP in the Address Bar . 

To find the terminal's IP address, look at the terminal itself as it boots (you may need to
disconnect and reconnect the power right when you're by the terminal) and note the IP
address listed in the 

startup information screen

.

Once you've accessed the terminal's IP address, you should get the following screen:

By default, there is no password. Just click  Login. You can configure a password once you've logged in.

Once you log in, you'll see the administration interface:

13

Содержание PROMAG TR610

Страница 1: ...trademarks of the respective owners The publisher and the author make no claim to these trademarks While every precaution has been taken in the preparation of this document the publisher and the author assume no responsibility for errors or omissions or for damages resulting from the use of information contained in this document or from the use of programs and source code that may accompany it In ...

Страница 2: ...istration 24 Settings 25 General 26 Network 27 AggreGate 28 Date Time 29 Event Log 29 Search 30 Download 31 Clear 31 White list 32 Search 32 Add Users 33 Download 33 Upload 34 Clear 34 Device Operations 34 Reboot 35 Initializesettings 35 FormatDisk 35 Log Out 36 Device status 37 2 Onscreen Setup and Administration 38 Text Entry 40 3 AggreGate Integration 48 4 Configuration Priorities Part IV Refer...

Страница 3: ...3 Contents 3 2010 GIGA TMS Inc 63 4 Event Log File Format 64 5 I O Connector Pin Assignment Cable Wiring 66 6 Time Zones 68 7 Specifications 69 8 Update History ...

Страница 4: ...Part I ...

Страница 5: ...ent log may be viewed searched and downloaded Since the TR610 has a built in web administration interface web admin it does not require any additional software to administer Alternatively for larger systems with multiple terminals you could use TibboAggreGate software as an administrative back end To keep time and date precise the TR610 can automatically synchronize the internal clock with an Inte...

Страница 6: ...be configured Internal backup battery for the real time clock Firmware may be upgraded through the network or serial port Built in web administration interface web admin IP address configuration using DHCP Time Date synchronization through SNTP time zone can be preset Works with Tibbo AggreGate Internal application written in Tibbo BASIC and may be changed or customized Keeps time accurate for up ...

Страница 7: ...Part II ...

Страница 8: ...For the First Time Shows you what to expect when you turn the device on for the first time Setting a New IP Address Goes over setting an IP address for the device Time Synchronization Shows how to set up time synchronization with a time server Working in the Normal Mode Provides an overview of normal use of the device You can let your users read this topic if they have any questions about operatin...

Страница 9: ...ut of the box The kit should include the following TR610Terminal 12V Power Adaptor Two mounting screws Two screw anchors for drilling into the wall One Allen type hexagonal screwdriver CD with manual and software 2 If mounting on a wall Drive the two provided mounting screws into the wall 9 5cm apart using the provided screw anchors as needed These should fit the terminal s mounting holes ...

Страница 10: ...e front of the cover 4 Carefully flip the top cover up by holding the metal base of the terminal and pulling up the edge from which you removed the screws Note The top does not come off It is connected via a ribbon cable it only flips up 5 With the terminal open locate the Ethernet and power connectors ...

Страница 11: ...the terminal block located next to the power jack For a complete overview of the different parts in the diagram seeI O Connector Pin Assignment Cable Wiring in the Reference section 6 Now route the cables into the terminal and connect them Ethernet and power If mounting on a wall There are two possible ways to route cables into the terminal 64 ...

Страница 12: ...cables are routed on the surface of the wall or using wiring ducts To route the cables through the top cover the two plastic flaps covering the cable holes should be snapped off see drawing B above these are the holes through which the cables go If mounting on a desk Usually method B should be used unless you wish to route the cables through the actual surface of the desk by making a hole 7 Once t...

Страница 13: ...sic device settings as follows ON Owner Name See General Settings DN Device Name See General Settings DHCP Status of IP address configuration through Dynamic Host Configuration Protocol OFF OK or FAIL See Network Settings IP The current IP address of the terminal See Web based Setup and Administration and Network Settings MAC Media Access Control address This is a unique address every Ethernet dev...

Страница 14: ...d up or if it has just been initialized the master card enrollment screen is shown You should now scan the RFID card which you designated as the master card Master Card Confirmation Screen Once you scan the master card you will hear a beep and the following screen will be shown You can now use this card to access the terminal s internal setup menus Keep it in a safe place If you do lose the card y...

Страница 15: ... closely DHCP should say ENABLED and then the IP address of the device will be displayed In case DHCP is disabled perform the following operations to enable it 1 Scan the master card to go into the onscreen setup For a description of the controls in the onscreen setup see Onscreen Setup and Administration 2 Go to Setup Network DHCP and select Enabled 3 Go back in the menu system and select Reboot ...

Страница 16: ...s using the buttons is described here 6 Go back to the Network menu and go to Gateway IP Enter the gateway IP using the same method 7 Finally enter the Netmask using the same method 8 Go back in the menu system and select Reboot in the main menu The device should now reboot and show a screen similar to this As you can see DHCP is off and the IP address you set for the device should appear Testing ...

Страница 17: ...server used is 192 43 244 18 which is the IP address for time nist gov Ordinarily there should be no reason to change the default value Make sure this is the correct value or enter another one if you wish to switch to another SNTP server 3 Go to Setup Date Time Time Zone and select your current time zone relative to UTC GMT you can look for your time zone in the TimeZones section of this manual 4 ...

Страница 18: ...t When the time comes the terminal would connect to the time server configured above and get the correct time Note that DST Daylight Savings Time is not accounted for Thus when the clock shifts to from DST you would have to re configure theTime Zone setting to keep the terminal showing the correct time Manually Setting The Date And Time Sometimes time synchronization may not be needed or possible ...

Страница 19: ...is occupied So two black squares and two white squares for example mean that 50 of the memory space for records is occupied Each button activates a corresponding icon on the screen Ordinary use consists of two steps 1 Hit the correct button if it s not already selected The button s associated action will be displayed at the center of the screen 2 Scan your card The terminal will beep and display t...

Страница 20: ...Part III ...

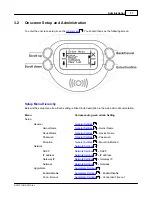
Страница 21: ...ration Explains the web setup system and all device settings Onscreen Setup and Administration Explains the onscreen setup system including how to navigate the menu and enter text and numbers using the four buttons of the device AggreGateIntegration Explains how to connect the TR610 to AggreGate LinkServer Programming Priorities Shows what happens when a programming session is started when another...

Страница 22: ...IP address look at the terminal itself as it boots you may need to disconnect and reconnect the power right when you re by the terminal and note the IP address listed in the startup information screen Once you ve accessed the terminal s IP address you should get the following screen By default there is no password Just click Login You can configure a password once you ve logged in Once you log in ...

Страница 23: ...ure current date time and auto synchronization with a time server EventLog is the ongoing record of users punching in and out using the TR610 Search Find specific records and reviewing the log on the device Download Get a file with the log contents in comma separated format for an external payroll system Clear Delete event log contents White list Controls which users can trigger the device s relay...

Страница 24: ... transaction In that case a small hourglass icon appears next to the H and the onscreen setup appears frozen doesn t respond to user input As soon as the transaction ends the hourglass disappears and you can keep using the terminal normally The web admin will not always be available When the onscreen setup is used and the user is modifying a setting i e editing a listbox or a textbox the web admin...

Страница 25: ...e device account A meaningful name selected for this specific TR610 Also used in AggreGate Password The password used for logging into the web admin andAggreGate Note that the password is not hidden either in the web admin nor in the onscreen setup Mounting method This is the orientation of the device Desktop or Wall It controls the orientation of text on the display White list Enable or disable t...

Страница 26: ... to acquire an IP address using DHCP every few minutes IP address This is the IP address for the TR610 It needs to be manually assigned only if DHCP is disabled With DHCP enabled this field displays the currently assigned address Gateway IP This is the IP address for the gateway connecting the terminal s subnet with a larger network usually the Internet It is used for accessing time servers for au...

Страница 27: ...ration configured here the connection times out This means TR610 ends it and tries to reconnect to AggreGate again It will keep trying to reconnect until a new connection is established This value should be higher than AggreGate s Synchronize period setting for the device so that AggreGate will poll the device often enough for the connection not to time out Server IP This is the IP address of an A...

Страница 28: ... SNTP server Auto synchronization time This option sets the time of day in which automatic synchronization will take place if enabled Time zone When using time synchronization the terminal gets the time in GMT UTC For the time to be correct the time zone for your geographic location must be set You may use the list of TimeZones in the Reference section for this setting Date dd mm yyyy Enter the cu...

Страница 29: ...earching events coming from a specific user Wildcards are not supported the user ID last 8 digits of card number has to be specified in full Event Used for limiting the filter to a specific event type In Out Temp In and Temp Out Date After and Time After Used for finding events which have been recorded after a certain date time You can fill in only part of the data for example put in the date but ...

Страница 30: ... the beginning most recent page of the log or search results Previous Go to the previous page containing newer entries of the log or search results This button is shown only when there is more than one page to display Next Go to the next page containing older entries of the log or search results This button is shown only when there is more than one page to display Bottom Go to the end oldest page ...

Страница 31: ...s can make the electromagnetic lock open and then your user could go through It does not matter whether the user is punching in or out any swipe of the card would activate the relay Also the user s name would appear on screen at that moment Note that not all TR610 users get this functionality by default only those users whom you manually add to the white list Available menu options Search Find a s...

Страница 32: ...oad new users Delete Selected Delete any selected entries Top Go to the beginning most recent page of the log or search results Previous Go to the previous page more recent than this one of the log or search results This button is shown only when there is more than one page to display Next Go to the next page containing older entries of the log or search results This button is shown only when ther...

Страница 33: ...his will mess it up since by default Excel strips all leading zeros So an ID such as 005498FF would become 5498FF on re saving the file and would be considered invalid by the TR610 on upload The solution is to use Notepad or any other text editor 3 1 3 4 Upload This option lets you load the device with a ready made white list This means you can use one white list for several devices or make change...

Страница 34: ... needed for some settings to be applied The message box shown above says that the IP address of the device might change after reboot This can happen if DHCP is being used and the DHCP server decides to assign the terminal a new IP address Of course it will also change if you manually set a new IP address and then reboot the device Once the device starts up try to access it again using the same IP ...

Страница 35: ...tact This operation can be used if new files cannot be created or in case of some other problem using the disk a reformatted disk should work properly once more 3 1 5 Log Out Clicking Log Out in the web admin will end the current session and bring you back to the login screen Note that logout may also occur automatically after a certain period of inactivity This is a security feature meant to prev...

Страница 36: ...Device Name Used mainly in AggreGate DHCP Status Shows if the device got its current IP automatically IP Currently assigned to the device You actually know this if you re seeing it since it is needed to access the web admin MAC The device s Media Access Control address 40 ...

Страница 37: ...ng Setup General General Settings OwnerName General Settings Owner Name DeviceName General Settings Device Name Password General Settings Password Mounting General Settings Mounting Method Network Network Settings DHCP Network Settings DHCP IP address Network Settings IP address Gateway IP Network Settings Gateway IP Netmask Network Settings Netmask AggreGate AggreGate Settings Enable Disable Aggr...

Страница 38: ...Date Time Settings Time White list White list Enable Disable General Settings White list Enable Disable Edit W L White list editing slightly different interface than web admin Clear W L White list Clear Initialize Initialize Reboot Reboot Clear Log Event Log Clear Log 3 2 1 Text Entry Some menu options require you to enter numbers IP addresses or even strings Owner Device Name It is recommended to...

Страница 39: ... character position Top left push and hold Move to previous character position Bottom left quick push Enter next character a then b then c etc Bottom left push and hold Enter previous character c then b then a Top right Abort exit without saving string Bottom right Save string and exit ...

Страница 40: ...greGate it will continuously transmit log events to AggreGate as they are generated You can read more about AggreGate Time and Attendance at http aggregate tibbo com solutions time attendance html and look at its detailed technical documentation at http aggregate tibbo com docs time_and_attendance htm Working with AggreGate falls outside the scope of this manual It is an extensive complex system w...

Страница 41: ... Client to LinkServer This is usually really simple if you re running both on the same computer Just log in to Client with admin as the username and admin as the password and it would detect LinkServer running on the same PC and prompt you to connect to it If that doesn t happen read the topic Workspaces and Server Connections in the AggreGate user manual or ask for help from AggreGate support 7 O...

Страница 42: ... let s see both possible ways to connect your TR610 starting with the simpler one The Easy Way Automatic Discovery If LinkServer and your TR610 are on the same subnet LinkServer should be able to discover the TR610 on its own 1 Click Time Recorders in the Quick Start widget You should get a simple Devices tree ...

Страница 43: ...There s your device The means there is no username or device name configured If you did configure them beforehand you would see them here If you don t see your device here the discovery failed move on the the Manual Override section 5 Assuming you do see your device here click it and select Connect Agent to LinkServer from the Related Actions list ...

Страница 44: ... Inc 6 You should get the Connect AggreGate to LinkServer dialog 7 Select your AggreGate username from the list admin by default 8 Enter a sensible name for the device e g Clock01 9 Click OK 10 On success you should get a dialog like this ...

Страница 45: ...ait and listen for it This is useful in WAN scenarios when the LinkServer has a stable and accessible IP while the TR610 is behind a corporate firewall or a NAT router In other words only the TR610 can reach LinkServer so discovery the previous method would not work AggreGate configuration 1 In the System Tree go to Drivers Plugins and double click AggreGate Agent 2 Note down the Port number to li...

Страница 46: ...te Connection to Enabled Connection Timeout to 10 minutes Server IP to your LinkServer s IP which should be reachable from the TR610 of course and Server Port to what you found in step 2 in AggreGate Configuration 6480 by default 5 Save your settings and restart the TR610 6 The TR610 will now try to connect to LinkServer If it succeeds you should See the letter A on the LCD itself See the device i...

Страница 47: ...ministration 47 2010 GIGA TMS Inc What s Next To see what you can do with AggreGate now that you ve configured it to work with your TR610 please read the AggreGate Time and Attendance module documentation ...

Страница 48: ...ed 1 Onscreensession This session type has the highest priority While an onscreen configuration session is in progress you cannot log in using the web admin and the terminal is not connected to AggreGate For example if you attempt to access the web admin while an onscreen configuration session is in progress you will get the following error When a web admin session is already in progress and someo...

Страница 49: ...AggreGate link has the lowest priority level While any other form of configuration is in progress the terminal is disconnected from the AggreGate server Once a higher level configuration session is ended the terminal re establishes connection with AggreGate if such a connection was configured On Screen Information The TR610 display shows the letter A in the lower left corner when the terminal is c...

Страница 50: ...TR610 User s Manual 50 2010 GIGA TMS Inc ...

Страница 51: ...Part IV ...

Страница 52: ...ty A short overview of how the TR610 may be customized Uploading New Firmware Showing how to upgrade the TR610 with new firmware Event Log File Format Explains the structure of the event log file for importing into time and attendance software I O Connector Pin Assignment Cable Wiring Shows all connectors and their pinouts Specifications Device hardware specifications Update History History of cha...

Страница 53: ...ver There are three ways to initialize the device Using the Menu System To use this method you need a master card which works 1 Scan your master card to go into the Setup menu 2 Scroll down to Initialize 3 Hit the lower right Enter button You will get a confirmation prompt 4 Hit the top right Y button 5 The device will now initialize and reboot 6 Upon rebooting the device will show the master card...

Страница 54: ...t requires a new master card to be scanned Until that is done the device may not be used Moreover the first card scanned is taken as a master card so if an employee inadvertently scans their card before you scan the master card the employee s card will become the new master card and the device would have to be initialized yet again to set the proper master card Using the MD Button This is a hardwa...

Страница 55: ...ce 55 2010 GIGA TMS Inc 3 Push the MD button for three seconds The LED pattern near the button should change Now release the button 4 The device will now reboot and show the master card registration screen 13 ...

Страница 56: ...he appearance of the web admin Add and remove menu options Change the beeps or eliminate them completely These are just a few of the things you could do You are not limited to a pre defined set of customizations The TR610 firmware is open source and is written in Tibbo BASIC so it s easy to understand You can download the firmware source files and modify them using readily available development to...

Страница 57: ...firmware from an OEM customizing the device for your needs 3 Your device is malfunctioning and an initializing it did not solve the problem Uploading Via The Network The easiest way to upload new firmware is via the network using the Device Explorer utility which can be freely downloaded at http tibbo com downloads basic software html 1 Run Device Explorer and locate your TR610 It should have two ...

Страница 58: ...tings will be lost You will then be prompted for a master card continue as per Powering Up for The First Time 4 3 1 SerialUpload Serial firmware upload maybe used when upload via the network fails or is impossible for some reason such as network topology firewall restrictions etc Before You Start The upload process requires the following 1 Tibbo DS Manager which is a part of the TDST Tibbo Device ...

Страница 59: ...610 close to your computer Unmount it from the wall if needed 2 Open the TR610 as shown under HardwareInstallation 3 Connect the serial cable to your computer s COM port and to the COM port on the TR610 Leave the TR610 open you will need to press a button inside the device later on 4 Run DS Manager switch to the Serial Access tab and click the COM port to which the TR610 is connected 5 Click the U...

Страница 60: ...10 User s Manual 60 2010 GIGA TMS Inc file you wish to upload 6 Click OK The following dialog will be shown 7 Look at the open TR610 on your desk and visually locate the small MD and RST buttons on the PCB ...

Страница 61: ...the MD button and hold it as well Now let go of the RST button and leave MD pressed The device will boot with MD pressed which will put it into firmware upgrade mode Now let go of the MD button and the following progress dialog will be shown 9 Upon completion of the process the following dialog will be shown ...

Страница 62: ...ror message when first booting up after a major firmware update Data is corrupted please format the disk This is due to differences in firmware Press Y and the TR610 will format the flash disk thus losing all data Press the Y button and TR610 will format the flash disk This means that all current data and settings will be lost You will then be prompted for a master card continue as per Powering Up...

Страница 63: ... output 33445566 CLOCK IN 20100218083110 33445566 TEMP OUT 20100218122725 33445566 TEMP IN 20100218132022 33445566 CLOCK OUT 20100218180718 The fields are delimited separated using commas Following are the fields within a single record Card ID Event Time 33445566 CLOCK IN 20100218180718 Card ID Limited to last 8 digits of card Can be CLOCK IN TEMP OUT TEMP IN CLOCK OUT Formatted as YYYYMMDDHHMMSS ...

Страница 64: ... s Manual 64 2010 GIGA TMS Inc 4 5 I O Connector Pin Assignment Cable Wiring The following diagram shows the user serviceable parts of the TR610 PCB These are the pinouts for all internal connectors on the TR610 ...

Страница 65: ...Reference 65 2010 GIGA TMS Inc ...

Страница 66: ...Verde 1 00 Cayman Islands 5 00 Central African Rep 1 00 Chad Rep 1 00 Chile 4 00 China 8 00 ChristmasIs 10 00 Colombia 5 00 Congo 1 00 Cook Is 10 00 Costa Rica 6 00 Croatia 1 00 Cuba 5 00 Cyprus 2 00 Czech Republic 1 00 Denmark 1 00 Djibouti 3 00 Dominica 4 00 Dominican Republic 4 00 Ecuador 5 00 Egypt 2 00 El Salvador 6 00 Equatorial Guinea 1 00 Eritrea 3 00 Estonia 2 00 Ethiopia 3 00 Faeroe Isla...

Страница 67: ... 2 7 00 RussiaEast 11 00 Rwanda 2 00 Saba 4 00 Samoa 11 00 San Marino 1 00 Sao Tome 0 00 Saudi Arabia 3 00 Senegal 0 00 Seychelles Islands 4 00 Sierra Leone 0 00 Singapore 8 00 Slovakia 1 00 Slovenia 1 00 Solomon Islands 11 00 Somalia 3 00 South Africa 2 00 Spain 1 00 Sri Lanka 5 30 St Lucia 4 00 St Maarteen 4 00 St Pierre Miquelon 3 00 St Thomas 4 00 St Vincent 4 00 Sudan 2 00 Suriname 3 00 Swazi...

Страница 68: ... 1024KB flash approx 17 500 event log records Interfaces 10 100 Base T Ethernet port RS232 port Relays x2 1Amp 12V rating Configuration Onscreen setup web admin Tibbo AggreGate software Internal firmware Upgradeable open source written in Tibbo BASIC Mounting Wall or desktop programmable display orientation Power supply DC 12V 500mA Backup power Internal battery for RTC up to 7 days Operating temp...

Страница 69: ...sion Amongst major changes AggreGate topic updated Changed web admin menu system structure Documented new white list functionality 10 August 2009 Changed specifications added Mifare model 25 February 2009 Added Time Zone table changed screwdriver type 24 November 2008 Initial release of manual 40 22 31 ...

Отзывы: