background image


9.3.1.3


E

FFECTS


The dials 

Ambient

Instrument Reverb

Room Reverb

 and 

Multi Effects

  allow for gradually dialing in 

settings  made  in  the 

Effects

  mode.  As  an  instance,  these  sliders  are  exact  representations  of  the 

corresponding pad slider in the 

FX Send

 mixer of the 

Effects

 module. On the right-hand side, you can 

turn on or mute the corresponding module in the 

Effects

 mode. Tap on the corresponding software 

dial and increase the amount of an effect by dragging the slider up. When muting an effect in this 
function set, the dial values are saved (provided you don´t change the Drum Kit before saving), so 
that they are remembered when turning on the effect again. The on/off buttons are an instance of 
the module switches in the 

Effects

 mode. When you turn off a module in 

Effects

, you also mute it in 

the 

Mix/Effect


Sends

  function  set  of  the 

Kit  Editor

  and  vice  versa.  Effect  dials  don´t  distinguish  be-

tween pad components but affect each component in the same way. For instance, it is not possible 
to assign a different ambience to a rim than to the matching head. 


Tip:

 All settings of this function set affect the currently active Input channel (pad) and/or its 

selected component as well as the active drum kit as a whole. Always be aware of the active 
drum kit, input channel and component, to keep track of your adjustments. Note that when 
changing the kit without saving, all adjustments are dismissed. Always save your work before 
moving on. 

9.3.2


S

OUND 

E

DIT


Although GEWA invested in  multi-dimensional sampling of sounds, it is  almost impossible to record 
any drum of any size and depth with any combination of differences in tension between top and 
resonant head. The number of required samples would be sheer endless and 

would exceed today’s 

capacities of memory. 
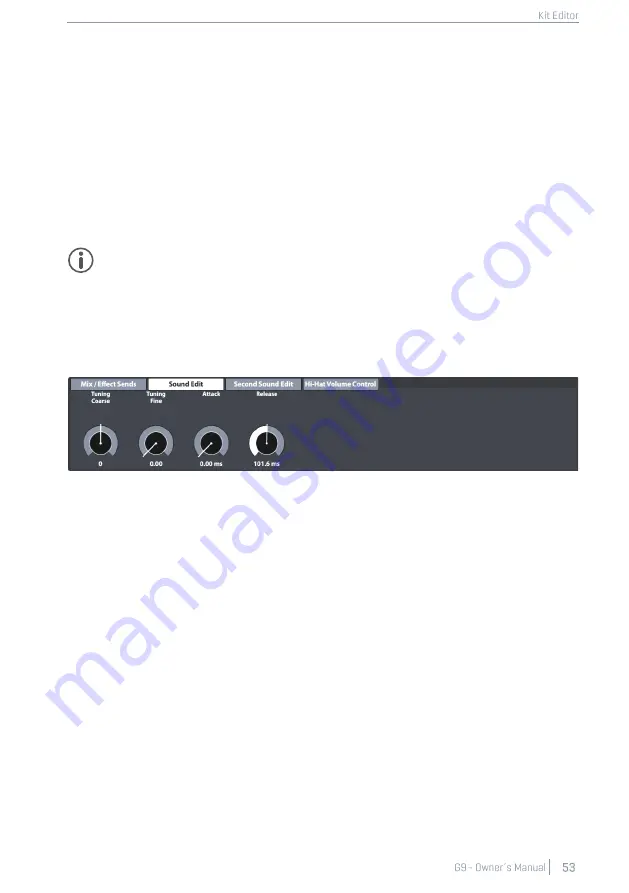
With this I mind, the function set 

Sound Edit

 offers tools to tweak the sound qualities of the recorded 

samples, such as changing the pitch and sustain of the drum. See all options below. 

9.3.2.1


T

UNING 

C

OARSE


This  dial  allows  for  rough  tuning  of  the  drum  in 

increments  of  semi  tones

.  With  the  default  fader 

position in the middle of the spectrum you can tune up or down by 12 whole tones in each direc-
tion,  giving  you  a  full  range  of 

24  whole  tones  (2  octaves)

.  Tuning  your  sounds  works  on  the 

pad 

component

  level,  so  that  you  can  tune  each  component  (e.g.  Head  or  Rim)  independently  from 

each other. 

9.3.2.2


T

UNING 

F

INE


From the chosen semi tone, you can fine tune the pitch. The default fader position is centered and 
has a full 

range of one semi tone

  (100 cents), allowing to tune  up or  down by  a quarter tone  (50 

cents). The relative range of -50 to +50 cents is translated into fader scales from 

0.00

 (-50 cents) to 

1.00

 (+50 cents). 


Содержание G9

Страница 1: ...CONTENT ...

Страница 2: ......

Страница 3: ......

Страница 4: ......

Страница 5: ......

Страница 6: ......

Страница 7: ......

Страница 8: ......

Страница 9: ......

Страница 10: ......

Страница 11: ...D IN THE MANUAL The following symbols are used to signal risks and to give advice Level of Risk Symbol Definition Serious Injuries WARNING Failure to observe the following safety instructions can result in serious injury or death Electrical Hazard WARNING Failure to observe the following safety instructions can result in serious injury or death by electrical hazards Minor Injuries and device damag...

Страница 12: ...ndles on the apparatus Candles or oil lamps can tip over and cause a fire Never bring open fire on or near to the digital drum set Do not install near any heat sources such as radiators heat registers stoves or other apparatus including amplifiers that produce heat Use the apparatus only in moderate climates not in tropical climates WARNING Unusual Behavior Switch the drum console off or unplug it...

Страница 13: ...environment Setting up the digital drum set in damp rooms Using power supplies not authorized by GEWA music or connecting the console to an electrical outlet despite mismatching local voltage specifications Playing the digital drum set close to electrical or electronic devices such as stereo sys tems TV sets radios or mobile phones These devices can cause interferences and seri ously effect and de...

Страница 14: ... 2010 EN55032 2012 EN61000 3 2 2014 EN61000 3 3 2013 EN301489 17 V3 2 0 EN60065 2014 EN62311 2008 2009 125 EC 2009 EC Regulation 1275 2008 801 2013 EN300328 V2 1 1 EN301893 V2 1 1 Compliance with the above directives is confirmed by the CE label on the device The declaration of conformity can be viewed at the following address GEWA music GmbH Oelsnitzer Straße 58 08626 Adorf GERMANY ...

Страница 15: ...peration NOTE This equipment has been tested and found to comply with the limits for a Class B digital device pursuant to part 15 of the FCC Rules These limits are designed to provide reason able protection against harmful interference in a residential installation This equipment generates uses and can radiate radio frequency energy and if not installed and used in accordance with the instructions...

Страница 16: ...orth for an uncontrolled environment and meets the RSS 102 of the ISED radio frequency RF Exposure rules This equipment has low levels of RF energy that are deemed to comply without maximum permissible exposure evaluation MPE LE LAN Device Notice This product complies with the rules for license exempt transmitter s receiver s covered by the RSS 247 and RSS Gen LE LAN Device Operating in the band 5...

Страница 17: ...CNR 102 Cet équipement possède niveaux d énergie de radiofréquences bas que sont considérés d être conforme sans l évaluation des valeurs d intensité maximale de champ des RF Avis Dispostif RL EL L émetteur récepteur exempt de licence contenu dans le présent appareil est conforme au CNR 247 et CNR Gen d Innovation Sciences et Développement économique Canada applicables aux appareils radio exempts ...

Страница 18: ... labeled with this symbol must be disposed separately from household waste Under the Electrical and Electronic Equipment Act owners of devices marked with this symbol are required by federal law to deposit waste electrical and electronic equipment in a separate waste collection Please help us with your contribution to protect the environment by not depositing your old electric equipment with the g...

Страница 19: ...ins the following items Please check carefully the completeness of the purchased product G9 Drum Workstation 10 5 12 7 mm Mount Bracket Product ID Card USB Stick Quick Start Guide Multilingual Power Cords 2 m IEC C18 Type C CEE 7 17 Type A Type G Type I Type C CEE 7 16 ...

Страница 20: ...3 ASSEMBLY INSTRUCTIONS 3 1 MOUNT BRACKET ASSEMBLY 3 2 CONNECT YOUR EQUIPMENT TO THE CONSOLE 3 2 1 FRONT PANEL ...

Страница 21: ...3 2 2 REAR PANEL Make sure the power is OFF when connecting the drum module with external devices ...

Страница 22: ...two Stereo jacks 6 35 mm 1 4 TRRS standard In conjunction with GEWA modules only the jack closest to the middle hole of the cymbal is relevant 3 2 3 2 OTHER MANUFACTURERS Regarding analogue cymbals from other manufacturers use the corresponding input jacks as follows ...

Страница 23: ...r Type on page 95 3 2 3 3 ANALOGUE CYMBALS WITH SEPARATE BELL CHANNEL Cymbal Pads with extra Bell output can connect to GEWA consoles in different ways See the follow ing table for all possible pairs of Bow Edge and Bell channel combinations GEWA Inputs for analog Cymbals with separate Bell Channel Cymbal Component Bow Edge Bell Input Channel Ride Aux 1 Aux 1 Aux 2 Aux 2 Aux 3 Aux 3 Aux 4 Hint Cym...

Страница 24: ...le This section describes the standard functionalities when starting the device Panel Display Standard Functions Power Button Turns Power ON and shuts down the device Hardware Dial Metronome Tempo Hardware Dial Monitor Out Mix Input Volume Hardware Dial Headphone Volume Home Button Master Volume XLR Outputs Returns to Start Screen Touch Display Various Gestures and Features ...

Страница 25: ...ton lights up in red The device is in stand by mode and ready to be explored Press the Power button to boot the apparatus Wait for the device to boot Note In order to save energy the G9 provides an Auto Power feature With this function the Workstation will shut down automatically being left it idle for more than 30 default minutes Change this property in General Settings Module 4 Device Auto Off ...

Страница 26: ...igger presets for different pad configurations available If you have purchased your G9 with a prepacked pad configuration choose one of the following setups for satisfactory trigger performance Follow the safety instructions of sections 1 5 of the Quick Start Guide Owner s Manual and proceed as follows Push Power Button Tap Advanced Button Trigger Settings Load Setup ...

Страница 27: ... WI FI AND AUTO OFF Access the wireless options and shut down timer in General Settings Bluetooth Password 4392 Push Power Button Tap Advanced Button General Settings Bluetooth Wi Fi Auto Off Bluetooth Password 4392 ...

Страница 28: ...ch as Select preset drum Kits Tap on Kit name or and Tap on Drums and Cymbals to preview Sounds Basic Metronome features on off and tempo dial Pad volume mixer Output volume dials Master Headphone Monitor Out and Mix Input All these features can be tweaked further in the Advanced Modes which are accessible by tapping the Advanced button in the bottom right corner All changes made in the advanced m...

Страница 29: ...he screen The red dial at the bottom controls the master volume master out and serves as the home button No matter what if you press the red dial you will be brought back to the Easy Mode If you tap on Master next to the red dial a volume bar appears which you can adjust by dragging your finger up or down Double tapping on the bar will cause the fader to jump to its factory default value Once you ...

Страница 30: ...ner Mode icons of the advanced modes are in the sidebar at the right hand side of the screen The G9 interface comprises 6 advanced modes Advanced Modes Performance Kit Editor Effects Trigger Settings General Settings Tools Within a mode all functions are divided into thematic modules Modules are further divided into function sets Active function sets are highlighted in UI Theme colors Thus the G9 ...

Страница 31: ...om right of the screen enables you to listen to the sounds of the currently selected pad Alternatively you can preview sounds in dropdown lists as well Select a pad or sound in a list and tap the preview button Note that you don t need any pad to use this function 7 5 1 KEYBOARD On several occasions you will be confronted with the built in keyboard It works in the same way as you are accustomed to...

Страница 32: ...ns Description Single Tap Double Tap Lower case Lower case Caps lock on Upper case Next letter as Upper case Caps lock on Upper Case Caps Lock On Delete Delete letter in front of the cursor Confirm Confirm and close keyboard ...

Страница 33: ...anied by a song metronome or both 8 1 MODULE 1 8 1 1 DRUM KIT The first section is the Drum Kit selector This function set offers a variety of options for choosing a drum kit Tap once on the Drum Kit field and double tap to choose a kit from the list in the Drum Kit Browser Use the filter functions provided to your advantage Drag your finger horizontally along the Drum Kit field Use and to move ba...

Страница 34: ...ry Alternatively select drum kits of different categories and observe how the feature shelf updates Preset Management Drum Kit Browser Category Function Load Save Rename New Delete Export Import Factory Preset User Preset When applying one of these functions to a drum kit it is important to understand what you are creating saving importing or exporting Drum kits as shown in the Drum Kit Browser ar...

Страница 35: ...um Kit field are in Performance Module 1 Drum Kit Kit Editor Module 2 Drum Kit Example For details on drum kit parameters please refer to the Kit Editor section on page 37 The most rele vant task in Performance mode is being able to select a drum kit 8 2 MODULE 2 In this module you can monitor your trigger detection customize the behavior of the snare rim and mix all pad volumes in relation to eac...

Страница 36: ...ack about Head and Bow values within the nor mal range of 0 to 125 Rim Edge Provides real time feedback about Rim and Edge values within the nor mal range of 0 to 125 Color Scales for Peak Detection by UI Theme MIDI Velocity Value UI Theme GEWA Red GEWA Classic GEWA White Tritanopia Protanopia Deuteranopia Grayscale Peak 126 127 Normal High 125 Normal Low 1 8 2 1 2 PEAK DETECTION The functions fil...

Страница 37: ...is function allows for changing toms and cymbals all at once in fixed relation to each other Double tap on a fader to restore its default factory position Grouped faders will center to the fader tapped preserving their spacing Leave the mixer by tapping on Kit Options G9 Mixer Mixer Tom Grouping Cymbal Grouping 12 dB 12 dB 12 dB 12 dB 12 dB 12 dB 12 dB 12 dB 12 dB 12 dB 12 dB 12 dB 12 dB 12 dB Kic...

Страница 38: ...ted in various applications in the G9 such as the Song Player PDF Reader or Import Tool However depending on the application it opens with different filters active to only show relevant file types Regarding the Song Player it displays all relevant audio files only Consequently non interpretable files are hidden and grayed out 8 3 1 1 1 PROPERTIES The top left side hosts buttons for selecting stora...

Страница 39: ...as follows 1 Tap the File field in the top left corner to open File Select 2 Specify the storage medium by tapping once on USB or SD 3 Navigate to your file a Double tap on folder names to open them left column b Move up the path by tapping the white bar left column 4 Select a file to open by double tapping list entries in the right column Intern USB Search DrumKits Firmware Manuals QuickRecord Fi...

Страница 40: ...racticing or being on stage manual start in paused or stopped state and quick file changes in the playing state let the song player act as an ordinary audio player Skip Buttons The behavior of skip buttons depends on the selected Play Mode as well as the state of Play Pause and Stop buttons Play Once or Loop Song active The song either starts from the beginning Play or the timeline is reset to zer...

Страница 41: ... beforehand see section 8 3 1 2 6 Vari Speed on page 32 Loop Loop section Tap 2 times to set start and end markers Visual feedback loop start and endpoints 8 3 1 2 5 QUICK RECORD Quick record allows you to record all inputs including song and drum kit and store it on the internal memory or any USB device Tap on the Quick Record button once to start record ing Another tap will stop the recording an...

Страница 42: ... up or slowing down by 50 compared to the recorded tempo Note that even if the speed varies the pitch remains the same 8 3 1 2 7 SONG VOLUME Adjusts the volume of the Song Player relative to all other inputs 8 4 MODULE 4 8 4 1 METRONOME Set the Metronome Tempo by doing one of the following Turn the physical dial at the top Tap the software dial once and drag the fader Tap once on the Tempo Field a...

Страница 43: ... the click without any accents 8 4 2 VISUAL MODE There is also an option for a Visual Mode where numbers will appear and light up with the speed of the metronome Tap on the button Visual Mode next to the function set Metronome A Pop up appears which covers module 3 leaving full access to all metronome settings which affect the visual mode To see all effects of your adjustments in the following ple...

Страница 44: ...y playing Tap Channel 8 4 3 1 METRONOME SOUND The metronome sound by default is Metro However this can be changed easily 1 Tap once on the Metronome Sound field 2 Optional Preview metronome sounds a Activate the Play button make sure Click Volume is not muted b Tap once on a sound Metro Claves etc 3 Select a sound by doing one of the following a Select the preferred sound by double tapping b Keep ...

Страница 45: ...desired pad component by checking one or both boxes below the Tap Chan nel field Pad or Rim etc All functions on the right hand side of the Tap Channel field are identical with those in the function set Metronome Thus make sure that Tap is set to on and Click Volume is not muted Tap Channel Aux 2 ...

Страница 46: ......

Страница 47: ...stomize each pad to the desired sound qualities Use the presets provided as a starting point Finally you will learn how to save export and import drum kits of the drum kit library All settings made in the Kit Editor mode apply to the active Drum Kit which is shown in the respec tive Drum Kit fields 9 1 MODULE 1 9 1 1 CHANNEL SELECT The main purpose of the channel select feature is to select connec...

Страница 48: ...values which depend on the selected UI Theme Check your UI Theme first to be able to interpret the colors returned under Peak see General Settings Module 4 Device UI Theme The following table shows the relation between velocity value UI theme and color gradients used Color Scales for Peak Detection by UI Theme MIDI Velocity Value UI Theme GEWA Red GEWA Classic GEWA White Tritanopia Protanopia Deut...

Страница 49: ... to the selected drum kit The Drum Kit field in Kit Editor mode is an instance of the Drum Kit field in Performance mode so that they both update simulta neously when managing Drum Kits in one of them To select a drum kit in Kit Editor the following options are available Tap the Drum Kit name field to open the Drum Kit Browser Tap or in the Drum Kit name field to cycle trough the drum kit library ...

Страница 50: ...nent com ponent icon in module 2 The sound assigned to a com ponent is shown in the Sound Select field Sound name and component icon frames use the same color values giving a quick visual feedback about which component is active By changing either pad or component sounds module 2 and parameter values module 3 will update accordingly To keep track of your sound settings try to look at this mode as ...

Страница 51: ...s Snare Drums Toms Ride Cymbals Crash Cymbals Hi Hats Cymbals SFX Percussion 1 Percussion 2 Sounds SFX Tap one of the category names to browse the contained sounds 9 2 1 4 2 SOURCE IMPORT Activating the Import check box under Source will display all sounds imported via the Import Tool See 13 5 Import Tool on page 158 The Tab Wave contains all imported single layer wave samples created by users whe...

Страница 52: ...positional sensing Center Side Blend CS and sample sets that only consist of samples from one of the 2 zones Center Only C Side Only S The choice of one of the latter de facto deactivates positional sensing by returning sounds of the same zone no matter which position on the head is detected Sound Grouping is designed to quickly pick all relevant samples that create the most realistic digital foot...

Страница 53: ...ed to the Input Channel is not correct The trigger bank assigned to a pad determines the icons shown in the function set Instrument Select Go to Trigger Settings Module 2 Trigger Selection Trigger Bank and tap on the Trigger Bank field to assign a matching Trigger Bank for the active Input Channel As a result all component icons under Kit Editor Module 2 Instrument Select should update ac cordingl...

Страница 54: ...s we will have a closer look at parameters and preset management in this section Before we start it is important to understand that drum kits listed in the Drum Kit Browser are simply a collection of drum kit related parameter values stored in a table These parameters define the sounds used but don t store entire sound sample libraries Especially when exporting a drum kit it is important that the ...

Страница 55: ... Pre Delay Ambience Gate Threshold Instrument Reverb Send to Room Reverb Multi FX Every other FX 2 4 parameter Hint Any change in value of one or more of the parameters shown above will cause the drum kit name to update A preceding asterisk will be added to the drum kit name in all Drum Kit fields in the user interface The asterisk is a reminder to save the drum kit before changing it so that alte...

Страница 56: ...in the Drum Kit Browser which is explained in detail in the Performance mode section of this documentation The Drum Kit Browser can be accessed by tapping the Drum Kit field which has an instance in Performance and Kit Editor mode The relevant UI locations are Performance Module 1 Drum Kit Kit Editor Module 2 Drum Kit Drum Kit Field G9 Drum Kit Browser Drum Kit Browser Sorted by Preset Drum Kits U...

Страница 57: ... Feature Shelf b Double tap a list entry to load the Kit After step 2 the drum kit browser closes automatically and the selected kit is active The drum kit name in the drum kit field will update accordingly 9 2 1 6 2 SAVING AND OVERWRITING DRUM KITS In preparation please check if the Drum Kit name in the Drum Kit field is preceded by an asterisk Drum kits without asterisk do not possess any change...

Страница 58: ...user interface by its own icon When exporting a drum kit all presets are discarded and parameter values are stored directly instead resulting in Custom Setting contents of any preset field of the relevant drum kit parame ters This means that if presets are preferred you must store each preset individually after the import or simply assign the underlying presets from your existing preset library ag...

Страница 59: ...ed drum kit on a USB stick for import in other G9 devices See 13 3 File Manager on page 145 To export a drumkit in gdk file format proceed as follows 1 Tap the Drum Kit name field to open the Drum Kit Browser 2 Highlight the drum kit to be exported in the drop down list tap once 3 Tap Export in the Feature Shelf A success message appears and the drum kit is stored in the default drum kit folder Ti...

Страница 60: ...edium where the file is stored USB or SD 4 Navigate to the drum kit to be imported using the browser on the right hand side of the Drum Kit Import browser 5 To select a file choose one of the following options a Quick Import i Double tap the file to be imported This will import the drum kit with the orig inal export name In case that the name already exists the routine will add consecutive numberi...

Страница 61: ...n the Key board For further information regarding search and navigation see sections 13 3 File Manager on page 145 and 13 4 1 Search on page 153 File Name vs Import Name When exporting a drum kit the import name and file name are identical Renaming the file using File Manager or any other application will only change the file name When importing a drum kit the import name will be identical with th...

Страница 62: ...ches must be stored in the active drum kit otherwise they would be discarded when changing the drum kit 9 3 1 1 VOLUME COMPONENT This volume slider affects the volume of the currently active pad component in the Instrument Select function set in module 2 of this mode Here you can adjust the volume of the pad components in relation to each other whereas the Mixer see section 8 2 2 Mixer on p 27 glo...

Страница 63: ...the active drum kit input channel and component to keep track of your adjustments Note that when changing the kit without saving all adjustments are dismissed Always save your work before moving on 9 3 2 SOUND EDIT Although GEWA invested in multi dimensional sampling of sounds it is almost impossible to record any drum of any size and depth with any combination of differences in tension between to...

Страница 64: ... of the drum by choosing a low fader position for tight and snappy feel and high fader positions for a fluffy feel with almost washed out attack 9 3 2 4 RELEASE Controls the length of sustain to emulate a muffled instru ment The natural sustain of the DRY sample without effects fades out quickly in low fader positions and slowly in high fader positions Chang ing the fader position will add a prede...

Страница 65: ...tive drum kit before moving on 9 3 3 1 VOLUME SECOND SOUND While the volume of adjustments under Sound Edit is driven by the Pad Mixer Performance Module 2 Mixer the layered second sound is driven by its own volume dial to adjust the volume in relation to the main sound of the component The set relationship of the mix is then globally adjusted by the Mixer 9 3 3 2 TUNING This function set is equip...

Страница 66: ...F 7 Optional Select another Pad component under Instrument select in module 2 and repeat steps 1 4 8 Save the drum kit or create a new kit to memorize your edits Tip Assignment of second sounds will affect the active pad component only Make sure you have the correct pad selected module 1 and the desired component icon is highlighted in Module 2 Instrument Select It is recommended to keep Auto Sele...

Страница 67: ...t without saving it will discard all modified values and restore previous values when loading the kit again 9 4 MODULE 4 This function set hosts Equalizer and Compressor features which can be assigned to each Input channel displayed in Module 1 of the Kit Editor Mode Settings made in this module will be bundled with RAW MIDI signals and will consequently be audible in the direct outs when activate...

Страница 68: ...of equalizer and compressor in module 4 The following presets are available G9 Presets Pad EQ and Compressor Equalizer Compressor Linear Kick Compressor High boost 3dB Snare Compressor Bass boost 3dB Bad Kick Studio Snare A Fat Snare Studio Snare B Drum Grouping Drum Attack Master A Studio Kick A Master B Studio Kick B Limiter A Open Mix Limiter B Sweet Cymbals Tube Saturation ...

Страница 69: ...ompressors is identical with those available for the main stereo outputs Master Monitor and Headphones we will focus on these features in General Settings mode Please refer to section 12 2 1 1 Equalizer on page 113 and 12 2 1 2 Compressor on page 115 ...

Страница 70: ......

Страница 71: ...n module specific parameter properties 10 1 EFFECT PARAMETERS Effect parameters are the third group of parameters stored in drum kits Hence the name drum kit parameters Like the drum kit parameters of the Kit Editor mode Effects allow for storing each pa rameter directly into the kit For effect parameters that are characteristic of the effect the G9 also provides the preset option This enables the...

Страница 72: ...ance Module 1 Drum Kit Kit Editor Module 2 Drum Kit Example 10 2 EFFECTS MODULES MUTUAL PARAMETERS Every module of this mode can be switched on and off by the corresponding button on the left hand side of the module These buttons also have an instance in the Kit Editor to preview effects without switching the mode Level dials control the volume of each module whereas FX Sends mixers allow for adju...

Страница 73: ...side mod ules 2 4 Such parameters are located inside the dividing vertical bars and contain all functionali ties which form the fundamental characteristic of the effect The G9 offers two distinct ways of saving effect parameter values a Saving out a preset without overwriting the effect properties of the active kit b Directly into the drum kit Save the drum kit in e g Performance Chose a if you wa...

Страница 74: ...he kit or its effect presets Otherwise edits in effect values will be discarded 10 4 EFFECTS PRESETS The G9 provides a variety of options to manage preset libraries You can access the library and its functions by tapping on a Preset Field next to a group of preset parameters The G9 distinguishes between Factory Presets preceding lock icon and User Presets without lock icon Preset Field and Browser...

Страница 75: ...stored Hint A newly created effects preset will be added to the preset library only It is not automati cally stored with the active drum kit To ensure that the new preset loads with the kit you will have to additionally store the drum kit afterwards If not changing the kit will load all presets from the last saving 10 4 3 DIRECT STORAGE OF PARAMETER VALUES The G9 allows for storing parameter value...

Страница 76: ...te user presets with current values set in the interface This function is not available for factory presets preceding lock icon 1 Tap the Preset field 2 Tap on the preset name to be overwritten 3 Tap Save in the Feature Shelf 10 4 5 RENAMING PRESETS Renaming a preset will affect the preset name only and retain individual parameter values This option is only available for user presets without prece...

Страница 77: ...to adjust the maximum volume of the Effect 4 Tap on FX 1 Send if you want to change the effect volume a pad individually optional 5 Save the effect with the drum kit once you are happy 10 6 MODULE 2 10 6 1 FX 2 INSTRUMENT REVERB This module hosts classic and generic algorithms to simulate Instrument specific reverb Some Reverb Types are traditionally generated electronically whereas others e g Pla...

Страница 78: ...ize plate with a different characteristic than Plate 1 Small Plate2 Med Plates produce a mechanically generated reverb without early reflections This is a simulation of a medium size plate with a different characteristic than Plate 1 Med Plate2 Large Plates produce a mechanically generated reverb without early reflections This is a simulation of a large plate with a different characteristic than P...

Страница 79: ...equency at 1 5kHz Center frequency turning point Set positive values for increase and negative values for a decrease 12 6 dB 1 5kHz High Damp Filter that causes the high reverb frequencies to decay faster than the rest The slider ranges from 0 no damping up to 100 max damping 0 100 Gate Threshold Cuts off the reverb completely after dropping below the set Gate Threshold Level A value of 0 switches...

Страница 80: ... the Balance between dry and wet signal sent to the Mixer With Dry turned off the effect is config ured as an Insert type effect where Send level and Level have identical functionality and contribute to the presence of the effect in the Mixer in the same fashion Choose low fader positions for a quiet effect and high positions for more present effects Send to Room Reverb 0 dB With Room reverb activ...

Страница 81: ...fines to what extend the dynamics of a stroke on a pad velocity is allowed to drive the movement of the specified filter along the possible frequency spectrum The filter is defined by the pa rameters Filter Type Start Frequency and Resonance Technically Sensitivity works as a multiplier attenua tor for the effect intensity at a specific stroke velocity level Example With Sensitivity set to 50 a st...

Страница 82: ...s parameter determines the frequency spectrum affected by the chosen effect Type If you prefer to saturate only the lower end of the frequency spec trum set the desired filter frequency for the underlying Low Pass filter with transition steepness of 12 dB Post Gain 0 dB Adding this effect type will considerably amplify the output signal With post gain you can attenuate the mix Values range from mu...

Страница 83: ...filter effect until the effect fades out Choose low fader positions for less feedback signals and high fader positions for lots of feedback signals and strong enhancement of the filtering Phaser The G9 models the effect using a 6 notch filter directly applied to the dry signal Like Wah Wah the effect is gen erated by brushing with the filter through the frequency spectrum However while the dynamic...

Страница 84: ...ption Bit Resolution 0 16 bit This parameter pixelates the audio signal and reduces the resolution of the signal vertical direction Bit Depth Values 0 no reduction 1 bit up to16 bits Down Sampling 1 16 Reduces the resolution of the wave period by lowering the sampling rate horizontal direction quality Values are defined as a factor of reduction and range from 1 no reduction up to 16 reduction down...

Страница 85: ...een repeats Feedback 0 127 Controls the number of repeats until the effect fades out Choose low fader positions for less repeats and high fader positions for lots of repeats Pre Low Pass 2 8 kHz Cuts the high frequencies of the dry signal above the set cut frequency Only frequencies below the thresh old frequency are passed on to generate the effect The slope steepness of the filter is 12 dB Pre L...

Страница 86: ......

Страница 87: ...use factory presets for pads if available by browsing the Trigger Bank and Setup menus However the G9 provides a range of features to calibrate any analogue trigger pad to your playing style Learn how to create custom trigger banks and setups and gain an understand ing of the underlying parameters 11 1 MODULE 1 11 1 1 TRIGGER DETECTION The function set Trigger Detection hosts two main feature cate...

Страница 88: ...ir trigger parameters Trigger Settings The Pad order from left to right matches the order of Trigger Inputs of the rear panel Select a connected pad by tapping the button above the pad name A selected pad is highlight ed by a surrounding frame G9 Ports Input Channels The Peak row remembers the highest velocity value detected while playing and for each pad separately It works in the same way as the...

Страница 89: ...e to the color value assigned to the velocity level of 0 This is especially important to check if altered trigger parameters work as desired Tapping Reset refreshes the Peak Monitor and deletes the detection history 11 2 MODULE 2 11 2 1 TRIGGER SELECTION 11 2 1 1 SETUP A collection of trigger banks can be grouped under a setup which contains all trigger banks as signed to the input channels availa...

Страница 90: ... With the Setup on top the preset hierarchy of the trigger settings parameters is structured as follows 11 2 1 1 1 STANDARD SETUPS These Setups assign default Trigger Bank presets to all Input Channels available which store parame ter values optimized for GEWA pad components and can be found in the Trigger Bank Selection browser under Default Presets The Standard Setups are designed to match commo...

Страница 91: ...o section 11 2 1 3 1 Loading Presets on page 84 The setups shown above can also be used as a starting point for customized Hardware setups The following sections will guide you through the process of creating new setups You will also learn how to edit rename modify and delete existing presets 11 2 1 2 TRIGGER BANK As opposed to the sounds assigned to pad components Kit Editor trigger parameter val...

Страница 92: ...levant preset fields for setups and trigger banks are located in module 2 The parameter values stored in these preset fields are derived from module 3 See the following Screenshot for clarification The G9 distinguishes between Factory Presets preceding lock icon and User Presets without lock icon Both appear in the list that pops up when tapping a preset field Regarding Setups fields and browsers ...

Страница 93: ...ble Tap on a user preset or factory preset in the preset select dialog for com parison The following table for gives an overview of the functions available Preset Management Feature Shelf Preset Type Function Load Save Rename New Delete Factory Preset User Preset The next sections discuss the functionalities of the feature shelf Trigger Bank GEWA Snare 12inch Default Presets User Presets Kicks Pad...

Страница 94: ...y stored with the active setup To ensure that the new preset loads with the setup you will have to store the setup afterwards as well If not previous trigger banks will be remembered the next time you load the setup 11 2 1 3 3 DIRECT STORAGE OF PARAMETER VALUES SETUPS The G9 allows for storing parameter values directly into the setup without saving individual presets for trigger banks Instead of a...

Страница 95: ...3 Tap Save in the Feature Shelf 11 2 1 3 5 RENAMING PRESETS Renaming a preset will affect the preset name only and retain individual parameter values This option is only available for user presets without preceding lock icon 1 Tap the Preset field 2 Tap once on a preset name in the drop down list 3 Tap Rename in the Feature Shelf 4 Enter a name for the new preset using the keyboard 5 Confirm by ta...

Страница 96: ...d Parameters 11 3 MODULE 3 This module hosts all relevant accessible parameters to fine tune the trigger performance of your pads Here you can calibrate your G9 to 3rd party equipment and optimize the communication between pads and console In case of trigger issues please start based of the Setups and Trigger Banks provided and sparingly experiment with the parameters available Tip If available pl...

Страница 97: ...The following table lists all parameters available by component ...

Страница 98: ...ocity Curves Factory Velocity Curves Custom 3Way is a specialty of Roland analogue ride cymbals where bell and other components are separated by their own plug jack When using these cymbals choosing the Ride input channel of the G9 Aux 1 will be automati cally configured as Bell channel Optional channels are Aux 1 3 where the following Aux channel is always de fined as the bell channel To this end...

Страница 99: ...n Low Gain values are recommended for taming pads producing high electrical signals and higher gain values are suitable for pads producing weaker electrical signals The following illustration demonstrates the effect of increasing the gain value given the same veloci ty progression in the Pad Monitor module 4 Gain multiplies the signal with a certain factor Results above the maximum velocity of 127...

Страница 100: ...ck the Pad Monitor for Choke messages With a proper threshold value you should see at least one Choke message when you press the switch If detected these Choke Messages appear as black bars with a constant velocity value of 127 Depending on the selected Trigger Type and the way pressure is applied to the sensor you might observe more Choke messages If you apply pressure to an FSR Sensor and don t ...

Страница 101: ...r Inputs for registered signals again The exact system latency from stroke to sound consists of the delay from sensor to input 1 fixed millisecond for a non editable Latency parameter analysis trigger signals the Scan Time parameter and the time for the resulting MIDI message to produce the sound in the sound engine Scan Time and Latency describe the boundaries of minimum and maximum latency in tr...

Страница 102: ...d MIDI signals using the X Talk Monitor Then raise the X Talk value to at least one 1 on both pads emitting pad and receiving pad If the problem still occurs raise the value gradually on the pad which receives unwanted signals It is important that both pads have X Talk values of at least one to make them a member of the X talk group High X talk values on the pad experiencing disturbance will have ...

Страница 103: ...Position by using a calibration wizard Instead of trying out different values individually this guided process will be especially useful in conjunction with 3rd party equipment providing a good first estimate about the value range in which the equipment operates Since Low Position refers to a closed position with maximum pressure and limited musical application the routine will automatically defin...

Страница 104: ...he calibration Cancel Next The start screen with a short explanation Tap Next to start the calibration Hi Hat Calibration High Position 109 Low position 90 Low Position Press the pedal all way down and tap Calibrate After that tap Next Cancel Next Apply STRONG pressure as you would do for tight Hi Hat sounds before tapping Calibrate Hi Hat Calibration High Position 109 Low position 84 High Positio...

Страница 105: ...ad diameter the higher Dyn Time values are required GEWA Trigger Trays by design should produce best press rolls with Dyn Time values between 8 and 10 Dyn Level parameter value range 0 15 Dyn Time parameter value range 0 60 ms 11 3 2 2 SPLASH SENSITIVITY HI HAT PEDAL ONLY Sets the number of milliseconds the G9 will wait before sending a slash note when you execute a splash It can be set to any val...

Страница 106: ...s only and follow the type of trigger used For pads with 2 piezos for triggering Head and Rim choose Dual for the Head and Piezo for the Rim Cymbals mostly utilize an FSR film for the detection of Bell Edge and Choke Choose Switch for the edge component while the Bow can either be set to Dual or 3Way 11 3 2 4 CURVE SETTINGS Even if the sound samples of consecutive velocity layers are recorded in a...

Страница 107: ...ve Settings 6 Save your changes by doing one of the following a Directly in a Trigger Set Up i Tap the Setup field module 2 ii Highlight a user Setup where you want to store the curve and tap Save Al ternatively tap New in the Feature Shelf to create a fresh Setup Presets User Linear Custom 1 Convex 1 Custom 2 Convex 6 Custom 7 Kick Peak Input Snare Tom 1 Tom 2 Tom 3 Tom 4 Ride Hi Hat Crash1 Crash...

Страница 108: ... entry Alternatively tap New to create a new Trigger Bank with current parameter values visible in the User Interface Trigger Bank Selection Load Save Rename New Delete Feature Shelf GEWA STUDIO 5 GEWA PRO 6 GEWA PRO 5 User Setup 1 Highlighted User Setup Number 2 Default Presets User Presets Kicks Pads Cymbals Hi Hats My Custom Kick Pad My Custom Snare Customized GEWA HH My Custom Tom 12in Trigger...

Страница 109: ...f the stroke With this feature the G9 allows for compensation of different trigger detection methods and sensor types from various manufacturers In the acoustic world the relation between volume and velocity of strokes is typically linear but the relation between the voltage generated by the sensor depending on the stoke velocity is typically concave That means that without any compensation the tr...

Страница 110: ...s field 4 Select one of the curves in the User Presets column by double tapping Curve Settings 5 Tap the field Curve Editor once in the function set Advanced Settings 6 Edit the curve by dragging the dots and check effects by playing on the pad component Presets User Linear Custom 1 Concex 1 Custom 2 Convex 6 Custom 7 Kick Peak Input Snare Tom 1 Tom 2 Tom 3 Tom 4 Ride Hi Hat Crash1 Crash2 Aux 1 Au...

Страница 111: ... once on the list entry and Tap Save in the Feature Shelf to update the setup Alternatively tap New to create a fresh setup for your pad configuration b Storage as Trigger Bank indirect i Tap the Trigger Bank field module 2 ii Highlight a User Trigger Bank by tapping once on the list entry and tap Save to update the Trigger Bank Alternatively tap New to create a fresh Trigger Bank for your pad Hin...

Страница 112: ...n this module you will find all visual monitors tracking the input signals of each pad component Results are mostly visualized by colors which change depending on the active UI Theme check General Settings Module 4 Device UI Theme Color schemes for Trigger Monitors are chosen as follows Colors Trigger Monitor by UI Theme Head Bow Rim Edge Bell Choke UI Theme GEWA Red GEWA Classic GEWA White Tritan...

Страница 113: ...ur pose is to observe trigger signals sent by pad components you haven t hit at all Often vibrations travel through the hardware and cause accidental activation of other sensors X Talk Striking a certain component should only activate the sensor responsible for that very component Check your hardware set up if you activate more channels or components than those you are playing As opposed to the Pa...

Страница 114: ......

Страница 115: ...ace Module 3 manages everything related to MIDI implementation whereas module 4 host device specific features such as Bluetooth and Wi Fi Consult this module also for firmware updates factory resets and the download of manuals without the need of visiting external websites 12 1 MODULE 1 This module controls global properties for all standard outputs offered by the G9 Workstation Next to exclusivel...

Страница 116: ... L R Buttons in this function set have only informative character As mentioned above these outputs are exclusively stereo The following tables show the ports addressed by the adjustments made in this function set Ports Master Out XLR L analog XLR R analog S PDIF Stereo digital Ports Monitor Out 6 35 mm TRS L Mono 6 35 mm TRS R Mono Ports Phones Front Panel 6 35 mm TRRS Stereo 12 1 2 DIRECT OUTS Ad...

Страница 117: ...el 6 35 mm TRS Mono 12 1 3 DIGITAL IN OUT This function set controls the volume of the digital audio connections Note that USB Audio can be used next to the occupation of the USB port as MIDI Audio and MIDI Data can flow at the same time The logarithmic faders allow for digital attenuation of signals within a range between dB max to 0 dB min See the following table for ports addressed by the adjus...

Страница 118: ...uting Others While their routable channels vary the functionality and appearance are the same Thus the contents of the following subchapters apply to both input categories likewise Tap the routing buttons in the upper right corner of module 1 to open the corresponding Routing Matrix ...

Страница 119: ...the small dot at the point of intersection of input column and output row Direct Outs Routing Drums are special in a way that you can bind them together to a stereo out put Instead of 8 Mono outputs you have the option of at most 4 stereo outputs The L R icons on the right hand side of the routing matrix inform you about the current state Intersection of the circles stands for stereo whereas circl...

Страница 120: ...ield the G9 differentiates between Factory Presets preceding lock icon and User Presets without lock icon Routing Preset Field and Browser Preset Field Preset Browser Routing Select Routing Drums Preset Load New Regarding user presets the palette of options is extended since factory presets are not editable To see the difference between both types highlight them one after the other by tapping once...

Страница 121: ...ect Outs Mutes every input channel in every output and configures direct outs completely as 4 stereo outs Clear All Mono Direct Outs Mutes every input channel in every output and configures direct outs completely as 8 dual mono outs DAW Out Default Default preset with DAW configured direct outs 2 stereo groups for toms and cymbals and 4 mono configurations for kick snare ride and hi hat Routing Ot...

Страница 122: ...AMING PRESETS Renaming a preset will affect the preset name only and retain individual parameter values This option is only available for user presets without preceding lock icon 1 Tap the Routing Preset Field 2 Tap once on a preset name in the drop down list 3 Tap Rename in the Feature Shelf 4 Enter a name for the new preset using the keyboard 5 Confirm by tapping OK 12 1 4 2 5 DELETING USER PRES...

Страница 123: ... of this module 12 2 1 1 EQUALIZER The equalizer function mainly serves to remove unwanted signals from the audio mix such as fre quencies that may cause microphone feedback in the recording environment Since every envi ronment is different the need of correction and the edits required vary significantly depending on the situation Consequently the G9 only provides a constant linear factory preset ...

Страница 124: ...d a broader spread of the spectrum affected by Gain Frequency The frequency mean affected by the gain parameter Regarding Shelving this is the turning point in curvature Gain Boosts or attenuates the set band Frequency mean by the amount of Gain dB adjusted Neighboring frequencies get affected by the dB value of the Filter curve at this frequency 12 2 1 1 2 EDITING EQ CURVES Proceed as follows 1 T...

Страница 125: ...correction take effect in a narrow span around the chosen frequency value b Low Q values will widen the frequency range to be affected 10 Repeat steps 3 9 with the other frequency bands if necessary 11 Optional Save changes depending on the equalizer type a Pad Equalizer 3 Band By saving the drum kit direct or saving an EQ preset indi rect b Output Equalizer 4 Band By creating a new EQ preset Outp...

Страница 126: ...Soft Determines whether the compression is faded in soft or whether it is applied according to the parameter settings im mediately Hard as soon as the threshold value is exceeded Soft creates a soft line of transition around the set threshold Soft blurs the Threshold Attack 0 09 100 ms Sets a delay time for the compressor to start working as soon as the level exceeds the Threshold This way you can...

Страница 127: ...y for the compressor to stop working as soon as the Level drops below the Threshold using Release 10 Optional Save changes by storing the drum kit pad compressors or save your custom compressor as a preset pad Compressors and output compressors Hint Pad Compressors are part of the drum kit parameters and can be saved by saving the drum kit or creating a new drum kit direct storage as custom settin...

Страница 128: ...ceding lock icon and User Presets without lock icon Setup Preset Field and Browser Preset Field Preset Browser Equalizer Compressor Select Equalzer Preset Load Save Rename New Delete Regarding user presets the palette of options is extended since factory presets are not editable To see the difference between both types highlight them one after the other by tapping once on the corresponding list en...

Страница 129: ...kit to replace the preset currently stored Hint A newly created preset will be added to the preset library only It is not automatically stored with the active drum kit Only for Pad EQ and Compressor Kit Editor To ensure that the new preset loads with the kit you will have to additionally store the drum kit afterwards If not changing the kit will load all presets from the last saving 12 2 1 3 3 OVE...

Страница 130: ...is possible assign and mange control settings for peripheral devices choosing options from a predefined list The G9 allows for choosing between two types of control a Foot Switch To be chosen in conjunction with standard foot switch pedals sending stereo signals b Pad Switch For the use in conjunction with standard analog drum trigger pads stereo Hint Selecting Pad Switch Function will occupy the ...

Страница 131: ...cted but remote device The relationship of MIDI devices inside a MIDI network can be ambivalent All can function as server and client at the same time You can compare the function of MIDI in the digital music world best to the role of sheet music in the traditional way of thinking Sheet music contains all important information about a piece to reproduce it recognizably everywhere with any group of...

Страница 132: ... MIDI IN port or the built in USB MIDI connection Both ports can be found in the back of the console Ports MIDI MIDI Out unidirectional MIDI In unidirectional USB MIDI bidirectional connection in out 12 3 1 1 1 ROUTING MIDI SIGNALS The first column of the MIDI function set specifies to which output incoming control data is directed Tap on the corresponding fields for MIDI IN or USB MIDI and choose...

Страница 133: ...ation received from the MIDI out of the G9 back into the console to drive the internal sound processor In this setup the G9 sound processor would receive 2 identical sets of control data if Local Control was set to on Turn off Local Control to reduce the amount of re ceived data and avoid unnecessary duplication of signals and unwanted side effects See the following table for reference G9 MIDI Loc...

Страница 134: ...ed number of hardware components to control other devices or let these instruments be controlled by external MIDI devices You have the option to assign a limited number of Continuous Controllers out of the spectrum of the 127 controllers specified in the MIDI 1 0 stand ard The following table lists all available and relevant Continuous Controllers with their controller number and description The l...

Страница 135: ... t be compatible with the standard MIDI protocol The programs to change are the drum kits available in the Drum Kit Browser where the Drum Kit index number equals the program Program assignments are displayed as a chain of Internal Program Internal Program Name Drum Kit External Program The direction how this chain is read or applied is defined by the channel switches Transmit Receive 12 3 2 1 PRO...

Страница 136: ...on Turns program change off completely default Only the G9 controls programs of external MIDI devices by changing the drum kit The G9 only reacts to external MIDI program changes by changing the kit according to the linkage of programs in program chain Change programs of external devices and accept the drum kit to be changed by external MIDI program changes Turn Transmit Channel on if you like to ...

Страница 137: ...be set as default screen when pressing the red Home Button 12 4 1 1 AUTO OFF With Auto Off you can time when the G9 shuts down Tap repeatedly the Auto Off field to cycle through the countdown times available There are five options off 30 mins default 1h 2h 4h 12 4 1 2 KNOB BRIGHTNESS To adjust the Knob Brightness proceed as follows 1 Tap once on the corresponding visual dial to activate the fader ...

Страница 138: ... Within this function set you can manage all your Wi Fi connections and settings The Wi Fi connec tion is essential to the use of the sound store online as well as the internal update function To establish a Wi Fi connection between the built in card and the external router proceed as fol lows 1 Turn on Wi Fi 2 Tap the Search button 3 Select a Network from the List that opens up tapping once 4 Tap...

Страница 139: ...n between Bluetooth and the MIX IN port Bluetooth signals and signals from the MIX IN port cannot be played back at the same time As soon as Bluetooth is turned on audio signals from connected devices at the MIX IN port will be muted The G9 routs the signals with priority for the last action Consequently plugging in an audio cable at the MIX IN port while playing back audio via Bluetooth will mute...

Страница 140: ...ssible to create a backup of drum kits using the export function of the Drum Kit Browser The export routine will save all drum kits in the default system folder on the internal SD card which is excluded from the factory reset This way you can import your drum kits easily after the factory reset Sounds purchased in the Shop must be downloaded and reimported again A firmware upgrade on the other han...

Страница 141: ...ating your device The update process is split into 2 steps Download and Update You can choose between downloads from the support center on gewamusic com or downloads directly to your G9 using the download function of the update tab The update routine itself can be executed from either USB Stick or the internal Update feature of the workstation Which way you choose is up to you However with a worki...

Страница 142: ...se lected update and manual Using this method the latest Firmware and the latest Manual will be downloaded at the same time Update Dialogue Firmware version 9 9 99 is available Do you want to download it now 294 34 MB Change Log V 9 9 99 New Feature 1 Feature 2 Bugfixes Fix 1 Fix 2 User s Manual Version 9 99 99 Download Install Download Cancel 5 Choose one of the following options from the bottom ...

Страница 143: ...d file extension in order to work correctly Please do not rename firmware files or change their file extension swu 12 4 6 2 1 SOFTWARE UPDATE VIA USB Proceed as follows 1 Extract the downloaded files 2 Copy the firmware edrum_fw_ swu to the ROOT directory of your USB stick 3 Turn off your G9 by pressing the Power button 4 Plug the USB stick into the USB port of the front panel 5 Turn the G9 on by ...

Страница 144: ...ith different purposes or alternatively remove any swu file from the root directory right after the update 12 4 6 2 2 UPDATE ROUTINE VIA MODULE The Update section of the G9 derives its data from the default SYSTEM folder Firmware on the internal SD Card All files contained meeting the criteria for check sums naming conventions and version number will be considered The latest valid firmware version...

Страница 145: ...hased multi layer sounds 13 1 ON STAGE With the On Stage tool it is possible to compile important information around a song such as drum kit sound metronome backing tracks and pdf charts and make altogether available by tapping on one of the numbered tiles This way you can avoid time consum ing adjustments on stage and between the songs The On Stage screen always displays 8 tiles which can be save...

Страница 146: ...xpressions speci fied for each type In edit mode you can tap these fields to change the properties of the tile This will open the standard dialogues associated with a media type In this section we won t go into depth about these browsers again See the following table for the dialogues implemented and the chapter where their functioning is explained in more detail Tiles Media Types and Associated D...

Страница 147: ...d down 2 seconds With an adequate setlist loaded proceed as follows 1 Tap on the Edit button in the top right corner of a tile 2 Tap the fields that have changed color a Drum Kit b Metronome c Song Player d Attach Pdf button 3 Specify the expression of media types in the browsers that open 4 Exit the tile edit mode by tapping the Edit button again 5 Tap the next tile number and repeat steps 1 4 6 ...

Страница 148: ... or Effects you can skip this section Setlists Preset Field and Browser Preset Field Setlist Browser Select Stage List Preset Load Save Rename New Delete As with all other G9 presets the feature shelf updates depending on the chosen preset type Facto ry or User Preset Management Feature Shelf Preset Type Function Load Save Rename New Delete Factory Preset User Preset 13 1 3 1 LOADING SETLISTS To l...

Страница 149: ...preset browser again and tap New After that you can edit the tiles and overwrite the preset with Save 13 1 3 3 SAVE SETLISTS Save allows for saving edits of a setlist as well as overwriting presets in the setlist browser with the values of the current tile set This option is only available for user setlists Proceed as follows 1 Load a preset to start with 2 Edit the tiles as desired The Setlist Ed...

Страница 150: ...rm by tapping OK 13 1 4 WORKING WITH SETLISTS Setlists can be used in different ways Their main purpose is to make available important settings associated with a song by tapping a single button tile number But also during your practice routines it can contribute to a more efficient time management by providing matching charts drum kits tempo and audio files Tapping a tile number is very convenient...

Страница 151: ...st access to the Play Stop buttons of the On Stage mode to quickly react to issues on stage The built in Exit button closes the Pdf viewer and returns to the active tile in On Stage mode The allocation of these functions at the bottom minimizes the distance to the player and thus speeds up the workflow PDF Viewer Document Pdf Viewer 1 5 Pdf Viewer Exit to On Stage Screen Closes Pdf Viewer Next pag...

Страница 152: ...ication All functions available are visible in the start screen PDF Reader Document Name pdf 1 22 Chapter 1 Bookmark Navigation Chapter 2 Screen Layout Chapter 3 Expanded How to Proceed Chapter 4 Close Document The following table explains buttons and icons of the start screen PDF Reader Functions Open File Select Browser Next page Previous page Zoom Rotate page clockwise in Increments of 90 Expan...

Страница 153: ...ion and Search Intern USB Search Navigation Up the path G9 File Select Browser PDF File Select The left column displays all folders in the open directory the right column lists all contained files Double tap on a folder name to open it moving down the directory path Tap on the white bar below the SD and USB buttons to move up the path by one node each tap The panel in the middle contains filter op...

Страница 154: ... a document contains bookmarks then they are displayed in the left half of the resizable window next to the open page Bookmark hierarchies can be opened and collapsed by tapping on the preceding arrow buttons Bookmark Navigation Expand bookmark hierarchy Collapse bookmark hierarchy Tap in the center of the dividing bar between both split windows and resize the bookmark bar as desired by dragging T...

Страница 155: ...s internal SD card and external USB device There is no limit for file extensions but keep in mind that the G9 may not provide applications to open them However it is possible to comfortably manage all storage mediums and file types without any external operating system Icons are provided for the most common file extensions to easily distinguish between them when browsing folders The ability to sto...

Страница 156: ...stored on the internal SD Card In conclusion Import Tool and File Manager address different storage mediums and applications 13 3 2 SCREEN LAYOUT AND GENERAL PROPERTIES The File Manager is in the Tools mode Tools File Manager Once you open it a split window be comes visible The top section informs about the current memory usage of all accessible storage mediums Two horizontally resizable split win...

Страница 157: ...the active split window above The active split window is characterized by a highlighted frame To change the active window simply tap inside its frame and let the task bar functions affect the spilt window of your choice Task Bar Zones Filter Sort By Source Selection Path Navigation Selection Search File Transfer History Organize Enable Disable Filters and List Order Filter with icons for navigatio...

Страница 158: ...destination Undo up to 10 steps Redo up to 10 steps New folder preserving existing collections Rename highlighted list entry preserving existing collections Delete selected Opens the Filter Manager 13 3 4 COLLECTIONS CONCEPT AND OVERVIEW Compiling a collection is the process of gathering several files and folders from multiple path direc tories of multiple sources SD USB within the same split wind...

Страница 159: ...y directo ries As opposed to the traditional way of copying files step by step before leaving a folder the collection feature saves all intermediate steps and requires executing job tasks only once Since the G9 file manager provides two split windows the user can compile maximally two parallel collections for maximally 2 different destination folders Finally when having compiled your collections y...

Страница 160: ...ndow tap the area of folder contents and proceed in the same fashion as described in steps 1 5 Note that selected files of collection 1 appear grayed out A file or folder can t be member of 2 collections at the same time Navigate back in collection 1 and uncheck the item first be fore adding it to collection 2 and vice versa 7 Activate a split window with an active collection check the correct des...

Страница 161: ...Uncheck All button affects all files and folders in the active directory and all files and folders in the hierarchy below whereas Refresh unchecks all members of the collection of the active split window With the search dialogue active Refresh only affects the search term Deleting a collec tion is only possible in the default File Manager Screen Refresh Uncheck All 13 3 7 COLLECTION BASED TASKS MO...

Страница 162: ...by a single tap inside its frame Creating new folders 1 Optional Select a split window by a single tap 2 Optional Navigate to a directory of choice 3 Tap New Folder in the Task Bar 4 Enter a name using the keyboard 5 Confirm by tapping OK or abort by tapping Cancel 13 3 8 2 RENAME As with creating new folders renaming of single list entries is always possible without destroying existing collection...

Страница 163: ...tion find their application mainly in the Tools mode 13 4 1 SEARCH The search function of the G9 is viewed as a plug In which is not exclusive of the File Man ager It can appear in other file browsers as well It is designed as an inline tool which can be utilized as an alternative to linear path navigation open folders by double tapping and therefore inherits all important functions from the File ...

Страница 164: ...ollections remain intact Clearing collections can only be realized outside the search dialogue Search Refresh clears search term from the search box Internal SD card opens root directory External USB device opens root directory Go to root directory of active path in active split window Move up one level in folder hierarchy Check All Uncheck All Opens by tapping the magnifying glass in the UI Affec...

Страница 165: ... functionality o Independent from Filter Manager Refreshing editing the search term o Selections made so far Check Boxes are added to the collection File Man ager continues collecting items for collections Close o Tap Close o Or Song Player PDF Reader Double tap a file to select o Or change mode e g to Performance Close Rules o Selections made so far Check Boxes are added to the collection File Ma...

Страница 166: ...ategory will select all file types of that category at the same time parenting o Uncheck individually if needed category check box becomes unchecked other children remain checked o Check All Uncheck All buttons available affect all categories and their file types at the same time Sorting Function o No multiple selections allowed o Choose one of the options provided Close o Close the dialogue by ta...

Страница 167: ...ist during your daily work Selections made in the Filter Manager will not affect File Select browsers Song Player or PDF Read er but only apply to the split windows of the File Manager Filter Manager Complete Filter List Audio Docs Playlists Video Drum Kits Device Specific Music Notation Graphics Web Filter Manager Sort By Filter Name A Z Audio Name Z A Date Ascending Date Descending File Type Siz...

Страница 168: ...ts all imported sounds These sounds are available in the Sound Browser filed under a specific instrument category and indexed according to the next free slot number available The Trash Can icon deletes an entry from library and Importer likewise The Storage column lists all downloaded sound packages from the Cloud Downloaded sounds are provided as Sound Packages with several containers which repre...

Страница 169: ... SAMPLES SINGLE LAYER To import your custom samples proceed as follows 1 Go to Tools Import Tool 2 Tap Import wav samples to open the File Select browser 3 Select a source USB or internal SD card 4 Browse to your directory with the desired samples 5 Select a sample file by double tapping 6 Observe the Library column until the import is completed a trash can appears next to the imported file 7 Go t...

Страница 170: ...on Imported custom sounds are filed under category tab Wave Select Import as Source see section 9 2 1 4 Sound Browser Properties on page 41 SYSTEM Intern USB Search DrumKits Firmware Manuals QuickRecord Filter Sorted by Name Date Type Cabasa_Stroke wav Clacker wav Copper_tambourine wav Daiko_Open wav Elevator_Open wav Garage_Door wav Double Tap to import this File wav Triangle_Large wav SYSTEM ...

Страница 171: ... import is completed a trash can appears next to the imported file 4 Optional Repeat steps 1 and 2 for other containers in the Storage tab 5 Go to Kit Editor Module 2 Sound Select and assign imported sounds via the Sound Brows er The Sound Browser is explained in detail in the Kit Editor section Imported sounds from the cloud are automatically filed under the instrument categories associated with ...

Страница 172: ...y available for user import 2 GB are reserved and occupied by the facto ry sound bank 13 5 5 2 SCENARIOS FOR IMPORT LIMITATIONS It is easy to reach the maximum number of import slots by importing numerous small WAV files Over time these imports will accumulate and since they are small chances are high that you finally reach upload slot 200 while consuming only a small amount of flash memory Reachi...

Страница 173: ...embodiment of property rights of sounds excludes the repurchase of sounds deleted from the device This means that they are always available for Down load after the login to the Shop application see section13 6 3 Digital Property Rights on page 165 Regarding the import of WAV samples we recommend creating an import folder on the internal SD Card using the File Manager and copy your sounds to the de...

Страница 174: ... the Cloud 2 Tap on the Status button in the bottom left corner of the shop screen Icons Cloud Status button Tap for connection details This will call up the Login pop up The dialogue contains information about your login data such as Serial Number and the Username chosen during your registration Highlighted in red you can ob serve the current status of your cloud connection which should be not co...

Страница 175: ...GEWA sound store the customer acquires a lifetime license which entitles to download and import purchased sounds for an infinite amount of times on up to 5 five G9 devices parallelly The digital rights acquired apply to the number of registered device serial numbers in the sound store which are exchangeable 13 6 4 SALE OR EXCHANGE OF A G9 DEVICE Herewith the customer is informed that by selling a ...

Страница 176: ......

Страница 177: ...rate 24 sounds simultaneously Furthermore according to GM additional control parameters are defined such as e g effect control General MIDI standard sounds Sounds or instruments in compliance with the specifications of the General MIDI standard protocol Reverb This simulates a room environment It is preconfigured for some sounds to give them a more lively and realistic appeal Chorus The chorus eff...

Страница 178: ... the purchase price or withdraw from the contract and if the dealership is responsible for the defect demand compensation for damages and or expenses deriving from the defect s The buyer must inform the dealer immediately on any defects identified The only way to prove a warranty claim is that the buyer can present a valid proof of purchase e g invoice Damage arising from incorrect handling operat...

Страница 179: ...1 Check settings in the routing matrix and load one of the Factory Presets General Settings Module 1 Routing Drums and Routing others 2 If you have worked with MIDI lately a turned off Local Control might prevent the control data generated by the connected hardware from accessing the internal sound engine Check General Settings Module 3 MIDI Global MIDI Settings Soft Thru Local Control The Mix Inp...

Страница 180: ...al Memory external USB Connections TRIGGER INPUTS 14 x TRRS Socket MONITOR OUT 2 x TRS Socket Mono MASTER OUT BALANCED XLR SPDIF Stereo 48 kHz DIRECT OUT 8 x TRS Socket Mono PHONES TRRS Socket Stereo MIX IN TRRS Socket Stereo MIDI IN OUT THRU Outputs COMPUTER CONNECTION USB B Type USB Hi Speed AUDIO MIDI FOOT SWITCH 1 x TRRS 2 Channel AC IN IEC C17 Wireless Connections Bluetooth Wi Fi Recording Sa...

Отзывы: