background image

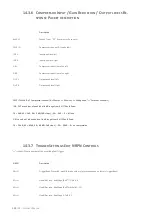
142

 |G3 – Owner’s Manual 

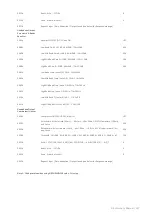
14.3.10


O

UTPUT 

L

EVELS 

R

ESPONSE 

P

ACKET DESCRIPTION 

(H

OST 

->


5916) 


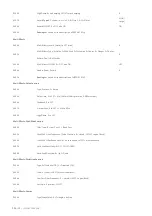
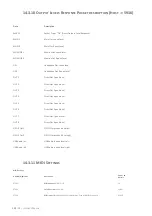
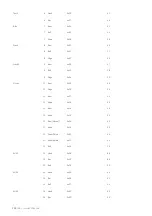
Data  

Description  

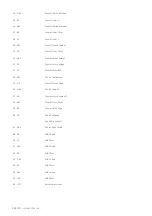
0x4452  

Packet Type = "DR" (Direct Outputs Level Response)  

MAIN L  

Main Out L peak level  

MAIN R  

Main Out R peak level  

MONITOR L  

Monitor Out L peak level  

MONITOR R  

Monitor Out R peak level  

HP L  

Headphone Out L peak level  

HP R  

Headphone Out R peak level  

OUT 1  

Direct Out 1 peak level  

OUT 2  

Direct Out 2 peak level  

OUT 3  

Direct Out 3 peak level  

OUT 4  

Direct Out 4 peak level  

OUT 5  

Direct Out 5 peak level  

OUT 6  

Direct Out 6 peak level  

OUT 7  

Direct Out 7 peak level  

OUT 8  

Direct Out 8 peak level  

S/PDIF Out L  

S/PDIF Output peak level left  

S/PDIF Out R  

S/PDIF Output peak level right  

USB Audio In L  

USB Audio In peak level left  

USB Audio In R  

USB Audio In peak level right  


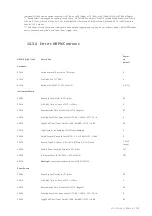
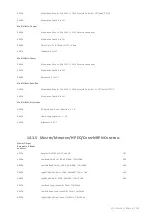
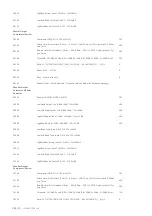
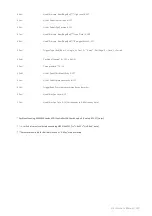
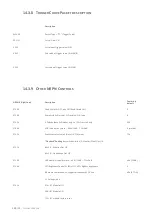
14.3.11


MIDI


S

ETTINGS


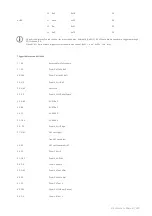
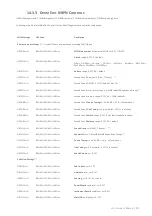
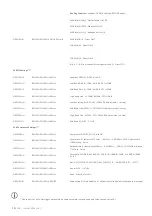
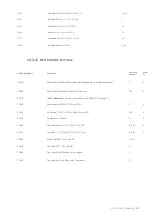
MIDI Settings  

NRPN # (High|Low)  

Description  

Power-up 
default  

3720h  

MIDI Channel 

0=Off, 1..16 


10 

3721h  

Local Control 

0=Off, 1=On 


1 (On)  

3722h  

MIDI Input 

Soft through 0=Off, 1=to MIDI-Out, 2=to USB MIDI, 3=to both 


0 (Off)  

Содержание G3

Страница 1: ...on Keep this document available for immediate reference Lesen Sie diese Bedienungsanleitung vo nahme und beachten Sie die Sicherhe Bewahren Sie die Anleitung zum Nachschl Download the complete owner s manual at gewadrums com gewadrums com service Eine Bedienungsanleitung zum Download gewamusic com https www gewamusic com downloads Manufacturer GEWA music GmbH Oelsnitzer Straße 58 08626 Adorf GERMA...

Страница 2: ...ry Information Canada XI 1 8 Recycling XIII 2 Scope of Supply GEWA G3 15 3 Mounting instructions 16 3 1 Mounting the module bracket 16 3 1 Connecting external equipment to the G3 module 17 3 1 1 Front 17 3 1 1 Rear Panel 18 3 1 2 Cymbals 19 4 User interface 21 5 Switchig the device ON and OFF 23 5 1 Icon List 24 6 Before you start 25 6 1 Welcome Wizard Start Assistant 25 6 2 Trigger Setup 27 6 3 H...

Страница 3: ...k X Fade Sensitivity 37 8 3 Metronome settings Click 38 8 4 Options 40 9 INSTRUMENT 41 9 1 Sound editing 42 9 1 1 Instrument Volume 42 9 1 2 Coarse Tuning 42 9 1 3 Fine Tuning 42 9 1 4 Attack Time 43 9 1 5 Release Time 43 9 2 FX Send 44 9 3 Sound 45 9 3 1 Sound Grouping 46 9 1 Equalizer Compressor 47 9 2 47 9 3 Second Sound 50 9 3 1 Sound Selection Second Sound 51 10 TRIGGER SET 52 10 1 Settings 5...

Страница 4: ...11 2 EFFECTS 71 11 2 1 Ambient 72 11 2 2 Instrument Reverb 74 11 2 3 Room Reverb 79 11 2 4 Multi FX 80 11 2 5 FX Type Multi FX 83 11 2 6 Parameter Detail Multi FX 85 11 3 USB Load Save 89 11 3 1 Import Wave Sound 90 11 3 2 Load Wave Sound 91 11 3 3 Import Backup 92 11 3 4 Import Kit 93 11 3 5 Export Backup Kit 94 11 4 SETUP 95 11 4 1 Bluetooth 97 11 4 2 BT Name 100 11 5 MASTER 101 11 5 1 Routing I...

Страница 5: ... NRPN GEWA G3 G5 G9 127 14 3 1 MIDI Implementation 127 14 3 2 Drum Kit Trigger List 127 14 3 3 Drum Edit NRPN Controls 131 14 3 4 Effects NRPN Controls 133 14 3 5 Master Monitor HP EQ Comp NRPN Controls 135 14 3 6 Compressor Input Gain Reduction Output levels Response Packet description138 14 3 7 Trigger Settings Edit NRPN Controls 138 14 3 8 Trigger Curve Packet description 140 14 3 9 Other NRPN ...

Страница 6: ... MANUAL The following symbols are used to signal risks and to give advice Level of Risk Symbol Definition Serious Injuries WARNING Failure to observe the following safety instructions can result in serious injury or death Electrical Hazard WARNING Failure to observe the following safety instructions can result in serious injury or death by electrical hazards Minor Injuries and device damage CAUTIO...

Страница 7: ...ted candles on the apparatus Candles or oil lamps can tip over and cause a fire Never bring open fire on or near to the digital drum set Do not install near any heat sources such as radiators heat registers stoves or other apparatus including amplifiers that produce heat Use the apparatus only in moderate climates not in tropical climates WARNING Unusual Behavior Switch the drum console off or unp...

Страница 8: ... environment Setting up the digital drum set in damp rooms Using power supplies not authorized by GEWA music or connecting the console to an electrical outlet de spite mismatching local voltage specifications Playing the digital drum set close to electrical or electronic devices such as stereo systems TV sets radios or mobile phones These devices can cause interference and seriously effect and dec...

Страница 9: ... conformity is declared EN55032 2015 EN55035 2017 A11 2020 EN61000 3 2 2014 EN61000 3 3 2013 EN301489 17 V3 2 4 EN62368 1 2014 A11 2017 Compliance with the above directives is confirmed by the CE label on the device The declaration of con formity can be viewed at the following address GEWA music GmbH Oelsnitzer Straße 58 08626 Adorf GERMANY ...

Страница 10: ...d to comply with the limits for a Class B digital device pursuant to part 15 of the FCC Rules These limits are designed to provide reasonable protection against harmful interference in a residential installation This equipment generates uses and can radiate radio frequency energy and if not installed and used in accordance with the instructions may cause harmful interference to radio communication...

Страница 11: ...nd 2 this device must accept any interference received including interference that may cause undesired operation This information is also shown on the permanent label at the bottom side of each device RF Exposure Statement This equipment complies with ISED radiation exposure limits set forth for an uncontrolled environment and meets the RSS 102 of the ISED radio frequency RF Exposure rules This eq...

Страница 12: ...reil doit accepter tout brouillage radioélectrique subi même si le brouillage est susceptible d en compromettre le fonctionnement Ces informations sont également affichées sur l étiquette permanente en bas de chaque dispositif Déclaration concernant l exposition humaine aux RF Cet équipement est conforme aux limites d exposition humaine aux radiofréquences d ISDE exposés pour environnement contrôl...

Страница 13: ...t devices labeled with this symbol must be disposed of separately from household waste Under the Electrical and Electronic Equipment Act owners of devices marked with this symbol are required by federal law to deposit Electrical waste and electronic equipment in a separate waste collection Please help us with your contribution to protect the environment by not depositing your old electric equipmen...

Страница 14: ......

Страница 15: ...kage contents is complete G3 Drum Module 10 5 12 7 mm module bracket Product ID card 1x 1x 1x USB Stick Quick start guide multilingual 1x 1x Power cable 1 8 m IEC C8 Type C CEE 7 16 Type A Type G EU CH CU IL IN US CA CU JP TW UK 1x 1x 1x Type I AU AR NZ 1x The number of power cables included varies depending on the country ...

Страница 16: ...16 G3 Owner s Manual 3 MOUNTING INSTRUCTIONS 3 1 MOUNTING THE MODULE BRACKET ...

Страница 17: ...G3 Owner s Manual 17 3 1 CONNECTING EXTERNAL EQUIPMENT TO THE G3 MODULE 3 1 1 FRONT ...

Страница 18: ...18 G3 Owner s Manual 3 1 1 REAR PANEL Make sure that the unit is switched off before connecting the equipment ...

Страница 19: ...d In operation with GEWA modules only the jack that is closer to the center hole of the cymbal is relevant 3 1 2 2 OTHER MANUFACTURERS Connect analog sensors from other manufacturers as shown in the diagram below Also note the selection at TRIGGER SETTINGS AUX1 F1 Trigger Type 3 Way in the module Trigger Type by Cymbal Pad Type ...

Страница 20: ...L PADS WITH SEPARATE OUTPUT FOR THE BELL Cymbal pads with their own output for the bell can be connected to GEWA modules in various ways See the table below for all possible combinations of Bow Edge and Bell input channel assignments GEWA input assignments for cymbals with separate bell channel Cymbal components sensor Bow Edge Bell Input Input channel Aux 1 Aux 2 NOTE Cymbals with a separate bell...

Страница 21: ...3 Owner s Manual 21 4 USER INTERFACE The function of the dials and keys may vary depending on the active level based on the software This section describes the default assignment when the unit is started ...

Страница 22: ...eld of the display Dial 3 Variable application The function is shown in the lower right field of the display Selection and confirmation button ENTER ENTER Start Stop Metronome basic display navigation Home Start up screen Menu Opens the menu for basic settings effects mix and MIDI settings Instrument Opens the menu with pad specific sound parameters Trigger Set Opens the menu for trigger settings ...

Страница 23: ...ins plug into the socket When the mains cable is connected the Power key lights up red The unit is in stand by mode Press the Power key to start the unit Wait while the unit starts up To save energy the unit has the AUTO OFF function With the factory setting the unit shuts down automatical ly after 30 minutes of inactivity You can change this setting at any time in MENU SETUP Auto Off 1 2 3 4 ...

Страница 24: ...e Songplayer Folder Songplayer Loop function Songplayer Starting point set Loop Song Player Loop Active Song Player Preset Handling Abort Back Navigation Load Navigation Save Preset Management Edit Navigation Load from USB stick Navigation Factory Preset Navigation Open Navigation Delete letter Navigation Scroll list Navigation Trigger Select Zone Head Trigger Sensor Zone Rim Trigger Sensor Zone B...

Страница 25: ...s section gives a brief introduction to important global settings of your GEWA G3 Module 6 1 WELCOME WIZARD START ASSISTANT At the first start and after every factory reset you are offered configuration help so you can quickly and easily set your G3 module to the basics Of course you can quit the process by pressing F3 CANCEL and set it manually For manual setting read the following chapters POWER...

Страница 26: ...gation keys 8 and confirm the selection with F2 F2 NEXT Press the Hi Hat together with your foot and press F2 NEXT F2 NEXT Open the Hi Hat completely and press F2 NEXT F2 NEXT Test the Hi Hat and press F2 SAVE F2 SAVE Setup completed Press F3 DONE F3 DONE 3 4 5 6 7 ...

Страница 27: ...factory trigger performance GEWA G3 STUDIO GEWA G5 STUDIO I GEWA G5 PRO Should you use the G3 or G5 module with the pad configurations of the G9 then please select one of the following trigger presets GEWA G9 STUDIO GEWA G9 PRO 5 GEWA G9 PRO 6 Observing the safety instructions of the Quick Start or operating instructions proceed as follows Turn on the power by pressing the POWER P button POWER Pre...

Страница 28: ...UP F2 Setup Press F1 PRESET F1 Preset Use the dial 5 or the navigation keys 8 to select your GEWA set from the list and confirm via F1 The process is now complete and your GEWA drum set is optimally tuned to the G3 module F1 Load 2 3 5 ...

Страница 29: ...ng between hardware and software to produce the best playing results Proceed as follows to calibrate the Hi Hat Press 12 TRIGGER SET Trigger Set Press F3 HH CALIB F3 HH CALIB Press the Hi Hat together with your foot and press F2 NEXT F1 NEXT Open the Hi Hat ompletely Confirm the action by pressing the button F1 FINISH F1 FINISH 1 2 3 4 ...

Страница 30: ...fully calibrated and playable With the Hi Hat symbol you can directly test whether the mechanism works Then confirm the setting by pressing the button F1 DONE F1 DONE If you want to leave the calibration without saving press the button F3 5 ...

Страница 31: ... press another menu button If you are in a submenu then you can go back one level at a time by pressing F3 You can also use the navigation keys 8 for operation Use the keys to make a selection in the lists DOWN UP LEFT RIGHT The black push button in the center is the ENTER button and the start stop button for the metronome click You can for example change drum kits in the home menu with the and bu...

Страница 32: ...ration As soon as you make changes to the settings that are not automatically saved a is shown next to the corresponding name to indicate this Save your changes accordingly before changing the drum kit preset Unsaved settings will otherwise be discarded 7 2 1 LOAD Use the dial 5 or the navigation control 8 to select the desired preset from the list Press the button F1 or ENTER for loading the pres...

Страница 33: ... the navigation keys 8 or the dial 6 CHAR to select the desired character Press ENTER to confirm the respective character To change the cursor position use the dial 5 CUR The uppercase and lowercase letters as well as special characters can be selected by using the dial 7 ABC abc Delete individual characters by pressing the button F2 Cancellation is possible at any time by pressing the button F3 S...

Страница 34: ... then select a kit from the list using the arrow keys 8 or the dial 5 Confirm your entry with F1 or ENTER Press the and keys to scroll through the kit list Use the arrow keys 8 to move to the next kit Use the keys to change presets in steps of 10 Changing the Snare Rim properties Define whether you want to use a cross stick X Stick a rimshot or a dynamic combination of both X Fade Tap the F2 key r...

Страница 35: ...e metronome editor Here you can change the time signature the rhythm in terval the click volume and many other metro nome settings Volume settings Use the dial 5 to select the volume for the two master outputs Use the dial 6 to select the volume for the headphone output Set the headphone volume to a low level before use to avoid damaging your hearing Especially with in ear headphones the volume is...

Страница 36: ...01 Press F3 to exit the menu Functions Category Load Save Overwrite Factory Preset User Preset Action Press F1 Press F2 After loading a drum kit you are automatically redirected to the HOME menu You can find a detailed description of how to load presets save and overwrite at Loading and saving from presets As soon as you make changes to the settings that are not automatically saved a is displayed ...

Страница 37: ...y pressing the F2 key several times 1 Rimshot 2 X Stick 3 X Fade A dynamically controlled function that switches between a cross stick and a rimshot depending on the strength of the strike 4 X Fade EDIT A window opens with a fader Now you can set the threshold value that suits you with the dial 6 The window closes auto matically after 2 seconds ...

Страница 38: ...er the first beat is emphasised or not If the tap channel function is switched on the correspond ing channel is also displayed Start and stop the metronome by pressing the ENTER key 8 Setting the tempo bpm With the navigation keys 8 Left and right for steps in 1 bpm per key tap Down and up for steps in 10 bpm per key tap Alternatively the tempo can also be adjusted with the 22 and 23 keys Parallel...

Страница 39: ...e Button F2 TAP to tap the tempo Interval Rhythm interval Use the dial 5 to set the interval Time Sig Scroll through the preset time signatures with the dial 6 For advanced settings see F1 OPTIONS Click Volume Adjust the volume of the metronome sound To exit the metronome function and return to the home screen press the F3 key Set the metronome volume to a low level before use to avoid damaging yo...

Страница 40: ... of the preset tempo Switch the function to off to only receive visual feedback while the metronome is switched on Time Signature Scroll through the preset time signatures The most frequently used time signatures are at the front Press ENTER to enter the editing mode Here you can also set special time signatures Use the dial 5 COUNT to select the time signature Use the dial 6 PULSE to select the p...

Страница 41: ...hoose a User Preset Slot F2 If you do not save and change the drum kit preset all changes will be reset to the last saved state INSTRUMENT Instrument You always see the currently loaded drum kit in the upper part of the display With the dial 5 you can select the respective input pad or cymbal that you want to edit Select the respective zone with the dial 6 You can also use the Auto Detect function...

Страница 42: ...ameters that you can change in the list Use the dial 5 or navigation keys 8 to select the parame ter You can also select the input and the zone on the level with the dial 6 To change a value use the dial 7 or the navigation keys 8 9 1 1 INSTRUMENT VOLUME This volume control affects the basic volume of the currently active pad and zones In the MIX menu you can mix the preset in relation to the mast...

Страница 43: ...ather soft attack sound This way in the case of a snare you can also simulate different snare wire tensions 9 1 5 RELEASE TIME Controls the length of the sustain decay In this way the dampening of an instrument can be simulated The natural sustain of the DRY sample without effects shortens in low dial positions and sounds longer in high dial positions ...

Страница 44: ...nd The fader channel is displayed inverted Use the dial 7 VALUE or the navigation keys 8 to change the strength of the effect If you want to apply the effects to other drum sounds in this menu use the dial 6 INPUT to switch the different input channels and components Press F3 to exit the level or any menu key to exit the entire menu As soon as you make changes to the settings that are not automati...

Страница 45: ...ect sound source With the dial 7 TYPE you can select the sound category from the list that you choose your sound from The following categories are available Kick Drums I Snare Drums I Toms I Ride Cymbals I Crash Cymbals I Hi Hats I Cymbals SFX I Percussion 1 I Percussion 2 I Sound SFX I Custom Waves Select sound Use the dial 5 or the navigation keys 8 to select the sound you would like to load Gro...

Страница 46: ...tly to the corresponding zones For example Snare Snare CS consisting of two samples Snare Center Snare Side Snare Rim X Stick Tom Pad Head Rim shot Cymbals Bow Bell Edge Activate the function by pressing F2 GROUPING Grouping deactivated Grouping activated If you want to use the sound of only one zone deactivate the sound grouping function in advance ...

Страница 47: ... kit parameters and a part of the mix that can be heard in Direct Outs and Digital Outs EQUALIZER The EQ on the G3 affects the volume of the three frequency ranges LOW MID HIGH COMPRESSOR With the compressor a smoother audio output can be achieved Unwanted peaks can be lowered and soft sounds can be raised Select the desired menu item Equalizer Pad Compressor with the dial 5 or the navigation keys...

Страница 48: ...he dial 7 or the navigation keys 8 You can select the inputs with the dial 6 To exit the menu press F3 Note that all values are only temporarily saved immediately after they are changed If you want to finally apply the changes save your drum kit preset G3 Presets Pad EQ und compressor Equalizer Compressor Linear Kick Compressor High boost 3dB Snare Compressor Bass boost 3dB Bad Kick Studio Snare A...

Страница 49: ...e level loss caused by ratio This parameter affects the entire dB spectrum of the track Threshold settings are ignored Ratio Determines the compression rate for signals above the threshold The higher the value the more the dynamics are limited Treshold Threshold value for the compression Amplitudes below the threshold remain free of compression Knee Determines the threshold value how the compressi...

Страница 50: ...select the menu item SECOND SOUND ACTIVE with the dial 5 or the navigation key 8 and set it to ON with the dial 7 VALUE the navigation key 8 with ENTER All setting options are identical to the main sound Sound Press F3 to exit the level or any menu key to exit the entire menu To keep the settings save the drum kit before changing the drum kit preset For a detailed description of how to load save a...

Страница 51: ...ound source With the dial 7 TYPE you can select the sound category from whose list you choose your sound The following categories are available Kick Drums I Snare Drums I Toms I Ride Cymbals I Crash Cymbals I Hi Hats I Cymbals SFX I Percussion 1 I Percussion 2 I Sound SFX I Custom Waves Select sound Use the dial 5 or the navigation keys 8 to select the sound you would like to load for the input Lo...

Страница 52: ... channel The middle row shows all trigger inputs The inputs corre spond to the sockets on the back of the unit The active input is indicated by a highlighted letter Select the channel with the dial 5 INPUT Select zone The lower row shows all zones accessible at the active input When the input is changed the component icons are updated according to the trigger bank type assigned to the input channe...

Страница 53: ...nstrument HEAD I RIM BELL I EDGE I BOW The following functions are available for the selected trigger X Talk Press F1 to adjust the trigger behaviour in case of cross talk Preset Press F2 to access the presets Here you can load and save your own trigger presets Exit the menu Press F3 to go back one step Parameter The following values are available for selection GAIN THRESHOLD HIGH LEVEL SCAN TIME ...

Страница 54: ...uitable for pads that produce weaker electrical signals A gain value that is increased too much can lead to losses in the playing dynamics THRESHOLD The value Threshold regulates the sensitivity of the input channel from which velocity a sound is produced Unwanted too weak impulses e g triggering of sounds by vibrations can thus be excluded Procedure Hit a pad e g snare head as softly as you would...

Страница 55: ... MIDI notes with velocity 127 Values between Treshold and High Level define the possible dynamic range SCAN TIME The sampling time of the input signal Increasing it will worsen the latency and improve the accuracy Generally for rubber pads cymbals setting Scan Time to 20 2ms is sufficient for correct signal level detection For mesh pads you may need to increase Scan Time to 30 50 the larger the me...

Страница 56: ...nly resort to Retrigger Mask if even high threshold values and high dynamic decay times Dyn Time cannot turn off the unwanted effects For DIY pads and cymbals good Retrigger Mask values are in the range of approx 4 to 12 milliseconds High Retrigger Mask values make precise detection of fast drum rolls difficult Retrigger Mask Parameter Value range 1 127 TRIGGER TYPE If you use pads from other manu...

Страница 57: ...URVE ID Here you will find the selection of different trigger curves that significantly influence the response behaviour of the corresponding pad The following preset curves are available for selection Linear Convex Concave ...

Страница 58: ...ers are suppressed For most pads with rubber playing surfaces Dyn Level values between 8 and 15 and Dyn Time between 8 and 20 should give the best results For pads with fabric mesh heads it may be necessary to in crease Dyn Time to over 20 and up to 60 as the skin diameter increases Dyn Level Parameter Value range 0 15 Dyn Time Parameter Value range 0 60 ms ...

Страница 59: ...als using the X Talk monitor Then increase the X Talk value on both pads to at least 1 causing pad and receiving pad If the problem persists gradually increase the value on the pad that is receiving unwanted signals It is important that both pads have X Talk values of at least 1 to make them a member of the X Talk group High X talk values on pads experiencing interference will have no effect unles...

Страница 60: ...elf Use the dial 5 or the navigation keys 8 to select an appropriate preset from the list To load the preset press F1 or ENTER To save your own preset select a free USER slot and press F2 Press F3 to cancel the operation For a detailed description of how to load save and over write presets see Loading and saving from Presets ...

Страница 61: ...al components press F2 BANK or the ENTER key Load and save In contrast to the instrument level the trigger select set tings are saved automatically If you want to additionally save and name the settings as a separate preset you can do this in the submenu Preset An indicates that you have made changes Auto On Turn dial 7 to enable disable automatic channel detection Play a component on your drum ki...

Страница 62: ...ion keys 8 to select the input channel you want to change and press F2 Bank or ENTER Now select the category of your trigger with the dial 5 CAT or the navigation keys 8 If you have selected the hi hat channel the symbol hi hat is also displayed Confirm your selection with F1 or by pressing ENTER Press F3 to go back one step ...

Страница 63: ...ted with the GEWA instrument we have created trigger presets for you Of course you can also create save or load your own presets Use the dial 5 or the navigation keys 8 to select a corresponding preset from the list To load the preset press F1 or ENTER To save your own preset find a free USER slot and press F2 Press F3 to cancel the operation For a detailed description of how to load save and over...

Страница 64: ...ware and software to produce the best playing results Proceed as follows to calibrate the hi hat Press 12 TRIGGER SET Trigger Set Press F3 HH CALIB F3 HH CALIB Press the Hi Hat together with your foot and press F2 NEXT F1 NEXT Open the Hi Hat completely Confirm the action by pressing the button F1 FINISH F1 FINISH TRIGGER SET F3 Hi Hat Calibration 1 2 3 4 ...

Страница 65: ...fully calibrated and playable With the Hi Hat symbol you can directly test whether the mechanism works Then confirm the setting by pressing the button F1 DONE F1 DONE If you want to leave the calibration without saving press the button F3 5 ...

Страница 66: ...cessary by pressing the keys F2 F3 You can open the respective menu items from the list with F1 or by pressing ENTER MIX Press F1 MIX to access all volume controls EFFECTS By pressing F3 EFFECTS you can control all effects of your presets USB LOAD SAVE Select the menu item from the list to load your own wav samples import or export backups and drum kit presets SETUP Here you can manage all basic s...

Страница 67: ...channels of the drum kit Changes that are not yet saved are marked with a in front of the drum kit name MENU Mix When you open the Menu MIX you see the individual channels of the drum kit preset with the corresponding fader view Select channel Use the dial 5 INPUT or the navigation keys 8 to select the channel you want to change the volume of Change volume Use the dial 7 VALUE or the navigation ke...

Страница 68: ...ome Volume Songplayer Volume Select channel Use the dial 5 SELECT or the navigation keys 8 to select the channel you want to change in volume Change volume Use the dial 7 VALUE or the navigation keys 8 to change the volume Panning There is a panning setting for the master outputs and the headphones Adjust it with the dial 6 PAN Hi Hat volume Press F1 HIHAT VOL to access the Hi Hat volume control E...

Страница 69: ...at Getretene Hi Hat SPLASH Generation of a cymbal sound by striking the Hi Hat quickly with the foot Erzeugung eine Beckeklangs durch schnelles Anschlagen der Hi Hat mit dem Fuß Select zone Use the dial 5 SELECT or the navigation keys 8 to select the channel you want to change the volume of Change volume Use the dial 7 VALUE or the navigation keys 8 to change the volume Exit the level Press F3 to ...

Страница 70: ...tion AMB Ambience Room I REV Instrumental Reverb R REV Room Reverb MFX Multi Effects Choose effect Use the dial 5 SELECT or the navigation keys 8 to select the channel you want to change in volume Change level Use the dial 7 VALUE or the navigation keys 8 to change the volume Exit the level Press F3 to exit the level or any menu key to exit the entire menu ...

Страница 71: ...ve following chapters Ambient Instrument Reverb Inst Rev Room Reverb Room Rev Multi Effects Multi FX Turning the effect on and off With the dial 6 you can switch the effect on or off Volume level of the effect Depending on the effect you can change the volume dB or the level with the dial 7 This is a global function and changes the effect in total You can also adjust the intensity of the effects f...

Страница 72: ...ible to adjust the volume of the effect for each pad using the FX Send mixer which allows you to turn the effect off by dragging the control for the desired pad all the way down The following setting options are available Select the corresponding parameter with the dial 5 or the navigation keys 8 and change it with the dial 7 the navigation keys 8 or the and keys Level Adjust the volume level of t...

Страница 73: ...eys 8 to select the channel you want to change the volume of Change volume Turn dial 7 VALUE or press navigation key 8 to change the volume Grouping Turn the dial 6 and activate the GROUPING function Now you have the possibility when selecting the tom and cymbal channels to adjust them up or down as one unit Exit the level Press F3 to exit the level or any menu key to exit the entire menu ...

Страница 74: ...rb when there is no room This is certainly a philosophical question Both modules offer the same parameters except for the gate threshold Instrument Reverb only With Room Reverb you can put the whole kit in an environment and with the addition of Instrument Reverb it is possible to add reverb effects to the environment selectively for each input channel In this sense the additional Gate Threshold p...

Страница 75: ...s 8 to select the channel you want to change the volume of Change volume Use the dial 7 VALUE the navigation keys 8 or the keys to change the volume Grouping Turn the dial 6 and activate the GROUPING function Now you have the possibility when selecting the tom and cymbal channels to adjust them up or down as one unit Exit the level Press F3 to exit the level or any menu key to exit the entire menu...

Страница 76: ...e navigation keys 8 to select a corre sponding preset from the list To load the preset press F1 or ENTER To save your own preset find a free USER slot and press F2 Press F3 to exit the layer or any menu key to exit the entire menu For a detailed description of how to load save and over write presets see Loading and saving from presets ...

Страница 77: ... of a smaller reverb plate with a different characteristic than Plate 1 Small Plate2 Med Plates Mechanically generated reverb without early reflections This is a simulation of a medium reverb plate with a different characteristic than Plate 1 Med Plate2 Large Plates Mechanically generated reverb without early reflections This is a simulation of a large reverb plate with a different characteristic ...

Страница 78: ...system Pre Highpass The set value defines which frequencies are sent into the effect All frequencies below this value are faded out of the reverb effect signal Reverb Time Defines the length of the decay of the reverb tail decay time High Shelf Raises or lowers the entire treble range of the effect signal 6 12dB You control the effect strength of the boost via the numerical value with dial 6 Value...

Страница 79: ...strument Reverb but with a focus on the room specific qualities of the reverb Use this effects section to add reverb to a dry sound when ambience samples are not available or simply to create sounds of traditional recordings with electronically generat ed reverb The presets provided for this module reflect different ambient characteristics As the functionality of this effect section is identical t...

Страница 80: ...verb or room reverb such as frequency modulation The results are achieved by using algorithms to create a specific effect In contrast to the reverb modules the parameters of the multi effect module change depending on the selected algorithm The reciprocal effect parameters are drum kit parameters and are stored directly in the kit ...

Страница 81: ...elect the channel you want to change the volume of Change volume Use the dial 7 VALUE the navigation keys 8 or the buttons to change the volume Grouping Turn the dial 6 and activate the GROUPING function Now you have the possibility when selecting the tom and cymbal channels to adjust them up or down together as one unit Exit the level Press F3 to exit the level or any menu key to exit the entire ...

Страница 82: ...or the navigation keys 8 to select a corre sponding preset from the list To load the preset press F1 or ENTER To save your own preset find a free USER slot and press F2 Press F3 to exit the layer or any menu key to exit the entire menu For a detailed description of how to load save and over write presets see Loading and saving from presets ...

Страница 83: ...urates the audio signal with gain and adds additional harmonic frequencies to the mix resulting in a fuller but in the case of distortion also squarer sound Chorus Type Sinus Triangle Modulation Rate Modulation Depth Creates a fuller sound by creating the illusion that several instruments are playing simultaneously The effect is achieved by duplicating the dry signal and slightly delaying the detu...

Страница 84: ...hase shift of 180 The volume of both channels left and right is animated by a sine LFO waveform Bit Crusher Bit Resolution Down Sampling Brightness This effect increases the sharpness of your sound by reducing the resolution of the signal s waveform along amplitude and period Exit the level Press F3 to exit the layer or any menu key to exit the entire menu ...

Страница 85: ...rting point Resonance 0 127 Corresponds to the Q factor in equalization This parameter controls the width of the bell filter shape band pass and in case of selecting the low pass option Resonance controls the bell shape of the overshoot ing at the filter frequency Set the width of the bell filter shape from 0 no resonance wide in the lowest control position to 127 max reso nance narrow in the high...

Страница 86: ...pectrum of human ears below 20 Hz see also modulation rate With the waveform you can give the effect distinctive characteristics Sine produces smooth characteristics while triangle is known for sawtooth like sound characteristics of the delayed duplicate Rate 0 10 Hz Controls the speed of the LFO displacement and thus the speed of the fwaver ing sound This parameter controls the length of the peri...

Страница 87: ...he intensity of the panning effect Values range from 0 equals to mono to 127 full alternation between the extreme values 63L and 63R Bit Crusher Parameter Value range Unit Description Bit Resolution 24 1 16 bit This parameter pixelates the audio signal and thus reduces the resolution of the signal vertical direction bit depth Values 24 no reduction 1 bit up to 16 bits Down Sampling 1 16 Reduces th...

Страница 88: ... effect fades out Select low fader positions for fewer repetitions and high fader positions for lots of repeats Pre Low Pass 2 8 kHz Cuts the high frequencies of the dry signal above the set cut frequency Only frequencies below the threshold frequency are passed on to generate the effect The slope steepness of the filter is 12 dB Pre Low Pass is only applied to the delayed sound The dry signal its...

Страница 89: ...to your drum kit Backup Import a backup Kit Import all settings of a user drum kit EXPORT save the contents of the module Backup Create a backup of all parameters and settings of your module Previously imported samples will not be saved Current Kit Save the kit settings incl effects of the currently selected kit Select the corresponding menu item from the list with the dial 5 or the navigation key...

Страница 90: ...ssing the F1 key You can select a free memory location EMPTY or overwrite an already occupied memory location At the height of the dial 7 the remaining storage capacity is displayed megabytes The dial has no function Deleting the slots Press F2 CLEAR to delete the contents of the memory slot Exiting the level Press F3 to exit the level or any menu key to exit the entire menu Note Note that in the ...

Страница 91: ...your sample with the dial 5 or the navigation keys 8 Use the PLAY STOP or PREVIEW key to preview the sound Load the sample by pressing F1 or ENTER Name After loading you can give the file a new name to make it easier to find the sample in the Instrument menu Exiting the level Press F3 to exit the level or any menu key to exit the entire menu For details on naming and Load Save please refer to the ...

Страница 92: ...oad Save Backup Import Backup Selecting the backup Select your backup GDR file with the dial 5 or the naviga tion keys 8 Load the backup by pressing the F1 key or ENTER Exiting the level Press F3 to exit the level or any menu key to exit the entire menu ...

Страница 93: ...5 or the navigation keys 8 Load the kit by pressing the F1 or ENTER keys Exiting the level Press F3 to exit the level or any menu key to exit the entire menu Now save and name the loaded kit directly in the HOME KIT menu to a free user slot For a de tailed description of how to load save and overwrite presets see Loading and saving from presets ...

Страница 94: ...sing the F1 or ENTER keys Naming the backup or kit In the next step you will be asked to enter a file name For a detailed description of how to load save and over write presets see Loading and saving from presets Only the currently loaded kit is saved Please repeat the export procedure accordingly for other kits Factory presets are automatically saved as a backup in the unit and do not need to be ...

Страница 95: ...u Use the dial 5 or the navigation keys 8 to select a corre sponding list entry Use the dial 7 VALUE or the navigation keys 8 to adjust the values or press F1 or ENTER to open the selected list entry Press F3 to exit the level or any menu key to exit the entire menu The following functions are available Bluetooth To connect to a Bluetooth enabled device Read the following chapter Bluetooth ...

Страница 96: ...in the kit list without loading them OFF You need to load the drum kit first to preview it Welcome Wizard Start the settings help again Info All information about your software version and serial number Data Cleanup List of all options to reset the module completely or partially to the factory settings Data Cleanup Option Select Wave Manager Delete and load wave files See Chapter USB Load Save Cle...

Страница 97: ... custom name for the Bluetooth device Exit Press F3 to exit the level or any menu key to exit the entire menu Clear All Resetting the module to the factory settings All user presets and settings are deleted ABORT CLEAR Make your selection with the dial 6 Select or the navigation keys 8 Press ENTER to confirm Before a factory reset export your user drum kits and create a backup ...

Страница 98: ...G MENU SETUP F2 F1 Pairing Step by step explanation 1 Press F1 PAIRING 2 Switch your device to Bluetooth search mode and select the GEWA G3 module 3 Enter the PIN code 4392 4 Now you can use Bluetooth audio or and Blue tooth MIDI GEWA G3 ...

Страница 99: ...th the dial 5 Funktion Off Off Audio MIDI Audio MIDI connerction Audio Only audio MIDI Only MIDI As soon as your device is connected to the G3 module the connection is established automatically even after a restart of the module You can change the volume at the sending device and additionally via the MIX IN channel in MENU MIX ...

Страница 100: ...R to find the desired character Press ENTER to confirm the respective charac ter To change the cursor position use the dial 5 CUR Use the dial 7 ABC abc to change the upper and lower case as well as special characters You can delete individual characters by press ing F2 You can cancel at any time by pressing F3 Save the Bluetooth name under F1 ...

Страница 101: ...the menu The following functions are available Routing Here you can assign the inputs to your outputs EQ Compressor Global equalizer and compressor settings MIDI All MIDI setting options Use the dial 5 or the navigation keys 8 to select a corre sponding list entry By pressing F1 or ENTER you can edit the selected list entry To access ROUTING F2 press the corresponding key Exiting the level Press F...

Страница 102: ... also controls the USB out In this section you will learn how to work with each matrix The routing function of the G3 is divided into 2 input categories Routing and Routing Others While the input channels displayed vary the functionality is identical Thus the content of the following subchapters applies to each matrix DAW 6 USB Outs are available Please read chapter Routing DAW ...

Страница 103: ...eactivate If you have selected In Output in the matrix then press ENTER or use the dial 7 to de activate the channel accordingly Mono Stereo You have the choice between stereo and mono routings Use the dials 5 and 6 or the navigation keys 8 to move to the symbols Mono Stereo Press ENTER or turn control 7 to switch between the mono and stereo function Exit Press F3 to exit the level or any menu key...

Страница 104: ...ster F2 F2 Defaults Press F2 DEFAULTS to access preset routings Use the dial 5 or the navigation keys 8 to select the preset from the list and confirm the selection with ENTER or F1 Press F3 to exit the level or any menu key to exit the entire menu ...

Страница 105: ...ack mix in Bluetooth songplayer to the corresponding outputs The master output and the headphone output are available here Effects songs and metronome are generally not sent via the direct outs Master Out Headphones The operation is the same as described in the previous chapter Press F3 to exit the level or any menu key to exit the entire menu ...

Страница 106: ...hannel assignment DAW Channel USB 1 Master Out 1 2 Master Out 2 3 4 5 6 7 8 Only the dry signals are sent via the USB channels Only the Ambient effect is output as well You can record the other effects via channels 1 2 Here the entire sum of the direct outs is reproduced Tip To record only the effects via channel 1 2 deactivate the input channels for the instruments at the Direct Outs in the matri...

Страница 107: ...ed Unwanted peaks can be lowered and quiet sounds can be raised MASTER EQUALIZER EQ HEADPHONES EQUALIZER EQ The EQ on the G3 affects the volume of the three frequency ranges LOW MID HIGH Select the desired menu item with the dial 5 or the navigation keys 8 Open the respective menu with F1 or with 8 ENTER Press F3 to exit the level or any menu key to exit the entire menu The operation of the indivi...

Страница 108: ... recognisably anywhere with any group of musicians and any instrument tempo tone instruments arrangement etc The only condition is that the group of musicians must be familiar with reading music By just looking at it no sheet of music makes music on its own it takes instruments and musicians to create a sound and interpret the melodies and rhythms written down And as in the digital world the compo...

Страница 109: ... cannot be modified MIDI CONTROL Under MIDI Control you will find a selection of hardware components to control other instruments or to let these instruments be controlled by external MIDI devices MIDI GLOBAL SETTINGS This menu item contains all settings for connecting the G3 to other MIDI devices to form an inline signal path for MIDI control data Using the MIDI 2 0 protocol it is then possible t...

Страница 110: ...hed Please also refer to the MIDI implementation for the units you wish to interact with MENU Master MIDI Pad Settings F1 MIDI Pad Settings Select input channel Use the dial 5 INPUT or the navigation keys 8 Zone Use the dial 6 ZONE or the navigation keys 8 MIDI Note Assignment Use the dial 7 VALUE to adjust the MIDI values List view Press F1 VIEW to view an entire overview of all assignments You c...

Страница 111: ...Manual 111 11 6 1 1 VIEW MENU Master MIDI Pad Settings F1 F1 MIDI Pad Settings Press F1 VIEW to switch between the Channel View and the List View Press F3 to exit the level or any menu key to exit the entire menu ...

Страница 112: ... CHANNEL VIEW to restore the default settings You can reset the MIDI Pad Settings for a ZONE an entire PAD or ALL PADS Turn the dial 6 SELECT to select the corresponding function and press ENTER Press F3 to exit the level or any menu key to exit the entire menu To enter the DEFAULT menu from the list view press F1 F2 in the list view ...

Страница 113: ... keys 8 to select the corresponding note Press F2 or ENTER to edit the note Exit menu Press F3 to exit the level or any menu key to exit the entire menu Use the control dial 5 or the navigation keys 8 to select the corresponding note Press ENTER to confirm the selection Exit menu Press F3 to exit the level or any menu key to exit the entire menu ...

Страница 114: ...ts controlled by external MIDI devices You have the option of assigning a limited number of continuous controllers from the range of 127 controllers defined in the MIDI standard Select input channel Use the dial 5 INPUT or the navigation keys 8 MIDI Control Assignment Use the dial 7 VALUE or the navigation keys 8 to adjust the MIDI values Press F3 to exit the level or any menu key to exit the enti...

Страница 115: ...t connected to the corresponding input channels HH Pedal Snare Ride Toms Aux has access to the same set of available controllers However in the factory configuration they are set to different initial values They go through the same list just starting at a different starting point G3 Continuous Controllers CC Components Continuous Controller CC Description HH Pedal CC Start Default 4 Foot 11 Expres...

Страница 116: ...gs This menu item contains all settings for connecting the G3 to other MIDI devices for remote control Select menu item Use the dial 5 or the navigation keys 8 Changing the setting Use the dial 7 VALUE the Navigation buttons 8 or the keys Press F3 to exit the level or any menu key to exit the entire menu ...

Страница 117: ...I signals G3 MIDI Routing Fields and menus MIDI Input Local Control off to MIDI Out to USB MIDI to both on off USB MIDI MIDI Channel off to MIDI Out 10 11 12 13 14 15 16 off 1 2 3 4 5 6 7 8 9 Bluetooth MIDI MIDI Channel off to MIDI Out 10 11 12 13 14 15 16 off 1 2 3 4 5 6 7 8 9 Factory settings are highlighted in bold ...

Страница 118: ...this setup the G3 sound processor would receive two identical sets of control data when Local Control is on Disable Local Control off to reduce the amount of data received and avoid unnecessary duplication of signals and unwanted side effects See the following table for reference on on off off G3 MIDI Local Control Figure Description MIDI network layout on Control data from the input channels pads...

Страница 119: ...me time accept that your kit will be changed depending on a change of external programs Note The links set modified in this menu item are automatically saved in the device database and loaded when restarting on on off off Channel conditions and their effects Transmit Receive Application scenario Drum Kit Program Change is completely deactivated factory setting Only the G3 controls programmes on ex...

Страница 120: ...he following chapters you can read about how the player and the record function are structured and work To use the player functions press the USB SONG key 13 12 1 SONGPLAYER USB SONG Load Insert a USB stick into the module Press the 13 USB SONG key USB SONG If no USB stick is inserted the following message appears in the display Insert USB Stick Press F1 to open the file manager F1 1 1 1 2 ...

Страница 121: ... to select the folder or song from the list To load press F1 or ENTER or cancel the operation with F3 F1 If you have opened a folder then proceed as described in point 3 to load a song To return to a higher folder level select the UP folder from the list F1 3 3 1 ...

Страница 122: ...of the song in a continuous loop LOOP Use the F2 key to set the starting and ending point 1 Start point 2 Ending point 3 Deactivate the function Repeat mode With the F3 key you can select the repeat mode 1 Single Only the loaded song is played 2 Repeat The song repeats itself 3 All All songs in the folder are played one after the other 4 Rpt All The entire folder is repeated V Speed Vari Speed You...

Страница 123: ... recorded Insert a USB stick into the module Press the 14 RECORD key The recording starts and the RECORD key flashes RECORD To stop recording press the 14 RECORD button again RECORD To assign a file name now press F1 or discard the file by pressing F3 DISCARD For how naming works see Loading and saving from presets You will now find the saved file on your USB stick F1 SAVE F3 DISCARD 1 2 3 ...

Страница 124: ...ur G3 module Updated files can be found at www gewadrums com service Follow the installation steps from the website and load the update into the root directory of your USB stick 1 Insert the USB stick and switch on the device Keep the F1 and F3 keys pressed during the booting up process P F1 F3 1 Follow the instructions and press ENTER 2 After the successful update remove the USB stick and reboot ...

Страница 125: ...eduction of the purchase price or withdraw from the contract and if the dealership is responsible for the defect demand compensation for damages and or expenses deriving from the defect s The buyer must inform the dealer immediately on any defects identified The only way to prove a warranty claim is that the buyer can present a valid proof of purchase e g invoice Damage arising from incorrect hand...

Страница 126: ...s are connected to the console correctly 2 Make sure your output volume dials are not muted Headphone Master Mix Input 3 Check settings in the routing matrix and load one of the Defaults Menu Master F2 Routing I can t hear any sound of connected pads Songplayer and Metronome are however both audible 1 Check settings in the routing matrix and load one of the Defaults Menu Master F2 Routing 2 If you...

Страница 127: ...page 3 and following CTRL 07 B9H 07H cc Drum Kit Volume default 100 CTRL 98 B9H 62H vv NRPN low see page 3 and following CTRL 99 B9H 63H vv NRPN high see page 3 and following CTRL 120 B9H 78H 00H All sound off abrupt stop of sound CTRL 123 B9H 7BH 00H All notes off 14 3 2 DRUM KIT TRIGGER LIST Following is the List of all Pad Triggers with its MIDI notes triggered on MIDI channel 10 Pad Chan inter...

Страница 128: ... 57 9 Bell 0x12 18 9 Edge 0x34 52 Hi Hat 11 Bow 0x2E 46 11 Edge 0x1A 26 11 Bow 0x17 23 11 Edge 0x18 24 11 Bow 0x14 20 11 Edge 0x19 25 11 Bow Closed 0x2A 42 11 Edge 0x16 22 11 Pedal Chick 0x2C 44 11 Pedal Splash 0x15 21 11 Bell 0x13 19 AUX1 12 Head 0x58 88 12 Rim 0x59 89 12 Bell 0x16 22 AUX2 13 Head 0x5A 90 13 Rim 0x5B 91 13 Bell 0x17 23 AUX3 14 Head 0x5C 92 14 Rim 0x5D 93 ...

Страница 129: ...ger table sorted by Note 1 16 Reserved for Metronome 17 F0 Drum Kit Crash Bell 18 F 0 Drum Kit Crash2 Bell 19 G0 Drum Kit HH Bell 20 G 0 Reserved 21 A0 Drum Kit HH Pedal Splash 22 A 0 AUX1 Bell 23 B0 AUX2 Bell 24 C1 AUX3 Bell 25 C 0 AUX4 Bell 26 D1 Drum Kit HH Edge 27 D 1 GM set High Q see GM sound list 35 B1 GM set Standard Kick2 36 C2 Drum Kit Kick 37 C 2 Drum Kit X Stick 38 D2 Drum Kit Snare 39...

Страница 130: ...al 52 E3 Drum Kit Crash 2 Edge 53 F3 Drum Kit Ride Bell 54 F 3 GM set Tambourine 55 G3 Drum Kit Crash Edge 56 G 3 GM set Cowbell 57 A3 Drum Kit Crash Cymbal 2 58 A 3 Drum Kit Tom 3 Rim 59 B3 Drum Kit Ride Edge 60 C4 GM set Hi Bongo see GM sound list 87 D 6 GM set Open Surdo 88 E6 AUX1 Head 89 F6 AUX1 Rim 90 F 6 AUX2 Head 91 G6 AUX2 Rim 92 G 6 AUX3 Head 93 A6 AUX3 Rim 94 A 6 AUX4 Head 95 B6 AUX4 Ri...

Страница 131: ...Volume range 0 127 64 12dB default NRPN 08rrH B9H 63H 08H 62H rr 06H vv Second Sound Coarse Tuning vv 40 64 88 24 0 24 semitones NRPN 09rrH B9H 63H 09H 62H rr 06H vv Second Sound Fine Tuning vv 0 no modify 127 1 semitone NRPN 0BrrH B9H 63H 0BH 62H rr 06H vv Second Sound Attack range 0 127 0 default see details above NRPN 0CrrH B9H 63H 0CH 62H rr 06H vv Second Sound Release range 0 127 64 default N...

Страница 132: ...cision 1Hz step NRPN 26rrH B9H 63H 26H 62H rr 06H vv High Band Freq 0 20Hz 127 16KHz 14bit precision 1Hz step NRPN 27rrH B9H 63H 27H 62H rr 06H vv Mid Band Q 0 0 1 127 8 Pad Compressor Settings NRPN 28rrH B9H 63H 28H 62H rr 06H vv Compressor ON OFF 0 OFF else ON NRPN 29rrH B9H 63H 29H 62H rr 06H vv Attack time 0 fast attack 0 1ms 60 1ms 100 10ms till 127 slow attack 100ms exp Curve NRPN 2ArrH B9H ...

Страница 133: ... ON 0 OFF Instrument Reverb 0200h Reverb Level 0 mute to 127 max 64 0201h Pre Delay Time 0 0ms till 127 250ms 0 0202h Reverberation Time 0 shortest till 7Fh longest 64 0203h Pre High Pass Filter Frequency 0 OFF 64 500Hz 127 1KHz 0 0204h High Shelf Filter Tone Gain 0 12dB 64 0dB till 7Fh 6dB 64 0205h High Damp 0 no damping till 127 max damping 0 0206h Gated Reverb Threshold Level 0 OFF 1 114dB till...

Страница 134: ...rols 0404h Type 0 mono 1 stereo 0405h Delay Time 0 to 127 0 to 1365ms 14bit precision 0 083ms steps 0406h Feedback 0 to 127 0407h Pre Low Pass 0 to 127 2KHz to 8KHz 0408h High Damp 0 to 127 Multi Effects Wah Wah Controls 0404h Filter Type 0 Low Pass 1 Band Pass 0405h Wah Wah Filter Frequency Pedal Position 0 closed till 127 open 8kHz 0406h Wah Wah Filter Resonance 0 no resonance till 127 max reson...

Страница 135: ...Rate 0 1Hz till 127 20Hz formula Rate Hz 1 19 value 127 2 0405h Modulation Depth 0 to 127 Multi Effects Bit Crusher 0404h Bit Resolution 0 no reduction 1 16 0405h Down Sampling Factor 1 16 0406h Brightness 0 127 14 3 5 MASTER MONITOR HP EQ COMP NRPN CONTROLS Master Output Parametric 4 Bands Equalizer 3855h Equalizer ON OFF 0 OFF else ON OFF 3808h Low Band Gain 0 15dB 40h 0dB 7Fh 15dB 40h 3809h Low...

Страница 136: ...Equalizer 3955h Equalizer ON OFF 0 OFF else ON OFF 3908h Low Band Gain 0 15dB 40h 0dB 7Fh 15dB 40h 3909h Low Mid Band Gain 0 15dB 40h 0dB 7Fh 15dB 40h 390Ah High Mid Band Gain 0 15dB 40h 0dB 7Fh 15dB 40h 390Bh High Band Gain 0 15dB 40h 0dB 7Fh 15dB 40h 390Ch Low Band Freq note 1 0 20Hz 7Fh 16kHz 390Dh Low Mid Band Freq note 1 0 20Hz 7Fh 16KHz 390Eh High Mid Band Freq note 1 0 20Hz 7Fh 16KHz 390Fh ...

Страница 137: ... 1 0 20Hz 7Fh 16KHz 3A0Fh High Band Freq note 1 0 20Hz 7Fh 16kHz 3A10h Low Mid Band Q Factor 0 Q 0 1 7Fh Q 8 0 3A11h High Mid Band Q Factor 0 Q 0 1 7Fh Q 8 0 Headphone Output Compressor Limiter 3A18h Compressor ON OFF 0 OFF else ON OFF 3A19h Attack time 0 fast attack 0 1ms 60 1ms 100 10ms till 127 slow attack 100ms exp Curve 40h 3A1Ah Release time 0 fast release 10ms 60 100ms 100 1s till 127 slow ...

Страница 138: ...ter 1 Monitor 2 Headphone rr for drum channels INP OUT are values of peak level in dB range from 0 till 70 as follows 70 0dB 69 1dB 68 2dB 1dB steps 64 6dB 0 infinite GR is a value of reduction level in dB range from 0 till 70 as follows 70 70dB 69 69dB 68 68dB 1dB steps 20 20dB 0 no compression 14 3 7 TRIGGER SETTINGS EDIT NRPN CONTROLS rr is the MIDI note number of the according Pad Trigger NRPN...

Страница 139: ...tch 4ArrH Positional Sensing 0 OFF else ON 4CrrH Curve preset 0 15 4DrrH Hi Hat Pedal Chick Sensitivity 0 127 4ErrH Hi Hat Pedal Splash Sensitivity 0 127 4FrrH Trigger Bank Preset parameter transfer end marker 50rrH Head Rim Dyn Level 0 15 51rrH Head Rim Dyn Time 0 15 corresponds to 0 60ms decay time Positional Sensing SAM5916 sends MIDI Controller CC 16 with value 0 Center till 127 Outer Hi Hat P...

Страница 140: ...le 0 Rimshot 1 Crosstick 2 X Fade 0 3705h X Fade Balance 0 Rimshot only to 7Fh Crosstick only 40h 3706h MIX IN volume 0 mute 40h 12dB 7Fh 0dB 0 muted 3707h Synth Master volume 0 mute to 7Fh max 7Fh 370Fh Playback Routing bus switches bits 6 5 Master Main Out L R bits 4 3 Monitor Out L R bits 2 1 Headphone Out L R 3710h USB Audio IN Level 0 mute 40h 12dB 7Fh 0dB 40h 12dB 3740h LED Brightness Contro...

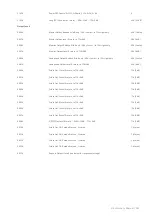
Страница 141: ... 0dB 40h 6dB 3B00h Direct Out 1 Level 0 mute to 7Fh 0dB 7Fh 0dB 3B01h Direct Out 2 Level 0 mute to 7Fh 0dB 7Fh 0dB 3B02h Direct Out 3 Level 0 mute to 7Fh 0dB 7Fh 0dB 3B03h Direct Out 4 Level 0 mute to 7Fh 0dB 7Fh 0dB 3B04h Direct Out 5 Level 0 mute to 7Fh 0dB 7Fh 0dB 3B05h Direct Out 6 Level 0 mute to 7Fh 0dB 7Fh 0dB 3B06h Direct Out 7 Level 0 mute to 7Fh 0dB 7Fh 0dB 3B07h Direct Out 8 Level 0 mut...

Страница 142: ...peak level OUT 3 Direct Out 3 peak level OUT 4 Direct Out 4 peak level OUT 5 Direct Out 5 peak level OUT 6 Direct Out 6 peak level OUT 7 Direct Out 7 peak level OUT 8 Direct Out 8 peak level S PDIF Out L S PDIF Output peak level left S PDIF Out R S PDIF Output peak level right USB Audio In L USB Audio In peak level left USB Audio In R USB Audio In peak level right 14 3 11 MIDI SETTINGS MIDI Settin...

Страница 143: ...etronome click sound selection values depending on sound bank content 1 X 1A01h Metronome click level 0 mute to 7Fh max 7Fh X 0F01h Click Routing bus switches see description of NRPN 370FH page 7 3763h Metronome ON OFF 0 OFF else ON 0 X 3764h Set Tempo 0 127 20 274 BPM 20 value 2 120 X 3765h Numerator 1 15 beats 4 X 3766h Denominator 0 4 1 1 1 2 1 4 1 8 1 16 2 1 4 X 3767h Interval 0 5 1 2 3 8 1 4 ...

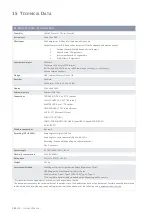
Страница 144: ...PHONES TRS socket Stereo MIX IN TRS socket Stereo MIDI IN OUT THRU COMPUTER CONNECTION USB B Type USB Hi Speed AUDIO MIDI AC IN IEC C7 Wireless connections Bluetooth Recording G3 DAW Sampling rate original 48 kHz Sampling rate with converter 96 kHz 44 1 kHz Recording 6 channels depending on software version Play 2 channels Power supply AC 100V 240V 50Hz 60Hz Electricity consumption 55 W EN60065 Di...

Отзывы: