background image

4

   ANSCHALTEN: An-/Aus-Schalter Nr. 6 in  

   Position „ON“ stellen. Das Gerät ist nun  

   betriebsbereit (POWER LED leuchtet).

   Steht das Gerät zu schräg (außerhalb des  

   Selbstnivellierbereiches), ertönt ein akusti- 

   sches Warnsignal. Eingeschaltete Laserlinen  

   blinken als zusätzliche Warnung.

   Zum Ausschalten An-/Ausschalter wieder in 

   Position „OFF“ bringen.

   Das Gerät ist nun ausgeschaltet, und der  

   magnetgedämpfte Kompensator wird blok- 

   kiert, um Beschädigungen während des  

   Transportes zu vermeiden.

   Bevor das Gerät in den Transportkoffer ge- 

   packt wird, An-/Aus-Schalter immer in Posi- 

   tion „OFF“ stellen! Ein akustisches Warnsig- 

   nal ertönt, wenn dies einmal übersehen wur- 

   de.

   SWITCH ON: Set On/Off knob no. 6 in posi- 

   tion „ON“. Instrument is now ready for  

   use (POWER LED is illuminated).

   An audible and optical (blinking lines) alarm 

   indicates the instrument was set up outside  

   of compensator rage of ± 3,5 °. Set up  

   instrument on a more even surface.

   To switch off instrument bring On/Off knob 

   into position „OFF“.

   Instrument is now switched off and the mag- 

   netic dampened compensator is blocked to  

   avoid damages during transport.

   NOTE: During transport On/Off knob (com- 

   pensator clamp) no. 8 must be set to“OFF“.  

   Disregard may lead to damage of compensa- 

   tor.

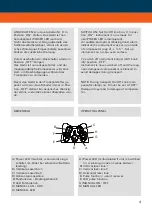
  A)  Power LED (leuchtet, wenn Gerät einge- 

     schaltet ist, blinkt bei schwacher Batterie- 

     leistung)

  B)  Vertikale Laserlinie 1

  C)  Vertikale Laserline 2

  D)  Horizontale Laserlinie

  E)  Pulsfunktion / Empfängerbetrieb

  F)  LED Pulsfunktion

  G)  MANUELL AN / AUS

  H)  MANUELL LED

  A)  Power LED (is illuminated if unit is switched  

     on, is binking in case of weak battery)

  B)  Vertical laser linie 1

  C)  Vertical laser line 2

  D)  Horizontal laser linie

  E)  Pulse function / use of receiver

  F)  LED pulse function

  G)  MANUAL ON / OFF

  H)  MANUAL LED


B

A

C

D

E

G

F

H

   BEDIENFELD

   OPERATING PANEL

Содержание MULTI-LINER FL 55

Страница 1: ...Bedienungsanleitung Users manual Vollautomatischer Linienlaser Fully Automatic Laser Cross Level MULTI LINER FL 55...

Страница 2: ...lders tripod 11 Adjustable leg 12 Circular bubble LIEFERUMFANG Linienlaser FL 55 Bodenstativ magn Ziel tafel Lasersichtbrille Akkusatz Ladeger t Kunststoffkoffer Bedienungsanleitung KIT CONSISTS OF La...

Страница 3: ...unten in das Ger t hinein schrauben Durch L sen ON der Klemme Nr 6 kann das Ger t ber einem definierten Boden punkt ausgerichtet werden Ger t immer m glichst gerade aufstellen damit die Selbstnivellie...

Страница 4: ...blinking lines alarm indicates the instrument was set up outside of compensator rage of 3 5 Set up instrument on a more even surface To switch off instrument bring On Off knob into position OFF Instr...

Страница 5: ...im Lieferumfang enthalten USE WITH RECEIVER OPTIONAL To prolong the working range or at unfavou rable light conditions FL 55 can be used with the optional receiver FR 55 not included in this kit MANUE...

Страница 6: ...ht at laser indicates that batteries are fully charged The working time with fully charged battery pack is approx 12 hrs ACHTUNG Bitte das Ger t nicht ber einen l ngeren Zeitraum z B Wochenende un kon...

Страница 7: ...alinebatterien betrieben werden Verschluss des Batteriefachs 2 aufschrau ben und Akkupack herausnehmen Alkaline batterien gem Zeichnung einlegen korrekte Polarit t beachten W hrend der Verwendung von...

Страница 8: ...ken ist Transport nur in Originalbeh lter oder tasche CARE AND CLEANING Please handle measuring instruments with care Clean with soft cloth only after any use If necessary damp cloth with some water I...

Страница 9: ...all and mark laser cross Repeat measurements with distance of about 0 6 m to one wall and about 4 4 m to second wall Devi ation between two measurements taken from the centre and two measurements take...

Страница 10: ...irs should be carried out by authorized work shops only Please contact your local dealer Do not remove warning labels or safety instructions Keep instrument away from children Do not use instrument in...

Страница 11: ...wie die Nichterf llung zugesicherter Eigenschaf ten Ein Garantieanspruch besteht nur bei bestim mungsgem er Verwendung Mechanischer Verschlei und u erliche Zerst rung durch Gewaltanwendung und Sturz u...

Страница 12: ...S FROM RESPONSIBILITY The user of this product is expected to follow the instructions given in operators manual Although all instruments left our warehouse in perfect condition and adjustment the user...

Отзывы: