0
Amplified Big Button Telephone
Ampli550
English
Страница 1: ...0 Amplified Big Button Telephone Ampli550 English ...
Страница 2: ...12 Muting the Microphone 12 Using the Amplification Function 12 Using you Phone with hearing aids 13 Using Audio and Headset jacks 13 Hands free 14 Hold Function 14 Ringer Setting 15 Speed Dial Setting 15 Flash Signal 18 Shaker 18 Caller ID 19 Phone Book 20 Menu Functions 22 Menu Navigation 22 Menu Map 22 Set Display 23 Set Phone 24 Setting Date Time 26 Set Talk 27 Caller ID On Call Waiting 29 INT...
Страница 3: ...2 Feature List 30 Troubleshooting 32 Safety Information 33 Regulatory Compliance 34 Guarantee 37 CONTENTS ...
Страница 4: ... has a large button easy to see and use keypad to help stop any misdialing This telephone is compatible with hearing aids It is important that you read the instructions below in order to use your Geemarc telephone to its full potential Keep this user guide in a safe place for future reference This guide explains how to use the following telephone Ampli550 To use the caller display facility you mus...
Страница 5: ... possibility of electrical shock do not use this product near water For example near a bathtub wash basin kitchen sink or laundry tub in a wet basement or near a swimming pool WARNING Avoid using the telephone during electrical storms There may be a remote risk of electric shock from lightning If the electrical storm is present in your immediate area possibility of electrical shock exists WARNING ...
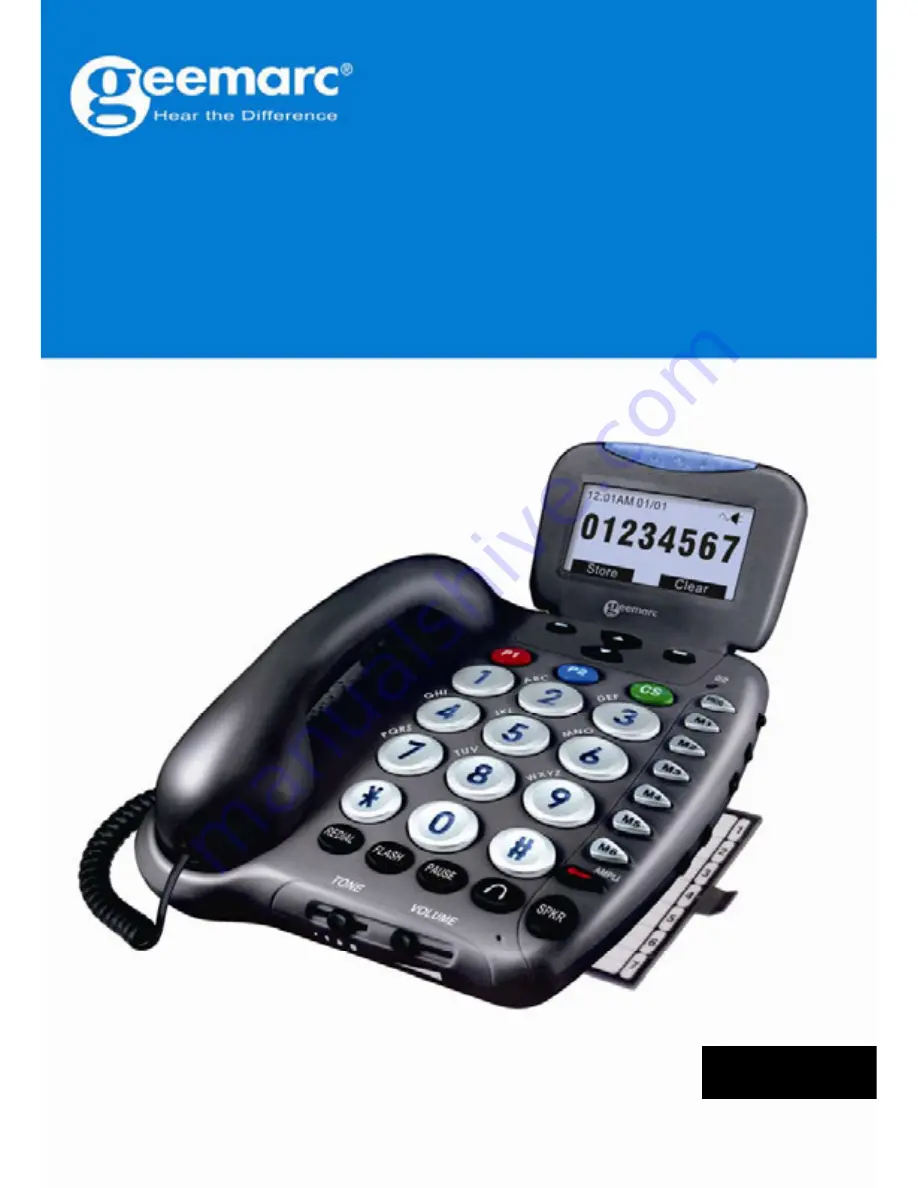
Страница 6: ... 3 Large LCD Screen 13 Headset Key 4 Left Soft Key 14 Microphone 5 Up Down Scroll 15 Pause Key 6 Right Soft Key 16 Volume adjustment 7 Message waiting new call LED 17 Tone adjustment 8 Programming Key 18 Flash Key 9 Emergency Speed Dial P1 P2 CS 19 Redial Key 10 Speed Dial Keys M1 M6 20 Handset DESCRIPTION ...
Страница 7: ... 5mm 3 Optional Bed Shaker jack 4 Volume Reset Override Switch ON OFF 5 Power jack 6 Phone Line Cord jack 7 Back Light Switch 8 New Call Indicator Switch 9 Ringer shaker strobe select mode 10 Volume controls for ringer and speakerphone DESCRIPTION ...
Страница 8: ... immediately over it on the bottom line of the display which changes time by time Press this button to turn the extra amplification ON or OFF The nine keys are used as one touch speed dial keys This button is used to disconnect a call and re establish dial tone or to switch over to another caller if you use custom calling services such as call waiting Press this key to insert one or more pauses Us...
Страница 9: ...e display will show the main menu Use S or T key to scroll through the menu and select the desired one then press Select soft key to confirm When a new call comes in the screen will display the caller s phone number and or name If you subscribe to cid This shows you the total and new calls to be reviewed In this example you have 16 calls in total which includes 12 new calls DESCRIPTION ...
Страница 10: ...number from being sent Blocked number will be shown on the display This message will display when someone calls from an area where the telephone company is not offering the caller identification services or is not yet providing number delivery to your area DESCRIPTION ...
Страница 11: ... tab out and reverse its position rotate it 180 degrees Slide it back into place so that the hook points up see diagram 1 This will keep the handset from falling out of the cradle when it is mounted on the wall 2 Install two self tapping screws not supplied at a distance of 80 mm from each other and located on a vertical line 3 Place the phone onto the screw heads and slide down to secure see diag...
Страница 12: ...it it 2 When the number appears correctly lift the handset or press the SPKR key Last Number Redial The REDIAL key is used to quickly redial the last number you dialed 1 Lift the handset and listen for the dial tone 2 Press the REDIAL key The phone will redial up to 32 digits automatically Dialing a Number from the Redial List 1 Press the REDIAL key in standby mode 2 Press S or T key repeatedly un...
Страница 13: ...r you To mute your microphone press the Mute soft key during the conversation The Mute appears on the LCD To unmute your microphone press the Unmute soft key You will restore the normal condition Using the Amplification Function Your phone is equipped with a specialized amplification function designed to fit your needs During a conversation you can adjust the controls on the front panel of the pho...
Страница 14: ...to Important Note When the switch is set to you do not need to press the AMPLI key to turn on the amplification feature the volume can be very loud and may damage your hearing If the phone works with batteries but without power adapter in the handset mode the Amplify feature will not be activated even if Amplify mode appears on the LCD Using your Phone with hearing aids Your phone can be used with...
Страница 15: ... the feature on press the SPKR key during a call then replace the handset on the base The icon appears on the LCD To turn the feature off and keep on talking in normal mode simply pick up the handset The icon will disappear Adjusting Speaker Volume In speaker mode you can adjust the speaker volume by using the Volume Controls or located on the right side of the phone Hold Function During a call yo...
Страница 16: ...e Ringer tone press the Select soft key 6 Press the S or T key repeatedly to select the desired ringer tone Each time you press the S or T key the phone rings with the selected ringer tone 7 Press Select soft key to confirm and return to the previous menu In standby mode You can also adjust the ringer volume by using the Volume Controls or on the right side of the base phone The display will show ...
Страница 17: ...ng and Dialing Two Touch Memory Numbers In standby mode press one of the memory dial keys or Speed dial keys the display will show the corresponding number Lift the handset or press the SPKR key to dial it out Using the Options 1 In standby mode press one of the memory dial keys or Speed dial keys 2 Press Options soft key to choose the desired option Play Voice allows you to play the voice prompt ...
Страница 18: ...an use the Clear soft key to edit it Press the Save soft key to confirm 5 Press the S or T key repeatedly to select the desired ringer tone to use with the number 6 Press Select soft key to confirm Note Entering a new number in the same location will automatically erase the previous number Viewing and Dialing Memory Numbers In standby mode press and hold one of the numeric keys 0 9 the display wil...
Страница 19: ...ils please contact your network telephone company To use the said special services just press the FLASH key while the line is engaged Note This key only operates when your telephone has been installed for Tone mode Dialing Mode menu must be set to Tone option Shaker Your telephone incorporates several options to alert you that the phone is ringing The loud adjustable Ringer as well as the bright S...
Страница 20: ...ou can add or remove a 1 from in front of the number For example if the original number in Caller ID list was 800 965 9043 press the key repeatedly to change it to 1 800 965 9043 or 965 9043 Or if the number is 1 987 654 3210 press the key repeatedly to change it to 987 654 3210 or 654 3210 Then pick up the handset or press the SPKR key to dial it out Using the Caller List Options 1 Use S or T key...
Страница 21: ...6 Mm Nn Oo 6 7 Pp Qq Rr Ss 7 8 Tt Uu Vv 8 9 Ww Xx Yy Zz 9 Notes If you want to shift the case between upper and lower while entering letters press the key When entering the same letter twice or a different letter with the same key wait for a few seconds for the cursor to move automatically and then select the next letter Adding the Phonebook Entries 1 Enter a phone number up to 24 digits while in ...
Страница 22: ...hted entry Using the Phonebook Options 1 Press PhoneBk soft key to enter the phonebook 2 Press S or T key repeatedly until the desired entry is highlighted 3 Press Options soft key to choose the desired option Play Voice allows you to play the voice prompt of this entry If you have recorded the name for this entry the system will announce the name otherwise it will only announce the number Record ...
Страница 23: ...he Back soft key or the Exit soft key the phone returns to the previous screen Menu Map Set Display Set Language see page 24 Set Contrast see page 24 Font Size see page 25 Hour Format see page 25 Date Format see page 25 Set Phone Set Ring see page 15 Call Waiting see page 26 Set Flash see page 26 Dialing Mode see page 26 AUTO ON HOOK see page 27 Set Time Date see page 27 Set Talk DIALING TALKING s...
Страница 24: ...ress Select soft key to select the required language LCD Contrast Setting 1 Press Menu soft key to display the main menu list 2 Press Select soft key to access Set Display 3 Press the T key to move to Set Contrast press Select soft key 4 Press S or T key repeatedly to choose among the 8 available contrast levels and then press Select soft key Switch to smaller font 1 Press Menu soft key to display...
Страница 25: ... 2 Press Select soft key to access Set Display 3 Press S or T key repeatedly to move to Date Format press Select soft key 4 Press S or T key repeatedly to choose MM DD or DD MM and then press Select soft key Set Phone Keypad Tones Setting 1 Press Menu soft key to display the main menu list 2 Press the T key to move to Set Phone and then press Select soft key 3 Press Select soft key to access Set R...
Страница 26: ...ng 4 Press S or T key repeatedly to choose among 100ms 300ms and 600ms press Select soft key Dialing Mode Setting 1 Press Menu soft key to display the main menu list 2 Press the T key to move to Set Phone and then press Select soft key 3 Press S or T key repeatedly to move to Dialing Mode and then press Select soft key The display shows the current setting 4 Press S or T key repeatedly to choose b...
Страница 27: ... standby mode the phone displays the current date and time to help you keep track of your appointments You need to set the date and time so that when you receive calls they will appear with the correct date and time 1 Press Menu soft key to display the main menu list 2 Press S or T key repeatedly to move to Set Time Date press Select soft key The current settings are displayed 3 Enter the current ...
Страница 28: ...king at the display Note that if you have stored a number in phone book and recorded the corresponding name when an incoming call with this number comes in the system will announce the name associates with this number 1 Press Menu soft key to display the main menu list 2 Press S or T key repeatedly to move to Set Talk press Select soft key 3 Press the T key to move to CID TALKING press Select soft...
Страница 29: ... use and button to adjust the talking volume and at the same time the memo announcement volume will be adjusted accordingly Voice Prompt You are able to select the language used to play the voice prompt messages 1 Press Menu soft key to display the main menu list 2 Press S or T key repeatedly to move to Set Talk press Select soft key 3 Press S or T key repeatedly to move to Voice Prompt press Sele...
Страница 30: ...aller while you are having a conversation 1 When you are on the line the telephone will automatically display the name and number of the second caller 2 Press the FLASH key to answer the second caller 3 When you have finished press the FLASH key to continue with your conversation with the first caller CALLER ID ON CALL WAITING Caller ID info displayed Caller two s information is displayed ...
Страница 31: ...d compatible Adjustable volume control Adjustable extra loud ringer Big Keypad buttons 3 5mm Bed Shaker jack Real time clock with date time Flash Mute Hold 9 one touch speed dial buttons 10 two touch speed dial buttons 0 9 LCD contrast setting Hour format setting Date format setting Dialing talking CID talking Reviewing talking Hands free speakerphone Auto on hook Dialing mode selection Wall mount...
Страница 32: ...31 FEATURE LIST Volume Amplification Extra Large Caller ID Screen Memory Card Big Keypad Buttons ...
Страница 33: ...nger is not turned off Check the volume level of the ringer You may have too many extensions on your line Try unplugging a few devices No amplification Check to see if the Amplify key is On The red light should be lit Also check power supply connections Noise Static Interference while using the handset A filter may be required for homes with a DSL line or near Radio towers Caller ID information do...
Страница 34: ...soft cloth Never use polishes or cleaning agents they could damage the finish or the electrics inside Environmental Do not expose to direct sunlight Always ensure there is a free flow of air over the surfaces of the telephone Do not place any part of your product in water and do not use it in damp or humid conditions e g bathrooms Do not expose your product to fire or other hazardous conditions Un...
Страница 35: ...ur telephone number is called In most but not all areas the sum of the REN s of all devices connected to one line should not exceed five 5 0 To be certain of the number of devices you may connect to your line as determined by the REN you should contact your local telephone company to determine the maximum REN for your calling area If this equipment causes harm to the telephone network the telephon...
Страница 36: ...n a particular installation If this equipment does cause harmful interference to radio or television reception which can be determined by turning the equipment off and on the user is encouraged to try to correct the interference by one or more of the following measures Re orient or relocate the receiving antenna Increase the separation between the equipment and receiver Connect the equipment into ...
Страница 37: ...formation If your home has specially wired alarm equipment connected to the telephone line ensure the installation of this telephone equipment does not disable your alarm equipment If you have questions about what will disable alarm equipment consult your telephone company or a qualified installer This equipment is hearing aid compatible Sonic Alert warrants the phone against any defect in materia...
Страница 38: ...nal time on the original warranty whichever is longer The warranty does not cover accidents negligence or breakage to any parts or damage due to installing incorrect batteries This includes shipping damage failure to follow instructions misuse fire floods use of incompatible accessories Acts of God or failure in your phone service carrier s line service The product must not be tampered with or tak...
Страница 39: ... is available from 9Am 5Pm Monday through Friday Central time Sonic Alert Warranty Center 1081 West Innovation Dr Kearney MO 64060 RMA sonicalert info IMPORTANT YOUR RECEIPT IS PART OF YOUR WARRANTY AND MUST BE RETAINED AND PRODUCED IN THE EVENT OF A WARRANTY CLAIM Sonic Alert Warranty Center 1081 West Innovation Dr Kearney MO 64060 Sales 248 577 5400 Fax 248 577 5433 Customer Service Warranty 1 8...