background image

29

09665

-0

8.

20

18-

Gb

5

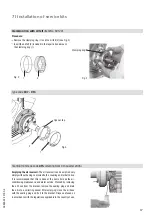
Removal of the oil pump

Position in 
parts list

Parts list position: 2020

Tools: Spanner SW 13

Working course

40, 41
460, 470

- Loosen screws on the oil pump and unscrew
- Remove the oil pump and gasket

10 I Disassembly of the compressor

Содержание FK40/390 N

Страница 1: ...s FK40 390 K FK40 470 K FK40 560 K FK40 655 K FK40 755 K FK40 390 N FK40 470 N FK40 560 N FK40 655 N FK40 390 TK FK40 470 TK FK40 560 TK FK40 655 TK FKX40 390 K FKX40 470 K FKX40 560 K FKX40 655 K FKX...

Страница 2: ...rations and functional modifications have been carried out No original replacement parts have been used Contents Page 1 Introduction 3 2 Safety 3 3 Product description 5 4 Technical data 8 5 Maintenan...

Страница 3: ...t group of these instructions Work on the compressor may only be carried out by persons whose technical training skills and expe rience along with their knowledge of pertinent regulations and document...

Страница 4: ...the safety switch out of action Prior to commissioning check whether all the components installed by the user have been fastened expertly and connected pressure tight with the compressor e g piping pl...

Страница 5: ...as regards capacity Aluminium light weight construction Crankshaft supported in roller bearings on both sides Bidirectional lubricating oil pump with relief valve Variable arrangement shut off valves...

Страница 6: ...3 Valve plate 4 Compressor housing 5 Location hole for fitting magnetic coupling 6 Integrated leak oil collector 7 Leak oil drain hose 8 Shaft seal 9 Shaft end 10 Baseplate 11 Connection thermal prot...

Страница 7: ...in m Cotes en mm Ma e in mm nderungen vorbehalten Subject to change without notice Sous r serve de toutes modifications Sight glass Version K 1 0851 13983 0 Schauglas K 1 Ne possible qu ex usine L Ra...

Страница 8: ...Oil pump FK X 40 390 4 385 33 5 34 0 22 7 8 28 1 1 8 2 0 0 0043 Forced lubrication Rotation independent FK X 40 470 466 40 5 33 0 28 1 1 8 35 1 3 8 FK X 40 560 554 48 3 33 0 28 1 1 8 35 1 3 8 FK X 40...

Страница 9: ...e operating point The oil level must be visible in the sight glass Changing oil In case of orderly manufactured and operated plants an oil change is in principle not absolutely necessary Yet based on...

Страница 10: ...1 Turn 1 2 1 rotation to the right Service connection 2 opened shut off valve opened position B Fig Connection 3 is provided for safety devices and is not lockable 1 3 Pipe connection 2 5 I Maintenan...

Страница 11: ...ve not functioning properly Check the setting of the expansion valve Solenoid valve on the liquid line not opening Check the control function Fault diagnosis In case of malfunctions during compressor...

Страница 12: ...switch Condensing pressure too high Check the setting of the high pressure switch Adjust the switching points or replace switch Pressure valve of the compressor closed Open the pressure valve Condense...

Страница 13: ...hange Valve plate damage Replace valve plate Internal decompression valve has opened Replace decompression valve see the section on Disassembly Assembly of Compressor Oil problems Problem Possible cau...

Страница 14: ...magnetic coupling slipping see also p 14 Malfunction of electromag netic coupling Checking V belt drive increased noise generation Belts vibrating excessively Check belt tension Use tensioning roller...

Страница 15: ...dentical WARNING Before starting any work on the compressor Switch of the compressor and guard it against switching on Close the discharge and suction shut off valves Relieve the compressor from syste...

Страница 16: ...4 O ring 3 and the guide ring 2 together as a unit The large chamfer on the sliding ring 4 should show in the direction of the shaft seal cover 6 During the assembly the compression spring 1 must enga...

Страница 17: ...be emptied very simply without having to dismantle the coupling and or belt drive It is recommended that this is done at the same time as the air conditioning maintenance and motor service Proceed by...

Страница 18: ...r bank which is regulated down run idle The capacity of the compressor is still approx 50 Further information together the description of the working principle of the solenoid valve is contained in th...

Страница 19: ...ssor type Kit Item No FK X 40 390 N 80240 FK X 40 390 TK 80240 FK X 40 470 N 80240 FK X 40 470 TK 80240 FK X 40 560 N 80241 FK X 40 560 TK 80241 FK X 40 655 N 80241 FK X 40 655 TK 80241 FK X 40 390 K...

Страница 20: ...ay attention to the correct installation position of the gaskets 3 5 of the valve plate 4 and of the cylinder cover 2 Tighten the cylinder cover screws Pos 1 in Fig 6 according to the sequence shown i...

Страница 21: ...A 16 The front bearing flange has a location face 148 h8 for fitting the solenoid of the electromagnetic coupling see Fig 8 Fig 8 Front bearing flange Magnetic field Fig 9 148 h8 For fitting the solen...

Страница 22: ...it Screw tightening torque 85 Nm Install the K circlip 5 Push the sheave 6 over the studs 9 and fasten it with zinc coated M8 DIN 934 8 nuts 7 Connect the cable 8 The connection is polarity independe...

Страница 23: ...an the system install a suction line filter if necessary Moisture in the system Dry the system trough changing refrigerant and oil replace the drier install a suction line filter if necessary Overheat...

Страница 24: ...stem Close the suction and discharge shut off ports on the compressor with stoppers Disassembly of compressor The disassembly of the compressor is explained in separate steps on the following pages Th...

Страница 25: ...7 allen key 6 mm Working course 220 330 210 230 210 233 232 231 The compressor has to be depressurized Unscrew the fixing screws of shut off valves Remove the shut off valves and the gaskets Remove th...

Страница 26: ...l filter Position in parts list Parts list position 2130 Tools Container 2 liter for collection oil spanner SW 19 allen key 10 mm Working course 510 500 490 Drain the oil from the compressor into a su...

Страница 27: ...Removal of the cylinder cover and valve plates Position in parts list N TK K Parts list position 170 2000 N TK versions 1940 2900 K version Tools Spanner SW 17 Working course 180 181 170 70 60 50 1950...

Страница 28: ...a Remove the leak oil collection device from the bearing flange until type code 014 Unscrew the cylinder screws Remove the shaft seal cover the guide ring the O ring and the spring INFO For a detailed...

Страница 29: ...oval of the oil pump Position in parts list Parts list position 2020 Tools Spanner SW 13 Working course 40 41 460 470 Loosen screws on the oil pump and unscrew Remove the oil pump and gasket 10 I Disa...

Страница 30: ...eplate Position in parts list Parts list position 20 30 40 Tools Container for collection oil spanner SW 13 Working course 40 20 30 Place the compressor into the oil collection pan and turn it sideway...

Страница 31: ...e 2100 2100 2040 2045 300 290 Unscrew the hexagon head screws from the connecting rod cap Mark the connecting rod cap and remove it Push the piston and connecting rod upwards until the stop Remove the...

Страница 32: ...bearing Position in parts list Parts list position 2140 Tools Allen key 6 mm Working course 750 730 740 745 Loosen the screws at the front bearing and unscrew Remove the front bearing flange gasket an...

Страница 33: ...Gb 9 Removal of the crankshaft Position in parts list Parts list position 2050 Tools Working course 2050 Pull out the crankshaft carefully in direction of the front bearing flange 10 I Disassembly of...

Страница 34: ...2100 Tools Needle nosed pliers Working course 2100 2030 280 270 2100 Mark corresponding pistons of cylinder bore Remove the piston connecting rod in direction of baseplate Remove circlips of the pist...

Страница 35: ...r 36 For the decompression valve GEA Bock special tool item No 09524 up to A015 socket wrench SW 22 from A017 Working course 570 590 520 521 100 Dismount the sight glass Remove O ring Remove the 1 8 N...

Страница 36: ...r bearing from the front bearing flange If a pulling apparatus is not available the front bearing flange may be heated for approx 15 minutes in a pre heated 220 C baking oven Afterwards the roller bea...

Страница 37: ...that an unhindered oil flow is ensured Piston cylinder bore 0 13 mm Connecting rod piston pin 0 03 mm Crankshaft connecting rod 0 08 mm Checking compressor parts for damages and wear Before re using...

Страница 38: ...The connecting rod shank must be straight Valve plates Suction and pressure lamella must be undamaged and undeformed The sealing surfaces must be clean and undamaged between lamellas and valve plates...

Страница 39: ...use GEA Bock special tool item No 09524 up to A015 socket wrench SW 22 from A017 The internal decompression valve must be replaced after it has operated INFO In case of larger compressor damages whic...

Страница 40: ...730 312 2150 Heat the bearing flange compressor casing for approx 20 minutes in a pre heated 120 C baking oven Insert tolerance ring into the roller bearing if available Press the roller bearings onto...

Страница 41: ...Bock special tool item No 09524 up to A015 socket wrench SW 22 from A017 Working course 570 590 520 521 100 Screw on the sight glass with oiled O ring to the compressor body Screw in the 1 8 NPTF scre...

Страница 42: ...s Position in parts list Parts list position 2040 opt 2045 or 2030 opt 2035 together with 2100 Tools Needle nosed pliers Working course 270 280 Assemble piston and connecting rod with piston pin use s...

Страница 43: ...eassembled connecting rod assembly and mark it Apply a little oil to the cylinder bore Insert pistons connecting rods from below into the cylinder liners In the case of TK compressors pay attention to...

Страница 44: ...Assembly of compressor 5 Fitting the crankshaft Position in parts list Parts list position 2050 Tools Working course 2050 Fit the crankshaft so that the drive journal engages into the pump gear Apply...

Страница 45: ...730 740 750 Apply oil to the O ring and place it into the groove in the bearing flange The sealing surfaces have to be clean Slightly oil seals Install the front bearing flange with gasket to the bod...

Страница 46: ...on into the cylinder liner Place the marked connecting rod caps onto the related connecting rods Screw on the connecting rod caps and tighten Turn the crankshaft by hand In case the crankshaft does no...

Страница 47: ...st axial clearance The axial clearance of the crankshaft must be at least 0 15 mm When parts of the driving unit of the compressor have been repaired or replaced an accurate measurement of the axial c...

Страница 48: ...gasket using the protective sleeve The inscription TOP must be at the top Press the shaft seal cover onto the bearing flange and tighten the screws Turn the crankshaft by hand Remove the protective s...

Страница 49: ...49 09665 08 2018 Gb POE TOP TOP TOP 2 3 4 5 6 mm 8 9 POE 1 2 3 4 5 6 TOP TOP 6 7 CLICK 2 4 6 5 3 7 9 Fitting the shaft seal...

Страница 50: ...50 09665 08 2018 Gb 8 9 1 2 3 4 5 6 TOP 10 11 12 6 mm 37 Nm 8 10 9 9 Fitting the shaft seal...

Страница 51: ...arts list Parts list position 20 30 40 Tools Spanner SW 13 Working course 20 30 40 Install the baseplate with gasket Tighten the screws M8x30 crosswise 11 14 18 15 12 13 17 16 10 4 2 6 3 9 5 1 7 8 34...

Страница 52: ...position 2130 Tools Allen key 10 mm spanner SW 19 Working course 490 500 510 With the allen key screw on the filter into the hole in the body and tighten it Install gasket Screw on the M22x1 5 mm plu...

Страница 53: ...nt the valve plate with the lower valve plate gasket onto the body Mount the cylinder cover with the upper valve plate gasket on the valve plate Tighten the screws and washers cross wise in at least t...

Страница 54: ...rse 230 210 2060 233 232 231 Put in the suction filter with the gasket Install the shut off valves on the discharge and suction side with gaskets and screws Install the blind flange with O ring and sc...

Страница 55: ...n Note Tighten the screws cross wise in at least two stages tightening torque 50 100 Working course 1 Evacuation leak check of compressor Connect the discharge and suction sides of the compressor to a...

Страница 56: ...N K TK 2 05075 05075 05075 05075 05075 270 Piston pin 15x10x41 N K TK 4 07211 270 Piston pin 15x10x46 N K TK 4 07212 07212 270 Piston pin 15x10x50 N K TK 4 07857 07857 280 Seeger circlip 15x1 DIN 472...

Страница 57: ...6726 06726 740 Front bearing flange gasket N K TK 1 06165 06165 06165 06165 06165 745 O Ring 101 19x3 53 N K TK 1 05169 05169 05169 05169 05169 750 Cylinder screw M8x25 N K TK 14 06067 06067 06067 060...

Страница 58: ...t piston con rod 55 rilled optimized TK 4 80250 2045 Set piston con rod 60 rilled optimized TK 4 80251 2045 Set piston con rod 65 rilled optimized TK 4 80226 2050 Set crankshaft 49 stroke optimized N...

Страница 59: ...en N K TK 1 05987 05987 05987 05987 05987 3312 Disc 30x16x2 0 N K TK 1 05143 05143 05143 05143 05143 3313 Milled nut M15x1 with O Ring N K TK 1 05885 05885 05885 05885 05885 3320 Solenoid coil 24V DC...

Страница 60: ...0 2035 2100 2045 280 FK40 390 655 N TK 3313 3312 3311 3310 3320 3250 3220 3240 3200 3300 181 FK40 390 755 K 3313 3312 3311 3320 3300 3850 3820 3840 3800 3310 181 1930 1920 1910 2900 FK40 390 755 K 195...

Страница 61: ...61 09665 08 2018 Gb...

Страница 62: ...eration gea com www gea com GEA Group is a global engineering company with multi billion euro sales and operations in more than 50 countries Founded in 1881 the company is one of the largest providers...

Отзывы: