Chapter 2. Installation
GFK-2571N
May 2018
35
2.4
Module Installation
•
RX3i rack power may be off or on (see
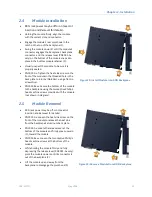
Figure 19: Install Module into RX3i Backplane
•
Holding the module firmly, align the module
with the correct slot and connector.
•
Engage the module’s rear pivot hook in the
notch on the top of the backplane (1).
•
Swing the module down (2) until the module’s
connector engages the backplane’s backplane
connector, and the release lever (PNC001-Ax
only) on the bottom of the module snaps into
place in the bottom module retainer (3).
•
Visually inspect the module to be sure it is
properly seated.
•
PNC001-Ax: Tighten the heat sink screw on the
front of the module in the threaded hole in the
back plate to 6 in-lbs (0.68 Nm), using a flat-tip
screwdriver.
•
PNC001-Bxxx: Secure the bottom of the module
to the backplane using the two captive
Phillip’s
head machine screws provided with the module
(not shown in diagram).
2.5
Module Removal
•
RX3i rack power may be off or on (see Hot
Insertion and Removal for details).
Figure 20: Remove Module from RX3i Backplane
•
PNC001-Ax: Loosen the heat sink screw on the
front of the module to release the heat sink
from the backplane’s aluminum back plate.
•
PNC001-Ax: Locate the release lever at the
bottom of the module and firmly press upward
(1), toward the module.
•
PNC001-Bxxx: Loosen the two captive
Phillip’s
head machine screws at the bottom of the
module.
•
While holding the module firmly and fully
depressing the release lever (PNC001-Ax only),
pivot the module upward until its connector is
out of the backplane (2).
•
Lift the module up and away from the
backplane to disengage the pivot hook (3).

