for use as a telephone
and to receive information from internet
Model 28320
InfoLink
Phone
User’s Guide
Страница 1: ...for use as a telephone and to receive information from internet Model 28320 InfoLink Phone User s Guide ...
Страница 2: ... telephone company Party lines are subject to state tariffs and therefore you may not be able to use your own telephone equipment if you are on a party line Check with your local telephone company Notice must be given to the telephone company upon permanent disconnection of your telephone from your line If your home has specially wired alarm equipment connected to the telephone line ensure the ins...
Страница 3: ...ving antenna is connected If these measures do not eliminate the interference please consult your dealer or an experienced radio television technician for additional suggestions Also the Federal Communications Commission has prepared a helpful booklet How To Identify and Resolve Radio TV Interference Problems This booklet is available from the U S Government Printing Office Washington D C 20402 Pl...
Страница 4: ...13 Right Soft Button 13 Navigational Volume Button 13 Alert Indicator 13 Call Speaker Button 13 End Button 13 FLASH Button 13 Caller ID Button 13 Intercom Lower Upper Case Button 13 Button 13 Pause Lock Button 13 Idle Mode Display 14 Programming Your Phone 15 Navigating The Menu 15 Handset Settings 16 Handset Name 16 Language 16 Menu Color 17 Background Picture 17 Display Contrast 17 Auto Talk 18 ...
Страница 5: ...all Waiting Calls 33 Caller Information Display 33 If a Caller Hangs Up 33 If You Forget a Waiting Call 33 Voice Mail Waiting 33 RSS Customization 34 Customizing your On Screen RSS InfoLink Services 34 Accessing the Configuration Page 34 Handset Management 35 Edit RSS Feed 36 Personalizing your Content Information Service 37 Information Categories 38 Handset Registration 39 Accessory Handset 39 De...
Страница 6: ...ction at the back of this guide Parts Checklist for model 28320xx2 Make sure your package includes the items shown here 2 Handset charge cradles 3 AC power adaptors 4 AAA Nickel metal Hydride batteries 2 Battery compartment covers 2 Belt clips 2 Handsets Base Ethernet cable Telephone line cord CAUTION When using telephone equipment there are basic safety instructions that should always be followed...
Страница 7: ...ances to avoid interference issues Your phone works by sending radio signals between the handset and base The strength of the signal depends on where you locate the base Putting it as high as possible and separated as much as possible from other radio devices and metal objects ensures the best signal INSTALLATION NOTE This product operates at a frequency of 1 9GHz to provide communication with min...
Страница 8: ...ays an icon of a full battery To keep your batteries in the best condition leave the handset off the charge cradle for a few hours at a time after the initial 16 hour charge Battery Low Warning The handset displays a flashing icon of an empty battery and emits 3 warning beeps Recharge your handset right away When charging the battery level bars are animated Battery Charging Light The blue charging...
Страница 9: ...ate environments applications This includes wired and or wireless routers which provide additional hard Firewall security functionality HTTP Internet traffic transmits inbound and outbound via Port 80 which is typically open on most firewall set ups However this unit may not function properly behind a firewall that does not allow http traffic inbound and outbound on Port 80 The unit will not work ...
Страница 10: ...rvice Wizard which will guide you step by step through setup of Weather and Weather Alerts There are some useful channels pre configured to help get you started OR you can bypass the Wizard at this time and return later 3 Programmed content windows will start auto scrolling and handset is ready for use For more information on the RSS setup refer to Programming Your Phone RSS Settings NOTE Your han...
Страница 11: ... connection When off indicates no ethernet connection DECT Indicator blue When flashing indicates base is in handset registration mode When solid indicates an active call When off indicates no activity POWER Indicator green When solid indicates base is powered When flashing indicates base is in start up mode PAGE button Press to locate misplaced handset s For more information on the Page feature r...
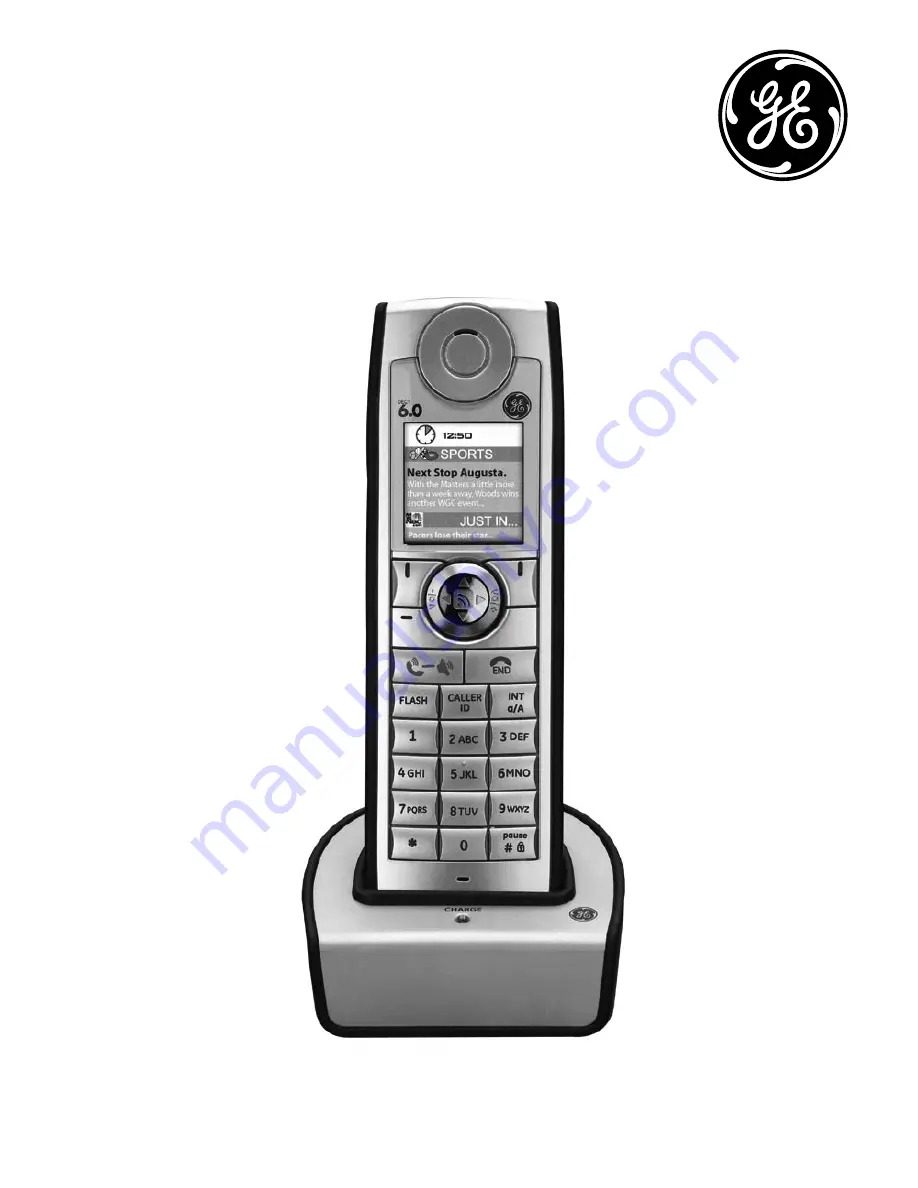
Страница 12: ...one Handset Layout Left soft button Display pause lock button button Navigational button END button Right soft button microphone Call Speakerphone button FLASH button Caller ID button INT a A button Alert Indicator Headset jack ...
Страница 13: ...eather Alert has been selected After the alert is viewed the indicator shuts off Call Speaker button Initiates or answers a call During a call activates speaker End button Ends a call Also returns any RSS or menu function to idle mode FLASH button Call Waiting acceptance during a call push to accept new incoming call Caller ID button Short press to view list of received calls Press and hold to vie...
Страница 14: ...rtially charged Fully charged Charging Battery Status indicates the status of the battery Range Indicator flashes when handset is out of range of the base Weather Alert flashes during a Weather Warning or Watch remains flashing until the condition for the alert has ended Voice Mail Alert in top info bar on display screen Ringer Off Alarm On Missed Call Battery Status Range Indicator Action Action ...
Страница 15: ...e mode at any time press The following table outlines the main menu items Calls Lists Access to received calls dialed calls and delete calls list Handset Set preferences for handset name language menu color wallpaper picture contrast auto talk regional and local area codes and default settings Contacts Add edit or delete entries to phonebook listings Sounds Set preferences for volume ringtones rin...
Страница 16: ...nguage From the Handset menu 1 Use or to scroll to Language 2 Press to enter the menu 3 Use or to scroll to the desired language The default is ENGLISH 4 Press to save your selection NOTE If you cannot read the display language refer to Handset Settings Language NOTE If you cannot read the display language refer to Handset Settings Language Entering Handset Name It may be necessary to press repeat...
Страница 17: ...to save your selection Background Picture From the Handset menu 1 Use or to scroll to Picture 2 Press to enter the menu 3 Use or to scroll through the selection press to view The default is Picture 4 4 Press to save your selection Display Contrast From the Handset menu 1 Use or to scroll to Contrast 2 Press to enter the menu 3 Use to lighten or to darken 4 Press to save your selection ...
Страница 18: ...ammed area code is also used for the Dialback feature Regional Area Codes Depending on your area you may need to set regional area codes These are needed in order for the phone to determine the number format to display when a valid Caller ID signal is received Calls received that match any of the regional area codes display as 10 digits If the number is not displayed correctly the phone may not be...
Страница 19: ...he menu 3 Press to confirm List of Default Settings Handset Name Handset Earpiece Volume 6 Bars Language English Internal Ringtone Melody 1 Menu Color Blue External Ringtone Melody 5 Background Picture Picture 4 Ringer Volume 6 Bars Contrast Mid level Key Beep On Auto Talk Off Time Format 12 Hour Area Codes Alarm Tone Off ...
Страница 20: ...or to scroll through the contacts 4 Press to select contact to view details delete entry edit entry copy entry to other handsets and view phonebook status Add Entry From the Contacts menu 1 Use or to scroll to Add Entry 2 Press to enter the menu 3 Name Home Work Cell is displayed Use or to scroll the list Press to edit entry Copy All Names to another Handset From the Contacts menu 1 Use or to scro...
Страница 21: ...etting is displayed Use to increase or to decrease the volume The default is 6 bars 4 Press to save your selection Ringtone From the Sounds menu 1 Use or to scroll to Ringtone 2 Press to enter the menu Use or to switch between Internal intercom page and External incoming calls and press 3 Scroll or A sample is played Press to confirm The default for Internal is Melody 1 the default for External is...
Страница 22: ...via the Menu 1 Make sure your phone is OFF not in talk mode 2 Press navigate to the Base Settings menu press to enter Base IP Address From the Base Settings menu 1 Use or to scroll to Base IP Address 2 Press to enter the menu 3 Your IP address is displayed Ring Volume Information There are six handset ringer volume levels including off If you select ringer off an icon is shown in the upper left si...
Страница 23: ...time in hh mm format press for AM or PM 5 Press to save your selection Time and Date Saved is displayed Time Format From the Time Settings menu 1 Use or to scroll to Time Format 2 Press to enter the menu 3 Use or to switch between 12 Hour or 24 Hour The default is 12 Hour 4 Press to save your selection Time Format Saved is displayed NOTE If you subscribe to Caller ID the handset time is automatica...
Страница 24: ...Press to save your selection Alarm Tone Saved is displayed RSS Settings To Access RSS Settings via the Menu 1 Make sure your phone is OFF not in talk mode 2 Press navigate to the RSS menu press to enter View Channels From the RSS menu 1 Use or to scroll to View channels 2 Press to enter 3 The pre configured RSS Channels are displayed When the alarm is activated an icon is displayed on the main scr...
Страница 25: ...ce Deactivate Removes the channel from your scrolling menu Identified by an X d out channel number 5 Press to save your selection Reset RSS to Default From the RSS menu 1 Use or to scroll to Reset RSS to Default 2 Press to confirm return to default settings You will now be prompted to customize your Weather and Weather Alert feeds for your preferred area 3 Press to begin customization NOTE Only on...
Страница 26: ...avigate to the Help menu press to enter Feed Set Up From the Help menu 1 Use or to scroll to Feed Set Up 2 Press to enter the menu 3 Use or to scroll through text 4 Press to return to previous screen Button Navigation From the Help menu 1 Use or to scroll to Button Navigation 2 Press to enter the menu 3 Use or to scroll through text 4 Press to return to previous screen ...
Страница 27: ... an asterisk on the right side of each entry Missed Calls If you have missed calls the main display will notify you of the presence and count of the missed calls Press to see the missed call Dialed Calls List shows details of the last 24 outgoing calls made from that handset A combined total of 50 calls can be stored in the Received and Dialed calls lists per handset You can display scroll through...
Страница 28: ... decrease the volume level The display will show the current level 2 bars are the minimum and 10 bars are the maximum Silencing a Call Press when receiving an incoming call to silence the ringer The handset displays a red X in the CID information Adjusting Handset Speakerphone Volume During a call Use to increase or to decrease the volume level The display will show the current level 2 bars are th...
Страница 29: ...t any time press again i e toggles between the handset and the speakerphone mode 3 Press to end the call Answering a Call with the Speakerphone When the phone rings 1 Press to answer the call then press again for speakerphone mode Your call will be on the handset s loudspeaker 2 Press to end the call Mute To have a private off line conversation with someone nearby use the MUTE feature The party on...
Страница 30: ... you want 1 5 2 Press to end the intercom call Receiving an Intercom Call When you receive an intercom call your handset will ring using selected Internal Ringtone To answer the call press NOTE You can make 911 emergency calls while the keypad is locked Answer incoming calls by pressing the keypad as normal NOTE Intercom allows the users to have a conversation in HD sound NOTE You can make 911 eme...
Страница 31: ... the call Transfering a Call You can transfer a call to another handset 1 During a regular telephone call press and your call is put on hold Enter the handset number you want to join on the call 1 5 2 When the other handset answers inform them they have a call then press The call is then transferred If the other handset does not answer or you decide not to transfer the call press to cancel and res...
Страница 32: ...u a chance to monitor the information and decide whether or not to answer the call IMPORTANT In order to use this phone s Caller ID features you must subscribe to either the standard Name Number Caller ID Service or Call Waiting Caller ID Service To know who is calling while you are on the phone you must subscribe to Call Waiting Caller ID Service IMPORTANT In order to use this phone s Caller ID f...
Страница 33: ... you may hear a dialtone when you reconnect to that caller Press the FLASH button again to be connected to the remaining caller If one of the callers hangs up the phone may not recognize this and may display the incorrect caller information on the display If You Forget a Waiting Call It is possible you may have a call on hold and finish your conversation with another caller and hang up In this cas...
Страница 34: ...s Go on your PC web browser The following InfoLink webpage will be displayed NOTICE Thomson Inc does not warrant that the content of any website or RSS feed transmitting content to this product InfoLink Phone will be uninterrupted or error free Access to streaming content through this device is subject to provider availability Thomson Inc does not endorse any Internet based content or RSS feeds ma...
Страница 35: ... Handsets 3 Channels available to view are made active by clicking On Clicking Off will deactivate channel in handset 4 Each handset s content channels can be configured differently or copied to another handset 5 Clicking edit opens the Edit RSS Feed list Each channel can be configured from a large list of feeds 6 When finished configuring handset click the Update Handset button to activate change...
Страница 36: ...personal feeds 3 Once you have made all of your changes simply click on the Update Handset button at the bottom of the page to update your preferences 4 The phone will automatically acknowledge any changes made to the configuration file within a few minutes by showing the RSS Synchronization icon 5 You can repeat this process for each of the available six channels ...
Страница 37: ... www infolinkforum com to view additional RSS feeds read frequently asked questions and provide user feedback TIP You can find new RSS feeds by visiting web sites like www feedburner com or any RSS logo on your favorite web pages NOTE An Invalid URL message is displayed if the selected feed includes only graphics audio videos or does not adhere to RSS standards NOTE Also visit www infolinkforum co...
Страница 38: ...y combination of feeds by entering the RSS Menu and stepping through the Channel SetUp section HAMweather Government NOAA Weather Government Weather Alerts Government Homeland Security MSNBC com News Top World and US MSNBC com Entertainment MSNBC com Health MSNBC com Sports MSNBC com Tech Science MSNBC com Business MSNBC com Politics MSNBC com Travel ...
Страница 39: ...epending on EEPROM settings the base identification number RFPI 5 Handset Registered is displayed and the handset goes back to idle 6 The DECT indicator light on the Base stops flashing when a handset has successfully been registered If the handset does not locate the base it goes back to idle mode Try again If the handset emits a double beep it means that the base has reached the maximum number o...
Страница 40: ...OFF not in talk mode 2 Press navigate to the Registration menu press to enter 3 Use or to scroll to De register 4 Press to enter the menu and the screen displays Handset 1 5 5 Use or to scroll to desired handset press 6 Press to confirm or press to cancel 7 The screen displays De registered If you select a handset that is currently in use or is not registered an error beep is emitted and the proce...
Страница 41: ...cator starts to flash 2 Keep the button pressed until the DECT indicator stops flashing 3 The base will deregister the handsets one at a time WARNING It is not recommended that a handset be de registered unless absolutely necessary because once a handset is de registered that handset s telephone features cannot be used until the handset is re registered ...
Страница 42: ...in the screen 5 A firmware update notification is also displayed on the handset with specific screen and message when process is complete NOTE It will take several minutes to install new software During this time you will not be able to use your phone NOTE It will take several minutes to install new software During this time you will not be able to use your phone NOTE The software upgrade from the...
Страница 43: ...urs prior to first use or when you install new batteries If you do not properly charge the phone battery performance will be compromised Battery Safety Precautions Do not burn disassemble mutilate or puncture Batteries of this type could release toxic materials which can cause injury To reduce the risk of fire or personal injury use only the Nickel metal Hydride battery listed in the User s Guide ...
Страница 44: ...ress unlock in order to deactivate and enable the keypad No signal icon The handset may be out of range of the base Move closer to the base Register handset Handset does not ring Make sure the handset ringer switch is turned ON this can be done through the handset setup menu Sounds Ring Volume The handset may be out of range Move closer to the base You may have too many extension phones on your li...
Страница 45: ... in again Place the handset on the cradle for at least 2 to 3 minutes Disconnect the power adaptor and plug it in again Then place the handset on the cradle for at least 2 to 3 minutes Handset displays NOT REGISTERED Follow the programming in the telephone procedures to re register the handset to the base Press the SELECT button to begin handset registration Follow instructions on Handset screen R...
Страница 46: ...nd looking good follow these guidelines Avoid dropping the handset as well as other rough treatment to the phone Wipe the base station with a damp cloth or an antistatic wipe Never use a dry cloth as this can cause static discharge Retain the original packaging in case you need to ship the phone at a later date Periodically clean the charge contacts on the handset and remote charger with a clean p...
Страница 47: ...xpressly approved by Thomson Inc could void the user s authority to operate this product For instructions on how to obtain a replacement unit refer to the warranty included in this guide or call customer service at 1 800 448 0329 Or refer inquiries to Thomson Inc Manager Consumer Relations P O Box 1976 Indianapolis IN 46206 Attach your sales receipt to this booklet for future reference or jot down...
Страница 48: ...e product is within the warranty period must be presented to obtain warranty service For rental firms proof of first rental is also required Also print your name and address and a description of the defect Send via standard UPS or its equivalent to Thomson Inc 11721 B Alameda Ave Socorro Texas 79927 Insure your shipment for loss or damage Thomson Inc accepts no liability in case of damage or loss ...
Страница 49: ...tate of Indiana Except to the extent prohibited by applicable law any implied warranty of merchantability or fitness for a particular purpose on this product is limited to the applicable warranty period set forth above How state law relates to this warranty Some states do not allow the exclusion nor limitation of incidental or consequential damages or limitations on how long an implied warranty la...
Страница 50: ... Services 34 D De Registration 40 Default Settings 19 Digital Security System 7 Display Contrast 17 E Earpiece Volume 21 Edit RSS Feed 36 End Call 28 Equipment Approval Information 2 ETHERNET Connection 9 F FCC RF Radiation Exposure Statement 3 Feed Set Up 26 Find Entry 20 Firmware Update 42 G General Product Care 46 Getting to Know Your Phone 11 Global De Registration 41 H Handset Layout 12 Hands...
Страница 51: ...onebook Status 21 Power Supply Connection 10 Programming Your Phone 15 R Receiving an Intercom Call 30 Receiving Call Waiting Calls 33 Reset RSS to Default 25 Ring Volume 22 Ringtone 21 RSS Customization 34 RSS Settings 24 S Set Date Time 23 Sounds 21 Speakerphone 29 T Telephone Cable Connection 9 Telephone Company Calling Features 32 Telephone Jack Requirements 7 Time Format 23 Time Settings 23 T...
Страница 52: ...c 101 West 103rd Street Indianapolis IN 46290 1102 2008 Thomson Inc Trademark s Registered Marca s Registrada s Model 28320 00018937 Rev 2 Dom E S 08 11 Printed in China Visit the GE website at www GE com phones ...