GE H
EALTHCARE
RAFT
V
OLUSON
E8 / V
OLUSON
E6
D
IRECTION
KTD102576, R
EVISION
7
DRAFT (A
UGUST
23, 2012)
S
ERVICE
M
ANUAL
3-30
Section 3-5 - Connection of Auxiliary Devices
3-5-13
General Remarks and Hints when using external USB-Devices
3-5-13-1
External USB-Devices - Connection
When an external USB-storage device (such as a USB-memory stick or an external hard disk) is
connected to the Voluson E8 / Voluson E6, Windows detects the device and automatically installs a
driver. During this process, several dialogs may pop up, starting with the “Found New Hardware“ dialog.
NOTE:
If an external drive was not recognized automatically after connecting it, click
RESCAN DRIVE
.
The device is then accessible using the drive letter the system assigned to it.
3-5-13-2
External USB-Devices - Disconnection
By pressing the
USB
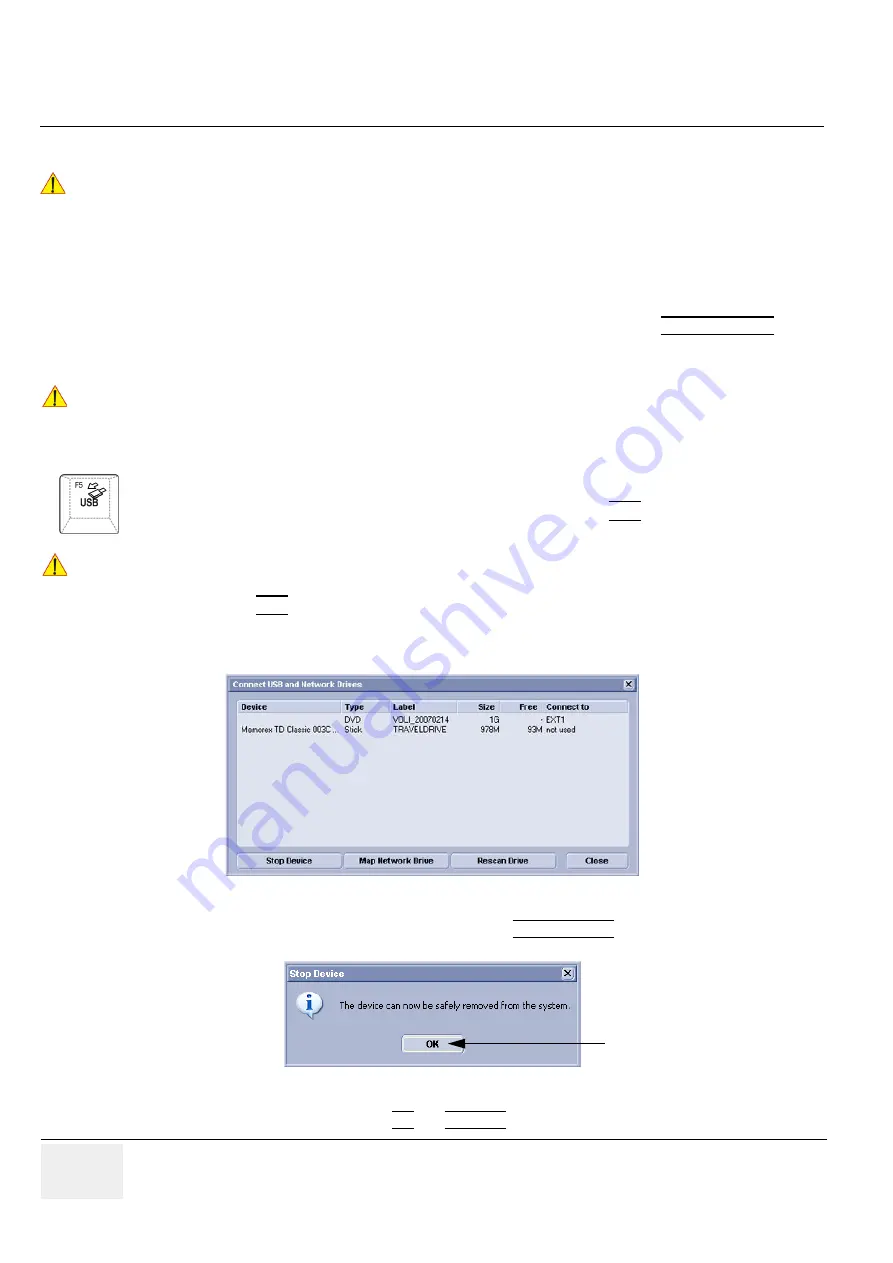
key on the keyboard, a dialog window (see:
below) is displayed.
The “Connect USB and Network Drives” window shows all USB and Network drives connected to the
system. Using this dialog, the USB-devices can be stopped before they are physically disconnected.
To stop the external device, select it and then click the STOP DEVICE button.
Confirm the ‘Stop Device‘ dialog with OK and CANCEL the “Connect USB and Network Drives” window.
WARNING
WARNING
!! WARNING:
Do not connect or disconnect any external USB-devices to or from the system while
scanning a patient! The appearing dialogs could distract you from the scan!
NOTICE
!! NOTICE:
When connecting external USB devices, be sure to execute Safety Directions found in the
Voluson E8 / Voluson E6 Basic User Manual.
Before an external USB-device (e.g., USB-memory stick) can be disconnected, the system has to be
informed about the removal of the device! For this purpose press the
USB
button on the keyboard.
CAUTION
!! CAUTION:
Unplugging or ejecting USB devices without first stopping them can often cause the system to
crash and possibly result in loss of valuable data.
Figure 3-23 Connect USB and Network Drives
Figure 3-24 Device can now be safely removed


