


March 2008
3-4
Operation
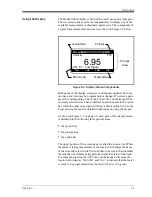
Using the Display (cont.)
At various times, one or more of the following four symbols may be
displayed on the far right of the locator bar:
•
: This symbol, which is called the
pointer
, indicates that
additional option bar entries are available. These options can be
accessed by using the [
←]
and [
→]
keys.
•
*: A flashing asterisk indicates that the Model GS868 is currently
logging information. See the
Programming Manual
for
instructions on creating a log file.
•
S or S
L
: This symbol indicates the status of the red
[SHIFT]
key. “S”
indicates that the
[SHIFT]
key is activated for the next keystroke
only, while “S
L
” indicates that the
[SHIFT]
key is locked. See the
next section for instructions on using the keypad.
•
T: This symbol indicates that the Model GS868 is currently
totalizing data.
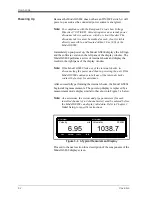
The middle portion of the screen pane is the
prompt area
. This area
displays data, graphs, and logs in measurement mode and menu
prompts in programming mode. In addition, error code messages,
which are described in the
Service Manual
, are displayed in the
prompt area.
The lower portion of the screen pane is called the
option bar
. The
option bar displays the functions assigned to the four keys
immediately below the display screen (
[F1]-[F4]
for the left pane and
[F5]-[F8]
for the right pane). Press a function key to select the function
listed in the option bar immediately above it. If more than four
functions are available, a pointer appears on the far right of the
locator bar. Press the [
←]
or [
→]
keys to display the additional
functions on the option bar.
For information about other symbols and text that may appear on the
display screen, refer to the
Service Manual
.
Содержание DigitalFlow GS868
Страница 6: ...Chapter 1...
Страница 28: ...Chapter 2...
Страница 40: ...Chapter 3...
Страница 41: ...Operation Introduction 3 1 Powering Up 3 2 Using the Display 3 3 Taking Measurements 3 5...
Страница 49: ...Chapter 4...
Страница 50: ...Specifications General 4 1 Electrical 4 2 Operational 4 4 Transducer 4 4 Flowcell 4 5...
Страница 56: ...Appendix A...
Страница 57: ...CE Mark Compliance Introduction A 1 Wiring A 1 External Grounding A 1...
Страница 59: ...Appendix B...
Страница 60: ...Data Records Option Cards Installed B 1 Initial Setup Data B 2...
Страница 64: ...Appendix C...
Страница 65: ...Optional Enclosures Introduction C 1 Rack Mount Enclosure C 1 Rack Mount Wiring C 1 Rack Mount Front Panel C 2...
Страница 71: ...Appendix D...
Страница 72: ...Measuring P and L Dimensions Introduction D 1 Measuring P and L D 1...


