background image

7-20

CIC Pro™

2026419-033E

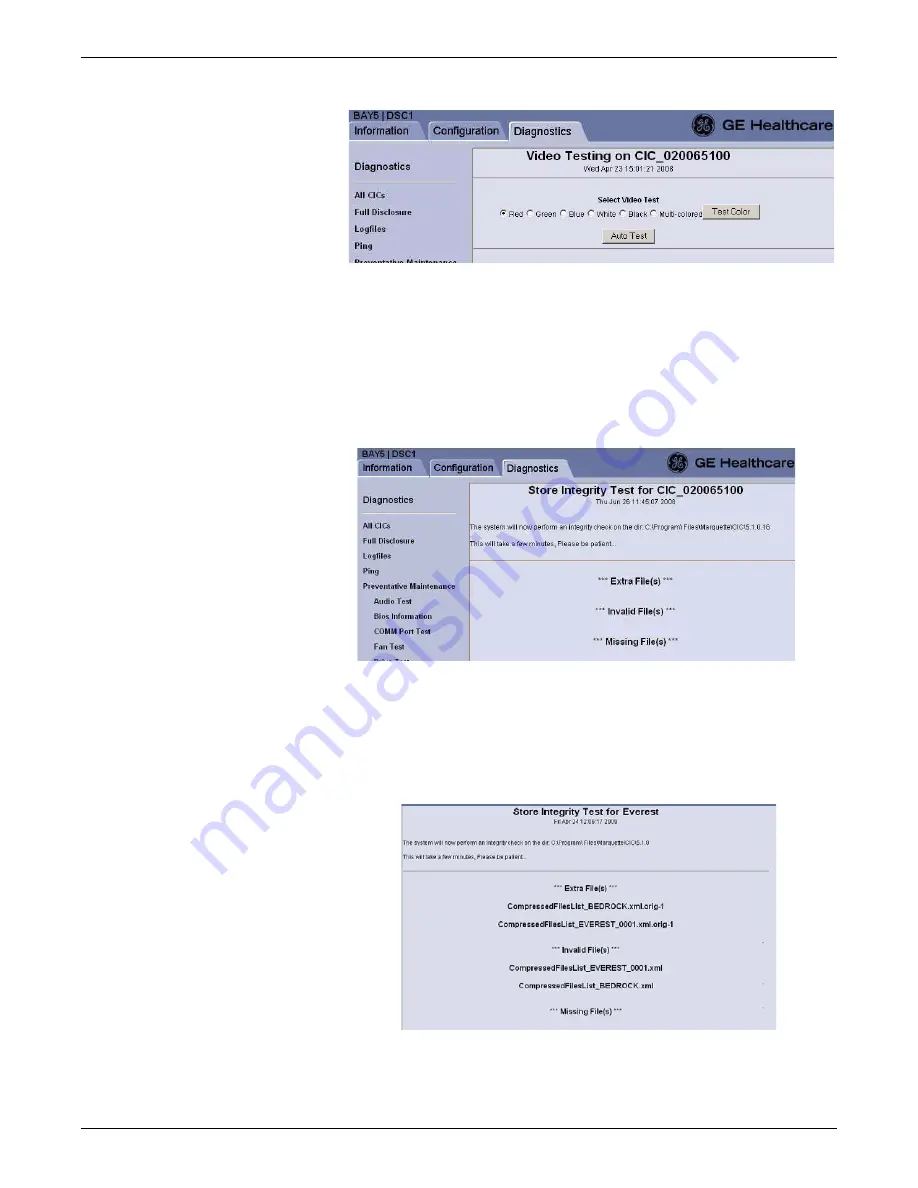
Checkout procedures

5.

Verify all colors pass the test.

Check integrity of system files

1.

If you have not already logged onto Webmin, 

Log on to the Webmin service 

interface on page 4-7

.

2.

Click 

Diagnostics > Preventative Maintenance > Store Integrity Test

.

3.

Ensure that there are no extra, invalid, or missing files.

NOTE

If the Log Compression Configuration utility has been run, the following 
extra/invalid files will appear during this check. These files are a result of 
running the utility and the system is functioning normally.

Содержание CIC Pro

Страница 1: ...E Healthcare CIC Pro English 2026420 003 CD 2026421 026E paper 2008 2010 General Electric Company All rights reserved CIC Pro Clinical Information Center Service Manual Software Version 5 1 MP100 Series ...

Страница 2: ...C Pro Clinical Information Center CARESCAPE CIC Pro CARESCAPE CIC Central Station CARESCAPE Clinical Information Center Pro and CARESCAPE Clinical Information Center all refer to the CIC Pro Clinical Information Center product Listed below are GE Medical Systems Information Technologies Inc trademarks used in this document All other trademarks contained herein are the property of their respective ...

Страница 3: ...13 Ordering manuals 1 14 Revision history 1 14 2 Equipment overview 2 1 Standard components 2 2 Display 2 3 Processor box 2 3 Controls 2 6 Power indicator 2 7 Optional components 2 7 Secondary display 2 8 Touchscreen displays 2 9 Mirror display 2 9 Laser printer 2 9 PRN 50 M digital writer 2 10 Un interruptible power supply UPS 2 11 Theory of operation 2 11 Functional description 2 11 Block diagra...

Страница 4: ...3 7 License activation methods 3 7 4 Service interfaces 4 1 Introduction 4 2 Access methods 4 2 Direct access method 4 2 Network access method 4 2 Operating modes 4 3 Overview 4 3 Administrator mode access 4 3 Service interface access 4 4 Overview 4 4 Setup CIC with service access 4 5 Command line interface access for advanced users 4 5 Windows utilities access 4 6 Screen sharing interface access ...

Страница 5: ...ration process checklist 6 7 Disconnect CARESCAPE Network IX and MC networks 6 7 Install licenses 6 7 Configure Webmin related settings 6 7 Configure desktop related settings 6 8 Configure clinical application settings 6 8 Reconnect the CIC Pro center with the network 6 9 Perform MultiKM Multimouse setup 6 9 Run Log File Compression Configuration Utility 6 9 Disconnect from the CARESCAPE Network I...

Страница 6: ...trends 6 61 Set up custom groupings for vital signs 6 64 Configure shortcuts to favorite CIC Pro center views 6 65 Configure the print location settings for stored patient data 6 67 Overview 6 67 Configure the print location settings for the patient data categories 6 67 Set the time of day or the date 6 68 Back up and restore the CIC Pro center configuration 6 71 Back up care unit default configur...

Страница 7: ...s for patient data 7 8 Check the shortcuts to favorite CIC Pro center views 7 8 Check MultiKM Multimouse operation 7 8 Check current system settings 7 8 Check full disclosure license type for all admitted in unit beds 7 9 Check full disclosure report printing 7 9 Save backup defaults file on the USB memory stick 7 10 FRU checkout procedures 7 10 Check read and write integrity of hard drive and sol...

Страница 8: ...arms 8 15 Admit Request Info button 8 15 Display waveform indicators 8 15 Require age selection for admit 8 16 Licensing issues 8 16 Time zone daylight saving time setting and network time issues 8 19 PDF file access from MUSE 8 19 Environment Monitor messages 8 19 Log files 8 20 Download log files 8 20 Access current log files 8 21 Application logs 8 23 Operating system event logs 8 24 Operating ...

Страница 9: ... 9 8 Desktop assembly 9 9 Rack mount assembly 9 10 Common replacement procedures 9 11 Replacing the CPU PCB mother board 9 14 Replacing the CPU battery 9 15 Replacing the hard drive 9 17 Replacing the flash drive 9 18 Replacing the SATA drive cables 9 19 Replacing the power supply 9 20 Replacing the fan 9 21 Replacing the dual speakers 9 22 Replacing the fuse 9 22 Replacing the front bezel 9 23 Re...

Страница 10: ...ocedure 10 13 Access log files 10 14 11 Reload software 11 1 Purpose 11 2 Process overview 11 2 Gather required equipment and tools 11 2 Create a CIC Pro center image restore USB memory stick 11 2 Reload CIC Pro center software 11 5 Complete checkout procedures 11 7 Confirm images restored to correct drives 11 7 Complete FRU checkout procedures 11 7 Check proper operation 11 8 Reload process troub...

Страница 11: ...12 9 A Electromagnetic compatibility A 1 Electromagnetic compatibility EMC A 2 Guidance and manufacturer s declaration A 2 Electromagnetic emissions A 2 Electromagnetic immunity A 3 Recommended separation distances A 5 Compliant cables and accessories A 6 B Backup and restore backed up data modules B 1 Data module detail B 2 C Device compatibility C 1 CIC Pro center v5 1 x compatibility C 2 Centra...

Страница 12: ...x CIC Pro 2026419 033E ...

Страница 13: ...2026419 033E CIC Pro 1 1 1 Introduction ...

Страница 14: ...or which a per unit royalty has been paid pursuant to Article II hereof II Royalty You have paid GE a one time per unit royalty equal to GE Medical Systems Information Technologies Inc s current published price for the use of the Program The per unit royalty is based on the actual number of patient monitors intended to be coupled by the Program to the Workstation as stated in the Purchase Order fo...

Страница 15: ...rror or non conformity C Except as stated above the warranty covering the Program and the Workstation shall be either GE Standard Warranty or Limited Extended Parts Warranty as published by GE and hereby made a part hereof D Except for the express warranties stated herein GE disclaims all warranties with regard to the program including implied warranties of merchantability or fitness for a particu...

Страница 16: ...access information from the CIC Pro Clinical Information Center central stations products in a web browser format Additionally the CIC Pro Clinical Information Center central station supports the ability to access patient information collected from the unity network and stored on a network server Safety information The terms danger warning and caution are used throughout this manual to point out h...

Страница 17: ... patient s vital signs by alternative means Then verify the CIC Pro center and printer are working correctly WARNING ALARMS Do NOT rely exclusively on the audible alarm system for Bedside Monitoring Adjustment of CIC Pro center alarm volume to a low level or OFF during Bedside Monitoring may result in inability to hear the alarm and a hazard to the patient Remember that the most reliable method of...

Страница 18: ...d by mistake WARNING DISPOSAL Dispose of the packaging material observing the applicable waste control regulations and keeping it out of children s reach WARNING EXPLOSION HAZARD Do not use this equipment in the presence of flammable anesthetics vapors or liquids WARNING INTERFACING OTHER EQUIPMENT Devices may only be interconnected with each other or to parts of the system when it has been determ...

Страница 19: ...s and regulations regarding EMC and needs to be installed and put into service according to the EMC information stated as follows Use of known RF sources such as cell portable phones or other radio frequency RF emitting equipment near the system may cause unexpected or adverse operation of this device system Consult qualified personnel regarding device system configuration The device system should...

Страница 20: ...tapped single phase circuit This equipment is suitable for connection to public mains as defined in CISPR11 EN55011 CAUTION RESTRICTED SALE U S federal law restricts this device to be sold by or on the order of a physician CAUTION SECURITY The web browser which runs in conjunction with the CIC Pro center is intended for hospital intranet use only If confidential patient information is made availab...

Страница 21: ...ntional external and internal application to the patient excluding direct cardiac application Paddles outside the box indicate the applied part is defibrillator proof Medical Standard Definition F type applied part floating isolated complying with the specified requirements of IEC 60601 1 Medical Standards to provide a higher degree of protection against electric shock than that provided by type B...

Страница 22: ...y In Accordance with UL 60601 1 CAN CSA C22 2 NO 601 1 and IEC 60601 1 For Russia only Russian GOST R certification USB connector port Ethernet connector port used to connect to the CARESCAPE Network MC or IX network as indicated on the device Serial connector ports 1 and 2 Digital Visual Interface Integrated for primary video connection that supports digital and analog displays Digital Visual Int...

Страница 23: ...for Certain Hazardous Substances in Electronic Information Products The number in the symbol is the Environment friendly User Period EFUP which indicates the period during which the toxic or hazardous substances or elements contained in electronic information products will not leak or mutate under normal operating conditions so that the use of such electronic information products will not result i...

Страница 24: ...tensions readjustments modifications or repairs are carried out by persons authorized by GE The electrical installation of the relevant room complies with the requirements of the appropriate regulations The equipment is used in accordance with the instructions for use Equipment identification Every GE device has a unique serial number for identification A sample of the information found on a seria...

Страница 25: ...Information Center Operator s Manual CIC Pro Clinical Information Center Technical Specifications Supplement MP100 Series Conventions used Equipment terms This manual uses the following terms to simplify common equipment names Term Description MC network Refers to the CARESCAPE Network MC network IX network Refers to the CARESCAPE Network IX network CIC Pro center Refers to the CIC Pro Clinical In...

Страница 26: ...quest the part number on the first page of the manual Revision history Each page of this document has the document part number and revision letter at the bottom of the page The revision letter changes whenever the document is updated Style Definition Bold Indicates hardware items such as keys labels or connectors Bold and italicized Indicates software items such as menus menu options or screen tex...

Страница 27: ...2026419 033E CIC Pro 2 1 2 Equipment overview ...

Страница 28: ...hey refer to the same GE monitoring network Standard components include the following items Processor box Primary display External speakers Standard keyboard and mouse 022B Item Function 1 Processor box Run the CIC Pro center application 2 Primary display Display real time and stored patient data control windows and various system level operations Can display 16 patients simultaneously 3 Standard ...

Страница 29: ...n also view stored parameter waveforms and numeric data control windows and various system level operations Processor box The processor box runs the CIC Pro center application It can be ordered as a desktop server MP100D or as a rack mounted server MP100R and has the following connectors ports and switches For information on USB extender limitations see Restrictions on page 5 11 Desktop views 14 F...

Страница 30: ...2 4 CIC Pro 2026419 033E Equipment overview Rack mount views 16 Side view 3 4 5 6 7 8 9 10 11 14 Front view 16 17 1 2 12 13 15 Back view ...

Страница 31: ...nector Connect to the PRN 50 M digital writer 7 RS232 1 connector Connect to the serial touchscreen display 8 DVI I 1 video connector Connect to the primary display 9 DVI D 2 video connector Connect to an optional secondary display 10 USB ports There are six USB ports you can use to connect the following devices Standard mouse Standard keyboard Touchscreen display USB memory stick used to activate...

Страница 32: ...p Access any CIC Pro center s display screen or enter text into any of the CIC Pro center s text fields in the group Support right and left mouse clicks and scroll wheel movement For more information see Perform MultiKM Multimouse setup on page 6 77 Pointer Function Arrow Indicates the CIC Pro center is operating in user mode Use the arrow pointer to select menu options patient data and to navigat...

Страница 33: ... the alarm condition is occurring Then press the Silence Alarms keyboard key to silence all alarms on this CIC Pro center for one minute Press the Silence Alarms key to silence all alarms for one minute Alarms that are in queue to sound are also silenced Any new patient alarm condition cancels the alarm silence breaking through to sound the new alarm Power indicator The power indicator is located ...

Страница 34: ...cations via the enhanced software tools provided Access custom views of routine applications using a single mouse click The following requirements apply when using a secondary display with your CIC Pro center Secondary displays must be the same type and the same size as the primary display For a list of displays that are validated for use with the v5 1 x CIC Pro center refer to Touchscreen display...

Страница 35: ...Laser printers are UL 60950 IEC 60950 certified equipment which may not meet the leakage current requirements of patient care equipment This equipment must not be located in the patient environment unless the medical system standard IEC 60601 1 1 is followed Do not connect a laser printer to a multiple portable socket outlet MPSO supplying patient care equipment The use of an MPSO for a system wil...

Страница 36: ... 8 7 Item Function 1 Writer door button Press to open the door and replace the writer paper 2 Graph stop button Press to stop printing a graph Holding the button will generate a self test print 3 Paper out indicator Illuminates when you need to replace the paper See Change writer paper on page 5 17 4 Power indicator Illuminates when the writer is connected to a power source 5 Power switch Press to...

Страница 37: ...l nurse stations in hospitals It can display real time waveforms and vital sign data with visual and audible alarms for up to 16 patients simultaneously The CIC Pro center supports both wired and wireless monitors and telemetry data The CIC Pro center software allows users to select any bed on the CARESCAPE Network MC network and display an expanded view of that bed s real time parameters and wave...

Страница 38: ... the value itself For example a five minute interval means one minute samples spaced five minutes apart not five minute samples and not a median of the five one minute samples Odd number values are rounded down to the nearest even number If the calibration of the system clock changes for example daylight saving time the time for periodic data slides into the revised time However episodic data is t...

Страница 39: ...emetry device the telemetry device s IP address is retrieved from the CIC Pro center computer RWHAT database the CARESCAPE Network messages are created and the CIC Pro center Windows operating system sends the messages to the telemetry device Storage The Full Disclosure FD Data interface uses the CARESCAPE Network IX network to retrieve data from the database Each bed is stored in a separate direc...

Страница 40: ...vent Behaviors or rules Installation Incompatible with previous full disclosure system prior to CIC Pro center v3 x Certain Unit Defaults are incompatible with CIC Pro center v3 x systems Start up modes Licensing Support for up to 16 patients per CIC Pro center Mode Description Auto For All Automatically detects admitted beds that are not currently storing full disclosure data anywhere and attempt...

Страница 41: ...e twin bed rules and rover rule Identifies CIC Pro centers with full disclosure capability NOTE The CIC Pro center master checks the software versions of the other CIC Pro centers before trying to identify CIC Pro centers with full disclosure capability Software versions earlier than 2 5 are ignored Guarantees that the right CIC Pro center is contacted if retrieving data while a multi full disclos...

Страница 42: ...rom one CIC Pro center to another if a CIC Pro center goes offline e g reboot shutdown etc The following examples describe how the multi full disclosure rule works when using two CIC Pro centers CICA and CICB NOTE In the examples start up mode is Auto and only one bed BED1 is used Example 1 1 CICA goes offline and stops full disclosure data collection on BED1 This causes CICB to begin full disclos...

Страница 43: ...and CICA stops NOTE At every wake up cycle 1 minute interval the CIC Pro center full disclosure master scans all CIC Pro centers within the care unit to determine if more than one CIC Pro center is collecting full disclosure data from the same bed this can happen as part of normal operation If the master detects this condition all CIC Pro centers are instructed to stop collecting full disclosure d...

Страница 44: ... data is kept because it is older than BED data and BED data is deleted Full disclosure data collection continues and the data is stored under the name BED 4 Combo mode is broken by discharging BED Full disclosure data collection continues with the data still stored under the name BED Combo mode Example 2 1 A hardwired bed BED is admitted and full disclosure data is collected 2 A telemetry bed BED...

Страница 45: ...l disclosure data is collected Two separate full disclosure data stores exist one for each bed possibly on a different CIC Pro center 3 The two beds are put into Combo mode When this happens BED data is kept because it is older than BED data and BED data is deleted Full disclosure data collection continues and the data is stored under the name BED 4 Combo mode is broken by discharging BED Full dis...

Страница 46: ...e amount of data storage based on time unless there is a failure to get a license 1 hour NOTE This can be different across different care units e g UnitA 72hours UnitB None 1 hour Start up mode The same start up rules apply to all beds within a care unit Default The same full disclosure defaults are used on all CIC Pro centers within a care unit Full disclosure master One per care unit Acquisition...

Страница 47: ...lt in patient data displayed in Internet Explorer not matching the patient s medical number CAUTION SECURITY The healthcare institution is responsible for ensuring the privacy of any protected health information that is displayed on this device CAUTION SECURITY The web browser which runs in conjunction with the CIC Pro center is intended for hospital intranet use only If confidential patient infor...

Страница 48: ...or video files The CIC Pro center can provide a web portal to access and view other in hospital web applications or other sources of patient data This web browser option is located in the menu bar of the CIC Pro center display screen Select this button to start a separate Microsoft Internet Explorer application See Browser configuration on page 6 57 Patient data interface The CIC Pro center allows...

Страница 49: ...Manuals for details 5 Additional parameter information 6 Patient name and Unit Name Bed Name The source of a patient s parameter data can be from a monitor a telemetry transmitter transceiver or from both a monitor and a telemetry transmitter transceiver To prevent the duplication of bed names and to help you identify the parameter data source the CIC Pro center appends the following symbols to th...

Страница 50: ...view patient data that has been collected and stored at the CIC Pro center 8 Empty patient window displaying an Admit window 9 System status tray Displays the following icons MultiKM icon See Using the MultiKM application on page 2 6 See System resource indicator on page 10 11 Print server queue icon Item Description 3 2 1 4 5 Item Description 1 Single patient viewer menu buttons 2 Expanded wavefo...

Страница 51: ...ou can review this trend more closely from the Graphic Trends tool For more information see the CIC Pro Clinical Information Center Operator s Manual Stored patient data You retrieve in unit parameter data from patient monitors connected to the CARESCAPE Network and retrieve parameter data from secondary devices connected through a device Unity Network ID In addition can use the following CIC Pro ...

Страница 52: ...g troubleshooting and completing some of the checkout procedures See Service interfaces on page 4 1 Graphic trends Review parameter numeric data over a specified period of time in bar graph format Vital signs Review parameter numeric data values for monitored parameters over a selected period of time Calipers Record measurements on the ECG waveforms Tool Description ...

Страница 53: ...2026419 033E CIC Pro 3 1 3 Licensing ...

Страница 54: ...onfiguration Patient management package Review package with or without FDPR and TDRT as needed See License packages on page 3 6 Clinician review workstation Review package without FDPR and TDRT See License packages on page 3 6 See Configure clinician review workstation on page 6 14 Secondary display utilizing a dual display configuration View license set Patient management package with dual displa...

Страница 55: ...se on each CIC Pro center up to 8 Patient management package and optionally review package on the required CIC Pro centers See License packages on page 3 6 CIC Pro center with enterprise solutions Aware Gateway connectivity ADT picklist license must exist on Aware Gateway See Admit Request Info button on page 8 15 Patient management package with ADT picklist option and optionally review package Se...

Страница 56: ...3 6 CIC Pro center with enterprise solutions Citrix server Citrix license connectivity Patient management package and optionally review package on the primary CIC Pro center See License packages on page 3 6 Configuration type Licenses required Diagram Name Option Code Description ADT Basic Functionality ADTF Fast and accurate way to admit patients Search by patient last name room bed and medical r...

Страница 57: ...T and R R interval measurements Automatic calculation of QTc measurement when both QT and R R measurements are recorded Full Disclosure Page Review FDPR Display multiple waveforms of full disclosure data in a page view View up to 72 hours of full disclosure data as a half page or a full page view View multiple up to 5 waveforms per line in 15 second 30 second or one minute per line increments Quic...

Страница 58: ...rends Real Time TDRT Display parameter trends in a patient s live view display slot Quick hands free view of recent patient trends Display trend changes in the patient condition over one hour time period at 1 minute resolution for two parameters Configure the trended parameters per patient Turn on or turn off the trend window per patient Click on a trend of interest to display detailed graphic tre...

Страница 59: ...e following procedures Activate licenses automatically via a service PC on page 8 16 Activate licenses manually via the Activation Code Summary Sheet on page 8 18 Full disclosure license FD24 FD48 FD72 Special options UTMM UTCX Package Licenses Icon Description Bedside monitor This can be either a telemetry or a hard wired bedside The amount of historical data is limited to the specific data sourc...

Страница 60: ...3 8 CIC Pro 2026419 033E Licensing ...

Страница 61: ...2026419 033E CIC Pro 4 1 4 Service interfaces ...

Страница 62: ...administrator mode supports multiple service access interfaces Windows utilities interface See Windows utilities access on page 4 6 Command line interface See Access command line interface from the administrator mode on page 4 5 Webmin interface web based tool for configuration and diagnostics See Webmin interface access on page 4 7 The clinical application mode supports multiple service access in...

Страница 63: ...ab 3 Type mms_com as the password and press Enter 4 At the Windows command line prompt type stop and press Enter 5 From the Windows taskbar click Start Shutdown 6 Choose Log off as CIC and while holding down the Shift key press OK until the logon screen displays 7 Enter the Administrator username and password a In the Username field type administrator b In the Password field type admin1 3 5 7 and ...

Страница 64: ...ro center application and launch other system applications This interface is intended for use by advanced users Direct Clinical application Not applicable mms_com See Command line interface access for advanced users on page 4 5 Administrator Administrator admin1 3 5 7 See Administrator mode access on page 4 3 Windows utilities 3M Touchware and ELO touch screen calibration applications On screen ke...

Страница 65: ...m the clinical application mode 1 From the multi patient viewer click Setup CIC 2 Click the Service Password tab 3 In the Password field type mms_com and press Enter Access command line interface from the administrator mode 1 From the Windows taskbar click Start Run 2 At the command prompt type cmd and click OK Log off command line mode To exit command line mode click the close button X 1 The pass...

Страница 66: ...re you installed UltraVNC Viewer and select Run UltraVNC Viewer Listen Mode The typical installation path on Windows XP is All Programs UltraVNC UltraVNC Viewer Run UltraVNC Viewer Listen Mode 3 Enter the IX network IP Address of the CIC Pro center in the VNC Server field and click Connect NOTE Do not type http or https before the IP address 4 Do not change any of the default settings NOTE A CIC P...

Страница 67: ...rface Complete the following procedure to log on to the Webmin service interface using the CIC Pro center s Browser function 1 From the multi patient viewer click Browser 2 Depending upon browser configuration click on either the Favorites menu or the Favorites button 3 Click LocalWebmin 4 In the Username field type biomed 5 In the Password field type password and press Enter NOTE The password is ...

Страница 68: ...Protocol TCP IP and select Properties 4 Select Use the following IP address 5 Type IP address and subnet mask and default gateway values matching the CARESCAPE Network IX network domain for the CIC Pro center For example IP Address 192 168 2 1 Netmask 255 255 0 0 Match the first two octets of the CIC Pro center s IX IP address 2 1 6 Select OK to save this configuration and close the Internet Proto...

Страница 69: ...re static in nature Since the Webmin service interface session times out after 15 minutes you must always refresh the browser to load the latest page Webmin is an internet based web application used to configure troubleshoot and perform checkout procedures For logon instructions see Webmin interface access on page 4 7 Webmin functionality is divided across the following tabs Information tab on pag...

Страница 70: ...ed service packs Printer Information View information about the installed digital writers and laser printers See Check status of installed printers on page 7 3 System Information View the serial number model ID and software version corresponding to the CIC Pro center See View system information on page 7 3 Logout Log off the Webmin service interface and display the login window ...

Страница 71: ... Set up a Citrix client on page 6 19 Language Set the language of the CIC Pro center application See Configure the CIC Pro center language on page 6 27 Licensing Activate or remove licenses from the CIC Pro center See Activate licenses automatically via a service PC on page 8 16 MultiKM Configure a group of centralized and configured CIC Pro centers to use one mouse and one keyboard in the group S...

Страница 72: ...oftware and perform software maintenance See Upgrade software on page 12 1 Time Date Set the time and date of the CIC Pro center See Set the time of day or the date on page 6 68 Logout Log off the Webmin service interface and display the logon window Option Function Option Function All CICs Check for time zone daylight saving time and CARESCAPE Network IP address errors for all CIC Pro centers on ...

Страница 73: ...ide variety of system tests Runtime Diagnostics Access a wide variety of system status information SMART Drive Status View the read and write integrity of the storage media devices See SMART drive status on page 8 29 Waveform Indicators Change the waveform indicator value See Display waveform indicators on page 8 15 Logout Log off the Webmin service interface and display the logon window Option Fu...

Страница 74: ...4 14 CIC Pro 2026419 033E Service interfaces ...

Страница 75: ...2026419 033E CIC Pro 5 1 5 Installation ...

Страница 76: ...on and testing must be completed and documented prior to equipment installation The site survey is completed by authorized GE personnel Service PC A PC is required for licensing This can be a desktop or a laptop computer Pre installation checklist Set up the service PC s network properties on page 4 8 Format a USB memory stick on page 5 3 Procure necessary licenses on page 5 3 Gather required tool...

Страница 77: ...memory stick and click Format 6 On the Format window select NTFS from the File system drop down list and click Start 7 Verify that this is the USB drive you want to format and click OK 8 Remove the USB memory stick a In the Windows system status tray click the Safely Remove Hardware icon to safely stop running the USB memory stick b On the Safe Eject window choose the drive running the USB memory ...

Страница 78: ...s screwdriver Wire cutter small Standard nut driver set Inspect equipment Unpack the equipment and inspect for shipping damage 1 Remove all equipment including all peripheral devices from the shipping cartons Inspect for damage If any damage is found contact GE Technical Support 2 Identify all required cables and prepare them for installation 3 Complete the Visual inspection on page 10 3 to inspec...

Страница 79: ... forced air cooling system but most displays do not The user must determine the heat dissipation requirements of the selected display and provide for any required cooling ventilation CAUTION NEGLIGENCE GE does not assume responsibility for damage to the equipment caused by improperly vented cabinets improper or faulty power or insufficient wall strength to support equipment mounted on such walls K...

Страница 80: ...ll power outlets and all exposed metal parts beds radiators water pipes etc in any patient area should be electrically connected together This common ground point should be connected to the nearest equipotential ground through a bonded grounding system or with a 10 AWG stranded copper grounding cable The equipotential ground point should be as close to earth ground potential as possible If a bonde...

Страница 81: ...er See Accessories on page 9 6 for a listing of UPS units available for the CIC Pro center Follow the manufacturer s recommendations for installing the UPS NOTE The CIC Pro center draws approximately 40 watts of power The displays each draw approximately 50 watts of power See the table on page 5 7 The following table identifies the estimated wattage for CIC Pro center MP100 systems and 19 inch med...

Страница 82: ... lost or corrupted telemetry alarm defaults data and loss of audible alarms See Device compatibility on page C 1 WARNING LOST OR INTERMITTENT COMMUNICATION Do not exceed a maximum of 15 CIC Pro centers in a single logical care unit Attempting simultaneous displays of a patient monitor bedside or telemetry at too many CIC Pro centers may cause lost or intermittent communication between CIC Pro cent...

Страница 83: ...nter v5 1 x and 4 1 1 or 4 0 x WARNING SITE REQUIREMENTS Do not route cables in a way that they may present a stumbling hazard For devices installed above the user adequate precautions must be taken to prevent them from dropping on the user WARNING ACCIDENTAL SPILLS To avoid electric shock or device malfunction liquids must not be allowed to enter the device If liquids have entered a device take i...

Страница 84: ...es not interfere with access to or operation of the CIC Pro center Install cabling to guard against tripping and accidental cable disconnection CAUTION Do not apply power until all equipment is installed and ready for use CAUTION This assembly is static sensitive and should be handled using precautions to prevent electrostatic discharge damage Installation process checklist Complete the following ...

Страница 85: ...ly on a desktop under the monitor stand base Physically mounted in a server rack Physically mounted to a rack using the supplied mounting bracket When using this method attach the bracket to the rack using the four mounting screws Restrictions CAUTION PERFORMANCE ISSUES DATA LOSS Failure to adhere to the following restrictions may cause CIC Pro center performance issues and data loss The following...

Страница 86: ...arm system for Bedside Monitoring Adjustment of CIC Pro center alarm volume to a low level or OFF during Bedside Monitoring may result in inability to hear the alarm and a hazard to the patient Remember that the most reliable method of Bedside Monitoring combines close personal surveillance with correct operation of monitoring equipment After connecting the monitor to the central station and or nu...

Страница 87: ...e information see Restrictions on page 5 11 1 Connect the external speaker cable into the speaker port on the CIC Pro center 2 Tighten the cable clamp screw to secure the clamp to the chassis Connect the display s Valid display configurations The primary display video connection supports DVI I analog digital connections Analog VGA monitors require a DVI to VGA adapter See Accessories on page 9 6 N...

Страница 88: ... Touchscreen primary display 1 Insert the single display DVI cable into the primary video DVI port DVI I 1 on the CIC Pro center 2 Firmly screw in the DVI connectors into the connector port 3 Insert the display power cable into a UPS if available See Un interruptible power supply UPS on page 5 7 1 Insert the touchscreen monitor DVI cable into the primary video DVI port DVI I 1 on the CIC Pro cente...

Страница 89: ... is used ensure the selected display is compatible with the Black Box CAT 5 VGA video splitter Non touchscreen secondary display Touchscreen secondary display 1 Insert the secondary display video cable into the secondary video port DVI D 2 on the CIC Pro center 2 Firmly screw in the DVI connectors into the connector port 3 Insert the display power cable into a UPS if available See Un interruptible...

Страница 90: ...interface with 2 There is no need to adjust the date and time on the printer The time is set by the time master of the central network 3 For registration of the printer please consult the hospital staff Registration of the printer is the hospitals responsibility Registration information is typically included within the printer packaging or manufacturing s instructions Or you can visit the printer ...

Страница 91: ...must use software v2B or later to operate properly with the CIC Pro center and telemetry systems 1 Screw the PRN 50 M adapter into the RS232 2 port on the CIC Pro center 2 Connect the supplied Category 5 cable into the adapter and into the PRN 50 M port 3 Load the printer with paper 4 Insert the digital writer power cable into an electrical power outlet Change writer paper Complete the following p...

Страница 92: ...nward Plug in the power cable to the CIC Pro center WARNING Ample access for AC power cord disconnect from the wall outlet or from the back of the unit is vital to provide positive AC power disconnection for service or in the event of emergency 1 Insert the power cable into the power outlet on the CIC Pro center 2 Tighten the cable clamp screw to secure the clamp to the chassis 3 Insert the power ...

Страница 93: ...on the power by pressing the power switch located on the CIC Pro center and on the displays A green power indicator illuminates when the power is turned on After approximately 30 seconds the multi patient viewer should display 2 Proceed to Configuration on page 6 1 ...

Страница 94: ...5 20 CIC Pro 2026419 033E Installation ...

Страница 95: ...2026419 033E CIC Pro 6 1 6 Configuration ...

Страница 96: ...r version CIC Pro center Use the Check Centrals utility to check for the following on all the CIC Pro centers on the network Time zone settings Daylight saving time DST status CARESCAPE Network IP address errors Status of 4 1 1 1 patch application on CIC Pro center v4 1 1 available only with the release of CIC Pro center v5 0 7 or later NOTE The Check Centrals utility does not discover any version...

Страница 97: ...ti patient viewer click Setup CIC 2 Click the Service Password tab 3 In the Password field type mms_com and press Enter 4 Run the Unity Time Zone Discovery Tool Check Centrals utility from the CD BCM and Nightshade platforms or a USB memory stick Bedrock platform 5 At the command prompt navigate to the drive where the Check Centrals utility is located e g E or F and type checkCentrals tz CIC Pro c...

Страница 98: ... F XX XXUU XUFX Central Station Summary Network Based Errors Unknown IX IP Address Errors 1 ICU SV5 2 ICUX DFR 3 ORSOUTH JJO Unknown Error Address has not been configured Not able to perform any remote checks for these systems No Path to the IX IP Address Errors 1 ANNEX BCM 2 DCM CIC2 3 DFR CIC 4 ICU CIC 5 ICU MAX 6 ORNORTH AGI No Path Error Address that does not have a physical path i e unplugged...

Страница 99: ...ate CIC Pro Clinical Information Center Service Manual 4 If there is any CIC Pro center hardware running v4 1 1 on the network make sure that the v4 1 1 1 patch is applied 5 Make sure that only the following compatible CIC Pro center versions co exist in a given care area CIC v5 1 x CIC v5 0 x CIC v4 1 1 1 CIC v4 0 7 or CIC v4 0 8 NOTE CIC Pro center hardware running v1 5 or any version of Central...

Страница 100: ...e are any spare un connected CIC Pro centers in the biomed shop and or if there are any CIC Pro centers in the care area that are designed to work on customer demand e g connected to the network currently switched off and used only when needed Before introducing such CIC Pro centers to the existing network do the following a Make sure that those CIC Pro center hardware and software versions are co...

Страница 101: ...connected the service PC to the CIC Pro center set up the service PC s network properties on page 4 8 12 Proceed to the Configuration process checklist on page 6 7 Configuration process checklist NOTE After making configuration changes ensure the CIC Pro center is functioning properly by completing all relevant checkout procedures before returning it to clinical use See Checkout procedures on page...

Страница 102: ...ltiviewer alarm audio setting if applicable on page 6 24 Configure ADU alarm audio setting if applicable on page 6 26 Configure the CIC Pro center language on page 6 27 Configure desktop related settings Configure USB laser printers on page 6 28 Configure HP LaserJet 2430 and HP LaserJet P3005 USB printers on page 6 28 Configure HP LaserJet P3015 USB printers on page 6 29 Set the laser printer def...

Страница 103: ...58 Configure shortcuts to favorite CIC Pro center views on page 6 65 Configure the print location settings for stored patient data on page 6 67 Set the time of day or the date on page 6 68 Back up and restore the CIC Pro center configuration on page 6 71 Reconnect the CIC Pro center with the network Connect the CIC Pro center to CARESCAPE Network IX and MC networks Verify network and time settings...

Страница 104: ...nse filename for CIC Pro center serial number SDY08010027GA should be SDY08010027GA txt USB memory stick containing required licenses Service PC desktop or laptop computer equipped with an Ethernet network card and running Windows NT 2000 or XP You will need this if you are accessing the service interface via a service PC Ethernet crossover cable Access to the Serial Number of CIC Pro center txt l...

Страница 105: ...of this CIC Pro center 3 Activation Code The activation code for each license activated on this CIC Pro center A license is activated when an activation code displays and the activation icon appears green in color 4 Install Licenses button Activate purchased licenses 5 Activation icons The activation level of each license on this CIC Pro center Green activated Red not activated ...

Страница 106: ... USB memory stick Typically this is the H drive on the CIC Pro center c Remove the USB memory stick from the USB port d Store the USB memory stick and the Activation Code Summary Sheet in a safe and accessible location In the event of a hard drive failure the option activation codes on this USB memory stick are required for disaster recovery e Restart the CIC Pro center You must restart before you...

Страница 107: ...for details 5 Under Unity IX enter the IP Address Subnet Mask and Default Gateway settings according to the values identified in the site survey workbook NOTE Typically the Unity IX Subnet Mask setting should remain at 255 255 0 0 See the site survey workbook A route must exist from the IX network to other CIC Pro centers Citrix servers browser services and the Internet for Remote Connection Servi...

Страница 108: ...estart of the CIC Pro center on page 8 30 Configure network laser printers This section describes the procedures required to configure network laser printers Install a network laser printer on page 6 14 Delete a network laser printer on page 6 16 Install a network laser printer NOTE The following installation procedure requires a CARESCAPE Network IX network connection See Set the network IP addre...

Страница 109: ... for future reference NOTE If the IP address is not specified or if it has not valid the following error will be displayed 6 In Printer Type select the default printer driver HP Universal Printing PS NOTE This driver will support the currently released printers listed on page 2 9 7 In Printer Name type a name for the printer up to 29 characters NOTE If a printer name is not specified the following...

Страница 110: ...e from the drop down list 5 Click Submit The printer is deleted from the printer list NOTE Deleting a printer does not remove the references to it under the CIC Setup care unit default settings Configure the server for remote connectivity The CIC Pro center is capable of remote service using GE Healthcare InSite ExC Digital Services See the site survey workbook for required configuration informati...

Страница 111: ...t number are required for the Remote Service communication to work Otherwise select None If the HTTP proxy server requires user authorization a specific Username and Password is required Otherwise select None These values are determined during the site survey See the site survey workbook Port Username and Password Remote Service Configuration Parameter Value Notes System ID Identifies the system t...

Страница 112: ...cate with the Remote Service agent This address is typically preconfigured to connect to the Remote Back Office but it can be edited to suit customer requirements Enterprise Tunnel URL If required designate the address of the GE backoffice servers required to communicate with the tunneling agent Protocol Identifies the protocol used to communicate with the enterprise servers This field is read onl...

Страница 113: ...th a Java Citrix client Citrix clients display the applications and pass keyboard mouse and sound events back and forth to the Citrix server This means that you are just viewing the application at the CIC Pro center while the application itself is running on the Citrix server If the facility supports a Citrix server a Citrix client can be set up on the CIC Pro center 1 If you have not already logg...

Страница 114: ...usted during configuration of the Citrix application Initial Program The name of the program that is initially displayed in the browser Width The numeric value that defines the display size of the Citrix application window The approximate width x height default settings for a full page application on a secondary display is 1280 x 900 The approximate width x height default settings for a half page ...

Страница 115: ...n the Please enter a name for this favorite field type the name that will identify this website in the browser s Favorites menu 4 In the Please enter an IP address or URL webpage address field type the internet address IP address of this website 5 In the Please select a favorite type field select the option associated with the type of browser favorite this is NOTE If necessary click Reset to clear...

Страница 116: ...f applicable on page 6 22 Configure force age setting if applicable on page 6 23 Configure multiviewer alarm audio setting if applicable on page 6 24 Configure ADU alarm audio setting if applicable on page 6 26 CAUTION OUT OF UNIT ALARMS If the CIC Pro center is configured to alarm for out of unit alarms any patient displayed on that out of unit CIC Pro center and is alarming can have their alarms...

Страница 117: ...m on the CIC Pro center 1 If you have not already logged onto Webmin Log on to the Webmin service interface on page 4 7 2 Click Configuration Set Flags NOTE The Set Flags Module screen shows the current set flags settings which can be modified 3 In the NO COMM field on the Set Flags Module screen click Enable 4 Click Submit 5 Restart the application See Perform safe restart of the CIC Pro center o...

Страница 118: ... Module screen shows the current set flags settings which can be modified 3 In the FORCE AGE field on the Set Flags Module screen click Enable 4 Click Submit 5 Restart the application See Perform safe restart of the CIC Pro center on page 8 30 6 Verify the new settings prior to monitoring patients Configure multiviewer alarm audio setting if applicable This setting is applicable for mirror or out ...

Страница 119: ...service interface on page 4 7 2 Click Configuration Set Flags NOTE The Set Flags Module screen shows the current set flags settings which can be modified 3 Change the settings in the MULTIVIEWER ALARM AUDIO field as required 4 Click Submit 5 Restart the application See Perform safe restart of the CIC Pro center on page 8 30 6 Verify the new settings prior to monitoring patients Option Description ...

Страница 120: ...silenced from the out of unit CIC Pro center CAUTION AUDIBLE ADU ALARMS MAY NOT SOUND Depending on the configuration of your CIC Pro center audible ADU alarms may not sound at the CIC Pro center for any in unit patient beds Only on screen ADU alarm indicators display unless the CIC Pro center is configured to also sound audible alarms Complete the following procedure to configure the ADU Alarm Aud...

Страница 121: ...f the CIC Pro center is not currently running in English then reimage the system which will default to English and allow you to set the CIC Pro center to the required language NOTE The Webmin interface is always in English Complete the following procedure to set the language of the CIC Pro center s software application 1 If you are not already logged onto the CIC Pro center as administrator Log on...

Страница 122: ...ters HP LaserJet 2430 Supported as a Plug and Play device doesn t require any special installation configuration See Configure HP LaserJet 2430 and HP LaserJet P3005 USB printers on page 6 28 HP LaserJet P3005 Supported as a Plug and Play device doesn t require any special installation configuration See Configure HP LaserJet 2430 and HP LaserJet P3005 USB printers on page 6 28 HP LaserJet P3015 No...

Страница 123: ... list or specific location Advanced and select Next to continue 6 Select Don t search I will choose the driver to install and select Next to continue 7 Select DOT4 USB Printing Support and select Next to continue 8 Select Finish After approximately 2 minutes the Found New Hardware Wizard window will display This wizard allows the installation of the generic IEEE 1284 4 printing support 9 Select In...

Страница 124: ... center you must make sure all of the installation and configuration preconditions have been met Then you can verify that the interface to the secondary display is working 1 If you are configuring a NEC display as a secondary display then perform the following tasks only after completing Touchscreen calibration using the Touchware application on page 6 34 2 Verify the secondary display interface i...

Страница 125: ...nitor displays a mirror image of the primary monitor display when the Extend my Windows desktop onto the monitor option is not checked g Note the Screen resolution setting for display 2 h Click the display 1 icon Make sure the Screen resolution setting is the same for both displays The recommended screen resolution is 1280 x 1024 i On the Display Properties window click display 2 and then click Ad...

Страница 126: ... video drivers Calibrating a touchscreen display adjusts the accuracy of the touchpoint on the display used to select an item Touchscreen displays can be used with a CIC Pro center however if present touchscreen calibration is required The type of video driver installed on the touchscreen display determines the application you must use to calibrate the touchscreen display Use the following informa...

Страница 127: ...e green colored check mark button b If the cursor did not follow your finger click the blue colored arrow button and repeat steps 5 and 6 7 If a secondary display is connected complete steps 5 and 6 to calibrate the second touchscreen display 8 If two USB touchscreen displays are used you must go back and calibrate the primary touchscreen display again Repeat steps 5 and 6 to calibrate the primary...

Страница 128: ...0 Proceed to Configure a secondary display on page 6 30 Set the time zone NOTE To change the time zone daylight saving time time of day or the date on a CIC Pro center on a v4 0 x or v4 1 1 software or later see the CIC Pro Clinical Information Center Service Manual that was provided with your equipment NOTE Do not set the time zone until all other configuration steps have been completed Setting t...

Страница 129: ...e or Date Time tab to change the time The time change request must be made only from Webmin Otherwise the time change request will not be sent to the Time Master 8 Click OK to close the window 9 Restart the CIC Pro center From the Windows taskbar click Start Shut Down Restart and press Enter CAUTION LOSS OF FULL DISCLOSURE DATA Failure to reboot the CIC Pro center after changing the time zone resu...

Страница 130: ...IC Defaults on page 6 36 2 If you are printing to the bedside patient monitor s default printer verify the correct printer is selected in the Print Window field under Graph Setup on the Telemetry Unit Defaults window See Set the Telemetry Unit Defaults on page 6 44 Configure clinical application telemetry and care unit settings This section describes the procedures required to configure the clinic...

Страница 131: ...g and experience in its use The consequences of misuse include loss of alarm configuration loss of patient data corruption of the CIC Pro center operating system software or disruption of the CARESCAPE Network 3 From the CIC Setup menu click CIC Defaults 4 On the CIC Defaults window make the appropriate changes to the following default settings ...

Страница 132: ...sure the care unit names match exactly If the care unit name is not displayed in the Unit list you must type it in Then press Enter Mirror Central Display Set up a mirror image view of a primary CIC Pro center See Mirror another CIC Pro center on page 6 41 Waveforms Set the waveforms you want to display up to three in addition to the ECG waveform ECG1 From ECG Source This waveform data automatical...

Страница 133: ...er NOTE The Minimum alarm volume can only be set via the Service mode You can set the Current alarm volume to any level above the Minimum via the user or Service mode All clinical setting values must be received from the GE Clinical Application Specialist CAS or from the nursing director of the care unit Consult with your CAS or hospital staff about the use of these functions and if they should be...

Страница 134: ...er mode The ability to turn off arrhythmia detection for a selected patient while in user mode Real Time BP NIBP UOM Selection NOTE This option is only available on CIC Pro centers running software v5 0 6 or later configured for the Chinese language Pressure values may be displayed in kPa when configured for the Chinese language This option will be displayed in the Chinese language when the CIC Pr...

Страница 135: ... mirroring CIC Pro center You can set up a mirror CIC Pro center for remote monitoring This is set in the Service mode Changes made on the primary CIC Pro center are not always made at the mirror CIC Pro center When a mirror CIC Pro center is set up these rules are in place If the user selects new parameters or colors to view on one display that view is not mirrored on the other display Auto Displ...

Страница 136: ...ter application on page 6 42 Restriction in setting up a mirror CIC Pro center using a Russian or Spanish CIC Pro center application 1 Do not create a primary and mirror configuration between CIC Pro center application versions 5 0 7 5 0 8 and 5 1 x or vice versa See the table below for additional clarification Set up a mirror CIC Pro center using a non Russian and non Spanish CIC Pro center appli...

Страница 137: ...o match the main CIC Pro center 7 Click CIC Defaults 8 From the Mirror Central Display drop down list choose the main CIC Pro center you want mirrored on the remote CIC Pro center 9 Check the title bar on the remote CIC Pro center to verify that it is mirroring the correct CIC Pro center 10 Click Apply to apply your changes without closing the CIC Setup window 11 Confirm proper operation of the mi...

Страница 138: ... the telemetry system s operator manual Complete the following procedure to configure the Telemetry Unit Defaults settings 1 From the multi patient viewer click Setup CIC 2 Log on to Setup CIC with service access on page 4 5 3 Click Telemetry Unit Defaults 4 On the Telemetry Units Defaults tab change the settings as needed NOTE When changing the Graph Setup options for admitted patients the change...

Страница 139: ...atient is not linked to a patient monitor these defaults are necessary to specify the destination for alarm and manual graph printouts Waveforms Designate the primary ECG lead for printing and enable or disable printing from subsequent ECG leads ECG 1 Designate the primary ECG lead for printing Waveform 2 to Waveform 4 Choose other ECG leads to print or choose OFF to disable printing an ECG lead T...

Страница 140: ...Defaults tab change the settings as needed Option Function Parameter Limits and Alarm Levels Set default parameter alarm limits and alarm levels for the following parameters HR NBP S NBP D NBP M SPO2 SPO2 R ST I ST II ST III ST V ST V2 ST V3 ST V4 ST V5 ST V6 ST aVR ST aVL ST aVF PVC RR and RR Apnea Arrhythmia Alarm Levels Set default alarm levels for the following arrhythmia calls ASYSTOLE VFIB V...

Страница 141: ...ving the full disclosure option and the other without It is necessary to turn full disclosure OFF on the CIC Pro center without the full disclosure option to prevent a conflict between the two different storage capacities of the CIC Pro centers To turn off full disclosure on the CIC Pro center without the full disclosure option you must set the full disclosure License type to none See Set the full...

Страница 142: ...tions Graybar Display every other line of the report on a shaded background to provide visual differentiation from other lines Arrhythmia Annotations Display the name of an applicable arrhythmia call underneath its occurrence in the report Heart Rate Display the last active heart rate included in the report appears at the end of the report line Line Time Designate how much data shows on an individ...

Страница 143: ...the actual license full disclosure does not work Display a list of the full disclosure license type Offline Storage WARNING POTENTIAL DATA LOSS Do not allow a NO COMM patient offline event to exceed the time limit selected in the Offline Storage setting The patient s full disclosure data is deleted if the time limit is exceeded Set the amount of time stored in Offline Storage This exists as a prec...

Страница 144: ...service access on page 4 5 3 On the CIC Setup screen click Display Configuration 4 On the Display Configuration tab change the settings as needed Option Function Columns Set the number of columns of patient windows displayed in the multi patient viewer Rows Set the number of rows of patient windows displayed in the multi patient viewer Screen Calibration Display the Screen Calibration window used ...

Страница 145: ...the duration of displayed waveforms Maximize Number of Waveforms Maximizes the number of displayed waveforms Disable Auto Display Button Removes the Auto Display button from the multi patient viewer menu bar and prevents the use of this function When enabled the Auto Display button is selectable from the CIC Pro center s menu bar Clicking the Auto Display button while viewing the multi patient vie...

Страница 146: ... TTX number The second line of an entry shows the current software level for the patient bed in question Tower The telemetry receiver cabinet tower this telemetry patient is communicating with Receiver The receiver assembly inside the telemetry receiver cabinet this telemetry patient is communicating with Unit Bed The unit and bed to which this patient has been assigned Type The type of patient th...

Страница 147: ...IC Pro center and users are unable to move the bed to another slot NOTE It is possible to admit a patient to a window with a bed name that is locked to NONE To avoid duplication of patient waveforms a window locked as NONE should not be used to admit a patient Complete the following procedure to lock or unlock a bed 1 From the multi patient viewer click Setup CIC 2 Log on to Setup CIC with service...

Страница 148: ...026419 033E Configuration 2 On the CIC Defaults window under Real Time BP NIBP UOM Selection select kPa 3 Click Apply to apply your changes without closing the CIC Setup window The pressure value now displays in kPa ...

Страница 149: ...asurements should be made from that monitor only NOTE Screen calibration should be performed every time a monitor is installed or serviced NOTE If two displays are connected to the CIC Pro center complete the screen calibration on the primary display first then the secondary display Calibrating the display screen adjusts the waveform gain and sweep speed to ensure the displayed sweep speed is accu...

Страница 150: ...6 56 CIC Pro 2026419 033E Configuration 4 Under Screen Calibration click Begin Calibration The Screen Calibration window displays on the primary display and also the secondary display if present ...

Страница 151: ...f the screen ruler match the calibration marks of your ruler and then release the mouse button 9 Repeat this procedure to calibrate the vertical screen ruler NOTE The Maintain Aspect Ratio option allows you to adjust both screen rulers simultaneously However because of differences in monitors and screen resolution it is recommended that each ruler be adjusted separately Therefore this option shoul...

Страница 152: ... loss of patient data corruption of the CIC Pro center operating system software or disruption of the CARESCAPE Network Icon Description Return to previous cached webpage Advance to next cached webpage Stop the webpage loading process Reload the current webpage Go to the home webpage To set a home page see Define the Internet options on page 6 58 Print the current webpage Configure the internet op...

Страница 153: ... of the browser Do not attempt to download files of any type This includes but is not limited to audio or video files 1 Log on to Setup CIC with service access on page 4 5 2 From the multi patient viewer click Browser 3 Click the Internet Properties icon to display the Internet Properties window NOTE The internet options icon will not be selectable unless you first log on to the CIC Pro center in ...

Страница 154: ...60 CIC Pro 2026419 033E Configuration NOTE When Internet Explorer starts the browser displays the specified Home Page 5 Click the Connections tab 6 Under Local Area Network LAN settings click LAN Settings ...

Страница 155: ...wser and the CARESCAPE Network by completing the respective checkout procedures Check the hospital intranet browser functionality on page 7 7 Check access to all other care units on page 7 7 and Check full disclosure report printing on page 7 9 Configure customize groupings You can configure customized groups of parameters for viewing patient data NOTE You can delete the default groups You can con...

Страница 156: ...single patient viewer click 6 From the Customize Graphic Trends menu click 7 Using the onscreen or external keyboard enter the name of the custom view up to 10 characters and click Enter The name of the custom view is displayed under Groups on the Customize Graphic Trends menu ...

Страница 157: ...opup window select the appropriate parameter and click Close 10 Repeat steps 8 and 9 for the remaining parameters NOTE In split screen or on a single display you can configure up to 6 parameters In full screen or on a secondary display you can configure up to 12 parameters 11 When you have finished configuring groups click Close on the Customize Graphic Trends window 12 Verify the new settings pri...

Страница 158: ...ect any patient window 3 Click Patient Data 4 Click Vital Signs 5 In the upper right corner of the single patient viewer click 6 From the Customize Vital Signs menu click 7 Using the onscreen or external keyboard enter the name of the custom view up to 10 characters and click Enter The name of the custom view is displayed under Groups on the Customize Vital Signs menu ...

Страница 159: ...y the new settings prior to monitoring patients Configure shortcuts to favorite CIC Pro center views NOTE You can configure up to eight shortcut buttons for favorite CIC Pro center views when in dual display mode primary and secondary displays are connected configured with a CIC Pro center You can configure up to two shortcut buttons for favorite CIC Pro center views when in single display mode 1 ...

Страница 160: ...66 CIC Pro 2026419 033E Configuration 4 In the popup window type the text up to 10 characters that should appear on the shortcut button and click OK 5 Verify the new settings prior to monitoring patients ...

Страница 161: ...side monitor only prints the categories of patient data it supports Consult with your CAS or hospital staff about the use of this function and if it should be used with your configuration Configure the print location settings for the patient data categories 1 Make sure the print settings are configured for the laser printer and bedside patient monitor s default printer 2 If you have not already lo...

Страница 162: ...le the print button located in the CIC Pro center s menu bar for Alarm Control Calipers FD Report FD Strip The print button is enabled The CIC Pro center application prints to the Full Disclosure printer location as configured in CIC Setup N A Disable the print button located in the CIC Pro center s menu bar for the selected patient data category Event Directory The two printer buttons point to th...

Страница 163: ...4 1 1 software or later see the CIC Pro Clinical Information Center Service Manual that was provided with your equipment Use the Check Centrals utility See Pre configuration instructions on page 6 2 This section describes the procedures required to set the time and date of a CIC Pro center using v5 1 x software or later 1 If you need to change the time zone or daylight saving time DST settings be ...

Страница 164: ...le changing time using Webmin please note that only 6 time changes will be allowed every 10 minutes The 10 minute window is a rolling window therefore if no new time change is attempted the user will be able to change time again after 10 minutes Exceeding the number of permitted time changes does not result in any user notification the system simply ignores the time change request However an entry...

Страница 165: ...em restore if it should become necessary You can back up and restore the following Care unit defaults See page 6 71 Custom defaults See page 6 75 Back up care unit default configuration settings NOTE The real time trend graph setting is not saved during backup It must be restored manually 1 If you have not already logged onto Webmin Log on to the Webmin service interface remotely via the CARESCAPE...

Страница 166: ...care unit that should be consistent between all the CIC Pro centers within that care unit All other configuration data is specific to the local CIC Pro center only and is not shared between the CIC Pro centers in the care unit See the following scenarios for information about how this automatic update impacts the backup and restoration process of a CIC Pro center Scenario 1 Restore a CIC Pro cente...

Страница 167: ... c Type mms_com as the password and press Enter d At the Windows command line prompt type stop and press Enter 2 Disconnect the CIC Pro center from the CARESCAPE Network IX and MC networks 3 Connect a service PC directly to the CIC Pro center and Log on to the Webmin service interface remotely via the CARESCAPE network IX network on page 4 7 4 Click Configuration Backup Restore Unit Defaults 5 Cli...

Страница 168: ...See Perform safe shutdown of the CIC Pro center on page 8 31 This prevents the restore from being overwritten by associated data from other CIC Pro centers running on the care unit network NOTE The CIC Pro center application must be stopped in order to perform a restore Because configuration data is automatically updated to match other CIC Pro centers found running in the care unit if other CIC Pr...

Страница 169: ...with the care unit is updated with data from the restored CIC Pro center as the other CIC Pro centers start up 13 Verify the new settings prior to patient monitoring Backing up and restoring local custom default configuration settings You can back up and restore any of the custom default configuration settings associated with the Single Patient Viewer applications These configurations may be uniqu...

Страница 170: ...ed up defaults file 5 On the file download window click Save Target As 6 On the Save As window navigate to a directory on your local computer where you want to save the downloaded configuration file If required rename the file 7 Click Save 8 On the Download complete window click Close Restore local custom default configuration settings NOTE The backup and restore procedures must only be completed ...

Страница 171: ...prior to monitoring patients Reconnect the CIC Pro center with the network Connect the CIC Pro center to the IX and MC networks Perform MultiKM Multimouse setup The MultiKM license allows you to connect a minimum of one keyboard and one mouse to a group of centralized and configured CIC Pro centers NOTE To prevent temporary loss of navigation control in a configured keyboard and mouse group you sh...

Страница 172: ...re application Please be aware that these names refer to the same licensed software application MultiKM With the MultiKM license activated you can do the following tasks Move the mouse across all of the CIC Pro centers in the group Support right and left mouse clicks and scroll wheel movement Access any CIC Pro center s display screen or enter text into any of the CIC Pro center s text fields in t...

Страница 173: ...plays of a MultiKM keyboard and mouse group NOTE Be sure to apply a Computer Name label to both the primary 1 and secondary 2 displays 5 Verify the MultiKM license is activated on each CIC Pro center you want in the keyboard and mouse group a In the Feature List locate System Utilities MultiKM b Next to System Utilities MultiKM verify the Activation Code field displays an activation code If an act...

Страница 174: ... can only perform these tasks while you are locally seated at the CIC Pro center and logged on to the local webmin service interface 1 If you have not already logged onto Webmin Log on to the direct access local Webmin service interface on page 4 7 2 Click Configuration MultiKM 3 On the MultiKM Configuration window click Enable NOTE To disable the MultiKM application on this device click Disable 4...

Страница 175: ...o centers to be added or removed from a group are displayed in the list All CIC Pro centers that have Multimouse enabled but do not belong to a group will be automatically added to the list 8 Remove any names of the CIC Pro centers you do not want included in this group a Under Other Computers click the computer name of the CIC Pro center you want to remove and click Remove b Repeat step 8 to remo...

Страница 176: ...n 10 Click and drag the location of the computer names to match the physical layout of the CIC Pro center displays in this group NOTE Leave the Hot key field blank CIC Pro centers with a secondary display will move together 11 Click Finish ...

Страница 177: ...C Pro centers to an existing keyboard and mouse group 1 At each CIC Pro center that you want to add to the keyboard and mouse group a If you have not already logged onto Webmin Log on to the direct access local Webmin service interface on page 4 7 b Click Configuration Licensing and do the following Identify the Computer Name of the CIC Pro center you are adding Verify the MultiKM license is activ...

Страница 178: ... If you have not already logged onto Webmin Log on to the Webmin service interface on page 4 7 5 Click Configuration MultiKM and start the MultiKM application 6 On the Multimouse application window click Configure Create Group 1 NOTE Because the primary CIC Pro center is the device that has the mouse and keyboard connected to it the computer name of this device will not be displayed in the Other c...

Страница 179: ... E and F NOTE If any CIC Pro center is taken off of an existing Multimouse group for any reason you must remove that CIC Pro center from the existing group 2 On the Change Configuration window click Next 3 Click and drag the location of the computer names to match the physical layout of the CIC Pro center displays in this group ...

Страница 180: ...running on each CIC Pro center in the keyboard and mouse group If there are problems see MultiKM issues on page 8 10 Create Group 2 1 Determine which CIC Pro center in Group 2 will be the primary device and connect a mouse and keyboard to it 2 From any one of the CIC Pro centers that will be in Group 2 e g D E or F a If you have not already logged onto Webmin Log on to the direct access local Webm...

Страница 181: ... 4 Click Configuration MultiKM Configure and start the MultiKM application 5 Repeat the configuration starting with step 5 See Configure the keyboard and mouse group on page 6 80 6 Complete step 2 to step 5 on CIC Pro centers D E F B and C 7 Go to CIC Pro center A Verify that all the CIC Pro center computer names are listed and then click Next 8 Click and drag the location of the computer names to...

Страница 182: ...on the service computer 2 Insert the Log Compression Configuration Utility software CD into the service PC CD drive NOTE Use the Help link for details on usage prerequisites and troubleshooting 3 Click List USB Drive s on the GE Patch Distribution Utility window NOTE The utility displays a message identifying the USB drives that are connected to the service PC 4 Select the appropriate USB drive fr...

Страница 183: ...NG LOSS OF MONITORING This procedure requires you to stop the CIC Pro center application and reboot the CIC Pro center after completion Stopping the application or rebooting a CIC Pro center stops active patient monitoring Notify the site s biomedical department to provide alternate bedside patient monitoring See Establish alternate monitoring methods on page 12 3 1 Insert the USB memory stick con...

Страница 184: ...s CIC has already had the log compressor reconfiguration applied Exiting with no action taken will appear NOTE If the installation fails in applying the utility a message similar to the following figure will appear If this occurs the CIC Pro center will have to be re imaged reconfigured and the utility will need to be reinstalled 11 Exit the command window 12 Select Start Shutdown Restart in order...

Страница 185: ...installed licenses on page 7 4 Verify settings with Check Centrals command on page 7 5 Check and configure the speaker volume on page 7 5 Check operation of audible alarm tones on page 7 7 Check access to all other care units on page 7 7 Check the operation of the Citrix application viewed at the CIC Pro center on page 7 7 Hospital responsibility Check the hospital intranet browser functionality o...

Страница 186: ...6 92 CIC Pro 2026419 033E Configuration Check successful execution of Log File Compression Configuration Utility on page 7 21 ...

Страница 187: ...2026419 033E CIC Pro 7 1 7 Checkout procedures ...

Страница 188: ...f the equipment The safety tests and checkout procedures are based on the assumption that the equipment being tested is using known good cables It also requires that the user be familiar with the operation of the system For more information concerning the operation of these components refer to the operator manual associated with the equipment Perform all of the checkout procedures included in this...

Страница 189: ...lts Confirm the unit defaults match the customer s needs as provided by the clinical application specialist or the responsible hospital care nurse Check status of installed printers 1 If you have not already logged onto Webmin Log on to the Webmin service interface on page 4 7 2 Click Information Printer Information View system information 1 If you have not already logged onto Webmin Log on to the...

Страница 190: ... window 2 Perform all of the checkout procedures as listed in Configuration checkout procedures on page 7 3 3 At the top of the multi patient viewer window confirm that the name of the mirror is displayed as Mirror of XXX XXX is the name of the intended primary CIC Pro center Check the status of installed licenses Complete the following procedure to confirm all purchased licenses for this CIC Pro ...

Страница 191: ...ring Adjustment of CIC Pro center alarm volume to a low level or OFF during Bedside Monitoring may result in inability to hear the alarm and a hazard to the patient Remember that the most reliable method of Bedside Monitoring combines close personal surveillance with correct operation of monitoring equipment After connecting the monitor to the central station and or nurse alert verify the function...

Страница 192: ...audio space d and press Enter The current speaker volume values for this CIC Pro center display 5 Compare the speaker values displayed on your CIC Pro center to the following HDM 5 speaker values 6 If the values do not match complete the following steps a At the command prompt type setaudio space x space and press Enter Repeat for each incorrect volume value x 10 to 100 and audio value setting b T...

Страница 193: ...access to all other care units 1 From the multi patient viewer menu click View Other 2 Verify that the list shows all care units that should be networked Check the operation of the Citrix application viewed at the CIC Pro center It is the responsibility of the hospital s IT or Biomedical department to meet the required CIC Pro center configuration needs to check this functionality Check the hospit...

Страница 194: ...a In the single patient viewer window verify that the custom groupings display properly Check the shortcuts to favorite CIC Pro center views In the single patient viewer window verify that the favorite view buttons are displayed Check MultiKM Multimouse operation Verify that the MultiKM application is running on each CIC Pro center in the keyboard and mouse group If there are problems see MultiKM ...

Страница 195: ...nit beds 1 If you have not already logged onto Webmin Log on to the Webmin service interface on page 4 7 2 Click Diagnostics Full Disclosure 3 On the Full Disclosure screen click FD List 4 Verify all admitted beds in the care unit have the correct full disclosure license type Check full disclosure report printing 1 From the single patient viewer click Patient Data FD Page 2 Verify waveforms appear...

Страница 196: ...Check read and write integrity of hard drive and solid state flash drive The following table lists the drives partitions on the CIC Pro center hardware NOTE The CIC Pro center application must be stopped before you can check for disk errors on a disk drive CAUTION During shutdown or while in administrator mode beds displayed by the CIC Pro center will be unmonitored if not displayed by a different...

Страница 197: ...b At the C prompt type chkdsk and press Enter 7 Ensure that there are no errors If errors are found refer to Troubleshooting on page 8 1 If you require additional information or troubleshooting assistance contact Technical Support 8 Repeat the procedure described in step 6 to check the F and G drives Check USB devices 1 If you have not already logged onto Webmin Log on to the Webmin service interf...

Страница 198: ... internal ports which are not used and 6 external physical ports Check internal hardware temperature and voltage status 1 If you have not already logged onto Webmin Log on to the Webmin service interface on page 4 7 2 Click Diagnostics Runtime Diagnostics Temp Voltage Info 3 On the Temp Voltage Info screen verify that the values displayed are within the following acceptable limits ...

Страница 199: ...re configured properly Check BIOS information 1 If you have not already logged onto Webmin Log on to the Webmin service interface on page 4 7 2 Click Diagnostics Preventative Maintenance Bios Information Property Value Acceptable limits System Voltage 5V Actual real time voltage of the CIC Pro center s 5 volt internal power sub system 4850 5250 mV System Voltage 12V Actual real time voltage of the...

Страница 200: ... screen Phoenix AwardBIOS v6 00PG Phoenix AwardBIOS v6 00PG Check drive operation information Flash drive and hard drive 1 If you have not already logged onto Webmin Log on to the Webmin service interface on page 4 7 2 Click Diagnostics Preventative Maintenance Drive Test 3 View the Flash drive information on the first screen that is displayed ...

Страница 201: ...This software currently does not support a temperature reporting feature for the flash drive Therefore the zeroes which are displayed in the Drive Temperature section do not reflect the actual temperature 4 Scroll down to view the hard drive information Hard drive information ...

Страница 202: ... CIC Pro center will be unmonitored if not displayed by a different CIC Pro center 1 Log on to the CIC Pro center as Administrator on page 4 3 2 From the desktop launch Internet Explorer 3 If you have not already logged onto Webmin Log on to the Webmin service interface on page 4 7 4 Click Diagnostics Preventative Maintenance Audio Test 5 On the Audio Test screen select CIC Alarm Sounds from the d...

Страница 203: ... tone sounds from the CIC Pro center Check speaker status 1 If you have not already logged onto Webmin Log on to the Webmin service interface on page 4 7 2 Click Diagnostics Runtime Diagnostics Closed loop Audio Info 3 On the Closed loop Audio Info screen verify the speakers are plugged into the correct socket ...

Страница 204: ...t already logged onto Webmin Log on to the Webmin service interface on page 4 7 4 Click Diagnostics Preventative Maintenance Watchdog Test 5 On the Watchdog Testing screen click Start Test Once the Watchdog timer counts down to zero the CIC Pro center will reboot and must return to the normal state Property Value External Speaker Status Plugged 1 indicates connector is plugged into the external sp...

Страница 205: ...cting this test CAUTION During shutdown or while in administrator mode beds displayed by the CIC Pro center will be unmonitored if not displayed by a different CIC Pro center 1 Log on to the CIC Pro center as Administrator on page 4 3 2 From the desktop launch Internet Explorer 3 If you have not already logged onto Webmin Log on to the Webmin service interface on page 4 7 4 Click Diagnostics Preve...

Страница 206: ...ebmin service interface on page 4 7 2 Click Diagnostics Preventative Maintenance Store Integrity Test 3 Ensure that there are no extra invalid or missing files NOTE If the Log Compression Configuration utility has been run the following extra invalid files will appear during this check These files are a result of running the utility and the system is functioning normally ...

Страница 207: ...ter as Administrator on page 4 3 2 Insert the USB memory stick containing the Log Compression Configuration Utility into one of the available USB ports of the CIC Pro center 3 Navigate to the H drive and double click LogCompressionConfigUtility_Install bat 4 Once started the message This V5 1 0 CIC has not been reconfigured Continue with reconfiguration of this system y n will be displayed Type y ...

Страница 208: ...7 22 CIC Pro 2026419 033E Checkout procedures ...

Страница 209: ...2026419 033E CIC Pro 8 1 8 Troubleshooting ...

Страница 210: ...ce malfunction liquids must not be allowed to enter the device If liquids have entered a device take it out of service and have it checked by a service technician before it is used again Before starting any detailed troubleshooting you should always check for the following conditions Verify all cable connections are secure and properly seated Verify all components are connected properly Verify all...

Страница 211: ...enter software should come back normally Operating system does not boot from the USB memory stick An incorrect boot order in the system BIOS is the most likely cause The correct boot order is First Boot Device USB HDD Second Boot Device HDD 2 Third Boot Device IBA GE Slot 010 Picklist server is not available The server is not present on the network There are network problems and you cannot perform...

Страница 212: ...ESCAPE Network IP address errors Resolve any issues 2 Run lw s time to identify the Time Master on the network 3 Using the results of steps 1 and 2 ensure that the Time Master highest MC network IP address is the CIC Pro center with the highest CIC Pro center application software version on the network See Pre configuration instructions on page 6 2 4 Shutdown the Time Master CIC Pro center See Per...

Страница 213: ... is recommended that you try to segment the network closet by closet NOTE After completing the tasks in this step you know have multiple segmented closets on different isolated networks 2 If the problem still persists on any network then power down the MC network switch in the specific segmented closet e g closet A 3 Wait for approximately 15 seconds and power on the MC network switch in the segme...

Страница 214: ...ed configuration as described in Perform MultiKM Multimouse setup on page 6 77 MultiKM worked for only one hour MultiKM enable has failed See MultiKM issues on page 8 10 When using Multimouse unable to locate the control focus screen Cannot physically locate due to the physical layout of the displays Use Ctrl F1 to change the focus to the CIC Pro center where the keyboard and mouse are connected U...

Страница 215: ...s on page 8 21 Need to access application logs See Application logs on page 8 23 Need to access operating system event logs See Operating system event logs on page 8 24 Need to access operating system Dr Watson log See Operating system Dr Watson log on page 8 25 Need to view Webmin action log See Webmin action log on page 8 25 Unable to access PDF file Microsoft security restrictions with the Win ...

Страница 216: ...onal error and patient monitoring at the CIC Pro center is not occurring If the CIC Pro center does not automatically restart after 90 seconds the monitoring function at the CIC Pro center will not resume During CIC reboot the display screen shows a blank screen with the cursor blinking A USB device other than a keyboard or mouse is connected to the CIC Pro center Remove unplug USB memory stick fr...

Страница 217: ...events browser connection to Patient Viewer A parsing defect in the Microsoft Internet Explorer browser can in some cases prevent access to certain sites Also the level of security present on the CIC Pro center server prevents running applications from the Windows desktop The combination of these two factors contribute to loss of browser function under certain circumstances Add a forward slash to ...

Страница 218: ...MultiKM application will work for a maximum of one hour Complete the following procedure to troubleshoot a MultiKM license activation failure License activation failures 1 Look in the bottom right corner of the display screen for the failed MultiKM license icon with the red slash through it This icon indicates that the MultiKM license has failed 2 Remove the CIC Pro center where MultiKM license fa...

Страница 219: ... and click Remove to remove this CIC Pro center from the group 3 Click Hide to hide the Multimouse application window 4 Use the hotkey Ctrl F1 to change the focus to the CIC Pro center where the keyboard and mouse is connected CIC Pro center setup issues Unable to communicate with a device 1 If you have not already logged onto Webmin Log on to the Webmin service interface on page 4 7 2 Click Diagn...

Страница 220: ...ice 4 If you do not receive a reply perform a network integrity check Run the Check Centrals utility and resolve any configuration errors See Pre configuration instructions on page 6 2 List full disclosure beds 1 If you have not already logged onto Webmin Log on to the Webmin service interface on page 4 7 2 Click Diagnostics Full Disclosure 3 Click FD List A typical listing includes the following ...

Страница 221: ...i patient viewer click Setup CIC b Click the Service Password tab c Type mms_com as the password and press Enter d At the Windows command line prompt type stop and press Enter 2 If you have not already logged onto Webmin Log on to the Webmin service interface on page 4 7 3 Click Diagnostics Full Disclosure 4 In the Full Disclosure Mode field click On or Off to begin or end full disclosure mode 5 C...

Страница 222: ...isclosure server process you want to ping in the format 4 Click Ping Display current system settings 1 If you have not already logged onto Webmin Log on to the Webmin service interface on page 4 7 2 Click Configuration Set Flags For information on changing these settings refer to Configure set flags settings on page 6 22 UNIT CIC X X X X p Ping FDDataSvr Database process UNIT CIC Ping FDSvr contro...

Страница 223: ...nter before you can retrieve patient demographic information from a networked database If the Admit Request Info button is dimmed and unselectable and both ADT configurations are being run simultaneously only the Prism IS information is accessible You must choose to run only one ADT configuration Two Admission Discharge Transfer ADT configurations can exist Prism IS Legacy existing technology Pick...

Страница 224: ...rvice PC on page 8 16 Activate licenses manually via the Activation Code Summary Sheet on page 8 18 Activate licenses automatically via a service PC Use this procedure when the license activation codes are retrieved from a service PC via a USB memory stick CD or the service PC s hard drive Option Function Enable TTX only Display only telemetry indicators Enable all Display all waveform indicators ...

Страница 225: ...between different access modes 2 If you have not already logged onto Webmin Log on to the Webmin service interface on page 4 7 3 Click Configuration Licensing 4 Scroll down to the bottom of the Add Remove Feature Activation Codes window 5 Click Browse and navigate to the location where you stored the Serial Number of CIC Pro center txt license activation file on the service PC 6 Click Upload to lo...

Страница 226: ... 8 30 Activate licenses manually via the Activation Code Summary Sheet Use this procedure when the license activation codes reside on the printed Activation Code Summary Sheet The printed Activation Code Summary Sheet that matches the serial number of the CIC Pro center you are the activating the options on is required 1 If you have not already logged onto Webmin Log on to the Webmin service inter...

Страница 227: ...want to remove click Remove Time zone daylight saving time setting and network time issues Follow the Pre configuration instructions on page 6 2 PDF file access from MUSE Because of changes to security restrictions with Windows XP OS Service Pack2 you must use IP addresses for the server location instead of the domain name Environment Monitor messages When the CIC Pro center is experiencing limite...

Страница 228: ...rd Disk Drive failure CAUTION LIMITED DATA STORE IN FULL DISCLOSURE If rotating the hard drive fails the system can be used for patient monitoring but with limitations on the amount of data stored in full disclosure and provided that the hard drive be replaced within five days of hard drive failure notice on the CIC Pro center Flash Disk Drive failure MP100 platform Warning System resources are ru...

Страница 229: ... contain today s log file To collect logs for today current day refer to Access current log files on page 8 21 5 Send this log file to GE Service for further investigation Access current log files This feature allows the user to download the current day s log files which include up to a total of 60 days 1 Log in as administrator See Log on to the CIC Pro center as Administrator on page 4 3 2 Log o...

Страница 230: ...6419 033E Troubleshooting 4 Click Download Logs 5 Click Package Current Logfiles The job status information is displayed on the Download Logs window A link to the current log files is added to the list of Archived Logs ...

Страница 231: ...mmdd_hhmmsssc bfp and select Save Target As to save the log file 7 Send the log files to GE Service for further investigation Application logs 1 If you have not already logged onto Webmin Log on to the Webmin service interface on page 4 7 2 Click Diagnostics Logfiles View Application Logs ...

Страница 232: ... Operating system event logs 1 If you have not already logged onto Webmin Log on to the Webmin service interface on page 4 7 2 Click Diagnostics Logfiles View OS Event Logs 3 From the Event Log drop down list select the type of event logs Application Security or System you want to view 4 From the Number of entries drop down list select the number of entries you want to include in the log 5 Click V...

Страница 233: ...rface on page 4 7 2 Click Diagnostics Logfiles View OS Dr Watson Log Webmin action log 1 If you have not already logged onto Webmin Log on to the Webmin service interface on page 4 7 2 Click Diagnostics Logfiles View Webmin Action Log 3 Select the applicable options to search for the user s module s time and date range you want to view 4 Click Search ...

Страница 234: ...If you have not already logged onto Webmin Log on to the Webmin service interface on page 4 7 2 Click Diagnostics Runtime Diagnostics Device Driver Info Network information 1 If you have not already logged onto Webmin Log on to the Webmin service interface on page 4 7 2 Click Diagnostics Runtime Diagnostics Network Info ...

Страница 235: ...g 2026419 033E CIC Pro 8 27 Operating system runtime statistics 1 If you have not already logged onto Webmin Log on to the Webmin service interface on page 4 7 2 Click Diagnostics Runtime Diagnostics OS Runtime Stats ...

Страница 236: ...ready logged onto Webmin Log on to the Webmin service interface on page 4 7 2 Click Diagnostics Runtime Diagnostics OS Service Process Info Process information 1 If you have not already logged onto Webmin Log on to the Webmin service interface on page 4 7 2 Click Diagnostics Runtime Diagnostics Process Info ...

Страница 237: ...rive status Self Monitoring Analysis and Reporting Technology SMART is a monitoring system for computer hard disks to detect and report various indicators of reliability The tests you can execute from the SMART Drive Status window do not interfere with the normal functioning of the disk 1 If you have not already logged onto Webmin Log on to the Webmin service interface on page 4 7 2 Click Diagnost...

Страница 238: ...short self test typically takes a minute or two to complete The extended self test takes approximately one hour to complete 5 Click View Self Test Log to view the logs resulting from the test Perform safe restart of the CIC Pro center WARNING If a USB memory stick blank or containing data is connected to the USB port of this device CIC Pro center or ApexPro you need to remove it prior to restartin...

Страница 239: ...mode beds displayed by the CIC Pro center will be unmonitored if not displayed by a different CIC Pro center CAUTION EQUIPMENT DAMAGE OR DATA LOSS Turn off the CIC Pro center power switch only when the message It is now safe to turn off your computer displays Equipment damage or data loss can occur if this instruction is not followed 1 From the multi patient viewer click Setup CIC Service Password...

Страница 240: ...n 1 If you have not already logged onto Webmin Log on to the Webmin service interface on page 4 7 2 Click Configuration Passwords 3 On the Edit User Password window type the new password in the Password field 4 Retype the new password in the Confirm Password field and click Save ...

Страница 241: ...2026419 033E CIC Pro 9 1 9 Field replaceable units FRUs ...

Страница 242: ...9 2 CIC Pro 2026419 033E Field replaceable units FRUs Exploded views Desktop Front bezel Speakers Fans CPU Power supply FRU ...

Страница 243: ...Field replaceable units FRUs 2026419 033E CIC Pro 9 3 Hard drive Flash drive ...

Страница 244: ...9 4 CIC Pro 2026419 033E Field replaceable units FRUs Rack mount ...

Страница 245: ...Field replaceable units FRUs 2026419 033E CIC Pro 9 5 Mounting options ...

Страница 246: ...chematics or troubleshooting assistance contact Technical Support Disaster recovery software kit and Service Tools CD Accessories FLASH DRIVE Part number Description 2040226 001 CIC MP100 V5 1 DISASTER RECOVERY SW KIT 2010433 047 SERVICE TOOLS CD Part number Description 420650 005 CABLE ASSY 20 FT DVI D SINGLE LINK 420650 009 ADPTR DVI M TO VGA ADAPTER 422310 001 MOUSE PAD 2001323 001 KOSS HDM 5 C...

Страница 247: ...UPS SMK 600VA 220 VOLTS 2022038 003 PWR SPLY UPS SMK 2000VA 120 VOLTS 2022144 002 USB MOUSE OPTICAL SCROLL LIGHTED 2028077 002 1GB USB 2 0 MEMORY STICK UNFORMATTED Part number Description Part number Description 80274 006 CORD PWR 125V 6FT STR 401855 001 PWR SPLY CRD RA CONT Euro 10A 250V 2 5M 401855 002 PWR SPLY CRD RA British 10A 250V 2 5M 401855 003 PWR SPLY CRD RA Italian 10A 250V 2 5M 401855 ...

Страница 248: ...ires into the sockets of the power cord by mistake Part number Description 2012217 037 KYBD KIT CIC USB WIN95 POLISH 2012217 038 KYBD KIT CIC USB WIN95 HUNGARIAN 2012217 021 KYBD KIT CIC USB ENG US 2012217 022 KYBD KIT CIC USB WIN95 BELGIAN 2012217 023 KYBD KIT CIC USB WIN95 DANISH 2012217 024 KYBD KIT CIC USB WIN95 ENG EU 2012217 025 KYBD KIT CIC USB WIN95 ENG UK 2012217 026 KYBD KIT CIC USB WIN9...

Страница 249: ...39793 002 FRU MP100 CPU PCB Replacing the CPU PCB mother board on page 9 14 2 2039793 003 FRU MP100 FAN Replacing the fan on page 9 21 3 2039793 004 FRU MP100 DUAL SPEAKERS Replacing the dual speakers on page 9 22 4 2039793 005 FRU MP100 POWER SUPPLY Replacing the power supply on page 9 20 5 2039793 006 FRU MP100 SATA DRIVE CABLES Replacing the SATA drive cables on page 9 19 6 2039793 009 FRU MP10...

Страница 250: ...10 CIC Pro 2026419 033E Field replaceable units FRUs Rack mount assembly Refer to Replacement procedures on page 9 8 for a description of the parts referenced in the following diagram 2 3 4 1 5 6 and 7 8 ...

Страница 251: ...L INJURY OR EQUIPMENT DAMAGE Follow these precautions whenever performing disassembly Failure to follow this instruction could result in serious injury or product property damage All external connector inputs and outputs of the device are protected from electrostatic discharge ESD damage However if the interior of the device needs to be accessed for any reason internal components and assemblies ar...

Страница 252: ...lutely necessary Make sure power to an assembly is turned off before removing or inserting a semiconductor Do not slide electrical electronic assemblies across any surface Semiconductors and electrical electronic assemblies should be stored only in antistatic bags or boxes These guidelines cannot guaranty a 100 static free workstation but greatly reduce the potential for failure of any electrical ...

Страница 253: ...r WARNING SHOCK HAZARD Whenever the cover is removed you can disrupt internal components and potentially disrupt proper power or ground connections The potential for electric shock exists When the cover is replaced perform Electrical safety tests on page 10 6 and FRU checkout procedures on page 7 10 Desktop 1 Prepare the unit for disassembly on page 9 12 2 Remove the eight screws that connect the ...

Страница 254: ...om the CPU PCB 9 Remove the four screws that connect the DVI ports to the chassis retain the screws 10 Remove the six screws that connect the CPU PCB to the chassis retain the screws 11 Replace the CPU PCB NOTE Do not discard the memory cards qty 2 and battery 12 Reverse steps to re assemble the CPU 13 Replace the original memory cards qty 2 and battery 14 Re assemble the cover on page 9 24 15 Per...

Страница 255: ...tus of installed printers on page 7 3 Check MultiKM Multimouse operation on page 7 8 Check full disclosure report printing on page 7 9 Check read and write integrity of hard drive and solid state flash drive on page 7 10 Check audio component operation on page 7 16 Check integrity of system files on page 7 20 Check operation of the secondary display on page 7 4 Check COMM ports on page 7 13 Check ...

Страница 256: ...he battery 4 Replace the battery 5 Reverse steps to re assemble 6 Re assemble the cover on page 9 24 7 Set the time on the CIC Pro center as close as possible to any other device on the CARESCAPE Network CAUTION NETWORK DEVICE TIME SYNCHRONIZATION When adding a new device e g CIC Pro center to the CARESCAPE Network the existing devices on the CARESCAPE Network will synchronize to the new device s ...

Страница 257: ... power cable from the hard drive 4 Remove the SATA cable from the hard drive 5 Loosen the four screws that connect the hard drive to both sides of the mounting bracket NOTE The mounting bracket holds both the hard drive and the Flash drive The hard drive is on the top the Flash drive on the bottom 6 Slide the hard drive out of the mounting bracket 7 Replace the hard drive 8 Reverse steps to re ass...

Страница 258: ... as possible to the time within a few seconds used by the existing GE devices on the CARESCAPE Network 1 Prepare the unit for disassembly on page 9 12 2 Remove the cover on page 9 13 3 Remove the power cable from the hard drive 4 Remove the SATA cable from the hard drive 5 Remove the power cable from the Flash drive 6 Remove the SATA cable from the Flash drive 7 Loosen the four screws that connect...

Страница 259: ... page 9 13 3 Remove the two SATA cables that connect to the PCB CPU 4 Remove the two SATA cables that connect to the hard and Flash drives 5 Replace the SATA cables 6 Re assemble the cover on page 9 24 7 Perform the following checkout procedures For the HDD SATA Perform Ground continuity test on page 10 6 Perform Ground earth wire leakage current test on page 10 7 Perform Enclosure leakage current...

Страница 260: ...ces which are not connected to the same circuit must be electrically isolated when operated WARNING SHOCK HAZARD Never touch components inside the power supply There are no field serviceable components in the power supply Capacitors in the power supply present a shock hazard even when the power is off CAUTION BURNS During operation the power supply can become hot enough to cause severe burns Allow...

Страница 261: ...RESCAPE Network the existing devices on the CARESCAPE Network will synchronize to the new device s time To prevent potential time synchronization issues you should set the new device s time to be as close as possible to the time within a few seconds used by the existing GE devices on the CARESCAPE Network NOTE There are two internal fans Either can be replaced independently 1 Prepare the unit for ...

Страница 262: ...r to the mounting bracket retain the screws 5 Replace the dual speaker assembly 6 Reverse steps to re assemble 7 Re assemble the cover on page 9 24 8 Perform the following checkout procedures Perform Ground continuity test on page 10 6 Perform Ground earth wire leakage current test on page 10 7 Perform Enclosure leakage current test on page 10 8 Check operation of audible alarm tones on page 7 7 C...

Страница 263: ...rnal hardware temperature and voltage status on page 7 12 Verify that the power LED is on after the unit is powered up Replacing the front bezel CAUTION NETWORK DEVICE TIME SYNCHRONIZATION When adding a new device e g CIC Pro center to the CARESCAPE Network the existing devices on the CARESCAPE Network will synchronize to the new device s time To prevent potential time synchronization issues you s...

Страница 264: ...NING SHOCK HAZARD Whenever the cover is removed you can disrupt internal components and potentially disrupt proper power or ground connections The potential for electric shock exists When the cover is replaced perform Electrical safety tests on page 10 6 and FRU checkout procedures on page 7 10 Re assemble the cover on the desktop 1 Slide the cover over the chassis 2 Replace the eight screws that ...

Страница 265: ...2026419 033E CIC Pro 10 1 10 Preventive maintenance ...

Страница 266: ...ance be performed by service personnel upon installation every 12 months after original installation and each time the unit is serviced In addition the following preventative maintenance should be performed Perform periodic calibration of bedside monitors by a satisfactory maintenance schedule Test UPS yearly to confirm it meets at least 80 of rated capacity Perform the SMART Run Short Self Test a...

Страница 267: ...r repair Display Inspect the display face for marks scratches or other damage Physical damage to a touchscreen face may jeopardize its performance Replace if necessary Fans Inspect all cooling fans in the CIC Pro center to make sure they are in good working order and are not clogged with dust These fans draw outside air into the unit to cool internal components Safety labels and inscriptions Check...

Страница 268: ... types of problems listed previously include but are not limited to Sani Cloth Wipes Ascepti Wipes HB Quat Clorox Wipes they do not contain bleach Over the counter detergents e g Fantastic Tilex etc Products that contain active ingredients and solutions similar to these products should be avoided External surfaces NOTE Any contact of the disinfectant solutions with metal parts may cause corrosion ...

Страница 269: ...blot dry with a soft lint free cloth 6 Do not use excessive drying techniques such as oven forced heat or sun drying Internal components CIC Pro center WARNING In order to remove power from the CIC Pro center disconnect the power cord from the wall outlet The power switch on the back panel of the processor box does not disconnect the CIC Pro center from AC power Additionally wait 40 seconds after ...

Страница 270: ...ne neutral and ground conductors are properly connected to the power cord plug and are not short circuited Rewire and tighten these or replace the power cord as necessary Electrical safety tests Electrical safety tests provide a method of determining if potential electrical health hazards to the patient or operator of the device exist Electrical safety tests may be performed under normal ambient c...

Страница 271: ...d voltage not exceeding 6 V is passed for at least 5 s through the protective earth terminal or the protective earth pin in the mains plug and each accessible metal part which could become live in case of failure in basic insulation 2 The voltage drop between the parts described is measured and the impedance determined from the current and voltage drop It shall not exceed the values indicated For ...

Страница 272: ...µA 0 3 volts on the DMM and the device under test is powered from 100 120 V 50 60 Hz 300 µA 0 3 volts on the DMM and the device under test is powered from a centered tapped 200 240 V 50 60 Hz single phase circuit 500 µA 0 5 volts on the DMM and the device under test is powered from a non center tapped 200 240 V 50 60 Hz single phase circuit NOTE Center tapped and non center tapped supply circuits ...

Страница 273: ...test fails Contact GE Technical Support 300 µA 0 3 volts on the DMM and the device under test is powered from 100 120 V 50 60 Hz 300 µA 0 3 volts on the DMM and the device under test is powered from a centered tapped 200 240 V 50 60 Hz single phase circuit 500 µA 0 5 volts on the DMM and the device under test is powered from a non center tapped 200 240 V 50 60 Hz single phase circuit 7 Set the GND...

Страница 274: ...s packaged with each display to check for and adjust if necessary the following operational requirements Proper contrast and color for best viewing in the environment where used Proper screen focus Correct horizontal and vertical linearity Correct horizontal and vertical position Perform checkout procedures If you replaced any part follow the appropriate instructions as listed for that part Check ...

Страница 275: ...ck internal hardware temperature and voltage status on page 7 12 Check COMM ports on page 7 13 Check BIOS information on page 7 13 Check drive operation information Flash drive and hard drive on page 7 14 Check audio component operation on page 7 16 Check speaker status on page 7 17 Check processor fan status on page 7 19 Check video function and status of video card and drivers on page 7 19 Check...

Страница 276: ... indicates the number of days since the CIC Pro center was last rebooted Resource indicator messages from Environment Monitoring Service Icon color Text Green System Resources Normal Yellow System Resources Advisory Red System Resources Low Icon color Text Green This CIC is operating within normal software parameters and no Preventive Maintenance action is currently required X Yellow System resour...

Страница 277: ...e number in minutes ranging from 0 to 60 Icon color Text System resource indicator System resource condition Action required Green Normal System resources are within normal parameters No service action is currently required Yellow value equal or greater than 364 Advisory System has been running continuously for at least 364 days without a system resource reset System resources may be running low S...

Страница 278: ...displays turn off the CIC Pro center power switch 6 Wait for 5 seconds 7 Turn on CIC Pro center power switch 8 Allow the CIC Pro center application to start up completely 9 Complete the procedure as described in Access current log files on page 8 21 Access log files When you contact GE Service you may have to provide required log file information See Log files on page 8 20 ...

Страница 279: ...2026419 033E CIC Pro 11 1 11 Reload software ...

Страница 280: ...ve and running Windows NT 2000 or XP This manual CIC v5 1 x Image DVD supplied via the CIC v5 1 x software reload disaster recovery kit USB memory stick with a minimum of 1 GB memory Create a CIC Pro center image restore USB memory stick 1 Insert the USB memory stick into a vacant USB port on the service PC 2 Insert the DVD containing the GE Software Distribution Utility into the service PC s DVD ...

Страница 281: ...ppropriate USB drive usually drive F from the drop down list NOTE This procedure erases any existing data on the USB memory stick If more than one USB memory stick is identified be sure to select the correct one 5 Click Make USB Stick 6 Select OK to confirm that you wish to continue the operation The reload utility displays the progress of the operation ...

Страница 282: ...e USB memory stick indicates that the program is still processing If the USB memory stick is not equipped with an LED wait for approximately 5 minutes after the progress indicator shows that the process is 99 complete 7 Wait for a message indicating that the operation is complete 8 Remove the USB memory stick from the service PC NOTE The reload process also prepares the USB memory stick for safe r...

Страница 283: ...layed NOTE If the system does not boot from the USB memory stick refer to Reload process troubleshooting on page 11 8 6 Select the appropriate option from the menu options that are displayed 1 _Restore MP100 CIC image and clear and initialize HDD NOTE This option will restore the CIC image on the Flash drive and will clear and initialize the hard drive 2 _ Quit NOTE This option will cancel the rel...

Страница 284: ...ll be displayed 9 Power down and power up the CIC Pro center using the power switch NOTE Upon first boot the screen will be blank for a few minutes and then the following warning message will be displayed Setup is in progress do not close this window System will reboot automatically in approximately 2 minutes 10 Verify that the CIC Pro center is defaulted to the following IP addresses a If you hav...

Страница 285: ...Disk 0 shows four partitions C D E F Disk 0 also has a smaller capacity than Disk 1 Disk 1 shows one partition G and has a larger capacity than Disk 0 NOTE The smaller drive contains all the software and the larger drive contains only full disclosure data Complete FRU checkout procedures Refer to the following table for the applicable checkout procedure If this FRU is replaced Complete the applica...

Страница 286: ...oting If the system doesn t boot from the USB stick then there could be one or more of the following problems Incorrect boot order The correct boot order is USB HDD HDD 2 IBA GE Slot 010 The correct boot order can be set by completing the load optimized defaults procedure as follows NOTE Correcting the boot order is a password protected process The password is 8765309 1 Press Ctrl Alt Delete to re...

Страница 287: ... Operating system not found or unknown platform image indicate that the software image on the USB stick does not match the correct hardware In this case the USB stick may contain the wrong image files it may not contain any image at all or it may have been improperly created If needed repeat Create a CIC Pro center image restore USB memory stick on page 11 2 ...

Страница 288: ...11 10 CIC Pro 2026419 033E Reload software ...

Страница 289: ...2026419 033E CIC Pro 12 1 12 Upgrade software ...

Страница 290: ...version In any given CARESCAPE Network many Multimouse groups can co exist as long as each individual group devices are the same CIC Pro center versions Example all CIC v5 0 x in one group and all CIC v5 1 x in another group If a CIC Pro center is swapped from an existing MultiKM group ensure that the new CIC Pro center is the same version as the other CIC Pro centers in the Multimouse group You c...

Страница 291: ...es on page 6 91 Software upgrade CD for CIC Pro center supplied as part of the software upgrade kit Prepare the CIC Pro center The CIC Pro center must be running and be connected to the CARESCAPE Network IX network NOTE The software installation process does not require the CIC Pro center to be disconnected from the CARESCAPE Network IX or MC networks Do not stop the active monitoring of patients ...

Страница 292: ...IC Pro centers to be updated on page 12 5 Connect the service PC to the CARESCAPE Network IX network WARNING LOSS OF ALARMS When using a service PC to install or reload software onto the CIC Pro center do not connect the Ethernet cable from the service PC to the CIC Pro center s CARESCAPE Network MC network port You must use the CARESCAPE Network IX network to install or reload software Connect an...

Страница 293: ...plete the following steps a Under Add Target IP Addresses type the IP address of a CIC Pro center you want to install the software packages on b Click down arrow to add this IP Address to the displayed list c Repeat step a and step b for each additional CIC Pro center you want to install the software packages on 2 To automatically upload a txt file containing the list of CIC Pro center IP addresse...

Страница 294: ... only contains the CIC Pro centers you want updated 4 To remove an IP address from the displayed list select the IP address and click up arrow Install the software on the target CIC Pro centers Once the GE Healthcare Software Transfer Utility Add Target IP Address list only displays the IP addresses of the CIC Pro centers you want to update you are ready to start installing the software packages C...

Страница 295: ...stall may occur in sequential groupings 659A 3 To cancel a software install select Cancel NOTE Selecting Cancel only cancels the installation of the Queued software packages identified in the Transfer Status window Once the installation of a software package has started you cannot cancel it 4 To save the list of displayed IP address in a txt file format select File Export IP File Specify the desti...

Страница 296: ...Software Management module interface to activate selected software packages 1 If you have not already logged onto Webmin Log on to the direct access local Webmin service interface on page 4 7 2 Click Configuration Software Management The Software Management window displays 668A 3 Select the radio button next to the software packages clinical application or service application you need to activate ...

Страница 297: ...ee Perform MultiKM Multimouse setup on page 6 77 NOTE The Log Compression Configuration Utility must be run After upgrading to CIC Pro center software v5 1 x When a CIC Pro center v5 1 x is added to an existing Multimouse group Initial configuration of any CIC Pro center v5 1 device during new installs During CIC Pro center v5 1 configuration after software re image reload process After activating...

Страница 298: ...12 10 CIC Pro 2026419 033E Upgrade software ...

Страница 299: ...2026419 033E CIC Pro A 1 A Electromagnetic compatibility ...

Страница 300: ...magnetic radiation CAUTION Use of portable phones or other radio frequency RF emitting equipment near the system may cause unexpected or adverse operation CAUTION The equipment or system should not be used adjacent to or stacked with other equipment If adjacent or stacked use is necessary the equipment or system should be tested to verify normal operation in the configuration in which it is being ...

Страница 301: ...ative humidity should be at least 30 Electrical Fast Transient Burst IEC 61000 4 4 2 kV for power supply lines 1 kV for input output lines 2 kV for power supply lines 1 kV for input output lines Mains power should be that of a typical commercial or hospital environment Surge IEC 61000 4 5 1 kV differential mode 2 kV common mode 1 kV differential mode 2 kV common mode Mains power should be that of ...

Страница 302: ...e compliance level in each frequency rangeb Interference may occur in the vicinity of equipment marked with the following symbol Note 1 At 80 MHz and 800 MHz the higher frequency range applies Note 2 These guidelines may not apply in all situations Electromagnetic propagation is affected by reflection from structures objects and people a Field strengths from fixed transmitters such as base station...

Страница 303: ...nications equipment For transmitters rated at a maximum output power not listed above the recommended separation distance d in meters m can be estimated using the equitation applicable to the frequency of the transmitter where P is the maximum output power rating of the transmitter in watts W according to the transmitter manufacturer NOTE These guidelines may not apply in all instances Electromagn...

Страница 304: ...ccessories with which GE claims EMC compliance NOTE Any supplied accessories that do not affect EMC compliance are not included Part number Description Maximum lengths 80274 006 AC Power Cord 1 8 m 6 ft 201792 001 DVI D to DVI D Cable 1 8 m 6 ft 418331 002 PRN50 M printer N A 418335 00x RJ45 Category 5 Cable N A 418708 001 Key Pad N A 2001323 001 Speakers N A 2006733 001 Serial Cable 1 8 m 6 ft 20...

Страница 305: ...2026419 033E CIC Pro B 1 B Backup and restore backed up data modules ...

Страница 306: ...els System def System mei Full Disclosure Defaults Report Duration NewTelem def Report Hole Location NewTelem def Include Graybar NewTelem def Include Arrhythmia Annotations NewTelem def Include Heart rate NewTelem def Line Time NewTelem def Strip Duration NewTelem def Strip Hole Location NewTelem def Full Disclosure License NewTelem def Full Disclosure Offline Storage NewTelem def Start Data Stor...

Страница 307: ...er Enabled Config dat Browser Status Config dat ColorSetECG0 Config dat ColorSetECG1 Config dat ColorSetECG2 Config dat ColorSetECG3 Config dat ColorSetECG4 Config dat ColorSetECG5 Config dat ColorSetECG6 Config dat ColorSetART Config dat ColorSetPA Config dat ColorSetFEM Config dat ColorSetCVP Config dat ColorSetRA Config dat ColorSetLA Config dat ColorSetICP Config dat ColorSetSP Config dat Colo...

Страница 308: ...ph NewTelem def Display Lead Telem def Arrhythymia Telem def Lead Analysis Telem def ST Analysis Telem def Va Lead NewTelem def Vb Lead NewTelem def Detect Pace Telem def Patient Age Telem def Transmitter Alarm Pause Telem def Alarm Pause Breakthrough NewTelem def PDT NewTelem def Transmitter Nurse Call NewTelem def Bed Slot Assignment Display Format Config dat Beds Configured Config dat Slot Info...

Страница 309: ...Device compatibility 2026419 033E CIC Pro C 1 C Device compatibility ...

Страница 310: ...5 1 x Full disclosure data transfer 4 0 3 4 0 6 4 0 7 4 0 8 4 1 1 4 1 1 1 5 0 3 5 0 6 5 0 7 5 0 8 5 1 x Unity iCentral LNET05 4 1 LNET05 4 3 Devices Versions ApexPro software 3 9 4 0 ApexPro transmitters transceivers PT series NEC transmitter PT2110 PT2210 PT2310 ApexPro FH transceiver ApexPro transmitter ApexPro CH transmitter CARESCAPE Telemetry T14 transmitter CDT LAN system 6D CDT LAN transmit...

Страница 311: ...e Critikon Pro 100 400 device Critikon Pro 1000 V2 HW RAH SW V3 HW RAA SW Unity Network ID 1A 3B 4A 4B Devices Versions Devices Versions Unity Network PatientViewer system 1 0 Unity Network Patient Data Server PDS 1 0 3 1 0 6 StatView Impact pager system administrator functionality 6 10 030 7 MUSEWeb Compatibly when using the CIC Browser for MUSE versions 5C 06 5C 10 5D 02 5D 06 5E 7 0 MUSE server...

Страница 312: ...C 4 CIC Pro 2026419 033E Device compatibility ...

Страница 313: ......

Страница 314: ...zingerstrasse 5 79111 Freiburg Germany Tel 49 761 45 43 0 Fax 49 761 45 43 233 Asia Headquarters GE Medical Systems Information Technologies Asia GE China Co Ltd No1 Huatuo Road Zhangjiang Hi tech Park Pudong Shanghai P R China 201203 Tel 86 21 5257 4650 Fax 86 21 5208 2008 GE Medical Systems Information Technologies Inc a General Electric Company going to market as GE Healthcare www gehealthcare ...

Отзывы: