9
Installation Instructions
COOKTOP BURNERS
1 ASSEMBLING THE COOKTOP BURNERS
The electrode of the igniter is exposed. Be careful not to turn on any cooktop controls
while the top of the burner is removed. Do not remove the top or touch the electrode
of any burner while another burner is turned on. Electrical shock might result.
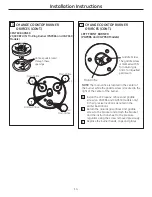
A Place the burner head onto the burner base. Make sure to place the correct
burner head on the correct burner base and that the burner head sits level on
the burner base. The burner heads are not interchangeable. Ensure the slot in
the burner head is positioned over the electrode and that the burner head is
fully inserted inside the burner base. A small gap between the base and head is
normal.
B Place the burner caps on the burner heads, making sure to place the correct
burner cap on the correct burner head. The burner caps are not
interchangeable. Each cap has three to four pins. Make sure that the burner
caps are properly seated on the burner heads and that none of the pins sit in the stability chamber.
Burner cap not properly seated
Burner cap properly seated
2 CHECK IGNITERS
Operation of the electric igniters should be checked after the cooktop and supply line have been carefully
checked for leaks and the cooktop has been connected to the electrical power.
On models so equipped, check to be sure the cooktop is in the
UNLOCKED
position.
A Push and turn a burner valve to the
LITE
position. All spark igniters will make a series of sparks (ticking
sounds), but only the burner turned to
LITE
will light.
• The burner should light when gas is available to the burner.
• Once the burner lights, it should be turned out of the
LITE
position.
B Try each valve separately until all burners have been checked.
Burner cap
Inner
Burner cap
OR
Burner head
Burner
head
Burner
base
Burner
base
Electrode
Electrode
Stability
chamber


