background image

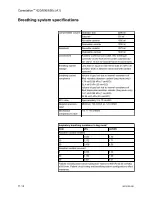
Airway module specifications

Use only airway modules that have anesthetic agent monitoring and
O2 monitoring on this system. The following modules can be used on
this system:

Airway Gas Option: N-CAiO

CARESCAPE

 series: E-sCAiO and E-sCAiOV

Gas specifications for airway modules

.

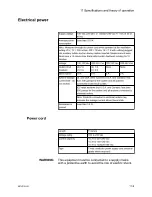
Airway humidity (patient
spirometry)

10% RH to 100% RH

Sampling delay

3.0 seconds typical with a 3 m sampling line

Total system response time

Less than 3.8 seconds with a 3 m sampling line

Warm-up time

1 minute for operation with CO2, O2, and N2O
5 minutes for operation of anesthetic agents
20 minutes for full specifications

Respiration rate

4 to 100 breaths/min

Diversion flow

120 +/- 20 ml/min

Airway pressure

-20 cmH2O to 100 cmH2O

.

Accuracy during stable conditions

Ambient temperature: 10 to 40°C
Ambient pressure: 495 to 795 mmHg
Ambient humidity: 10 to 98% RH, non-condensing
Automatic compensation for ambient pressure
Full module accuracy for Respiration rate of 4 to 70 breaths/min

CO2

+/- (0.2 vol% + 2% of reading)

O2

+/- (1 vol% + 2% of reading)

N2O

+/- (2 vol% + 2% of reading) between 0 and 85 vol%
+/- (2 vol% + 8% of reading for N2O between 85 and 100 vol%

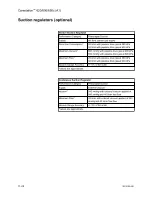
Carestation

 620/650/650c (A1)

11-20

2076152-001

Содержание Carestation 620

Страница 1: ...Carestation 620 650 650c A1 User s Reference Manual Software Revision 01...

Страница 2: ...en request for service advice be made to the nearest manufacturer Customer Service Center This product or any of its parts should not be repaired other than in accordance with written instructions pro...

Страница 3: ...ls used on the equipment 1 9 Symbols used on the user interface 1 12 Typeface conventions used 1 13 Abbreviations 1 14 System information 1 17 System classification 1 17 Device standards IEC 60601 1 2...

Страница 4: ...orm fields 2 16 Split screen field 2 17 ACGO display 2 18 Aux O2 Air display 2 20 Display navigation 2 21 Using menus 2 21 Using the ComWheel 2 22 Using quick keys 2 22 3 Operation System operation sa...

Страница 5: ...21 Setting MV TV alarms 3 22 Setting alarm limits 3 22 Viewing alarm history 3 22 Setting alarm volume 3 23 Setting apnea delay 3 23 Silencing leak audio alarms 3 23 Setting auto MV limits 3 24 Settin...

Страница 6: ...rst patient 4 2 Before every patient 4 3 5 Preoperative tests Vaporizer installation 5 2 Checking vaporizer installation 5 2 Flow and pressure calibration 5 4 Circuit compliance compensation 5 5 Check...

Страница 7: ...ting the airway module 6 10 7 Alarms and troubleshooting Alarms 7 2 Alarm priorities 7 2 Pausing alarms 7 2 Cancelling audio pause 7 3 Display changes during alarms 7 3 De escalating alarms 7 3 Batter...

Страница 8: ...tions 8 16 Pipeline inlets 8 16 Scavenging 8 16 Scavenging a gas monitor sample flow 8 17 Sample gas return port 8 17 Suction control panel 8 18 Vacuum suction regulator optional 8 18 Venturi suction...

Страница 9: ...ell replacement 9 6 Flow control test 9 9 Calibration menu 9 11 Flow and pressure calibration 9 11 Circuit O2 cell 9 11 Airway gas calibration 9 12 Water buildup 9 13 How to help prevent water buildup...

Страница 10: ...equirements 11 19 Airway module specifications 11 20 Gas specifications for airway modules 11 20 Suction regulators optional 11 22 Ventilator theory 11 23 O2 monitoring theory of operation 11 23 ecoFL...

Страница 11: ...ting agent costs 12 3 System configuration 12 5 Display settings 12 5 Ventilator settings 12 5 Alarm settings 12 6 Parameter settings 12 6 Trends setup 12 7 Page setup 12 8 Case defaults 12 10 Configu...

Страница 12: ...Carestation 620 650 650c A1 x 2076152 001...

Страница 13: ...tion Introduction Intended use 1 2 Symbols used in the manual or on the equipment 1 9 Typeface conventions used 1 13 Abbreviations 1 14 System information 1 17 System safety 1 19 In this section 20761...

Страница 14: ...g patients Synchronized Intermittent Mandatory Ventilation SIMV modes Pressure Control Ventilation Volume Guarantee PCV VG Continuous Positive Airway Pressure Pressure Support Ventilation CPAP PSV and...

Страница 15: ...ministers medical gases such as O2 N2O or volatile anesthetic agents For contraindications to the applied medical gases strictly observe the instructions for use of the medical gas Safe disposal Dispo...

Страница 16: ...efer to the Technical Reference manual for service information including special installation instructions installation checklist means of isolating the supply mains and replacement of fuses supply po...

Страница 17: ...roducts have unit serial numbers with coded logic which indicates a product group code the year of manufacture the week of manufacture a sequential unit number for identification manufacture location...

Страница 18: ...or product names used in this manual are trademarks or registered trademarks of their respective holders Feature overview Hardware feature Carestation 620 A1 Carestation 650 A1 Carestation 650c A1 Fra...

Страница 19: ...ower right Not available Optional Not available mount separately to Medi rail or Wall Long cable management arm Optional Optional Optional Short cable management arm Optional Optional Optional Cylinde...

Страница 20: ...O2 Air system fresh gas controls Not available Optional Optional Integrated suction Optional Optional Optional Software features Carestation 620 A1 Carestation 650 A1 Carestation 650c A1 VCV Included...

Страница 21: ...bols used on the equipment O2 Flush button O2 concentration Air Air APL settings are approximate Anesthetic Gas Scavenging System Maximum Vacuum Serial number Stock number Exhaust Bellows volumes are...

Страница 22: ...outlet Off for a part of the machine Bag position manual ventilation Mechanical ventilation Inspiratory flow Expiratory flow Lock Unlock Read to center of float CO2 absorber off CO2 absorber on Total...

Страница 23: ...shelf in the transport position as shown Make sure that the arm and shelf remain in position while moving the system MR unsafe MRI not compatible red circle and slash Single use device This way up Sta...

Страница 24: ...n Button label to lock or unlock the touchscreen Audio Pause Submenu No battery battery failure Battery in use Bar indicates amount of battery power remaining Airway module indicator Manual ventilatio...

Страница 25: ...etup Messages that are displayed on the screen are enclosed in single quotes for example Check sample gas out When referring to different sections and other documents the names are written in italic t...

Страница 26: ...eathing system CO Carbon monoxide CO2 Carbon dioxide Compl Compliance CPAP PSV Continuous positive airway pressure pressure support ventilation E EMC Electromagnetic Compatibility ET End tidal concent...

Страница 27: ...Mean pressure Ppeak Peak pressure Pplat Plateau pressure Psupport Support pressure PSV Pressure support ventilation PSVPro Pressure support ventilation with apnea backup Paw Vol Pressure volume loop...

Страница 28: ...Abbreviation Definition TV Tidal volume TVexp Expired tidal volume TVinsp Inspired tidal volume V VCV Volume control ventilation Vol Volume Carestation 620 650 650c A1 1 16 2076152 001...

Страница 29: ...80601 2 13 Anesthetic vapor delivery devices ISO 80601 2 13 Anesthetic agent monitors ISO 80601 2 55 Oxygen monitors ISO 80601 2 55 Carbon dioxide monitors ISO 80601 2 55 Exhaled volume monitors ISO 8...

Страница 30: ...l Anesthesia ventilator Breathing system Anesthesia Gas Scavenging System Not integral system components These devices are not integral to this anesthesia system CO2 monitor Anesthetic agent monitor O...

Страница 31: ...ional and national standards require the following monitoring be used with this system Exhaled volume monitoring O2 monitoring CO2 monitoring Anesthetic agent monitoring be used when anesthetic vapori...

Страница 32: ...breathing system assembly instructions The vaporizers are locked in position and contain sufficient agent Pipeline gas supplies are connected and the pressures are correct Cylinder valves are closed...

Страница 33: ...place items not approved to IEC 60601 1 closer than 1 5 m to the patient All items medical electrical equipment or non medical electrical equipment connected to the system by a signal input signal out...

Страница 34: ...in IEC 60601 1 2 near the system may cause unexpected or adverse operation Monitor operation when RF emitters are in the vicinity Use of other electrical equipment on or near this system may cause int...

Страница 35: ...nus System controls and menus System overview 2 2 Vaporizer controls 2 11 Display controls 2 12 Anesthesia system display 2 15 ACGO display 2 18 Aux O2 Air display 2 20 Display navigation 2 21 In this...

Страница 36: ...4 Vaporizer 15 Leak test plug 5 Suction regulator and control 16 Bag Vent switch 6 On Standby switch 17 Adjustable pressure limiting APL valve 7 Flip up shelf 18 Bellows assembly 8 Drawer lock 19 Auxi...

Страница 37: ...Mains inlet 3 Third cylinder mount 10 Mains power fuses inside 4 Cylinder guard 11 Right dovetail 5 Caster guard 12 Pipeline connections 6 Electrical outlets 13 Side rail 7 Outlet circuit breakers 14...

Страница 38: ...guard 8 Anesthesia Gas Scavenging System AGSS port 3 Inspiratory port 9 Sample gas return port 4 Expiratory port 10 Airway module 5 Absorber canister 11 Suction trap 6 Absorber canister lifter handle...

Страница 39: ...and rear view of pendant system AC 24 293 1 2 1 Wall mounting rack 2 Wall mounting interface Figure 2 5 Front and rear view of wall mount system See Feature overview for more information on product s...

Страница 40: ...his could cause the machine to tip over Only use the brake to keep the system in place 1 Push down the brake pedal to lock the system in place 2 Push up the brake pedal to release the brake AC 24 025...

Страница 41: ...to flow 1 Turn the knob counterclockwise to increase gas flow 2 Turn the knob clockwise to decrease gas flow Using the O2 flush button The O2 flush button supplies a high flow of O2 to the breathing...

Страница 42: ...er from the system with only one pivot point and no tilt available AC 24 298 The display can be positioned closer to or further from the system can be tilted up or down and can be rotated with two piv...

Страница 43: ...r AC 28 027 3 Close the cover of the holder 4 Push the hose into the clip on the bag arm 5 Bring the hose down through the base of the bag arm and around the back of the breathing system 6 Route the h...

Страница 44: ...on Figure 2 10 Bag hose connection Using the bag support arm Use the optional bag support arm to hold the breathing circuit bag The bag support arm can be moved up or down and left or right Carestatio...

Страница 45: ...ser s Reference manual for more detailed information on the vaporizer 3 1 1 2 2 AB 80 052 1 2 1 Lock lever 2 Concentration control and release 3 Audio pause touch key Figure 2 11 Vaporizer controls 2...

Страница 46: ...liquids come in contact with the display lock the touchscreen and clean the display Unlock the touchscreen once the display has been cleaned to resume use of the touchscreen Do not apply excessive fo...

Страница 47: ...tive medium or high priority latched alarms Figure 2 12 Display controls Touch points AC 24 050 2 1 3 4 5 6 1 Wave fields 4 Digit fields 2 Measured values 5 Ventilator quick keys 3 Function keys 6 Spl...

Страница 48: ...layed at the top of the screen and if applicable the alarming numeric field and digit field flashes The Alarm messages at the top of the screen are message alerts only and not active touch points 1 To...

Страница 49: ...own clock until audio is on 2 Alarm message fields Displays the active alarms 3 Waveform fields Displays the waveforms of measured values For example Paw Flow and CO2 4 General message fields or lock...

Страница 50: ...ee Screen setup menu in the Operation section for more information Waveform fields Up to three waveforms can be shown on the normal screen view Each waveform can be set to show specific Paw agent flow...

Страница 51: ...rway compliance and optional ecoFLOW information If None is selected the waveforms expand to fill the split screen area Touch the spilt screen field to directly open the Screen Setup menu See Screen s...

Страница 52: ...through the ACGO port 3 Measured values fields When pressure waveform is selected displays the meassured values for pressure through the ACGO port 4 ACGO status Shows that the ACGO switch is set to th...

Страница 53: ...ode the system starts mechanical ventilation using the parameters set in ACGO mode When the ACGO is used with an open patient circuit the only available source for spirometry is the CARESCAPE Airway m...

Страница 54: ...nd alarm or status messages For example Aux Gas in use Ventilator Off 3 Message field Displays the message O2 Air enables Air control Turn off Aux gas to use circle circuit 4 Quick keys Shows gas sele...

Страница 55: ...messages 3 Menu items Shows Case Defaults Volume Apnea Alarm CO2 Alarms Age Ideal Weight and Start Case Now Figure 2 17 Menu view and menu example Using menus Use the function keys to access the corr...

Страница 56: ...key on the right For settings the value changes to the next available setting For pull down selections the highlight moves to the next available selection Turn the ComWheel to the left For menu items...

Страница 57: ...3 Push the ComWheel or select the quick key to confirm the change 2 System controls and menus 2076152 001 2 23...

Страница 58: ...2 24 2076152 001...

Страница 59: ...tion 3 7 Start a case 3 8 End a case 3 11 Standby 3 12 Turning off the system 3 13 Ventilator setup 3 14 Auto limits 3 15 System setup 3 16 Alarm setup 3 20 Next page 3 25 Trends 3 26 Spirometry 3 27...

Страница 60: ...ient safety If an alarm occurs safeguard the patient first before performing troubleshooting or doing repair procedures Failure to safeguard the patient could result in patient injury Make sure that t...

Страница 61: ...ubject the system to excessive shock and vibration Equipment damage could occur Do not place excessive weight on flat surfaces or drawers Equipment damage could occur The system does not meet the ISO...

Страница 62: ...stem The Total flow indicator shows total fresh gas flow and the display shows the power up screen The system does a series of automated self tests In case of emergency during power up O2 and agent de...

Страница 63: ...Wait a minimum of 5 seconds after the display keypad lighting turns off before restarting the system Note 3 Operation 2076152 001 3 5...

Страница 64: ...ting manual ventilation 1 Connect a manual breathing circuit 2 Make sure the APL valve is set to a clinically appropriate value 3 Set the Bag Vent switch to Bag Carestation 620 650 650c A1 3 6 2076152...

Страница 65: ...ator settings can injure the patient Make sure that the preset alarm limits are appropriate for the patient before starting ventilation Incorrect alarm settings can injure the patient 1 Set the ACGO s...

Страница 66: ...t emergency the Full Test may be bypassed by selecting Start Case and then selecting Bypass The general message Please Do Checkout is displayed if a Full Test or all of the individual tests are not co...

Страница 67: ...veform numeric information agent digit field and graphical trends page Starting a case using default settings Start a case using the default settings by case type defined by the Super User Case Defaul...

Страница 68: ...is changed the Case Defaults remains as previously selected 3 To change ventilation mode select Mode Make the change To change the ventilation settings select a ventilator quick key or More Settings...

Страница 69: ...arms 1 Set the Bag Vent switch to Bag 2 Turn off the gas flows 3 Select End Case 4 Select End Case Now on the menu to put the system in Standby stops patient alarms The End Case menu shows the gas and...

Страница 70: ...turn off the fresh gas flow From the Standby menu A case can be started using the default settings by increasing the fresh gas flow setting Bag Vent switch to vent turning on Aux O2 Air switch or by...

Страница 71: ...o the previous display When the system is in a complete system failure state the On Standby switch may be pushed and held in for 10 seconds to shut down the system If On Standby switch does not shut d...

Страница 72: ...ilation modes Changing ventilator mode 1 Select the Mode quick key The Vent Mode menu shows 2 Select the desired ventilation mode 3 Set and confirm the primary ventilation setting to activate the vent...

Страница 73: ...osed low and high alarm limits 2 Check the proposed parameters Select Confirm to use the proposed low and high alarm limits Select Cancel to leave the alarm limits unchanged Select Case Default Limits...

Страница 74: ...he screen view Areas of the screen can be customized to show specific information Screen Setup contains the Layout Scales Time and Date and More Settings submenus Setting waveform fields The waveforms...

Страница 75: ...nd select the desired view from the drop down menu 4 Select Close Setting time and date Use the Time and Date menu to set the time and date The Time and Date menu cannot be changed when a case is runn...

Страница 76: ...2 Select More Settings 3 Select Sweep Speed and then select Fast or Slow 4 Select Close Setting display brightness Use the brightness setting to adjust the contrast level of the display 1 Select Syst...

Страница 77: ...sed for the three most recent cases Data only shows for gases available on the system Agent data shows the three most recently used agents 1 Select System Setup Fresh Gas Usage 2 Select Case Start Tim...

Страница 78: ...e unless enabled in Super User mode CO2 Alarms and Vol Apnea Alarm can only be turned off while in manual ventilation Once mechanical ventilation begins by setting the Bag Vent switch to Vent the alar...

Страница 79: ...n on the CO2 alarms set CO2 Alarms to On 4 Select Close Setting volume apnea alarm Use the Vol Apnea Alarm setting to turn off the volume apnea alarm during manual ventilation The volume apnea alarm r...

Страница 80: ...the general message field The volume alarm limits waveform numerics shows alarm off symbol during a case 3 To turn the volume alarms on set MV TV Alarms to On 4 Select Close Setting alarm limits Do n...

Страница 81: ...nt of time that can pass without the system detecting a measured breath before the apnea alarm occurs 1 Select Alarm Setup 2 Select the Configure tab 3 Set Apnea Delay to the desired time The apnea ti...

Страница 82: ...ceeds the allowable limit the minimum or maximum alarm limit is used 1 Select Alarm Setup 2 Select the Configure tab 3 Set Auto MV Limits to On The MV alarm limits are automatically calculated until A...

Страница 83: ...are available A general message displays identifying the page number of the screen view See the Super user mode section for information on setting the preset screen views Any changes that were made to...

Страница 84: ...information is saved every 15 seconds for the most recent 24 hours Setting trends 1 Select Trends 2 Select the desired view 3 Select Scroll to move through the current trend view 4 Select Time Scale...

Страница 85: ...Flow Vol and Pressure Flow Paw Flow The spirometry loops show in the spirometry window and can be set to show alongside the waveforms as the split screen 1 4 3 2 AB 98 039 1 Volume axis 2 Pressure ax...

Страница 86: ...ale type from the drop down list 3 Select Back to view changes made and access other functions of the Spirometry menu Setting patient and sensor type Patient and sensor type refer to the style of airw...

Страница 87: ...volume or tidal volume 1 Select Spirometry Setup Loops 2 Select Show MV or TV and select MV or TV from the drop down list Set to TV to show TVinsp and TVexp on the spirometry split screen Set to MV to...

Страница 88: ...se shows in the window Gas flow stops for 1 minute and automatically resumes after 1 minute If mechanical ventilation is on mechanical ventilation stops for 1 minute and then automatically resumes aft...

Страница 89: ...l ventilation in VCV mode 2 Select Procedures 3 Select Start Cardiac Bypass PEEP is set to 5 cmH2O TV settings of less than 170 ml prior to starting cardiac bypass remain at the set TV TV settings of...

Страница 90: ...n 20 and 60 cmH2O Set Hold Time to between 10 and 40 seconds Set PEEP on Exit to Off or between 4 and 30 cmH2O 3 Select Start Vital Capacity 4 Select Close Cycling Use the Cycling procedure to deliver...

Страница 91: ...ing 6 Select Close Changing cycling settings 1 Select Procedures 2 Select Cycling 3 Select a Procedure to perform 4 Select Adjust Settings The first setting of Step 1 in the procedure window is select...

Страница 92: ...g up from zero Using the timer 1 Select Start to start the clock 2 Select Stop to pause or stop the clock If Start is selected the clock will resume operation If Start is selected and held for longer...

Страница 93: ...sured value of the liquid agent flow from the vaporizer The agent flow may have a delayed response For example Iso 4 FiO2 flow marker The graphical representation on the flow tube of the FiO2 flow val...

Страница 94: ...Using ecoFLOW 1 Select System Setup Screen Setup 2 Select the Layout tab 3 Select Split Screen and select ecoFLOW from the drop down menu 4 Select Close Carestation 620 650 650c A1 3 36 2076152 001...

Страница 95: ...irway module Delivered fresh gas O2 concentration is calculated and displayed based on fresh gas flow control settings The Bag Vent switch and the APL valve do not control the ACGO or any breathing ci...

Страница 96: ...3 Set the alarm limits to clinically appropriate settings 4 To stop fresh gas flow through the ACGO port set the ACGO switch to the circle circuit position Displayed fresh gas oxygen concentration may...

Страница 97: ...provides 100 O2 or a mixture of O2 and Air The delivery default is 100 O2 Selecting the O2 Air quick key enables both O2 and Air Adjust the O2 and Air individually using the flow control knobs Using...

Страница 98: ...3 40 2076152 001...

Страница 99: ...4 Preoperative checkout Preoperative checkout Every day before your first patient 4 2 Before every patient 4 3 In this section 2076152 001 4 1...

Страница 100: ...s sufficient absorbent in the canister Turn the System on Perform a Full Test from the Checkout menu Check that an adequate reserve O2 supply is available Check that the ventilator functions correctly...

Страница 101: ...eathing circuit is correctly connected not damaged and the breathing system contains sufficient absorbent in the canister Select Checkout and perform a Circuit Leak test Check that the ventilator func...

Страница 102: ...4 4 2076152 001...

Страница 103: ...er installation 5 2 Flow and pressure calibration 5 4 Circuit compliance compensation 5 5 Checkout menu 5 6 Full test 5 7 Individual tests 5 10 Vaporizer back pressure test 5 12 Low pressure leak test...

Страница 104: ...t steps 1 2 and 3 If the vaporizer lifts off a second time do not use the system 5 For a Tec 6 Plus vaporizer Make sure that the vaporizer is connected to an electrical outlet If the vaporizer is not...

Страница 105: ...Test each possible combination If more than one vaporizer turns on at the same time remove the vaporizers install them again and repeat the test 5 Preoperative tests 2076152 001 5 3...

Страница 106: ...system door Push the release button to unlock the breathing system 3 Lower the breathing system and select Confirm The breathing system should be completely disconnected from the system fully rotated...

Страница 107: ...eration the circuit compliance value In all modes circuit compliance compensation adjusts the volume measurements Circuit compliance compensation provides consistent ventilator accuracy at the patient...

Страница 108: ...o access the Checkout menu between cases select Checkout Step by step instructions show in the Checkout menu during the tests Use the Checkout menu to Perform a Full Test Perform any of the individual...

Страница 109: ...that backup ventilation is available and operational Check that patient suction is set up correctly Check the pressure of the backup O2 supply 4 When the Full Test is completed start a case Make sure...

Страница 110: ...this test follow the on screen instructions When the test passes the next test starts Gas controls The Gas Controls test checks the flow control valves and gas flows To run this test follow the on sc...

Страница 111: ...To run this test follow the on screen instructions When the test passes the next test starts 5 Preoperative tests 2076152 001 5 9...

Страница 112: ...ect the gas sampling line from the patient circuit and close the sample port before performing the checkout Ventilator leak The Ventilator Leak test checks the ventilator bellows gas supplies and brea...

Страница 113: ...Make sure the bag is connected to the bag hose connection To run this test follow the on screen instructions Note 5 Preoperative tests 2076152 001 5 11...

Страница 114: ...he proper function of the vaporizer actuator pins that activate the Selectatec manifold port valves Perform this test every time a vaporizer is attached to the system 1 Start a case 2 Set the O2 flow...

Страница 115: ...closed Do not overtighten Connect the leak test device to the ACGO outlet Squeeze the bulb repeatedly until it is empty If the bulb completely inflates in 30 seconds or less there is a leak in the lo...

Страница 116: ...ch to On Set the O2 flow to 1 l min Continue the O2 flow for one minute Turn the O2 flow control fully clockwise closed 9 Set the ACGO switch to the breathing circle position Carestation 620 650 650c...

Страница 117: ...irway modules Airway modules Airway modules 6 2 Connecting the airway module 6 6 Parameters setup 6 8 Automatic agent identification 6 9 Calibrating the airway module 6 10 In this section 2076152 001...

Страница 118: ...gas module sample flow See section Ventilator settings in Super user mode for more information In the Spirometry menu if the Data Source is set to Patient no Agent or CO2 waveforms or numeric informat...

Страница 119: ...sample gas to discharge into the room Use of airway modules during volume controlled ventilation at low tidal volumes may reduce the amount of gas delivered to the patient Make sure that there is app...

Страница 120: ...er trap latch 2 Gas sample connector 3 D fend Pro water trap 4 Sample gas outlet Figure 6 1 Airway Gas Option module Indications for use The Airway Gas Option is indicated for use with a host device f...

Страница 121: ...1 2 4 5 3 1 Water trap latch 2 Gas sample connector 3 D fend Pro water trap 4 Connectors for patient spirometry 5 Sample gas outlet Figure 6 2 CARESCAPE airway module figure may not represent all mode...

Страница 122: ...onnections may cause patient injury 4 Connect a line from the airway module sample gas outlet to the sample gas return port on the anesthesia machine 5 Attach the gas sampling line to the sampling lin...

Страница 123: ...or disposable clear Place all D lite ports upwards with a 25 to 35 tilt to prevent condensed water from entering the sensor interior and the tubings Use manufacturer approved gas sampling lines PVC PE...

Страница 124: ...formation If Patient is selected the airway module will be the first source for information If Vent is selected the internal sensors of the ventilator will be the first source for information When usi...

Страница 125: ...ARESCAPE modules identify two agents simultaneously and display them as primary and secondary agents Airway Gas Option modules identify and display only one primary agent Minimum concentration for the...

Страница 126: ...sed for CO2 regardless of selected measuring units 1 Turn on the power Let the module warm up for 30 minutes before starting calibration 2 Attach the regulator to the calibration gas cylinder 3 Attach...

Страница 127: ...r value If a gas needs adjustment select the gas to be adjusted Use the ComWheel to change the value until it matches the calibration gas cylinder value Push the ComWheel to confirm the change If a ga...

Страница 128: ...6 12 2076152 001...

Страница 129: ...s and troubleshooting Alarms 7 2 List of alarms 7 5 Alarm ranges 7 13 Alarm tests 7 15 Breathing system problems 7 17 Electrical problems 7 18 Pneumatic problems 7 20 Reporting of serious incidents 7...

Страница 130: ...priority alarms appear in black text on a blue background Pausing alarms Selecting Audio Pause for an active alarm stops the audible tone for 120 seconds The alarm message shows in the alarm message f...

Страница 131: ...lack background The parameter box will stop flashing All the associated waveform numeric and digit field messages are removed from the display The alarm will remain in this condition until it is ackno...

Страница 132: ...ion must be taken Reject tone is a low pitched tone that sounds for approximately 200 milliseconds This tone signifies that the previous action was rejected Alarm history Use Alarm History to view a l...

Страница 133: ...rent agents are detected by the airway module and the MAC age calculation is greater than or equal to 3 When using an Airway Gas Option airway module two different agents are detected by the airway mo...

Страница 134: ...e pressure is invalid Check pipeline supply pressure Check circuit connections Medium Breaths detected in the circle circuit while non circuit is selected Check circle circuit connections and settings...

Страница 135: ...Check agent setting EtHal high Medium EtHal is greater than alarm limit The alarm priority escalates to High if the alarm is not resolved after 2 minutes Set the alarm limits appropriately Check agent...

Страница 136: ...l and the airway module FiO2 low High FiO2 is less than low alarm limit Check O2 setting Check for leaks or blockages in the patient circuit FiSev high Medium FiSev is greater than alarm limit The ala...

Страница 137: ...n Aux Gas mode Medium N2O flow is lager than 100 ml min when system is in Aux gas mode Adjust N2O flow to less than 100 ml min Negative airway pressure High Paw is less than 10 cmH2O Check for blockag...

Страница 138: ...failure Replace the inspiratory flow sensor Replace O2 sensor Low Measure O2 is less than 5 Calibrate the O2 cell Replace the O2 cell if necessary Reverse exp flow Check valves OK Medium Flow toward...

Страница 139: ...volume monitoring from ventilator Use a manual bag to ventilate the patient or use an alternate machine Shut down the system as soon as possible and contact an authorized service representative Venti...

Страница 140: ...d pressure limit is 12 cmH2O Mechanical Ventilation with PEEP On For Pmax less than 30 cmH2O the sustained pressure limit is 6 cmH2O plus set PEEP minus 2 cmH2O For Pmax between 30 and 60 cmH2O the su...

Страница 141: ...High 2 100 Off min 1 min RR Low Off 1 99 min 1 min EtCO2 High 0 1 15 Off 0 1 15 Off kPa 1 115 Off mmHg 0 1 0 1 kPa 1 mmHg EtCO2 Low Off 0 1 14 9 Off 0 1 14 9 kPa Off 1 114 mmHg 0 1 0 1 kPa 1 mmHg FiCO...

Страница 142: ...High 0 1 10 0 Off 0 1 EtSev Low Off 0 1 9 9 0 1 EtDes High 0 1 20 Off 0 1 EtDes Low Off 0 1 19 9 0 1 EtEnf High 0 1 7 0 Off 0 1 EtEnf Low Off 0 1 6 9 0 1 EtHal High 0 1 7 0 Off 0 1 EtHal Low Off 0 1...

Страница 143: ...alarm limit back to 21 and make sure that the FiO2 low alarm cancels Set the FiO2 High alarm limit to 50 Push the O2 flush Make sure the FiO2 high alarm occurs Set the FiO2 High alarm limit back to 10...

Страница 144: ...Set the Bag Vent switch to Vent Set the tidal volume and total flow to minimum Other alarms such as MVexp low can occur Make sure that the Ppeak low Leak alarm occurs 10 Set all alarm limits to approv...

Страница 145: ...act an authorized service representative to repair the system APL valve does not operate correctly APL valve problem Replace APL valve seal and diaphragm Large breathing system leak Bag hose not conne...

Страница 146: ...et has a short Contact an authorized service representative to repair the system Tec 6 Plus vaporizer has no power Not plugged into outlet Connect power cable The outlet circuit breaker is off Turn th...

Страница 147: ...ution Indication lights are not on The gas port is not active The LED or power management board has failed Contact and authorized service representative to repair the system 7 Alarms and troubleshooti...

Страница 148: ...nstall new o rings A vaporizer malfunction the leak stops if you use a different vaporizer in the same position Send the vaporizer to an authorized service representative for repair A port valve malfu...

Страница 149: ...sentative Or report to in box complaints ge com Please provide the following information The catalogue number or the model designation of the device as stated on its identification plate affixed on th...

Страница 150: ...7 22 2076152 001...

Страница 151: ...up the absorber canister 8 6 Circuit O2 cell installation 8 11 Electrical connections 8 14 Pneumatic connections 8 16 Installing gas cylinders 8 22 Passive AGSS 8 24 Active AGSS 8 25 Attaching equipm...

Страница 152: ...trical interference can cause nuisance alarms that may stop mechanical ventilation This system operates correctly at the electrical interference levels of IEC 60601 1 2 To help prevent false alarms fr...

Страница 153: ...dify this equipment without authorization from the manufacturer Unauthorized modifications could result in damage to the equipment and or cause patient injury If an external pressurized pipeline gas s...

Страница 154: ...e display arm and shelf in the transport position Make sure that the arm and shelf remain in position while moving the system The system may tip if the display arms are not in the transport position w...

Страница 155: ...o the inspiratory and expiratory ports on the system 2 Perform the individual Ventilator leak test to set proper circuit compliance 1 AC 24 373 2 1 Expiratory port 2 Inspiratory port Figure 8 1 Breath...

Страница 156: ...oxide halothane enflurane isoflurane desflurane and sevoflurane 1 2 3 4 5 AC 24 073 7 8 6 AC 24 074 1 Canister handle 2 Canister lifter handle 3 Canister lifter base 4 Absorbent 5 Disposable absorber...

Страница 157: ...t material may produce dangerous chemical reactions when exposed to inhalation anesthetics Adequate precautions should be taken to ensure that absorbent does not dry out Turn off all gases when finish...

Страница 158: ...2 Lift the canister and remove it from the canister lifter base AC 24 072 Filling the reusable absorber canister 1 To open the canister cover lift the latch handle up Carestation 620 650 650c A1 8 8 2...

Страница 159: ...an and disinfect the canister refer to Automated washer in the Cleaning and sterilization manual 6 Pour fresh absorbent into the canister 7 Gently shake the canister from side to side to level the top...

Страница 160: ...y lock the canister cover could cause canister malfunction and breathing circuit leaks The locking tab of the canister cover must be in the downward position and flush with the cover 11 Place the cani...

Страница 161: ...the adapter and screw the adapter onto the O2 cell AC 24 093 1 2 3 1 O2 cell 2 Adapter 3 O ring 2 Pull down the canister lifter handle to unlock the canister from the breathing system 3 Lift the cani...

Страница 162: ...he O2 cell plug from the patient port assembly if present AC 24 376 7 Pull the cable out of the O2 cell bracket AC 24 374 8 Plug the cable connector into the O2 cell Carestation 620 650 650c A1 8 12 2...

Страница 163: ...m base A click sound will be heard when attached properly 10 Close the breathing system door 11 Place the canister onto the canister lifter base 12 Pull the canister lifter handle up to lock the canis...

Страница 164: ...ritical care areas by attempting to keep the conductive surfaces of all equipment in the patient care area at the same ground potential thereby minimizing unwanted current flow Outlets Labels show out...

Страница 165: ...by super user or authorized service personnel to access log files and for authorized service personnel to load software It should not be used for other purposes Only insert USB memory sticks powered...

Страница 166: ...y O2 flowmeter optional Auxiliary O2 Air optional ACGO optional Pipeline inlets AC 24 134 The pipeline inlets accept up to three different gases O2 Air and N2O A fourth pipeline inlet is available for...

Страница 167: ...n be scavenged by connecting the exhaust from the monitor to the sample gas return port on the left side of the machine Sample gas return port Connect the sample gas exhaust tube to the gas return por...

Страница 168: ...mode selection switch 5 Suction variable pressure control knob Figure 8 4 Suction control panel Vacuum suction regulator optional The vacuum suction regulator uses an external vacuum supply Connect th...

Страница 169: ...suction regulator optional The venturi suction regulator uses the system air supply source Connect the collection bottle connection on the overflow safety trap to the collection bottle 4 3 1 2 AC 24...

Страница 170: ...O2 outlet 2 Auxiliary O2 flow control Figure 8 7 Auxiliary O2 flowmeter Auxiliary O2 Air optional The optional auxiliary O2 Air port provides supplemental O2 or a mixture of O2 and Air to patients und...

Страница 171: ...cylinder See Installing cylinders with pin indexed yokes in the Installing gas cylinders section for installation instructions 1 2 3 AC 24 372 1 High pressure hose 2 Pin index cylinder interface 3 Th...

Страница 172: ...in indexed yokes 1 Locate the cylinder wrench 2 Close the cylinder valve on the cylinder to be replaced 3 Loosen the tee handle 4 Open the cylinder yoke 5 Remove the used cylinder and the used gasket...

Страница 173: ...the used cylinder 5 Install the new cylinder 6 Tighten the cylinder strap 7 Remove the cap from the cylinder valve on the new cylinder 8 Attach the hose connection to the cylinder 9 Complete Performin...

Страница 174: ...he patient Passive AGSS may be used with a non recirculating ventilation system for waste gas disposal The tube connection from passive AGSS to the non recirculating ventilation system should be an op...

Страница 175: ...n at 300 mmHg 12 inHg or greater vacuum pressure An alarm shows on the display when the flow is out of range If the alarm shows high flow the AGSS flow may be adjusted down to eliminate the alarm cond...

Страница 176: ...or 12 7 mm hose barb connector is for use with low vacuum disposal systems It requires an external venturi ejector system with 25 to 50 l min extract flow An alarm shows on the display when the flow...

Страница 177: ...may fall The top shelf patient monitor mount is only for use with General Electric channel mount adapter interface monitors 1 Align the device interface with the grooves of the top shelf monitor mount...

Страница 178: ...4 Tighten all thumb screws on the rear of the mounting plate AC 24 265 Carestation 620 650 650c A1 8 28 2076152 001...

Страница 179: ...ing cables from the cable management arm 2 Lift up on the cable management arm by grasping near the mounting post AC 24 122 3 When replacing the cable management arm make sure the o ring and split bea...

Страница 180: ...patient monitoring display 1 Route the cable through the hole on the display arm 2 Push the cable into the groove under the display arm 3 Place the cable in the cable routing groove 4 Use straps to b...

Страница 181: ...e AC 24 336 2 Connect the gas pipelines to the pipeline inlets Use straps to bundle the pipelines and electrical cable AC 24 337 3 Insert the hook on the cover into the grooves and push down the cover...

Страница 182: ...8 32 2076152 001...

Страница 183: ...ser maintenance Maintenance safety 9 2 Repair policy 9 3 Maintenance summary and schedule 9 4 Circuit O2 cell replacement 9 6 Flow control test 9 9 Calibration menu 9 11 Water buildup 9 13 In this sec...

Страница 184: ...may produce dangerous chemical reactions when exposed to inhalation anesthetics Adequate precautions should be taken to ensure that absorbent does not dry out Turn off all gases when finished using t...

Страница 185: ...cement and maintenance of those parts listed in this manual may be undertaken by a competent trained individual having experience in the repair of devices of this nature Do not attempt to repair this...

Страница 186: ...vailable Contact an authorized service representative to replace bacterial filters and to remove the ventilator waste gas passage gas to the system AGSS for disinfection Do not wipe the surfaces or cl...

Страница 187: ...and clean the fan filters display unit rear side of the machine and airway module Empty D fend Pro water trap on the airway module Drain the vaporizers and discard the agent as instructed in the vapor...

Страница 188: ...is removed if adding an O2 cell to the system see section Circuit O2 cell installation 1 Pull down the canister lifter handle to unlock the canister from the breathing system 2 Lift the canister and...

Страница 189: ...cable connector to the O2 cell and reinstall into holder 8 Rotate up and push the breathing system base to lock it into place A click sound will be heard when attached properly 9 Close the breathing s...

Страница 190: ...12 Calibrate the new O2 cell according to the Circuit O2 cell procedure Carestation 620 650 650c A1 9 8 2076152 001...

Страница 191: ...nimal flow 3 ACGO option only Set the ACGO switch to circle circuit position 4 Aux O2 Air only Set the Aux O2 Air switch to circle circuit position 5 Set the system to On Do not use the system if the...

Страница 192: ...sure that the flow tubes adjust accordingly 9 Disconnect all available O2 pipeline supplies or close the O2 cylinder valve 10 Make sure that The low O2 supply alarm occurs The N2O and the O2 flows st...

Страница 193: ...O2 cell calibration will calibrate the O2 cell to 21 O2 through exposure to room air 1 Select Checkout or System Setup 2 Select Calibration on the System Setup menu 3 Select Weekly O2 Cell 4 Follow th...

Страница 194: ...ection is only available on the Calibration menu when the system detects an airway module and the module has completed the warm up phase See the Airway modules section for calibration instructions Car...

Страница 195: ...re moist exhaled gas stays in the patient circuit and the absorber How to help prevent water buildup Suggested ways to prevent water buildup include Ensure the water condensing in the breathing circui...

Страница 196: ...9 14 2076152 001...

Страница 197: ...hing system assembly 10 3 Absorber canister 10 4 Test tools and system parts 10 5 Anesthesia system accessories 10 6 This section lists user replaceable parts only For other components refer to the Te...

Страница 198: ...im 1500 3352 000 5 Pressure relief valve assembly 1500 3377 000 6 Seal base 1500 3359 000 7 Manifold bellows base 2070996 001 S 8 Ventilator port 2071005 001 S 9 O2 cell includes O2 cell adapter and o...

Страница 199: ...m assembly 2079638 001 S 3 Diaphragm APL 1406 3331 000 4 Cage APL 1406 3333 000 5 Poppet APL valve 1406 3332 000 6 Flow sensor 2069358 001 S 7 O2 cell plug required if optional O2 cell is not availabl...

Страница 200: ...ster body CO2 with handle 2071166 001 S Absorber canister disposable white to violet Medisorb pack of six 2079796 001 Absorber canister disposable white to violet Medisorb EF pack of six 2079797 001 A...

Страница 201: ...pressure leak test device 0309 1319 800 Ring sealing gasket for DIN 477 O2 Air N2O Conn 12 and O2 high pressure hose 1009 3356 000 Ring sealing gasket for DIN 477 N2O Conn 11 and N2O high pressure hos...

Страница 202: ...58 001 S O2 cell Optional 2071018 001 S CARESCAPE respiratory modules Optional E sCAiO E sCAiOV Airway Gas Option Optional N CAiO Airway module exhaust line 8004463 Airway module water trap D Fend Pro...

Страница 203: ...11 Breathing system specifications 11 12 Physical specifications 11 15 Environmental requirements 11 19 Airway module specifications 11 20 Suction regulators optional 11 22 Ventilator theory 11 23 Ve...

Страница 204: ...NC P 27 28 29 52 NO NC 53 NO NC 50 51 P P F 57 P 62 64 30 23 20 31 9 19 11 12 10 22 43 44 49 F F 5 1 14 15 18 17 54 68 71 69 69 69 66 67 70 73 F 3 20 20 56 58 59 55 60 61 71 42 41 36 32 32 P P P 13 13...

Страница 205: ...transducer 24 Selectatec Manifold two vaporizer option 61 Expiratory flow transducer 25 Vaporizer 62 Paw transducer 26 Air regulator optional 30 psi 63 Patient Y or patient connection 27 ACGO optional...

Страница 206: ...t when the O2 flush button is pushed The flush switch uses pressure changes to monitor the position of the flush valve N2O flow A balance regulator controls the flow of N2O to the flow control valve O...

Страница 207: ...Mixed gas The mixed gas goes from the flowmeter outlet through the vaporizer that is on to the fresh gas outlet and into the breathing system 11 Specifications and theory of operation 2076152 001 11 5...

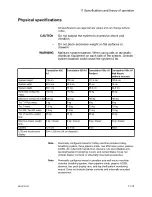
Страница 208: ...ary regulator is set to pressure less than 414 kPa 60 psi Pressure relief valve Approximately 758 kPa 110 psi Pipeline connections filtered DISS Male DISS Female AS 4059 Australian S90 116 French Air...

Страница 209: ...ort 45 Air pipeline sensor board 11 USB I O port 46 N2O pipeline sensor board 12 Network I O port Ethernet 47 Second O2 cylinder transducer 13 Network I O port Ethernet 48 O2 pipeline sensor board 14...

Страница 210: ...t airway transducer 30 Ambient pressure sensor 65 Expiratory transducer 31 Buzzer 66 Inspiratory transducer 32 AGSS transducer 67 Breathing system connected optical sensor 33 Debug serial port 68 Cani...

Страница 211: ...it do not exceed UL and CSA rated systems U S A and Canada less than 300 amps for the system and all systems connected to electrical outlets IEC rated systems not U S A and Canada less than 500 amps f...

Страница 212: ...intained from the mains input The system functions to specifications while the battery is recharging Electrical outlets if provided will not function during a power failure Electrical outlets if provi...

Страница 213: ...ot go to zero When O2 flow is displayed as 0 lpm there may a residual O2 flow of 25 to 125 ml per min Different breathing circuit pressures barometric pressures or temperatures change the total flow t...

Страница 214: ...eusable absorber canister bag mode only 1 74 ml 0 098 kPa 1 cmH2O 52 4 ml 3 kPa 30 cmH2O Volume of gas lost due to internal compliance of filled disposable absorber canister bag mode only 1 81 ml 0 09...

Страница 215: ...affect resistance Pressure flow data APL valve completely open Flow l min APL pressure cmH2O dry APL pressure cmH2O wet Open 0 978 0 996 3 1 07 1 08 30 1 46 1 49 60 2 20 2 31 70 2 65 2 81 Gas scavenin...

Страница 216: ...m DISS EVAC 25 to 30 l min 305 mmHg 12 inHg minimum vacuum Low flow high vacuum SIS EVAC 25 to 30 l min 305 mmHg 12 inHg minimum vacuum Low flow low vacuum 12 7 mm hose barb 25 to 50 l min Japan Speci...

Страница 217: ...mass 7 5 kg 7 5 kg 7 5 kg 7 5 kg Tec 820 Tec 850 mass 7 5 kg 7 5 kg 7 5 kg 7 5 kg Top of machine weight limit 25 kg 25 kg 25 kg 25 kg Machine drawer weight limit 9 kg drawer 9 kg drawer 9 kg drawer 9...

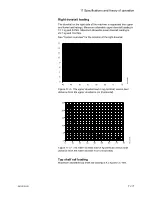
Страница 218: ...is 4 5 kg and 3 7 Nm Maximum allowable lower dovetail loading is 6 kg and 10 Nm See System overview for the location of the left dovetail 0 5 AC 24 289 1 4 5 10 15 35 30 25 2 3 20 Figure 11 2 The uppe...

Страница 219: ...t dovetail 5 40 AC 24 290 7 12 13 45 50 70 65 60 9 11 55 8 10 6 75 Figure 11 4 The upper dovetail load in kg vertical versus load distance from the upper dovetail in cm horizontal 0 0 AC 22 039 5 10 1...

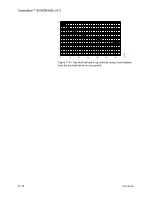
Страница 220: ...0 1 7 9 2 3 4 5 11 13 15 17 19 AC 22 021 Figure 11 6 Top shelf rail load in kg vertical versus load distance from the top shelf rail in cm horizontal Carestation 620 650 650c A1 11 18 2076152 001...

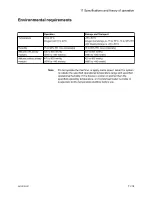
Страница 221: ...rs 425 to 800 mmHg 4880 to 440 meters Altitude without airway module 475 to 800 mmHg 4000 to 440 meters 425 to 800 mmHg 4880 to 440 meters Do not operate the machine or apply mains power when the syst...

Страница 222: ...me 1 minute for operation with CO2 O2 and N2O 5 minutes for operation of anesthetic agents 20 minutes for full specifications Respiration rate 4 to 100 breaths min Diversion flow 120 20 ml min Airway...

Страница 223: ...f reading 6 hour drift less than 0 3 vol Gas cross effects less than 2 vol anesthetic agents Anesthetic agents Measurement range Hal Enf Iso 0 to 6 vol Measurement range Sev 0 to 8 vol Measurement ran...

Страница 224: ...00 kPa Maximum Flow 29 l min with pipeline drive gas at 280 kPa 32 l min with pipeline drive gas at 600 kPa Vacuum Gauge Accuracy 5 of full scale Values are approximate Continuous Suction Regulator Pe...

Страница 225: ...n the patient circuit In volume ventilation modes certain alarm conditions prevent the automatic adjustment of ventilator delivery based on measured flow values In these cases TV accuracy decreased Ad...

Страница 226: ...arming up not present or non functional The split screen shows the Paw gauge in the upper area and the ecoFLOW gauge in the lower portion of the screen The ecoFLOW gauge consists of a fresh gas flow t...

Страница 227: ...e support ventilation CPAP PSV Volume control mode VCV Volume control ventilation supplies a set tidal volume The ventilator calculates a flow based on the set tidal volume and the length of the inspi...

Страница 228: ...culates the inspiratory time from the frequency and I E ratio settings A high initial flow pressurizes the circuit to the set inspiratory pressure The flow then decreases to maintain the set pressure...

Страница 229: ...n the high end The inspiratory pressure change between breaths is a maximum of 3 cmH2O If a high airway pressure alarm is active due to the current breath the next breath s target will be 0 5 cmH2O le...

Страница 230: ...trigger level When the ventilator senses the beginning of inspiration within the Trigger window it synchronously delivers a volume breath using the set tidal volume and the inspiratory time Tinsp that...

Страница 231: ...ed intermittent ventilation with pressure control ventilation SIMV PCV delivers a relatively slow breathing rate with pressure controlled breathing This mode combines mandatory breaths with spontaneou...

Страница 232: ...s a set rate of pressure controlled breaths with a guaranteed volume to the patient The patient can breathe spontaneously between mandatory breaths Pressure support can be used to support the spontane...

Страница 233: ...eed volume at the inspiratory limb A portion of the exhalation phase is defined as the trigger window If a spontaneous breath is detected in this window a new mandatory PCV VG breath is initiated If a...

Страница 234: ...determined by the pressure lung characteristics and patient effort PSVPro uses an inspiration termination level that establishes when the ventilator will stop the pressure supported breath and cycle...

Страница 235: ...pressure controlled breaths at the inspiratory pressure level inspiratory time and rate that the user has set If during this time the patient takes spontaneous breaths in between the machine breaths t...

Страница 236: ...peak inspiratory flow that the ventilator uses to end the inspiratory phase of the breath and to cycle into the expiratory phase If the inspiration termination is set to 30 then the ventilator will st...

Страница 237: ...for all other case default values Setting Range Mode VCV PCV PCV VG SIMV VCV SIMV PCV SIMV PCV VG PSVPro CPAP PSV TV 20 1500 ml 500 500 500 500 RR 4 100 bpm 12 12 12 RR 2 60 bpm 12 12 12 12 Minimum R...

Страница 238: ...use RR 4 to 100 the RR transfers to the new mode at the set RR or 60 whichever is smaller For example if the mode in use has a RR of 75 and the new mode does not support a RR of 75 the RR is set to 6...

Страница 239: ...mpensation range 0 1 to 15 l min Gas composition O2 N2O Air anesthetic agents Pressure Patient airway pressure measurement range 20 to 120 cmH2O 1 cmH2O resolution High pressure alarm set range 12 to...

Страница 240: ...ime of cell and adapters is measured using the text method described in ISO 7767 1997 Low O2 alarm range 18 to 99 High O2 alarm setting 19 to 100 or Off Note Low O2 limit may not be set above high O2...

Страница 241: ...curacy better than 9 Less than or equal to 210 ml but greater than or equal to 60 ml tidal volume accuracy better than 18 ml Less than 60 ml tidal volume accuracy better than 10 ml Inspiratory pressur...

Страница 242: ...ration when RF emitters are in the vicinity Use of other electrical equipment adjacent to or stacked with this system may cause interference Verify normal operation of equipment in the system before u...

Страница 243: ...manufacturer s declaration electromagnetic emissions The system is suitable for use in the specified electromagnetic environment The customer and or user of the system should assure that it is used in...

Страница 244: ...eless communication equipment table in Recommended separation distances Rated power frequency magnetic fields IEC 61000 4 8 30 A m 50 Hz or 60 Hz Phenomenon Basic EMC standard or test method Professio...

Страница 245: ...equipment RF wireless communication equipment Test frequency MHz Band MHz Service Modulation Maximum power W Distance m Immunity test level V m 385 380 390 TETRA 400 Pulse modulation 18 Hz 1 8 0 3 27...

Страница 246: ...11 44 2076152 001...

Страница 247: ...12 Super user mode Super user mode Super user mode 12 2 Gas usage 12 3 System configuration 12 5 Case defaults 12 10 Copy logs 12 15 Procedures setup 12 16 In this section 2076152 001 12 1...

Страница 248: ...making changes Several settings can be changed in Super User mode These changes should only be made by the person responsible for the configuration of the system To access the Super User mode select...

Страница 249: ...is only available on systems with the ecoFLOW option installed 1 From Super User mode select Gas Usage and then ecoFLOW 2 Select the item to change Make the change For FiO2 Setting set the numeric val...

Страница 250: ...3 Set the cost for each agent 4 Select Back to return to the Gas Usage menu Carestation 620 650 650c A1 12 4 2076152 001...

Страница 251: ...ter select the desired color from the drop down list 3 Select Back to return to the System Config menu Setting units Set Patient Weight CO2 Gas Supply Pressure Paw and Currency to the desired units Cu...

Страница 252: ...system uses a stand alone monitor for O2 agent and CO2 Selecting Yes disables the O2 limit alarms and the O2 monitoring not connected alarm when there is no O2 cell or airway module detected in the sy...

Страница 253: ...stem Config and then Parameter Settings 2 Select the item to change To set the volume calculation conditions set Vent and Airway Gas Module TV Basis Set to ATPD ATPD ATPD BTPS or BTPS BTPS To set the...

Страница 254: ...menu The table shows the factory default settings for each trend page Default settings for Trends on each Page Page 1 Page 2 Page 3 Page 4 Page 5 Top Pres O2 AA2 Bal RR CO2 Middle TVexp N2O N2O MAC C...

Страница 255: ...ases Gases Split Screen Paw Spiro None Paw None 1 From Super User mode select System Config and then Pages Setup 2 Select the page to set up 3 Select an item to change Make the change Waveform fields...

Страница 256: ...firm 6 Repeat to set the defaults for another default case Setting case name 1 From Super User mode select Case Defaults 2 Select the name of the case to enter the adjustment window 3 Select Name Sele...

Страница 257: ...ult case types are shown in the following table An indicates that the setting is not used for the default ventilation mode in the case type Use the empty columns to write in facility changes VCV ADULT...

Страница 258: ...or default case types Settings ADULT PEDIATRIC LOCAL CUSTOM 1 Backup Time 30 30 30 30 Rise Rate Auto Auto Auto Auto Rise Rate 5 5 5 5 PSV Rise Rate Auto Auto Auto Auto Exit Backup 2 2 2 2 Page 5 Defau...

Страница 259: ...Off Off EtO2 High Off Off Off Off FiCO2 High Off Off Off Off FiO2 Low 21 21 21 21 FiO2 High Off Off Off Off Page 7 Default settings for default case types Settings ADULT PEDIATRIC LOCAL CUSTOM 1 EtIso...

Страница 260: ...L CUSTOM 1 FiEnf High 5 0 5 0 5 0 5 0 Page 8 Default settings for default case types Settings ADULT PEDIATRIC LOCAL CUSTOM 1 EtHal Low Off Off Off Off EtHal High Off Off Off Off FiHal Low Off Off Off...

Страница 261: ...r logs event logs alarm logs and key press logs Using copy logs 1 From Super User mode select Copy Logs 2 Follow the instructions on the screen 3 Select Close to exit the menu Do not remove the USB me...

Страница 262: ...item on the user s Vital Capacity menu 7 Select PEEP on Exit and set to the desired value 8 Select Back to return to the Procedures menu Setting cycling controls and settings 1 From Super User mode se...

Страница 263: ...rm limits 3 22 setting apnea delay 3 23 volume apnea 3 21 Alarms battery indicator 7 3 viewing alarm history 3 22 Anesthesia system display 2 15 Apnea delay 3 23 Auto MV Limit 3 24 Automatic agent ide...

Страница 264: ...leak 5 8 G Gas cylinders installation 8 22 installing DIN connections 8 23 installing large cylinders 8 23 installing pin indexed yokes 8 22 Gas supplies specifications 11 6 H Hard keys 3 18 High pre...

Страница 265: ...r 11 37 ventilator accuracy data 11 39 Spirometry menu functions 3 27 setting loop type 3 27 Spirometry setup loopgraph scaling 3 28 setting patient and sensor type 3 28 volume type 3 29 Split screen...

Страница 266: ...es 11 24 Ventilation modes CPAP PSV 11 34 factory defaults 11 35 PCV 11 26 PCV VG 11 27 PSVPro 11 32 SIMV PCV 11 29 SIMV PCV VG 11 30 SIMV VCV 11 28 transition 11 36 VCV 11 25 Ventilator changing vent...

Страница 267: ...pect to expendable parts The foregoing warranties shall not apply if the Product has been repaired other than by the manufacturer or altered by anyone other than the manufacturer or if the Product has...

Страница 268: ...Carestation 620 650 650c A1 User s Reference Manual English 2076152 001 2021 05 Rev S...

Отзывы: