background image

49-80575-1   05-09 JR

GEAppliances.com

Write the model and serial 
numbers here:

Model #  ________________

Serial #  ________________

You can find them on a label
behind the drawer or behind the
lower oven door on the front of
the range frame.

Quick Set V,

Quick Set VI and

Next Step Control

Owner’s Manual

Ran

ges

Safety Instructions

 . . . . . . . . . . . . . . . . . . . . . . . . . . . .

2–5

Operating Instructions

Kitchen Timer  . . . . . . . . . . . . . . . . . . . . . . . . . . . . . . . . . . . . . . . . . .21
Oven  . . . . . . . . . . . . . . . . . . . . . . . . . . . . . . . . . . . . . . . . . . . . . . .14–35

Adjust Oven Thermostat  . . . . . . . . . . . . . . . . . . . . . . . . . . . . . .22
Baking or Roasting . . . . . . . . . . . . . . . . . . . . . . . . . . . . . . . . . . . .17
Broiling, Broiling Guide  . . . . . . . . . . . . . . . . . . . . . . . . . . . . . . . .18
Controls  . . . . . . . . . . . . . . . . . . . . . . . . . . . . . . . . . . . . . . . . . . .14, 15
Convection Oven . . . . . . . . . . . . . . . . . . . . . . . . . . . . . . . . . .23–26
Lower Oven Drawer . . . . . . . . . . . . . . . . . . . . . . . . . . . . . . . . . . .35
Preheating  . . . . . . . . . . . . . . . . . . . . . . . . . . . . . . . . . . . . . . . . . . . .17
Probe  . . . . . . . . . . . . . . . . . . . . . . . . . . . . . . . . . . . . . . . . . . . . . . . . .20
Sabbath Feature  . . . . . . . . . . . . . . . . . . . . . . . . . . . . . . . . . . . . . .33
Self-Cleaning  . . . . . . . . . . . . . . . . . . . . . . . . . . . . . . . . . . . . . .29, 30
Slow Cook, Warming and Proofing Features . . . . . . . . . . .27, 28
Special Features  . . . . . . . . . . . . . . . . . . . . . . . . . . . . . . . . . .31–32
Timed Baking and Roasting . . . . . . . . . . . . . . . . . . . . . . . . . . .19
Warming Drawer  . . . . . . . . . . . . . . . . . . . . . . . . . . . . . . . . . . . . .34

Surface Units . . . . . . . . . . . . . . . . . . . . . . . . . . . . . . . . . . . . . . . . 6–13

Cookware  . . . . . . . . . . . . . . . . . . . . . . . . . . . . . . . . . . . . . . . . . . . . . .7
Griddle  . . . . . . . . . . . . . . . . . . . . . . . . . . . . . . . . . . . . . . . . . . . .12, 13
Knob-Controlled Models . . . . . . . . . . . . . . . . . . . . . . . . . . .10, 11
Touch Pad-Controlled Models . . . . . . . . . . . . . . . . . . . . . . . .8, 9

Care and Cleaning

Control Knobs  . . . . . . . . . . . . . . . . . . . . . . . . . . . . . . . . . . . . . . . . . 36
Control Panel  . . . . . . . . . . . . . . . . . . . . . . . . . . . . . . . . . . . . . . . . . . 36
Glass Cooktop  . . . . . . . . . . . . . . . . . . . . . . . . . . . . . . . . . . . . . 42, 43
Lift-Off Oven Door  . . . . . . . . . . . . . . . . . . . . . . . . . . . . . . . . . 37, 38
Light  . . . . . . . . . . . . . . . . . . . . . . . . . . . . . . . . . . . . . . . . . . . . . . . 40, 41
Oven Floor  . . . . . . . . . . . . . . . . . . . . . . . . . . . . . . . . . . . . . . . . . . . . .39
Oven Heating Elements  . . . . . . . . . . . . . . . . . . . . . . . . . . . . . . . .41
Racks  . . . . . . . . . . . . . . . . . . . . . . . . . . . . . . . . . . . . . . . . . . . . . . . . . . 38
Removable Warming Drawer/Lower Oven Drawer Pan . . . . . 39
Storage Drawer . . . . . . . . . . . . . . . . . . . . . . . . . . . . . . . . . . . . . . . . 39
Surfaces  . . . . . . . . . . . . . . . . . . . . . . . . . . . . . . . . . . . . . . . . . . . . . . . 36
Vent . . . . . . . . . . . . . . . . . . . . . . . . . . . . . . . . . . . . . . . . . . . . . . . . 37, 39

Troubleshooting Tips

 . . . . . . . . . . . . . . . . . . . . . . . . . 44–48

Accessories

 . . . . . . . . . . . . . . . . . . . . . . . . . . . . . . . . . . . . . . . . . 50

Consumer Support

Consumer Support  . . . . . . . . . . . . . . . . . . . . . . . . . . . . . . . . . . . . 52
Warranty  . . . . . . . . . . . . . . . . . . . . . . . . . . . . . . . . . . . . . . . . . . . . . . 51

Printed on

Recycled Paper

Fr

ee-S

tanding, Slide-In, and Dr

op-In Electric

In Canada: 
www.GEAppliances.ca

Содержание 49-80575-1

Страница 1: ...ating 17 Probe 20 Sabbath Feature 33 Self Cleaning 29 30 Slow Cook Warming and Proofing Features 27 28 Special Features 31 32 Timed Baking and Roasting 19 Warming Drawer 34 Surface Units 6 13 Cookware 7 Griddle 12 13 Knob Controlled Models 10 11 Touch Pad Controlled Models 8 9 Care and Cleaning Control Knobs 36 Control Panel 36 Glass Cooktop 42 43 Lift Off Oven Door 37 38 Light 40 41 Oven Floor 39...

Страница 2: ...to see that the leveling leg is engaged in the bracket On models without a storage drawer or kick panel carefully tip the range forward The bracket should stop the range within 4 inches If it does not the bracket must be reinstalled If the range is pulled from the wall for any reason always repeat this procedure to verify the range is properly secured by the anti tip bracket Never completely remov...

Страница 3: ...opened food containers Pressure could build up and the container could burst causing an injury Do not use aluminum foil to line the drip pans or anywhere in the oven except as described in this manual Misuse could result in damage to the range and shock or fire hazard Avoid scratching or impacting glass doors cooktops or control panels Doing so may lead to glass breakage Do not cook on a product w...

Страница 4: ...op should break cleaning solutions and spillovers may penetrate the broken cooktop and create a risk of electric shock Contact a qualified technician immediately Avoid scratching the glass cooktop The cooktop can be scratched with items such as knives sharp instruments rings or other jewelry and rivets on clothing Do not place or store items that can melt or catch fire on the glass cooktop even wh...

Страница 5: ...e operating the self clean cycle wipe grease and food soils from the oven Excessive amount of grease may ignite leading to smoke damage to your home If the self cleaning mode malfunctions turn the oven off and disconnect the power supply Have it serviced by a qualified technician Do not clean the door gasket The door gasket is essential for a good seal Care should be taken not to rub damage or mov...

Страница 6: ...cookware from the oven or surface on the glass cooktop when the surface is cool Even after the surface units are turned off the glass cooktop retains enough heat to continue cooking To avoid overcooking remove pans from the surface units when the food is cooked Avoid placing anything on the surface unit until it has cooled completely Water stains mineral deposits are removable using the cleaning c...

Страница 7: ... the surface Cast Iron not recommended unless designed specifically for glass cooktops Poor conductivity and slow to absorb heat Will scratch the cooktop surface Check pans for flat bottoms by using a straight edge Pans with rounded curved ridged or warped bottoms are not recommended The following information will help you choose cookware which will give good performance on glass cooktops See inse...

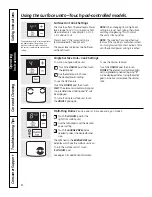
Страница 8: ...wer Level L the lowest setting is recommended for Keep Warm The power level increases one half level with each touch NOTE When changing from a high heat setting to a lower heat setting the surface unit may stop glowing This is normal The unit is still on and hot NOTE This cooktop has a rapid heat up feature If the cooktop is cool when turned on it will glow red for a short period of time until the...

Страница 9: ...FF FOOD POISON HAZARD Bacteria may grow in food at temperatures below 140 F Always start with hot food Do not use warm settings to heat cold food Do not warm food for more than 2 hours Failure to follow these instructions may result in foodborne illness Using the Warming Zone on some models The WARMING ZONE is located in the back center of the glass surface To use the WARMING ZONE Touch the WARMIN...

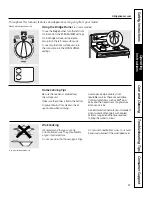
Страница 10: ...s cooled to approximately 150 F Indicator light will Come on when the unit is turned on or hot to the touch Stay on even after the unit is turned off Glow until the unit is cooled to approximately 150 F At both OFF and HI the control clicks into position You may hear slight clicking sounds during cooking indicating the control is maintaining your desired setting Be sure you turn the control knob t...

Страница 11: ...mmend that you use only a flat bottomed wok They are available at your local retail store Do not use woks that have support rings Do not use round bottom woks You could be seriously burned if the wok tipped over Home Canning Tips Be sure the canner is centered over the surface unit Make sure the canner is flat on the bottom To prevent burns from steam or heat use caution when canning Use recipes a...

Страница 12: ... rough edges which might damage the griddle Do not cut foods on the griddle Do not use cookware as a storage container for food or oil Permanent staining and or craze lines could result NOTE The nonstick coating will degrade when exposed to temperatures over 500 F Use only with the griddle control and only at the designated location on the cooktop Do not use the griddle to broil food in the oven D...

Страница 13: ...ame with your range into the center of the steak making sure that the tip of the probe is in the center of the steak 7 Plug the probe into the outlet located on the upper front side of the oven slide the rack back into the oven and close the door 8 Press PROBE on your control enter the desired internal temp and press START 9 Allow steak to finish cooking in the oven The range control will beep and...

Страница 14: ...START pad When cooking is finished touch the CLEAR OFF pad PIZZA Pad Touch the PIZZA pad Touch the number pads to select 1 for frozen or 2 for fresh pizza Touch the number pads to set the baking temperature Touch the START pad Baking time is determined by package directions Place pizza on top rack position of upper oven When using a metal tray use the lower rack position PROOF Pad Touch to raise y...

Страница 15: ... clock and all programmed functions must be reset The time of day will flash in the display when there has been a power outage CONTROL LOCKOUT Pad Your control will allow you to lock out the touch pads and the cooktop so they cannot be activated when touched To lock the controls and cooktop Touch and hold the CONTROL LOCKOUT pad for 3 seconds The oven display will show on Loc on To unlock the cont...

Страница 16: ...locks on the support tilt up the front and push the rack in When you are using a rack in the lowest position A you will need to use caution when pulling the rack out We recommend that you pull the rack out several inches and then using two pot holders pull the rack out by holding the sides of it The rack is low and you could be burned if you place your hand in the middle of the rack and pull all t...

Страница 17: ...the minimum time on the recipe Cook longer if necessary Touch the CLEAR OFF pad when baking is finished and then remove the food from the oven Preheating and Pan Placement To avoid possible burns place the racks in the desired position before you turn on the oven Preheat the oven if the recipe calls for it Preheating is necessary for good results when baking cakes cookies pastries and breads If ba...

Страница 18: ...ing organisms may survive Source Safe Food Book Your Kitchen Guide USDA Rev June 1985 Broiling Guide Type or Food Doneness Thickness Rack Position Comments Beef Rare 140 F Steaks E or F food should be 1 Steaks less than 1 1 thick to 3 from broil element thick are difficult to cook rare They cook Medium 160 F Steaks E food should be 3 through before browning 3 4 to 1 thick to 4 from broil element T...

Страница 19: ...or a specific length of time and then turn off automatically Make sure the clock shows the correct time of day Touch the BAKE pad Touch the number pads to set the desired oven temperature Touch the COOK TIME pad NOTE If your recipe requires preheating you may need to add additional time to the length of the cooking time Touch the number pads to set the desired length of cooking time The minimum co...

Страница 20: ...e or oven control Use the handles of the probe and plug when inserting and removing them from the food and outlet To avoid damaging your probe do not use tongs to pull on the cable when removing it To avoid breaking the probe make sure food is completely defrosted before inserting After preparing the meat and placing it on a trivet or a broiler pan grid follow these directions for proper probe pla...

Страница 21: ...on model is touched The 6 second tone can be cancelled by following the steps in the Special features of your oven control section under Tones at the End of a Timed Cycle The Kitchen Timer is in hours and minutes The Kitchen Timer does not control oven operations The maximum setting on the Kitchen Timer is 9 hours and 59 minutes To Reset the Kitchen Timer If the display is still showing the time r...

Страница 22: ...e thermostat yourself Do not use thermometers such as those found in grocery stores to check the temperature setting of your oven These thermometers may vary 20 40 degrees NOTE This adjustment will only affect baking and roasting temperatures it will not affect broiling or self cleaning temperatures The adjustment will be retained in memory after a power failure The type of margarine will affect b...

Страница 23: ...1 Rack Convection Baking The convection oven comes with one convection cook mode and can be used for 1 Rack Convection Baking or Multi Rack Convection Baking Convection Cook on some models Convection Fan Operation In a convection oven a fan circulates hot air over under and around the food This circulating hot air is evenly distributed throughout the oven cavity As a result foods are evenly cooked...

Страница 24: ...ction oven check to see if your cookware leaves room for air circulation in the oven If you are baking with several pans leave space between them Also be sure the pans do not touch each other or the walls of the oven Paper and Plastic Heat resistant paper and plastic containers that are recommended for use in regular baking can also be used for convection baking but should not be used at temperatu...

Страница 25: ...t for more than 1 hour before or after cooking Room temperature promotes the growth of harmful bacteria Be sure that the oven light is off because heat from the bulb will speed harmful bacteria growth 25 How to Set an Immediate Start and Automatic Stop Press desired convection function Proceed to step 2 of How to Set an Immediate Start and Automatic Stop in Using the timed baking and roasting feat...

Страница 26: ... control will signal if the probe is inserted intotheoutlet andyouhavenotsetaprobe temperature and pressed the START pad Touch the START pad When the oven starts to heat the word LO will be in the display After the internal temperature of the meat reaches 100 F the changing internal temperature will be shown in the display When the internal temperature of the meat reaches the number you have set t...

Страница 27: ... 3 4 hrs Place ribs in a single layer Pork Ribs LO 6 8 hrs Pork Chops 4 8 lbs C 2 Meats HI 3 4 hrs Place chops in a single layer LO 6 8 hrs Soup Vegetable Beef 4 quarts C 2 Meats HI 4 5 hrs Make sure beef chunks Soup LO 8 10 hrs are submerged Chili 4 quarts C 2 Meats HI 3 4 hrs Submerge beans LO 6 8 hrs to prevent surface drying Slow Cook Guide Guideline Tips The slow cook program uses a complex s...

Страница 28: ...ven on rack B or C NOTE For best results cover the dough with a cloth or with greased plastic wrap the plastic may need to be anchored underneath the container so the oven fan will not blow it off Touch the PROOF pad and then the START pad The display will read PrF proof The oven interior light turns on and remains on during proofing The proofing feature automatically provides the optimum temperat...

Страница 29: ...elf clean Wipe up heavy soil on the oven bottom Before a Clean Cycle FIRE HAZARD Wipe grease and heavy soil from the oven bottom before self cleaning Failure to do so may result in an oven fire We recommend venting your kitchen with an open window or using a ventilation fan or hood during the first self clean cycle Remove any broiler pan broiler grid probe all cookware and any aluminum foil from t...

Страница 30: ... towel and wipe the edges of the oven racks with the paper towel How to Delay the Start of Cleaning Touch the SELF CLEAN pad A 3 hour self clean time is recommended for use when cleaning small contained spills A self clean time of 5 hours is recommended for a dirtier oven If a time other than 5 hours or 3 hours is needed use the number pads and enter the desired clean time You can change the clean...

Страница 31: ...f a Timed Cycle At the end of a timed cycle 3 short beeps will sound followed by one beep every 6 seconds until the CLEAR OFF pad is touched This continual 6 second beep may be cancelled To cancel the 6 second beep Touch the upper oven BROIL HI LO and BAKE pads at the same time until the display shows SF Touch the BROIL pad The display shows CONTI BEEP continuous beep Touch the BROIL pad again The...

Страница 32: ... clock The display will show 24 hr If this is the choice you want touch the START pad Touch the CLOCK pad again to black out the clock display The display will show OFF If this is the choice you want touch the START pad NOTE If the clock is in the black out mode you will not be able to use the Delay Start function Tone Volume on some models This feature allows you to adjust the tone volumes to a m...

Страница 33: ...esired temperature between 170 F and 550 F No signal or temperature will be given There is no default temperature Touch the START pad on the corresponding oven After a random delay period of approximately 30 seconds to 1 minute will appear in the display indicatingthat the oven is baking roasting If doesn t appear in the display start again at Step 4 To bake in the other oven start at Step 4 on so...

Страница 34: ...utensil Melted plastic may not be removable and is not covered under your warranty Remove serving spoons etc before placing containers in warming drawer Temperature Selection Chart To keep several different foods hot set the control to the food needing the highest setting The temperature type and amount of food and the time held will affect the quality of the food Repeated opening of the drawer al...

Страница 35: ...mum height of foods that can be baked in the lower oven drawer is 31 2 Do not put liquid or water in the lower oven drawer Never place plastics paper canned foods or combustible material in the lower oven drawer The lower oven drawer may be used to bake foods using the same times and temperatures as a standard oven Foods ideal for baking in the lower oven drawer include pizza frozen foods casserol...

Страница 36: ...surface How to Remove Protective Shipping Film and Packaging Tape Carefully grasp a corner of the protective shipping film with your fingers and slowly peel it from the appliance surface Do not use any sharp items to remove the film Remove all of the film before using the appliance for the first time To ensure no damage is done to the finish of the product the safest way to remove the adhesive fro...

Страница 37: ...rculation Do not rub or clean the door gasket it has an extremely low resistance to abrasion If you notice the gasket becoming worn frayed or damaged in any way or if it has become displaced on the door you should have it replaced To clean the inside of the door Because the area inside the gasket is cleaned during the self clean cycle you do not need to clean this by hand The area outside the gask...

Страница 38: ...to the 45 degree position The hinge locks will contact the oven frame Slide the door back onto the hinges Make sure the buttons pop back out Fully open the door Push the hinge locks down onto the hinge Close the oven door Oven frame Door frame Release buttons Pull down Push in Oven Racks All oven racks may be cleaned by hand with an abrasive cleaner or steel wool After cleaning rinse the racks wit...

Страница 39: ...or service disconnect the range electrical power supply at the household distribution panel by removing the fuse or switching off the circuit breaker Make sure the drawer heating element is cool Press down and pull out Removable Oven Floor on some models To remove the oven floor Remove the oven door using the instructions in the Lift Off Oven Door section Press down and pull out the removable oven...

Страница 40: ...l will have one of the two types shown on the left To determine the correct replacement bulb check the bulb terminals Bulbs with 2 straight pin terminals are G6 35 bulbs Bulbs with 2 looped terminals are G9 bulbs Do not interchange Be sure the replacement bulb is rated 120 volts or 130 volts NOT 12 volts Using gloves or a dry cloth remove the bulb from its packaging Do not touch the bulb with bare...

Страница 41: ...element Any soil will burn off when the elements are heated To clean the oven floor gently lift the bake element Clean with warm soapy water Oven Heating Elements on some models Do not clean the broil element Any soil will burn off when the element is heated Clean the oven floor with warm soapy water On some models the bake element is not exposed and is under the oven floor If spillovers residue o...

Страница 42: ... CERAMA BRYTE Ceramic Cooktop Scraper and all recommended supplies are available through our Parts Center See instructions under To Order Parts section on next page NOTE Do not use a dull or nicked blade Heavy Burned On Residue Use a CERAMA BRYTE Cleaning Pad for Ceramic Cooktops Normal Daily Use Cleaning ΟΝΛΨ use CERAMA BRYTE Ceramic Cooktop Cleaner on the glass cooktop Other creams may not be as...

Страница 43: ...ervice will be necessary Damage from Sugary Spills and Melted Plastic Sugary spillovers such as jellies fudge candy syrups or melted plastics can cause pitting of the surface of your cooktop not covered by the warranty unless the spill is removed while still hot Special care should be taken when removing hot substances Be sure to use a new sharp razor scraper Do not use a dull or nicked blade Be c...

Страница 44: ... cookware and the surface of the cooktop Cookware has been slid across the cooktop surface Areas of discoloration Food spillovers not cleaned See the Cleaning the glass cooktop section on the cooktop before next use Hot surface on a model This is normal The surface may appear discolored with a light colored cooktop when it is hot This is temporary and will disappear as the glass cools Plastic melt...

Страница 45: ...power Preheat the broil element for 10 minutes voltage may be low Broil for the longest period of time recommended in the Broiling Guide Oven temperature Oven thermostat See the Adjust the oven thermostat Do it yourself too hot or too cold needs adjustment section Storage drawer Rear drawer support is Reposition the drawer See the Storage Drawer is crooked on top of the guide rail Removal instruct...

Страница 46: ...king and cleaning functions Excessive smoking Excessive soil Touch the CLEAR OFF pad Open the windows to during a clean cycle rid the room of smoke Wait until LOCKED DOOR goes off After the oven cools wipe up the excess soil and reset the clean cycle Oven door will not Oven too hot Allow the oven to cool below locking temperature open after a clean cycle Oven not clean after a Oven controls not pr...

Страница 47: ...g in the probe Power outage Power outage or surge Reset the clock If the oven was in use you must reset clock flashes it by touching the CLEAR OFF pad setting the clock and resetting any cooking function Steam from the vent When using the ovens This is normal it is normal to see steam coming out of the oven vents As the number of racks or amount of food being cooked increases the amount of visible...

Страница 48: ...r reset the circuit breaker lower oven drawer blown or the circuit breaker will not work tripped Controls improperly set See the Using the warming drawer section Excessive condensation Liquid in drawer Remove liquid in the drawer Uncovered foods Cover food with lid or aluminum foil Temperature setting too high Reduce temperature setting Food dries out in the Moisture escaping Cover food with lid o...

Страница 49: ...Safety Instructions Operating Instructions Care and Cleaning Troubleshooting Tips Consumer Support Notes GEAppliances com 49 ...

Страница 50: ...___________________________________________________________ ____________________ ______________________________________________________________ ____________________ ______________________________________________________________ Model Number ______________ Serial Number __________________ Brand________________ Date of Purchase __________ First Name ____________________________________________ Last ...

Страница 51: ...g the product to an Authorized GE Service location for service In Alaska the warranty excludes the cost of shipping or service calls to your home Some states do not allow the exclusion or limitation of incidental or consequential damages This warranty gives you specific legal rights and you may also have other rights which vary from state to state To know what your legal rights are consult your lo...

Страница 52: ...unts that are available while your warranty is still in effect You can purchase it on line anytime or call 800 626 2224 during normal business hours GE Consumer Home Services will still be there after your warranty expires Parts and Accessories GEAppliances com Individuals qualified to service their own appliances can have parts or accessories sent directly to their homes VISA MasterCard and Disco...

Страница 53: ...o rostizado 17 Horneado y rostizado con temporizador 19 Horno de convección 23 26 Precalentamiento 17 Sonda 20 Temporizador de cocina 21 Unidades de superficie 6 13 Modelos controlados por botones de toque 8 9 Modelos controlados por perilla 10 11 Plancha 12 13 Recipientes de cocción 7 Cuidado y limpieza Bandejas 38 Cajón calentador desmontable Recipiente del cajón del horno inferior 39 Cajón de a...

Страница 54: ...soporte En los modelos sin cajón de almacenamiento o panel de protección incline la cocina hacia adelante con mucho cuidado El soporte debe detener la cocina dentro de las 4 pulgadas Si no lo hace el soporte debe reinstalarse Si la cocina se separa de la pared por cualquier motivo siempre repita este procedimiento para verificar que la cocina esté bien sujeta mediante el soporte anti volcaduras Nu...

Страница 55: ...er una acumulación de presión en el recipiente y éste podría explotar provocando lesiones No utilice papel de aluminio para revestir las bandejas colectoras o ninguna parte del horno con excepción de lo descripto en este manual Un uso inadecuado puede provocar daños a la cocina y una descarga eléctrica o un riesgo de incendio Trate de no rayar o golpear las puertas estufas o paneles de control de ...

Страница 56: ...n la estufa rota y crear un riesgo de descarga eléctrica Comuníquese con un técnico calificado de inmediato Evite rayar la estufa de vidrio La estufa puede rayarse con elementos tales como cuchillos instrumentos filosos anillos u otras joyas y remaches de la ropa No coloque o almacene elementos que pueden derretirse o prenderse fuego sobre la estufa de vidrio aún cuando no la esté usando Si la est...

Страница 57: ...oras o tazones Antes de utilizar el ciclo de auto limpieza limpie la grasa y los derrames de alimentos del horno Una cantidad excesiva de grasa puede encenderse generando daños por el humo en su hogar Si el modo de auto limpieza no funciona apague el horno y desconecte el suministro de energía Llame a un técnico calificado para solicitar el arreglo No limpie la empacadura de la puerta La empacadur...

Страница 58: ...lientes desde el horno o superficie sobre la estufa de vidrio cuando la superficie está fría Aunque las unidades de superficie se hayan apagado la estufa de vidrio retiene suficiente calor para continuar la cocción Para evitar la sobrecocción quite las ollas de las unidades de superficie cuando los alimentos estén cocidos No coloque nada sobre la unidad de superficie hasta que se haya enfriado por...

Страница 59: ...eñado para estufas de vidrio Pobre conductividad y lentitud para absorber el calor Raya la superficie de la estufa Verifique que los recipientes tengan bases planas utilizando una regla No se recomiendan recipientes con bases redondeadas curvadas con rebordes o torceduras La siguiente información lo ayudará a elegir los recipientes de cocción que brindan un buen desempeño en estufas de vidrio Ver ...

Страница 60: ...el nivel de energía de L la configuración más baja para mantener caliente El nivel de energía aumenta de a medio nivel con cada toque NOTA Cuando se cambia de una configuración de calor alta a una baja la unidad de superficie puede dejar de resplandecer Esto es normal La unidad sigue encendida y caliente NOTA Esta estufa cuenta con una característica de calentamiento rápido Si la estufa está fría ...

Страница 61: ...crecimiento de bacterias en los alimentos Siempre empiece con alimentos calientes No utilice configuraciones de mantener caliente para calentar alimentos fríos No caliente alimentos por más de 2 horas No seguir estas instrucciones puede provocar enfermedades transmitidas por los alimentos Cómo usar la zona de calentamiento en algunos modelos La ZONA DE CALENTAMIENTO se encuentra en la parte traser...

Страница 62: ...uperficie baje la temperatura hasta aproximadamente 150 F 66 C La luz indicadora Se accionará cuando la unidad se encienda o esté caliente al tacto Quedará encendida aunque se haya apagado la unidad Resplandecerá hasta que la unidad baje la temperatura hasta aproximadamente 150 F 66 C En OFF apagado y HI alta el control se traba en su posición con un clic Usted puede oír ligeros chasquidos durante...

Страница 63: ...k Recomendamos el uso de woks de base plana solamente Se encuentran disponibles en su negocio minorista local No use woks con anillos de soporte No utilice woks con bases redondas Usted podría sufrir graves quemaduras si el wok se vuelca Consejos para realizar conservas en casa Asegúrese de que la olla se encuentre centrada sobre la unidad de superficie Verifique que la olla tenga una base plana P...

Страница 64: ...tes de cocción para el almacenamiento de alimentos o aceite Pueden provocarse manchas y o grietas permanentes NOTA El revestimiento antiadherente se degradará si lo expone a temperaturas superiores a 500 F 260 C Utilícelo sólo con el control de la plancha y sólo en la ubicación designada sobre la estufa No utilice la plancha para asar alimentos en el horno No limpie la plancha utilizando el modo a...

Страница 65: ... centro del filete verificando que la punta de la sonda se encuentre en el centro del filete 7 Introduzca la sonda en la boca de salida ubicada en el lado frontal superior del horno deslice la bandeja dentro del horno y cierra la puerta 8 Presione PROBE sonda en su control ingrese la temperatura interna deseada y presione START iniciar 9 Deje que el filete termine de cocinarse en el horno El contr...

Страница 66: ...convección Presione las almohadillas numéricas para configurar la temperatura deseada del horno Presione el botón START iniciar Cuando haya finalizado la cocción presione el botón CLEAR OFF borrar apagado Botón PIZZA Presione la almohadilla PIZZA Presione las almohadillas numéricas para seleccionar 1 para pizza congelada y 2 para pizza fresca Presione las almohadillas numéricas para configurar la ...

Страница 67: ... configurado para una operación de horno temporizada y ocurrió un corte de energía eléctrica el reloj y todas las funciones programadas deberán reconfigurarse La hora destellará en la pantalla cuando haya ocurrido un corte de energía Botón CONTROL LOCKOUT bloqueo de control Su control le permitirá bloquear los botones de toque y la estufa para que no puedan activarse al presionarlas Para bloquear ...

Страница 68: ...te incline el frente hacia arriba y presione la bandeja hacia adentro Cuando utilice la bandeja en la posición más baja A necesitará tener cuidado cuando la quite Recomendamos que deslice la bandeja varias pulgadas y luego utilizando dos agarraderas la quite sosteniendo de ambos lados La bandeja se encuentra muy abajo y usted puede quemarse si coloca la mano en la mitad de la bandeja y tira hacia ...

Страница 69: ...elos más si fuese necesario Presione el botón CLEAR OFF borrar apagado cuando se haya finalizado el horneado y luego quite los alimentos del horno Precalentamiento y colocación de recipiente Para evitar posibles quemaduras coloque las bandejas en la posición deseada antes de encender el horno Precaliente del horno si así lo indica la receta El precalentamiento es necesario para obtener buenos resu...

Страница 70: ...Comentarios Carne de res Jugosa Filetes E o F los alimentos Es difícil cocinar filetes 140 F 60 C Grosor de 1 2 5 cm deben estar 1 a 3 de menos de la 1 2 5 2 5 cm a 7 6 cm del cm de grosor y que elemento de asado queden jugosos Se cocinan por completo A punto Filetes E los alimentos deben antes de dorarse 160 F 71 C 3 4 a 1 1 9 cm a estar de 3 a 4 Para evitar que la 2 5 cm de grosor 7 6 cm a 10 2 ...

Страница 71: ...y luego se apagará automáticamente Asegúrese de que el reloj muestre la hora correcta Presione el botón BAKE hornear Presione las almohadillas numéricas para configurar la temperatura deseada del horno Presione el botón COOK TIME tiempo de cocción NOTA Si su receta requiere precalentamiento puede necesitar agregar tiempo adicional al tiempo de cocción Presione las almohadillas numéricas para confi...

Страница 72: ...distintas a las provistas con este producto puede provocarles daños a las mismas o al control del horno Utilice las manijas de la sonda y el enchufe cuando las introduzca y quite de los alimentos y de la boca de salida Para evitar daños a la sonda no utilice pinzas para tirar del cable cuando lo quite Para no romper la sonda verifique que los alimentos estén totalmente descongelados antes de intro...

Страница 73: ...idos en la sección Características especiales de los controles del horno bajo Señales sonoras al finalizar un ciclo con temporizador El temporizador de cocina utiliza horas y minutos El temporizador de cocina no controla las operaciones del horno La configuración más alta del temporizador de cocina es de 9 horas y 59 minutos Cómo reconfigurar el temporizador de cocina Si la pantalla todavía muestr...

Страница 74: ...aja o demasiado alta usted puede regular el termostato No utilice termómetros como los que se venden en las tiendas para verificar la configuración de temperatura del horno Esos termómetros pueden variar entre 20 40 grados NOTA Este ajuste sólo afecta las temperaturas de horneado y rostizado no afecta las temperaturas de asado o de auto limpieza El ajuste se conservará en la memoria aún después de...

Страница 75: ...n por convección y puede utilizarse para horneado por convección de 1 bandeja u horneado por convección con bandejas múltiples Cocción por convección en algunos modelos Funcionamiento del ventilador de convección En un horno de convección un ventilador hace circular aire caliente sobre por debajo y alrededor de los alimentos Esta circulación de aire caliente se distribuye de manera pareja a través...

Страница 76: ...éricas para configurar la nueva temperatura Cuando el horno comienza a calentar podrá verse la temperatura cambiante comenzando a 100 F 38 C Cuando el horno alcanza la temperatura configurada sonarán 3 pitidos Presione el botón CLEAR OFF borrar apagado cuando haya finalizado Mientras cocine por convección se oirá un ventilador El ventilador se detendrá cuando se abra la puerta pero el calor no se ...

Страница 77: ...e unrecipienteconladosbajos Elairecaliente no puede circular bien alrededor delos alimentos en un recipiente de lados altos Cuando hornee galletas obtendrá mejores resultados si usa una plancha plana para galletas en lugar de un recipiente de lados bajos Cómo usar las características con temporizador para cocción por convección en algunos modelos Mientras cocine con estas características se escuch...

Страница 78: ...almohadillas numéricas para configurar la temperatura deseada del horno La pantalla destellará PROBE sonda y el control del horno indicará si la sonda se encuentra enchufada dentro de la boca de salida y si usted no ha configurado una temperatura de sonda y presionado el botón START iniciar Presione el botón START iniciar Cuando el horno comienza a calentar la palabra LO baja aparecerá en la panta...

Страница 79: ...rgidos 3 8 liters LO baja 8 10 hrs Chile 4 cuartos C 2 Carnes HI alta Sumerja los frijoles para que de galón 3 4 hrs no se sequen 3 8 liters LO baja 6 8 hrs Guía de cocción lenta Consejos sobre la guía El programa de cocción lenta utiliza una serie compleja de ciclos de temperatura para obtener los mejores resultados Por esta razón se recomienda que el programa de cocción lenta funcione sin cancel...

Страница 80: ... interna del horno se enciende y continúa encendida durante el leudado La característica de leudado automáticamente brinda la temperatura óptima para el proceso de leudado y por lo tanto no existe un ajuste de temperatura Configure el temporizador para el tiempo de leudado mínimo Cuando haya finalizado de leudar presione el botón CLEAR OFF borrar apagado Para evitar bajar la temperatura del horno ...

Страница 81: ...do para la auto limpieza Limpie con un paño los desechos rebeldes acumulados en el piso del horno Antes de un ciclo de limpieza PELIGRO DE INCENDIO Limpie la grasa y la suciedad rebelde del piso del horno antes de la auto limpieza No hacerlo puede provocar un incendio en el horno Recomendamos ventilar su cocina con una ventana abierta o utilizando un ventilador o campana durante el primer ciclo de...

Страница 82: ...os extremos de las bandejas Cómo configurar un inicio retardado de limpieza Presione el botón SELF CLEAN auto limpieza Se recomienda un ciclo de 3 horas para limpiar derrames pequeños y contenidos Se recomienda un ciclo de auto limpieza de 5 horas para un horno más sucio Si necesita un ciclo diferente de 5 o 3 horas utilice las almohadillas numéricas e ingrese el tiempo de limpieza deseado El tiem...

Страница 83: ...se escuchan 3 pitidos cortos seguidos por un pitido cada 6 segundos hasta que se presione el botón CLEAR OFF borrar apagado Este pitido continuo de 6 segundos puede cancelarse Para cancelar el pitido continuo de 6 segundos Presione los botones BROIL HI LO asar alto bajo y BAKE hornear del horno superior al mismo tiempo hasta que en la pantalla pueda verse SF Presione el botón BROIL asar La pantall...

Страница 84: ... verse 24 hr Si esta es la opción que desea presione el botón START iniciar Presione el botón CLOCK reloj de nuevo para anular la visualización del reloj En la pantalla podrá verse OFF apagado Si esta es la opción que desea presione el botón START iniciar NOTA Si el reloj se encuentra en el modo sin visualización usted no podrá utilizar la función de inicio retardado Volumen del tono en algunos mo...

Страница 85: ...al o temperatura No hay una temperatura predeterminada Presione el botón START iniciar en el horno correspondiente Después de un período aleatorio de aproximadamente 30 segundos a 1 minuto aparecerá en la pantalla indicando que el horno está horneando rostizando Si no aparece en la pantalla comience de nuevo en el paso 4 Para hornear en el otro horno comience en el paso 4 en algunos modelos Para a...

Страница 86: ...ón o utensilio caliente El plástico derretido no puede removerse y esto no se encuentra cubierto por la garantía Quite las cucharas de servicio etc antes de colocar recipientes en el cajón calentador Tabla de selección de temperatura Para mantener calientes diferentes tipos de alimentos establezca el control con la configuración más elevada La temperatura tipo cantidad de alimentos y el tiempo en ...

Страница 87: ...mentos que pueden hornearse en el cajón del horno inferior es 3 8 9 cm No coloque líquido o agua en el cajón del horno inferior Nunca coloque plásticos papel alimentos enlatados o material combustible en el cajón del horno inferior El cajón del horno inferior puede usarse para hornear alimentos utilizando los mismos tiempos y temperaturas de un horno común Los alimentos ideales para hornear en el ...

Страница 88: ... de acero o abrasivos potentes sobre cualquier superficie pintada Cómo quitar el envoltorio de protección y la cinta de embalaje Con cuidado tome una punta del envoltorio de protección con sus dedos y lentamente quítelo de la superficie del aparato No use elementos filosos para quitar el envoltorio Quite todo el envoltorio antes de usar el aparato por primera vez Para asegurarse de no dañar el aca...

Страница 89: ...a resistencia muy baja a la abrasión Si se advierte que la junta está desgastada raída o dañada o si se ha desplazado de su lugar se la debe reemplazar Para limpiar la parte interna de la puerta Debido a que el área que se encuentra dentro de la junta se limpia durante el ciclo de autolimpieza no es necesario limpiarla a mano El área que se encuentra fuera de la junta y el burlete de la puerta pue...

Страница 90: ...n en la posición de 45 grados Las trabas de la bisagra harán contacto con el marco del horno Deslice la puerta dentro de las bisagras Asegúrese de que los botones vuelvan a salir Abra la puerta por completo Presione las trabas de la bisagra hacia abajo dentro de la bisagra Cierre la puerta del horno Marco del horno Marco de la puerta Botones de liberación Tire hacia abajo Presione hacia adentro Ba...

Страница 91: ...de el panel de distribución doméstico quitando el fusible o desconectando el interruptor de circuitos Verifique que el elemento calentador del cajón esté frío Presione hacia abajo y quite Piso del horno desmontable en algunos modelos Para quitar el piso del horno Quite la puerta del horno utilizando las instrucciones de la sección Puerta del horno desmontable Presione hacia abajo y quite el piso d...

Страница 92: ...l es la lámpara correcta controle las terminales de lalámpara Laslámparascon2terminales con clavijas rectas son lámparas de G6 35 Las lámparas con 2 terminales con clavijas con curvas son lámparas de G9 No las intercambie Asegúrese al reemplazar la lámpara que sea de 120 volts o 130 volts NO de 12 volts Utilizando guantes o un paño seco remueva la bombilla de su paquete No toque la bombilla con lo...

Страница 93: ...el piso del horno levante con cuidado el elemento para hornear Limpie con agua tibia jabonosa Elementos calentadores del horno en algunos modelos No limpie el elemento para asar Las suciedades se quemarán cuando se caliente el elemento Limpie el piso del horno con agua tibia jabonosa En algunos modelos el elemento para hornear no se encuentra expuesto y se halla debajo del piso del horno Si se acu...

Страница 94: ...recomendados se encuentran disponibles en nuestro Centro de Repuestos Ver instrucciones bajo la sección Para solicitar repuestos en la página siguiente NOTA No utilice hojas desafiladas o dañadas Residuos pegados rebeldes Utilice un paño de limpieza CERAMA BRYTE para estufas cerámicas Limpieza normal de uso diario SÓLO utilice el limpiador de estufas cerámicas CERAMA BRYTE en la estufa de vidrio O...

Страница 95: ...os por derrames azucarados y plástico derretido Los derrames azucarados como gelatinas dulce caramelo jarabes o plásticos derretidos pueden marcar la superficie de la estufa no cubierto por la garantía a menos que el derrame se quite mientras está caliente Debe tenerse mucho cuidado al remover sustancias calientes Asegúrese de utilizar un raspador nuevo y afilado No utilice hojas desafiladas o dañ...

Страница 96: ... la superficie lisas de la estufa Se ha deslizado un recipiente a través de la superficie de la estufa Áreas de decoloración No se limpiaron los derrames Ver la sección Cómo limpiar la estufa de vidrio en la estufa de alimentos antes del uso siguiente Superficie caliente en Esto es normal La superficie puede parecer decolorada un modelo con una estufa cuando está caliente Esto es temporal y desapa...

Страница 97: ... 10 minutos voltaje puede ser baja Ase por el período de tiempo más prolongado que se recomiende en la Guía de asado La temperatura El termostato del horno debe Ver la sección Ajuste el termostato del horno usted del horno es muy alta ajustarse mismo o muy baja El cajón de El soporte de cajón trasero Vuelva a colocar el cajón Ver las instrucciones de almacenamiento se encuentra sobre el riel Remoc...

Страница 98: ...ar apagado en el horno durante Abra las ventanas para que salga el humo Espere el ciclo de limpieza hasta que se apague LOCKED DOOR Después de que se enfríe el horno limpie el exceso de suciedad y vuelva a configurar el ciclo de limpieza La puerta del horno El horno está muy caliente Deje que el horno se enfríe por debajo no se abre después del de la temperatura de bloqueo un ciclo de limpieza El ...

Страница 99: ...gure el reloj Si el horno estaba en uso usted el reloj destella de tensión debe reconfigurarlo presionando el botón CLEAR OFF borrar apagado configurando el reloj y reconfigurando cualquier función de cocción Emisión de vapor Cuando se utilizan los hornos Esto es normal desde la ventilación es normal ver una emisión de vapor de la ventilación del horno A medida que el número de bandejas o la canti...

Страница 100: ...or circuitos puede haber saltado Los controles están mal Ver la sección Cómo usar el cajón calentador configurados Condensación excesiva Líquido en el cajón Quite el líquido en el cajón Alimentos sin cubrir Cubra los alimentos con una tapa o con papel de aluminio La configuración de Reduzca la configuración de la temperatura temperatura está muy alta Los alimentos se secan La humedad se escapa Cub...

Страница 101: ...Seguridad Operación Cuidado y limpieza Solución de problemas Apoyo al cliente Notas GEAppliances com 49 ...

Страница 102: ...ara asar Cantidad ____________________ Número de pieza ______________________________________________________________ ____________________ ______________________________________________________________ ____________________ ______________________________________________________________ Número de modelo ____________ Número de serie ________________ Marca ______________ Fecha de compra ________ Nombr...

Страница 103: ...uar la reparación En Alaska la garantía excluye el costo de envío o visitas para efectuar arreglos en su hogar Algunos estados no permiten la exclusión o limitación de daños incidentales o resultantes Esta garantía le otorga derechos legales específicos y usted puede contar con otros derechos que pueden variar de estado a estado Para conocer sus derechos legales consulte a su oficina del consumido...

Страница 104: ...prarla en línea en cualquier momento o llamar al 800 626 2224 durante horas normales de oficina GE Consumer Home Services estará aún ahí cuando su garantía termine Piezas y accesorios GEAppliances com Aquellos individuos con la calificación necesaria para reparar sus propios electrodomésticos pueden pedir que se les manden las piezas o accesorios directamente a sus hogares aceptamos las tarjetas V...

Отзывы: