

Ringer Tone
1. [
menu
]
2. [ ] / [ ]: “PERSONAL SET” [
ok
]
3. [ ] / [ ]: “HANDSET TONE” [
ok
]
4. [ ] / [ ]: “RING TONES” [
ok
]
5. [ ] / [ ]: Select the desired setting (MELODY 1 to 10)
6. [
ok
] [ ]
Phonebook
Adding record
1. [
menu
]
2. [ ] / [ ]: “PHONEBOOK” [
ok
]
3. [ ] / [ ]: “NEW ENTRY” [
ok
]
4. Enter the name (max. 12 character) [
ok
]
5. Enter the number (max. 24 digits) [
ok
]
6. [ ]
DECT
Cordless Telephone
Your new GE telephone system is EXPANDABLE up to 4 handsets
User’s Guide
model 30551
Model 30551
P/N:XXXXXXXX
CE.E Version 1.0 05/2011
Printed in China
© 2011 CCT Tech Global Limited
is a trademark of
The General Electric Company
and is under license by
CCT Tech Global Limited,
Central, Hong Kong
Introduction
CAUTION
: When using telephone equipment, there are basic safety
instructions that should always be followed.
Refer to the Important safety instructions section in this book and
save them for future reference.
This 30551 telephone is compliant with the DECT
TM
standard. It is designed to
transmit and receive telephone calls and be collected to the certain public
telephonic networks.
*DECT is the trademark registered by ETSI.
IMPORTANT
: Because cordless phones operate on electricity, you should have
at least one phone in your home that isn’t cordless, in case the power in your
home goes out.
Before you begin
Parts Checklist
Make sure your package includes the items shown here.
30551xE2 : 1
30551xE3 : 2
30551xE4 : 3
Power adaptor
30551xE2 : 1
30551xE3 : 2
30551xE4 : 3
Telephone
base 30551
Power adaptor
for telephone
base 30551
Battery compartment
cover
30551xE1 : 1
30551xE2 : 2
30551xE3 : 3
30551xE4 : 4
Handset
30551xE1 : 1
30551xE2 : 2
30551xE3 : 3
30551xE4 : 4
Battery
30551xE1 : 2
30551xE2 : 4
30551xE3 : 6
30551xE4 : 8
Telephone
line cord
User’s
manual
User’s manual
Installation
Important Installation Guidelines
• Avoid sources of noise and heat, such as motors, fluorescent lighting,
microwave ovens, heating appliances and direct sunlight.
• Avoid areas of excessive dust, moisture and low temperature.
• Avoid other cordless telephones or personal computers.
• Never install telephone wiring during a lightning storm.
• Never install telephone jacks in wet locations unless the jack is specifically
designed for wet locations.
• Never touch non-insulated telephone wires or terminals, unless the telephone
line has been disconnected at the network interface.
• Use caution when installing or modifying telephone lines.
Installing the phone
Telephone base and charging cradle installation
Install the telephone base and charging cradle(s) as shown below. Make sure that
the electrical outlet is not controlled by a wall switch.
If you have DSL high speed internet service, a DSL filter is required (not included).
Contact your DSL service provider for more information about DSL filter.
Modular
telephone line
jack
Wall plate
Installing the Handset Battery
CAUTION:
Use only the power adaptor that came with this unit.
Base: S003IV0600050, 6Vdc/500mA. Charger: S003IV0600015,
6Vdc/150mA).
Using other power adaptors may damage the unit.
CAUTION:
To reduce the risk of fire or personal injury, use only the CCT
Tech Global Limited approved Nickel-metal Hydride battery (Ni-MH) 1.2V
AAA size 400mAh (SHP or Sanik) which is compatible with this unit.
RISK OF EXPLOSION IF BATTERY IS REPLACED BY AN INCORRECT TYPE.
DISPOSE OF USED BATTERIES ACCORDING TO THE INSTRUCTIONS.
Please Fully Charge Before Using!
For optimum battery performance, charge the battery for 16 hours before use.
Battery
Battery
indicator
Flashing
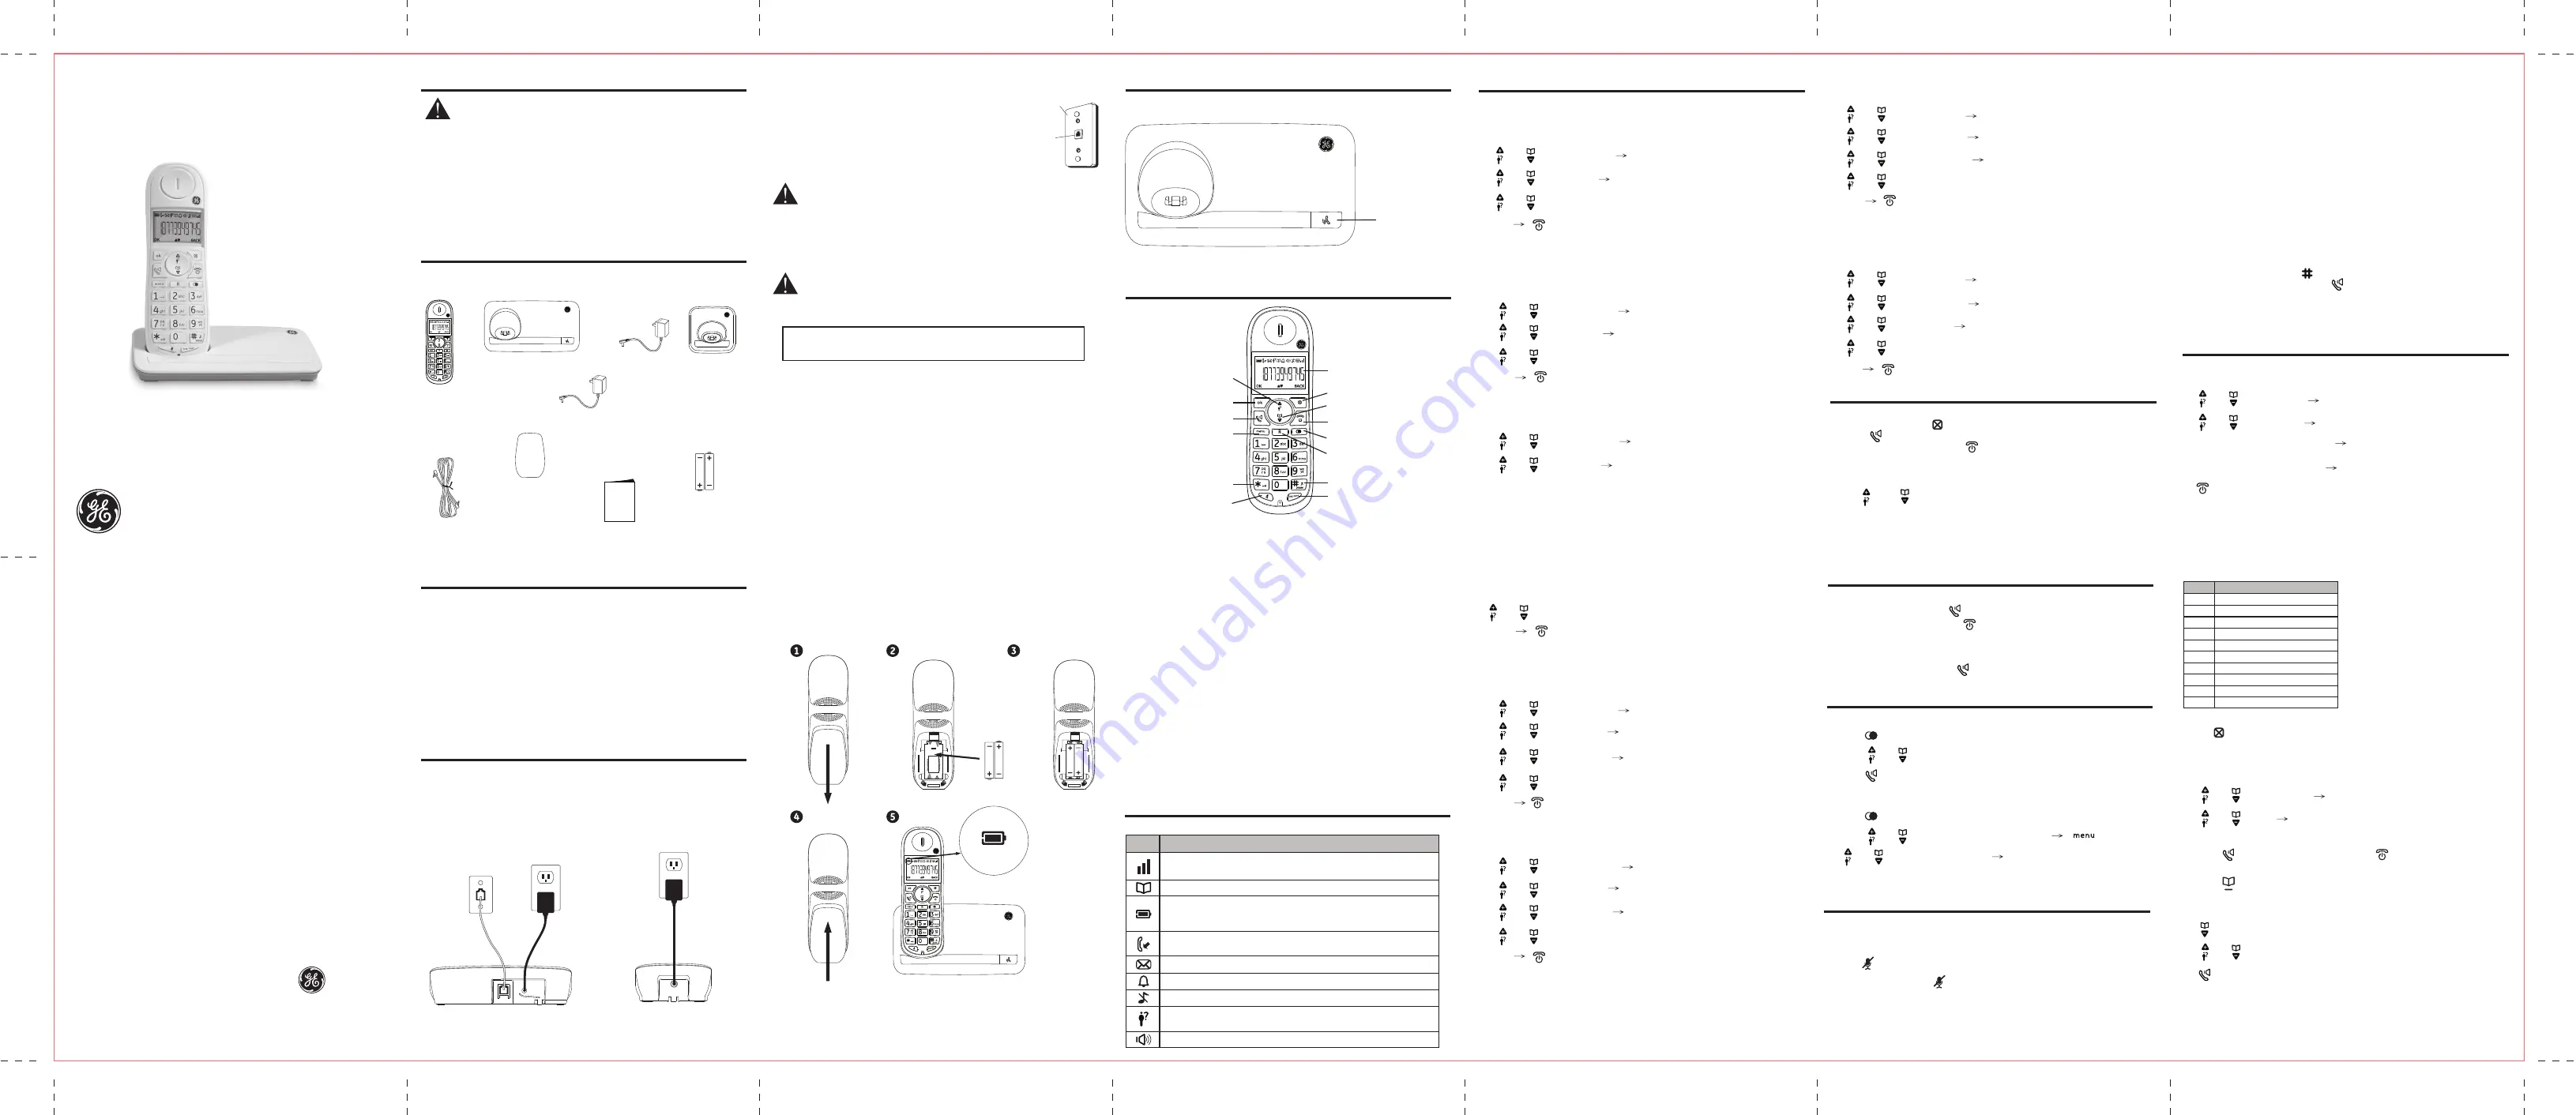
Base layout
Find
Basic Base
Find:
Press to page all system handsets
Up/Caller ID
OK
Talk
Menu
* / Keylock
Mute
Display
Down/Phonebook
Back/Delete
End/Power off
Redial
Flash
#/Ringer Off
Intercom/Conference
Handset layout
Initial settings
Display language
You can select change the display language.
1. [
menu
]
2. [ ] / [ ]: “PERSONAL SET”
[
ok
]
3. [ ] / [ ]: “LANGUAGE”
[
ok
]
4. [ ] / [ ]: Select the desired setting
5. [
ok
] [ ]
Dialing mode
If you cannot make calls, change this setting according to your telephone line
service. The default setting is “TONE”
1. [
menu
]
2. [ ] / [ ]: “ADVANCED SET” [
ok
]
3. [ ] / [ ]: “DIAL MODE” [
ok
]
4. [ ] / [ ]: Select the desired setting
5. [
ok
] [ ]
Date and time
1. [
menu
]
2. [ ] / [ ]: “CLOCK&ALARM” [
ok
]
3. [ ] / [ ]: “DATE/TIME” [
ok
]
4. Enter the current year, month and date by selecting 2 digits.
Example: May 16, 2010
[1][0][0][5][1][6]
5. Enter the current hour and minutes by selecting 2 digits.
Example: 9:30 am
[0][9][3][0]
[ ] / [ ]: Select am or pm
6. [
ok
] [ ]
Note:
You can change date and time display format
Date format
1. [
menu
]
2. [ ] / [ ]: “CLOCK&ALARM” [
ok
]
3. [ ] / [ ]: “SET FORMAT” [
ok
]
4. [ ] / [ ]: “DATE FORMAT” [
ok
]
5. [ ] / [ ]: Select the desired setting (MM/DD OR DD/MM)
6. [
ok
] [ ]
Time format
1. [
menu
]
2. [ ] / [ ]: “CLOCK&ALARM” [
ok
]
3. [ ] / [ ]: “SET FORMAT” [
ok
]
4. [ ] / [ ]: “TIME FORMAT” [
ok
]
5. [ ] / [ ]: Select the desired setting (12 HOURS OR 24 HOURS)
6. [
ok
] [ ]
Note:
To display date and time, press and hold the [BACK] button when handset is
in standby mode.
Ringer Volume
1. [
menu
]
2. [ ] / [ ]: “PERSONAL SET” [
ok
]
3. [ ] / [ ]: “HANDSET TONE” [
ok
]
4. [ ] / [ ]: “RINGER VOLUME” [
ok
]
5. [ ] / [ ]: Select the desired setting (VOLUME 1 to 4 and OFF)
6. [
ok
] [ ]
Note:
If Ringer off is selected, there is no preview during the ringer melody selection.
Pause (for PBX/long distance service users)
A pause is sometimes required when making calls using a PBX or long distance
service. When storing a calling card access number and/or PIN in the phonebook,
a pause is also needed.
Example:
If you need to dial the line access number “9” when making outside calls
with PBX:
1. Press [
9
], then long press [ ]
2. Dial the phone number and press [ ].
Note:
A 3 second pause is inserted each time, repeat as needed to create longer
pauses
Answering calls
When a call is being received, the LCD and keypad backlight flash rapidly
1. Lift the handset and press [ ] when the unit rings
2. When you finish talking, press [ ] or place the handset on the base unit
or charger
For Call waiting or Call Waiting Caller ID service subscriber
To use call waiting, you must subscribe to call waiting from your service provider.
This feature allows you to receive calls while you are already talking on the phone,
you will hear a call waiting tone. If you subscribe to both Caller ID and Call Waiting
with Caller ID services, the 2nd caller’s information is displayed after you hear the
call waiting tone on the handset.
1. Press [ ] to answer the 2nd call
2. To switch between calls, press [ ]
R
R
visit our website:
www.thehomephones.com
Conference
To join the conversation, press [ ] when other handset is on an outside call.
Character Table for the entering names
Key Character
[1]
Space 1 < > *
[2]
A B C 2
[3]
D E F 3
[4]
G H I 4
[5]
J L K 5
[6]
M N O 6
[7]
P Q R S 7
[8]
T U V 8
[9]
W X Y Z 9
[0]
0 - / \ # +
Correct the mistake
Press [ ] to delete the characters or numbers
Making a call using the redial list
The last 5 numbers dialed are stored in the redial list (each 24 digits max)
1. Press [ ]
2. press [ ] / [ ]: Select the desired phone number
3. Press [ ]
Erasing a number in redial list
1. Press [ ]
2. Press [ ] / [ ]: Select the desired phone number [ ]
3. [ ] / [ ]: “DELETE” or “DELETE ALL [
ok
]
4. Press [
ok
] to confirm
OK:
Press to select an item, or save an entry or settings.
Back/Delete:
Press to delete the last input number or letter.
While in a menu, press to
return the upper level without making changes.
Up/CID:
Press to review the call log when the telephone is not in use. While in a
menu, press to scroll up. During a call, press to increase the listening volume.
Down/Phonebook:
Press to review the phonebook when the telephone is not in use.
While in a menu, press to scroll down. During a call, press to decrease the listening
volume.
Talk:
Press to make or answer a call. Toggle between receiver and speakerphone
mode
Flash:
Press to answer a call when you receive a call waiting alert.
End/Power off:
During a call, press to hang up. During a programming, press to exit
without making changes. Press and hold to power off the handset
Menu:
Press to show menu.
Redial:
Press to review redial list.
*/Keylock:
Press and hold to set the keylock (Keylock will de-activate when handset
sit on the charge cradle)
#/Ringer off:
Press and hold to set the Ringer off when the telephone is not in use.
Mute:
While on a call, press to mute the microphone.
Intercom/Conference:
Set up the intercom between handset to handset. Press and
hold to make conference call during intercom mode
Display
Handset Display Items
• Turn on when base unit in range
• Blinking when base out of range
• Turn on during review the phone book
• Turn on when battery full
• Slow flash when battery less than 50% capacity
• Fast flash when battery less than 25% capacity
• Blinking when there is incoming call
• Steady on during a call
• Blinking when there is Voice mail
• Turn on when Alarm set
• Turn on when ringer off set
• Blinking when there is a missing call
• Turn on during review the call log and there is old record(s) in call log
• Turn on when handset in spearkerphone mode
Item
Meaning
Making calls
1. Lift the handset and dial the phone number
To correct a digit, press [ ]
2. Press [ ]
3. When you finish talking, press [ ] or place the handset on the base unit
or charger.
Adjusting the receiver volume
Press [ ] or [ ] repeatedly while talking
Other Feature during a call
Mute
While mute is turned on, you can hear the other party, but the other party
cannot hear you.
1. Press [ ] during the call
2. To return the call, Press [ ] again
Note:
LCD will show “MUTE ON” when mute feature activated
View record
1. [
menu
]
2. [ ] / [ ] : “PHONEBOOK” [
ok
]
3. [ ] / [ ] : “LIST” [
ok
]
4. Press [ ok ] to view the name and number
5. Press [ ] to dial out if necessary or press [ ] to return idle
OR
6. Press [ ] at idle and repeat step 3
Make a call from phonebook
1. [ ]
2. [ ] / [ ] : Select the desired record
3. [ ]
Telephone Jack Requirements
To use this phone, you need an RJ11C type modular
telephone jack, which might look like the one pictured
here, installed in your home. If you don’t have a
modular jack, call your local phone company to find
out how to get one installed.
1. Make sure the battery compartment cover is not attached with the handset.
2. Insert the AAA rechargeable batteries as shown on the engraving in the battery
compartment.
3. Align the cover against the battery compartment and slide it upwards until it
clicks into place.
4. Charge the handset by placing it in the telephone base. The light on the
handset is on when charging.
Charging cradle