background image


JF-2418UV User Manual 

132 


5.4.3


Preliminary Calibration Parameters


Set the printing direction. When Uni-Directional is selected, the image will be printed only from 

right to the left; when Bi-directional is selected, the image will first printed from right to left, then 

from left to right. This calibration is primarily used to ensure the uni-directional / bi-directional 

printing precision. 


Uni-Directional Calibration:   

1.


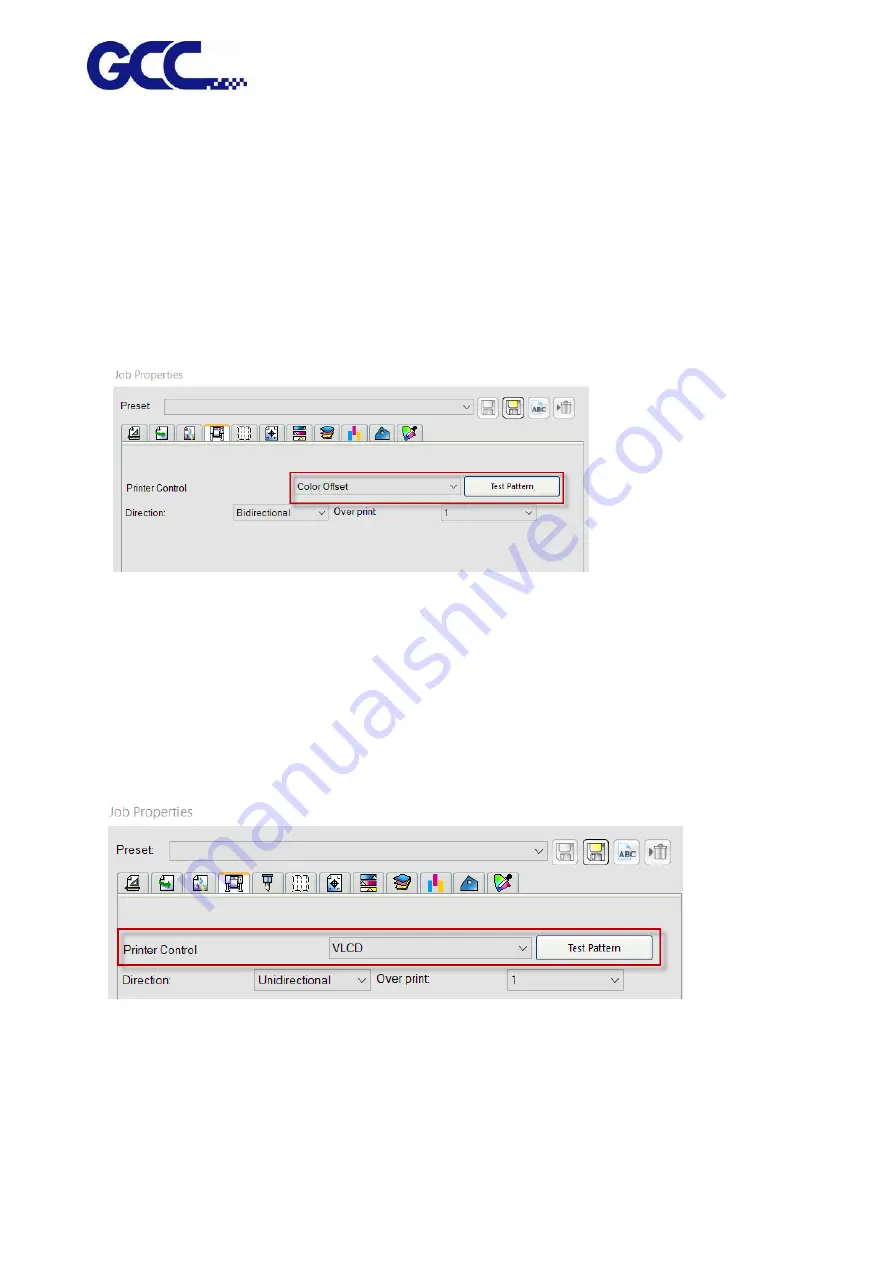
Start FlexiPRINT GCC Edition, select Color Offset in Printer Control and click Test Pattern. 


2.


JF-2418UV will automatically start Color Offset Test Pattern 


3.


Select VLCD in Printer Control and press Test Pattern 


4.


Start VLCD and click Open. 

Содержание JF-2418UV

Страница 1: ...JF 2418UV User Manual http www GCCworld com V 1 2022 Mar GCC GCC Club...

Страница 2: ...uctivity the JF 2418UV is clearly on the cutting edge of all UV inkjet systems GCC understands that a creative technical background is the key to successful growth in the ever changing information eco...

Страница 3: ...JF 2418UV User Manual 2 Release Note Version Change V 1 2021 Nov Add JF 2418UV User Manual...

Страница 4: ...oftware Setup 19 3 2 1 Softkey Installation Instructions 19 Chapter 4 Control Panel 22 4 1Control Panel Workflow 22 4 2Control Panel Layout Description 30 Chapter 5 Operating the JF 2418UV 38 5 1Hardw...

Страница 5: ...ect 120 5 3 8 How to set UV Lamp Curing mode for bright color printing 124 5 3 9 How to set CorelDraw for Spot White 125 5 4Tuning And Testing Procedure 129 5 4 1 Read Factory Settings 129 5 4 2 Intro...

Страница 6: ...rule 165 6 9 How to fill GCC Inkjet Coolant 166 Chapter 7 Caldera Installation 167 7 1Caldera Installation 167 7 1 1 How to set GCC JF 2418UV Driver 167 7 1 2 Launch Caldera RIP 170 Chapter 8 Referenc...

Страница 7: ...o Safety label Graphic Content 1 Warning The symbol indicates that fire is prohibited The ink and the fluid discharged out are highly flammable 2 High Voltage The symbol indicates high voltage Remove...

Страница 8: ...at during the printing process do not put your hands in the area to avoid your hands being pinched by moving parts 8 Keep Clear Warning The symbol indicates that do not put objects in addition to prin...

Страница 9: ...lations 1 3 First Aid Measures Contact by Remedy Inhalation Breathe in fresh air and consult a doctor in case of complaints Skin Immediately wash with soap and water then rinse thoroughly If skin irri...

Страница 10: ...ions WARNING Prohibit on exposure under direct sun light Prohibit on setting up on tilt surface Temperature and humidity The operation environment for this equipment 22 to 30 C 71 6 F to 86 F 40 to 60...

Страница 11: ...ding fluorescent lighting Store them away from acids alkalis and oxidizing material as well Additionally keep container tightly closed in a dry cool well ventilated place The recommended ink storage t...

Страница 12: ...that offer you the outstanding printing quality In addition to the application for sign industry like signage and signboard GCC JF 2418UV Flatbed Printer is dedicated to applications of custom items...

Страница 13: ...200dpi 4 Acceptable media weight up to 15Kg 5 Maximum Print Speed 3 75 m2 hr 6 Auto Media Calibration AMC 7 Bundled FlexiPRINT GCC Edition RIP software 8 Touch screen control panel 9 Roll to Roll Opti...

Страница 14: ...Front View I Touch screen control panel D Alignment ruler G Bulk Ink supply system E Front door H Emergency stop button L Print head set M Front lid Front hood J Waste ink bottle C LED lamp A Maintena...

Страница 15: ...2 3 JF 2418UV Parts Description Parts Name Description A Maintenance Maintain print head cleanness B Barometer Ink pressure adjustment and display P Fuse S Ethernet R USB Q Power socket O Rear door U...

Страница 16: ...aste ink bottle and dispose it Please follow the local regulations to dispose the waste ink to prevent contaminating the environment K Temperature Controller Temperature controller of water circulatio...

Страница 17: ...tep 2 Fill each color of ink bottle with corresponding color of ink It is suggested to horizontally shake the White ink 15 times before filling in the bottle or stir the White ink manually before prin...

Страница 18: ...rinter Heads Step 1 Remove the thumbscrew and open the left cover Step 2 Open the ink valve Ink valve is opened Ink valve is closed Step 3 1 Entre FLATBED mode 2 Select MENU 3 Select MAINTENANCE 4 Sel...

Страница 19: ...chips of each color Do not insert the chip of flush solution ENTER CANCEL Make sure the chips of each color are inserted properly and the chip of flush solution is removed ENTER CANCEL Seal the bottl...

Страница 20: ...allation Instructions Insert the DVD and run the installation and follow the instructions Disable your antivirus software before installing FlexiPRINT GCC Edition When the Install Manager dialog comes...

Страница 21: ...JF 2418UV User Manual 20 2 Select I am new to the SAI Cloud then select Create Account and click confirm 3 Select Activate Now...

Страница 22: ...JF 2418UV User Manual 21 4 The FlexiPRINT GCC Edition is installed 5 Select Yes I want to restart my computer now...

Страница 23: ...18UV User Manual 22 Chapter 4 Control Panel This section mainly describes JF 2418UV Flatbed Printer s touch screen control panel work flows and key operations 4 1 Control Panel Workflow Operating work...

Страница 24: ...JF 2418UV User Manual 23 Control panel flow...

Страница 25: ...JF 2418UV User Manual 24 Operating work flow...

Страница 26: ...EANING POWER SAVE VACUUM INK REMAINIING MAINTENANCE SYSTEM INFO OPTION NETWORK RESTORE DEFAULT SET1 SET2 SET3 PARAMETER AMC VACUUM LED POWER MANUAL CLEANIING YES NORMAL POWERFUL PASS TO WHITE CLEAN W...

Страница 27: ...JF 2418UV User Manual 26 Operating work flow...

Страница 28: ...JF 2418UV User Manual 27 Control panel flow O N FRONT REAR O N O N OFF OFF...

Страница 29: ...JF 2418UV User Manual 28 Operating work flow Control panel flow IP 192 168 102 249 Sub Mask 255 255 255 0 Gateway 192 168 102 250 MAC Address 00 CF 52 72 03 01 RESTORE DEFAULT YES ON OFF...

Страница 30: ...8UV User Manual 29 PAUSE while printing Users can pause on the printing job by pressing the PAUSE button and proceed to cleaning procedure to improve printing quality Operating work flow Control panel...

Страница 31: ...ll media printing settings work with roll to roll system Optional AMC Automatically detect the media height FLATBED Adjustment menu setup key for rigid media printing settings LOAD MADIA Set Place med...

Страница 32: ...RIGIN Set printing origin MENU USER SET USER DEFAULT SET1 SET2 SET3 1 USER DEFAULT Initial parameters settings 2 SET1 3 parameter settings Adjust VACUUM BAND AAS OFFSET BI UNI setting Can store up to...

Страница 33: ...N can define the number of passes for white ink clean WHITE CIRCULATION White ink circulation MENU MANUAL CLEANING MANUAL CLEANING When cleaning the print head manually the cartridge will move to main...

Страница 34: ...ucking during the printing operation ON OFF OFF MENU INK REMAINING INK REMAINING Check remaining ink volume 99 means there is sufficient ink 0 means short of ink need to refill ink immediately MENU MA...

Страница 35: ...on factory version settings FPGA Display FPGA version serial number based on factory version settings INK ID FPGA Display Ink ID FPGA version serial number based on factory version settings ENGINE FP...

Страница 36: ...S IP address MCA ADDRESS MAC address MENU RFACTORY DEFAULT FACTORY DEFAULT Reset machine setting to factory default YES MENU PH GAP AUTO DETECTION PH GAP AUTO DETECTION Automatically detect the gap be...

Страница 37: ...hine OPTIONAL PAUSE while printing Description PRINT LED LAMP LED LAMP Set LED Lamp Curing energy while printing ON OFF ON PRINT CANCEL JOB CANCEL JOB Delete current print job ON PRINT PAUSED NORMAL C...

Страница 38: ...JF 2418UV User Manual 37 MANUAL CLEANING WHITE CIRCULATION Circulation of white ink print head ON...

Страница 39: ...he PH Gap Auto Adjustment mode It is suggested to set the settings to be ON the default setting Turning on the PH Gap Auto Adjustment mode provides the fastest way for users to start printing on the m...

Страница 40: ...highest position of the media for AMC is easily to be determined 2 High print quality is high priority The platen will not automatically be adjusted to optimized position and the print job will be ca...

Страница 41: ...JF 2418UV User Manual 40 Workflow A Set the PH Gap Auto Adjustment to be ON on control panel The default setting...

Страница 42: ...JF 2418UV User Manual 41 B Set the PH Gap Auto Adjustment to be OFF on the control panel...

Страница 43: ...nstructions of rigid material printing Example 1 Set parameter settings of full table print size Please load the rigid material correctly according to following steps Step 1 Entre FLATBED mode Step 2...

Страница 44: ...the highest position of the media Step 8 Send the file from FlexiPRINT GCC Edition RIP software and printing is complete Example 2 Set parameter settings of SmartPOSITION define a diagonal as print si...

Страница 45: ...detect the height between print media and print head Note It is suggested to apply AMC onto the highest position of the media Step 8 Select SmartPOSITION Step 9 Press the Arrow Keys to move the cartri...

Страница 46: ...ss of JF 2418UV Step 1 1 Select MENU on the control panel 2 Select NETWORK 3 Select IP Step 2 Go to IP select IP Sub Mask Gateway and adjust the value and select ENTER Step 3 Go to Job Properties in F...

Страница 47: ...ess column and click Save 5 1 5 Simplified Output Procedure Basic Output Message Please make sure test tuning printing quality LED lamp are ok Note The tuning setting confirmation prior machine printi...

Страница 48: ...EFAULT select YES option then press ENTER to complete the restore to factory default settings Note YES to restore the factory default settings 5 1 7 Check Print Head Condition If the printing quality...

Страница 49: ...lity Please refer to Chapter 6 3 3 and Chapter 6 3 4 for detailed instructions If there is blocked pixel in print head recommend to conduct following steps Step 3 Conduct normal cleaning Suggest for f...

Страница 50: ...m continues please conduct the 2nd cleaning cycle If the machine has been used for a long time recommend to clean manually 5 1 8 How To Pause Clean Delete The Job While Printing When it is printing in...

Страница 51: ...ORMAL mode Step 4 Select POWERFUL CLEANING and press ENTER for POWERFUL mode Step 5 Complete cleaning select RESUME to continue Canceling job while printing Step1 Select PAUSE button on the control pa...

Страница 52: ...performed after the defined pass is printed in order to keep the print head cleaning Step 1 Select MENU on then control panel Step 2 Select CLEANING Step 3 Select PASS TO WHITE CLEAN Step 4 Complete...

Страница 53: ...JF 2418UV User Manual 52 Step 2 Go to Print settings Check engine board version and click Read to complete VLCD version upgrade...

Страница 54: ...xtra install space for ICC profiles Screen Resolution 1152 x 854 minimum with 16 bit color or higher Working Disk Space 4 GB Other Broadband Internet connection or Available port for hardware key and...

Страница 55: ...ct RIP for the selected job Click on RIP menu button to check on the quick menu Send Send the selected job to output to the output device if necessary conducts RIP for it Estimate Estimates the amount...

Страница 56: ...is connected to your computer For the installation of FlexiPRINT GCC Edition software refer to Chapter 3 2 Step 1 Right click on FlexiPRINT GCC Edition Icon and FlexiPRINT EDITOR Icon and select prop...

Страница 57: ...JF 2418UV User Manual 56 Step 4 The settings is completed and open FlexiPRINT GCC Edition...

Страница 58: ...UV User Manual 57 Step 5 From menu Setup Add Setup setting to open up Add Setup dialog box Short cut key Ctrl N Step 6 Select the output device model from the menu select Hybrid Devices and select JF...

Страница 59: ...JF 2418UV User Manual 58 Step 7 After the new device is added complete the operation Step 8 Select Add File Add Job Short Cut Key Ctrl O...

Страница 60: ...JF 2418UV User Manual 59 Step 9 At the Add Job window select the file name to be printed and click Add to add the file Step 10 The open file operation is complete...

Страница 61: ...b Short cut key Ctrl O The jobs can be transferred to the software via several channels Add job through file 1 Proceed with following operations a Select Add Job from the File drop menu b Click on the...

Страница 62: ...ew to view the thumbnail for the selected file b Select Copy to job folder to copy the file to local working folder If job is stored in removable disk or network drive you need to copy it to the local...

Страница 63: ...dialog box once the job is added to the retention queue 4 From the settings list select the settings that you want to apply to print the file 5 From the preset list select the preset settings that you...

Страница 64: ...the default Color management tab value Save the default Color adjustment tab value Save the default Separation tab value Save the default Tile tab value Save the default Cut tab value Save the default...

Страница 65: ...he SHIFT key to select the first job and the last job to select a range of jobs To select all jobs please click the select all in the Edit menu Deleting Setups To delete jobs please execute the follow...

Страница 66: ...a Media sizing When you specify a set of custom dimensions it is automatically added to the list of preset sizes Job Size Editing these options allows you change the output size and orientation of the...

Страница 67: ...dth of the printable area Centers the job in the middle of the printable area Only available for sheet material Places the job at the specified distances from the lower and left edges of the printable...

Страница 68: ...that the job is processed in After output Sets what to do with the job after output Delete Removes jobs from the queue after output Hold Places jobs in the Hold Queue after output or at the bottom of...

Страница 69: ...color correction Activates the color correction settings from the selected ICC Profile Use only linearization Activates the linearization settings only from the selected ICC Profile No color correcti...

Страница 70: ...the media Each dither type has advantages in terms of quality and RIP speed The default dither type is usually the best setting for your machine The software offers several dithering options to optim...

Страница 71: ...Diffusion A faster option as far as RIP times are concerned It is best used for large prints that are viewed from a considerable distance 8 Angle Screen Designed for use with thermal printers to produ...

Страница 72: ...ional Offset Band Offset AAS Offset Direction Select the type of print direction you want your output device to use Unidirectional The print head prints in one direction to ensure precise alignment Bi...

Страница 73: ...n you rotate or resize a job all tiling is removed If the job is larger than the output media after it rotates it will automatically be retiled If a job is larger than the output media it automaticall...

Страница 74: ...c tiles of equal size Selecting this option divides the job vertically into the number of columns specified Each column is of equal width Selecting this option divides the job into the number of rows...

Страница 75: ...to set all tiles in the job to be of the specified size 2 Set the and fields to the width and height desired for the tiles 3 Set the amount of overlap between the tiles in the field If the specified t...

Страница 76: ...have been overridden in order to keep all tiles uniform The tiles will not be editable using the Preview Pane either If you drag the edges of the panel over so that part of the job is exposed a new ti...

Страница 77: ...where the page should be trimmed or the job property Tile overlap lines Lines on tiles print to indicate where the edge of the overlap is Use these to align the tiles If you check On both tiles the ov...

Страница 78: ...ge input Preview Shows the changes in your color settings reflected in the preview pane Channel Select the color channel you want to edit Output The value for the point that is selected on the lineari...

Страница 79: ...ness but increase contrast This setting is only available when All color channels are selected Also you must have an ICC profile selected in the Color Management tab Click the Variations button to ope...

Страница 80: ...ecked but Print separations in color is not checked you can select how the separations for each color channel are output by selecting the desired color channel and clicking Edit Setting the Preview Pa...

Страница 81: ...rs will appear above the preview allowing you to select the page to display If you are using FlexiPRINT only the first page is displayed in Page Preview This option will be selected automatically when...

Страница 82: ...please enter the accurate media size 4 Click on OK 2 Select Print from the File menu a Set the Name settings to the network printing queue corresponding to the required output device b Set the Copies...

Страница 83: ...dialog box c Click on OK to leave the Print Setup dialog box 2 Select Print from the File menu a Set the Name setting to the network printing queue for the required output device b For the General ta...

Страница 84: ...for the color iv Click on Add to Palette v Repeat the process for all the other colors to be added as the spot colors vi Click on the Close button b Edit Spot Colors i Select the colors which are add...

Страница 85: ...taskbar and select Devices and Printers 3 GCC JF 2418UV_1 printer server is shared on the intranet 4 Then use anther computer to connect the shared printer Go to Start menu from the taskbar and selec...

Страница 86: ...anual 85 5 Select Add a Network wireless or Bluetooth printer and choose JF 2418UV from the printer list The JF 2418UV printer will be added 6 Open Illustrator go to Print under File from the menu bar...

Страница 87: ...JF 2418UV User Manual 86 7 Select GCC JF 2418UV from the Printer drop down menu and click Setup...

Страница 88: ...JF 2418UV User Manual 87 8 Select Advanced...

Страница 89: ...JF 2418UV User Manual 88 9 Set After Spooling Hold under Printer Features and click OK The JOB Server setting is complete The print mode and parameter setting can be set in FlexiPRINT...

Страница 90: ...User Manual 89 5 2 7 How to User Auto Serialization in FlexiPRINT GCC Edition ADVANCED Step1 Create or import a name card design in FlexiPRINT GCC Edition Step 2 Create Database of name card in a spr...

Страница 91: ...2418UV User Manual 90 Step 3 Save the EXCEL file as txt file Step 4 Use text tool to add texts to the name card design Note The input text need to be the same as the text in the cell of the spreadshe...

Страница 92: ...es please follow step 5 8 Step 5 Use text tool to add texts to the name card design Note the input text need to be the same as the text in the cell of the spreadsheet Step 6 Select the text and go to...

Страница 93: ...JF 2418UV User Manual 92 Step 7 Select Type Web URL in DesignCentral window the DesignCentral window should be located in the toolbox on the right side Step 8 Drag the QR Code to the desired position...

Страница 94: ...JF 2418UV User Manual 93 Step 9 Select all the object in the name card design Step 10 Go to Arrange Auto Serialization...

Страница 95: ...tep 11 Click Browse to import the txt file and select all the Select text to be replaced section The Select text to be replaced section allows you to decide which information on the name card to be re...

Страница 96: ...JF 2418UV User Manual 95 Step13 Click Finish Step14 Auto Serialization is completed 10 Click Preferences...

Страница 97: ...nting With the White solution it can be easily used to produce brilliant and rich color output on any transparent and dark media offering excellent quality images to fulfill all needs of for Promotion...

Страница 98: ...r for color white white color color white color printing 1 Open the Illustrator and load the image 2 Add a new color swatch Set the new color name to be Spot_White and the Color Type to be Spot Color...

Страница 99: ...e as EPS format Tips Preserve the overprints Select the PostScrip Level 3 5 Add the EPS file to FlexiPRINT GCC Edition 6 Go to Color Management page under FlexiPRINT and choose ICC under output profil...

Страница 100: ...ser defined area with white varnish color Substrate fill the entire file with white varnish color Under Color fill colored area with white varnish color Fill color fill the entire file except colored...

Страница 101: ...olor color white color Printing 1 Open the PhotoPRINT Editor and load the image 2 Create a spot white in Editor Open the color specs Tips it is suggested to use White Ink Percentage for the coverage o...

Страница 102: ...JF 2418UV User Manual 101 Create a New color Set the name to be Spot_White and the mode to be Spot...

Страница 103: ...JF 2418UV User Manual 102 3 Fill Objects with Spot White Swatch and overprint 4 Select Rip and print...

Страница 104: ...forms a thin and even transparent gloss layer after its leveling and UV curing for drying process Varnish protects printed content enhances durability and raises the value added of products as it crea...

Страница 105: ...GCC Editor refer to How to set FlexiPRINT DX Editor for color white white color color white color and set the name Spot_Varnish 1 Go to Color Management page under FlexiPRINT GCC choose ICC under out...

Страница 106: ...down menu in Spot_ Varnish section 3 Go to Separation page select Spot_Varnish and send it to Flexi PRINT 4 Flexi PRINT will open Spot Colors Settings dialog box 1 Set ink volume in the drop down men...

Страница 107: ...le to apply color varnish to printed matters This advanced technology is an excellent helper of color customization and fully exhibits the promoting effects and practical value of the combination of v...

Страница 108: ...Manual 107 1 Open Paint go to File under Properties 2 Select Pixels in Units column and set Width Length value The Width Length value must be a multiple of 8 i e 8 x 8 or 160 x 160 pixels 3 Create a d...

Страница 109: ...o the location C Program Files x86 SAi GCC Production Suite 19 Program GCCJF2418UV TestPattern Varnish Mark 6 Save the jpeg file to the location C Program Files x86 SAi GCC Production Suite 19 Program...

Страница 110: ...rnishControl exe Step 2 Click Add Image and select the file you want to use to create the varnish pattern Step 3 Name the file in Mark Name and click Set Step 4 GCC VarnishControl will generate the pa...

Страница 111: ...t location GCCVarnishControl TestPattern Varnish Step 6 Copy the Varnish file folder and paste it to the location C Program Files x86 SAi GCC Production Suite 19 Program GCCJF2418UV TestPattern Varnis...

Страница 112: ...centage to perform multilayer printing to reach the wanted thickness and produce ADA compliant signage 1 ADA Sign Braille Sign ADA sign Braille sign is a system printed as raised dot that can be read...

Страница 113: ...uite 19 Program GCCJF240j18UV Step 2 Double click the braille icon to install the font 4 How to Set ADA Braille Printing If creating Braille sign in Illustrator or CorelDraw set the font type to Brail...

Страница 114: ...erican Standard Sign According to American Standard Sign the value of b is between 2 3mm to 2 5mm defines a value of b as 2 5mm the value of e is between 1 5mm to 1 6mm and defines a value of e as 1 6...

Страница 115: ...ease use ACR mode to achieve the desired effect The following paragraph illustrates a step by step instruction of how to set the ARC mode and produce dome shaped Braille dots patterns The instruction...

Страница 116: ...JF 2418UV User Manual 115 4 Step 3 Set Offset to 0 4mm and click OK 5 Apply the Spot_White swatch to the layer which contains the 0 4mm shrink contour lines...

Страница 117: ...ws Attributes 7 Tick Overprint Fill in Attributes dialog box 8 Repeat step 2 4 to create another layer with the contour lines shrink inwards by 0 2mm 9 Apply the Spot_White2 swatch to the layer which...

Страница 118: ...JF 2418UV User Manual 117 10 Select Windows Attributes 11 Tick Overprint Fill in Attributes dialog box 12 Save the file as EPS...

Страница 119: ...n select Separation and check if the Spot_White and Spot_White2 channel are created If not please check if the two layers with shrink contour lines are created in Illustrator 14 Select Printer Options...

Страница 120: ...g Multiple layers mode Choose a proper printing mode that is appropriate Note When the outermost layer of the Braille sign is printed in white using white color but not any other colors as a cover to...

Страница 121: ...2418UV User Manual 120 5 3 7 How To Create Raised Printing Effect 1 Open a bitmap file in Photoshop 2 Select Channels tag in the panel 3 Create a new Channel and name it to be Spot_White then click O...

Страница 122: ...nts Note The Brightness Contrast Levels Curves value determines the raised printing effect Adjust the value according to what printing result you want to create Brightness Contrast Levels Curves 5 Sav...

Страница 123: ...JF 2418UV User Manual 122 6 Launch Illustrator and open the Tiff format file that just saved 7 Select Spot White layer in Layers tag 8 Go to Windows Attributes...

Страница 124: ...anual 123 9 Tick Overprint Fill 10 Save the file as EPS format 11 Launch FlexiPRINT and select Separation tag Make sure Spot_White channel is on the channel list and then click Send 12 Step 12 The pro...

Страница 125: ...lor brightness than Delay Curing 3 Delay Curing 2 creates greater color brightness than Delay Curing and so on Note Applying the Delay Curing option will reduce the print sharpness and ink adhesion pl...

Страница 126: ...JF 2418UV User Manual 125 5 3 9 How to set CorelDraw for Spot White Step 1 Open the file Step 2 Windows Color Palettes Palette Editor Step 3 Select Add Color...

Страница 127: ...UV User Manual 126 Step 4 Select any color from the color bar and create a new palette from the Name dropdown menu Step 5 Name the new palette to be Spot_White and select Spot from the Treat as dropdo...

Страница 128: ...JF 2418UV User Manual 127 Step 6 Add a layer2 and fill it with Spot_White Step 7 Right click on blank space of layer2 and tick Overprint fill...

Страница 129: ...JF 2418UV User Manual 128 Step 8 File Export Step 9 Save the file as eps format Step 10 The process is completed...

Страница 130: ...problem is eliminated and restart the machine 5 4 1 Read Factory Settings Please obey the following steps to read the parameter settings for first time use 1 Open FlexiPRINT GCC Edition select Printer...

Страница 131: ...s Color Offset Configure print direction unidirectional indicates printing image from right to left bidirectional indicates image will be printed from right to left then left to right This setting is...

Страница 132: ...wo jobs Max 500mm Negative Pressure Reset to Zero Reset negative pressure to 0 kap Set kpa Negative pressure settings Check engine board version Read engine board version Job Ink Use VWKCMY CC Price L...

Страница 133: ...l first printed from right to left then from left to right This calibration is primarily used to ensure the uni directional bi directional printing precision Uni Directional Calibration 1 Start FlexiP...

Страница 134: ...Example 1 and Example 2 Note Please read the following information thoroughly prior you proceed to the inkjet head horizontal alignment calibration 6 Please use K black color to calibrate other colors...

Страница 135: ...n line and Black line are aligned at number 1 line Keep a record on the number where two lines are aligned Step 2 Use a magnify lens to observe that Magenta line and the Black line are aligned at numb...

Страница 136: ...Enter 91 in JF 2418UV VLCD C 63 1 64 Enter 64 in JF 2418UV VLCD Step 5 Use the same approach to calibrate other inkjet heads Step 6 Use this method to enter the offset values for all the inkjet heads...

Страница 137: ...JF 2418UV User Manual 136 3 Select VLCD in Printer Control and press Test Pattern 4 Start VLCD and click Open 5 Confirm Bidirection Offset and adjust parameters as shown in the figure below...

Страница 138: ...ine 0 0705mm 1 inch 300 DPI 0 0705 Example 1 Bidirectional alignment calibration for the inkjet head of Cyan color Example 2 Bidirectional alignment calibration for the inkjet head of Magenta color St...

Страница 139: ...tion Offset K C M Y W V for JF 2418UV VCLD software to conduct bidirectional calibration In the Example 1 Cyan line shift 1 line to the left indicates that the bidirectional offset for the color Cyan...

Страница 140: ...aintenance professionals To keep the flatbed printer in the best performance and the best printing quality it is necessary to periodically clean maintain this equipment with appropriate procedures 6 1...

Страница 141: ...le to the position according to the color label 2 Please fill the ink slowly to prevent the ink from overflowing 3 Must be replaced with ink bottle of the same type 4 Do not use the uncertified ink bo...

Страница 142: ...It is required to use sponge swabs with Cleaner 26501007G to clean print head print head area and wiper everyday Note Switch the ink valve off while cleaning and switch the ink valves on after the pro...

Страница 143: ...e swab does not affect its function 6 Open ink valve close up the left cover and fix it with thumbscrews and press Required weekly maintenance Check whether the print head is in good condition It is r...

Страница 144: ...interval setting 15 sec 30 sec 1 min 3 min and 5 min user may choose whichever is suitable 6 2 3 How To Dispose Waste Ink Bottle When the waste ink bottle is full control panel will display Waste ink...

Страница 145: ...pment Note Please make sure power and ink valve are turned off and JF 2418UV is done the printing job before cleaning process starts Press the clip of ink valve to switch the ink valve off Ink valve i...

Страница 146: ...ntenance Apply automatic advanced cleaning up maintenance Required monthly maintenance Apply automatic advanced cleaning up maintenance and wipe the print head with cleaning swabs Note When the machin...

Страница 147: ...ual 146 6 3 1 Maintenance And Clean Up Step 1 Remove thumbscrews and open up the right cover Step 2 Remove the tool carriage cover Step3 Press the clip of ink valve to close it and turn off the machin...

Страница 148: ...JF 2418UV User Manual 147 Step4 Switch on the ink tube Step5 Take in cleaner 26501007G in syringe Step6 Inject cleaner 26501007G into ink tube of print head...

Страница 149: ...lose the tool carriage cover Step 9 Complete 6 3 2 Maintenance And Clean Up For Print Head of White Ink When the machine is power down longer than 7 days or print head nozzle of white ink clogged cond...

Страница 150: ...2418UV User Manual 149 Step 2 Remove thumbscrews and open up the left cover Step 3 Remove the tool carriage cover Step 4 Press the clip of ink valve to open it Step 5 1 Select MENU on the control pan...

Страница 151: ...WHITE CIRCULATION Step 6 After WHITE CIRCULATION is done continue to CLEANING process according to following steps 1 Select MENU on the control panel 2 Select CLEANING 3 Select POWERFUL Step 7 Close t...

Страница 152: ...sic cleaning up instruction procedure to clean up print head prior the print job Step 1 Perform NOZZLE CHECK 1 Select MENU on the control panel 2 Select NOZZLE CHECK 3 Enter X Y value and press ENTER...

Страница 153: ...he required printing quality If blocked area are filled then the basic clean up is completed 6 3 4 Automatic Advanced Cleaning Up Maintenance For the periodically cleaning up and maintenance if there...

Страница 154: ...t out Nozzle Check test pattern if the printing quality is similar to the figure below please clean it up according to the following steps Step 3 1 Select MENU on the control panel 2 Select CLEANING 3...

Страница 155: ...rocedures 1 Before the manual clean up please remove any media on the JF 2418UV printing platform 2 Don t use any tool other than the cleaning swab as it might damage the print head 3 Don t use the cl...

Страница 156: ...NING 3 Select ENTER The cartridge will move to maintenance area on the left side Step 3 Remove thumbscrews and open up the left cover Step 4 Press Purge switch for 3 seconds and wait for 20 seconds th...

Страница 157: ...nd wipe residues from back to front Step 8 Open ink valve close up the left cover and fix it with thumbscrews and select 6 4 How To Replace The Filter and Glass Surface Of LED Lamp Note It is suggeste...

Страница 158: ...REPLACE LED LAMP Step 2 Remove the thumbscrews and open the right cover Step 3 Turn off all ink valves Step 4 Turn off the power and unplug the power cord Step 5 Take apart the screw at the upper pos...

Страница 159: ...tep 6 Disconnect the Led Lamp wire Step 7 Please use a sponge swabs moistened with alcohol to clean the glass surface of the LED lamp Step 8 Follow the procedures in reverse order from step 7 to step...

Страница 160: ...V User Manual 159 Step 9 Plug in the power cord and restart JF 2418UV The process is done 6 5 Ink Drain Away Step 1 Remove thumbscrews and open the left cover Step 2 Turn on all ink valves Thumbscrew...

Страница 161: ...3 1 Select MENU 2 Select MAINTENANC 3 Select INK INSTALL DRAIN 4 Select INK DRAIN AWAY Step 4 Fill flush into flush channel by order of the instruction on control panel to complete the workflow of in...

Страница 162: ...ead ENTER CANCEL Flush purging ENTER CANCEL Check Flush solution level Low flush solution level Fill flush solution into flush ink bottle 1 Use cotton swabs with Cleaner to clean print head and print...

Страница 163: ...ath the machine on the left side to reset the pressure gauge with atmospheric pressure Step 1 Close all tube clip above print heads Step 2 Open the right side cover above main ink tank bottles Step 3...

Страница 164: ...essure gauge with and buttons Note the default setting for pressure gauge is between 3 4 kpa according to local environment Adjust the pressure gauge to optimized value base on the weather condition t...

Страница 165: ...back and forth on one side while injecting the grease 2 Users can apply manual lubrication or automatic lubrication to the Miniature linear rail for regular maintenance 3 There should always be lubric...

Страница 166: ...to replace alignment rule Step 1 Use cross screwdriver to remove the screws on the alignment rules on X and Y axis Replace the thin alignment rule by the thick one and fix it Step 2 the replacement o...

Страница 167: ...achine is lower than 4 C Follow the steps below to add the coolant in your machine 1 Loosen the bottle cap 2 Fill GCC Inkjet Coolant 3 Put the cap back on 3 Note Daily maintenance Check the coolant le...

Страница 168: ...icial Debian 8 6 Jessie Mate desktop CALDERA Debian 2 however APPE3 no APPE4 Processor Intel Core i3 i5 or i7 RAM 4GB or 8GB recommended minimum 1GB per core recommended at least 2 GB per core HDD 250...

Страница 169: ...JF 2418UV User Manual 168 Step 2 Enter the password caldera Step 3 Click Next...

Страница 170: ...JF 2418UV User Manual 169...

Страница 171: ...JF 2418UV User Manual 170 Step 4 Click OK and the installation is complete 7 1 2 Launch Caldera RIP Step 1 Click Caldera RIP Icon...

Страница 172: ...JF 2418UV User Manual 171 Step 2 Select the file you want to use Step 3 Move the selected file to the GCC JF 2418UV window...

Страница 173: ...ile in Main window and then click Print Step 5 Caldera will automatically create a file folder named GCC JF 2418UV under home public and save the RIP file in the folder Go to home public GCC JF 2418UV...

Страница 174: ...JF 2418UV User Manual 173 Step 6 Launch FlexiPRINT on your computer laptop Step 7 Go to Job Property Printer Control select VLCD from dropdown menu and click Test Pattern...

Страница 175: ...JF 2418UV User Manual 174 Step 8 Click Add job Step 9 Click Send job and the process is complete...

Страница 176: ...Quality YMCKWV Bi Directional 100 No 4 Wood 70mm pencil pen container wooden product Quality YMCKW Bi Directional 100 No 5 Plywood 50mm Quality YMCK Bi Directional 100 No 6 Gold foil paper 0 8mm packa...

Страница 177: ...per Gloss Mode 1 Coated Paper V V 2 Hannoart Silk V V 3 Magno Gloss V V 4 Gold Pearl Classic Linen V V 5 Starwhite V V 6 Majesty Chameleon V V 7 Bright white Classic Columns V V Material Uncoating Foi...

Страница 178: ...s shown below is provided for your reference 1 Never print on the media of which the surface is high reflection ex mirror like object 2 If the media has arc or inclined surfaces or edges within high r...

Страница 179: ...200 x 1 200 dpi 6 print heads High Speed 6 17 m2 hr 600 x 1 200 dpi Quality 4 15 m2 hr 600 x 1 200 dpi High Density 2 04 m2 hr 1 200 x 1 200 dpi Ink cartridges Type UV curable ink Capacity 1 Liter Col...

Страница 180: ...9 in Weight Net Weight 272kg Gross Weight 433kg Optional Rotary attachment V V Roll to Roll system V X Fume Extraction Unit V V Static Eliminator Bar V V JF 2418UV for blower model requires a blower t...

Страница 181: ...edge of the media need to be flat Media Roll size 76 2 mm 3 core with 150 mm 5 9 diameter Media Roll Weight 10 kg 22 lbs Rotary Specification Clamping Range 16 90mm Max diameter of printed material 16...

Страница 182: ...essure Running sound 60dBA Input power 220V 50Hz 220V 60Hz 110V 60Hz Non auto switch Fume dust inlet 100mm Single inlet include one fume extract tube Machine weight 90KG N W Machine with all elements...

Отзывы: