background image

Connecting the dial-up modem

www.gateway.com

13

Protecting from power source problems

Warning

High voltages can enter your notebook

through both the power cord and the

modem connection. To protect your

notebook and avoid electrical shock, use
a surge protector. If you have a telephone
modem, use a surge protector that has a
modem jack. If you have a cable modem,

use a surge protector that has an

antenna/cable TV jack. During an

electrical storm, unplug both the surge

protector and the modem.

During a power surge, the voltage level of electricity coming into your notebook 
can increase to levels far above normal levels and cause data loss or system 
damage. Protect your notebook and peripheral devices by connecting them to 

surge protector

, which absorbs voltage surges and prevents them from 

reaching your notebook.

Connecting the dial-up modem

Warning

To reduce the risk of fire, use only No. 26

AWG or larger telecommunications line

cord.

Your notebook has a built-in 56K modem that you can use to connect to a 
standard telephone line.

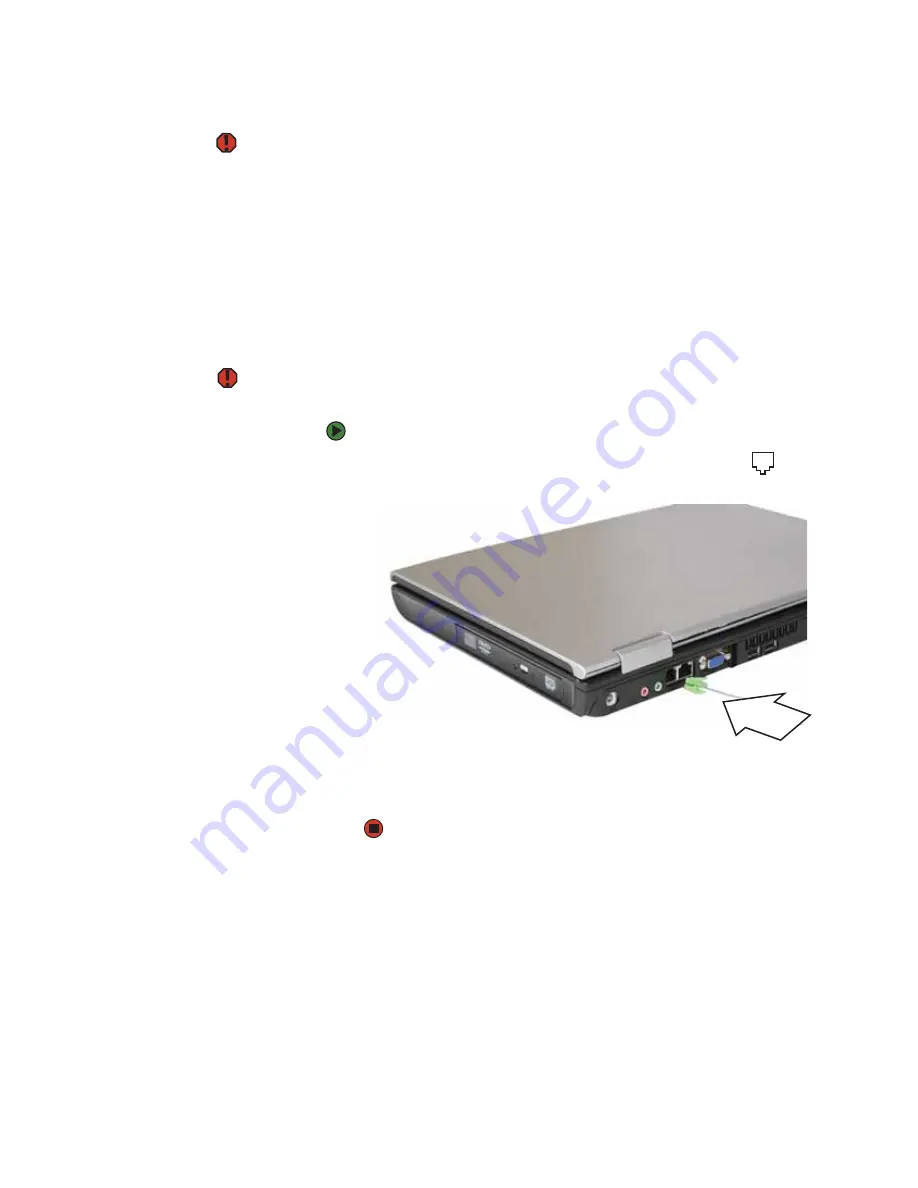
To connect the modem:


1

Insert one end of the modem cable into the modem jack

on the back 

of your notebook.

2

Insert the other end of the modem cable into a telephone wall jack. The 
modem will not work with digital or PBX telephone lines.

3

Start your notebook, then start your communications program.

Содержание MX7118

Страница 1: ...HARDWARE REFERENCE Gateway Notebook...

Страница 2: ......

Страница 3: ...n Ethernet network 14 Starting your notebook 15 Waking up your notebook 15 Turning off your notebook 15 Restarting rebooting your notebook 16 Using the status indicators 17 Using the keyboard 18 Key t...

Страница 4: ...ing the hard drive kit 38 Replacing the keyboard 42 Removing the keyboard 42 Installing the keyboard 45 Appendix A Safety Regulatory and Legal Information 47 Important safety information 48 Regulatory...

Страница 5: ...CHAPTER 1 1 Aboutthisreference About this guide Accessing the online User Guide Gateway contact information Microsoft Certificate of Authenticity For more information...

Страница 6: ...indows and other software Controlling audio and video settings Using the Internet Protecting your files Playing and recording media Networking Maintenance and troubleshooting To access the online User...

Страница 7: ...on the bottom of your notebook includes the product key code for your operating system For more information For more information about your notebook visit Gateway s Support page at support gateway co...

Страница 8: ...CHAPTER 1 About this reference www gateway com 4...

Страница 9: ...t network Starting your notebook Turning off your notebook Restarting rebooting your notebook Using the status indicators Using the keyboard Using the EZ Pad touchpad Adjusting the volume Turning your...

Страница 10: ...is on LED blinking notebook is in Standby mode LED off notebook is off LCD panel release latch Slide to open the LCD panel Battery charge indicator LED on battery is charging LED blinking battery char...

Страница 11: ...myour skin Caution Donotblockorinsertobjectsintotheseslots Iftheseslotsareblocked your notebook may overheat resulting in unexpected shutdown or permanent damage to the notebook Caution Provide adequa...

Страница 12: ...Description DVD drive Insert CDs or DVDs into this drive For more information see Using the DVD drive on page 25 To determine the type of drive in the notebook examine the drive tray s plastic cover a...

Страница 13: ...ports Plug USB devices such as a diskette drive flash drive printer scanner camera keyboard or mouse into these ports S Video out jack Plug an S Video device such as a television into this jack For mo...

Страница 14: ...9 Battery Provides power when the notebook is not plugged into AC power Hard drive bay The hard drive is located in this bay For more information see Replacing the hard drive kit on page 38 Memory bay...

Страница 15: ...tonhasbeenpressedthataffects howthekeyboardisused Formoreinformation see Usingthestatusindicators on page 17 Touchpad Provides all the functionality of a mouse For more information see Using the EZ Pa...

Страница 16: ...you expect If the battery life seems short even after being charged for three hours the battery may need to be recalibrated For information on recalibrating the battery see Recalibrating the battery...

Страница 17: ...book can increase to levels far above normal levels and cause data loss or system damage Protect your notebook and peripheral devices by connecting them to a surge protector which absorbs voltage surg...

Страница 18: ...a network jack that you can use to connect to a cable or DSL modem or to an Ethernet network To connect to a cable or DSL modem or to an Ethernet network 1 Insert one end of the network cable into th...

Страница 19: ...notebook for the first time follow the on screen instructions to set up your notebook Waking up your notebook Tips Tricks For more information about Standby mode see Changing power modes in the online...

Страница 20: ...sponding If closing unresponsive programs does not restore your notebook to normal operation you may have to restart reboot your notebook To close unresponsive programs and restart your notebook 1 Pre...

Страница 21: ...cated below the touchpad Indicator Icon Description AC power LED on AC power is connected LED off AC power is not connected Wireless network optional LED on Wireless network is turned on LED off Wirel...

Страница 22: ...key Arrow keys Key type Icon Description Function keys PressthesekeyslabeledF1toF12toperformactionsinprograms Forexample pressing F1 may open help Each program uses different function keys for differe...

Страница 23: ...dio frequency wireless communication can interfere with equipment on commercial aircraft Current aviation regulations require wireless devices to be turned off while traveling in an airplane 802 11G a...

Страница 24: ...D song or DVD track Skip ahead one CD song or DVD track Turn on Num Lock so you can use the numeric keypad Press this key combination again to turn off Num Lock The Num Lock status indicator appears w...

Страница 25: ...he Volume Up and Volume Down buttons at the same time to mute or un mute the sound Music player Open your default music player Volume up Turn the volume up Press the Volume Up and Volume Down buttons...

Страница 26: ...button For more information see Changing the mouse or touchpad settings in the online User Guide The EZ Pad consists of a touchpad two buttons and a scroll zone When you move your finger on the touchp...

Страница 27: ...screen Position the pointer over the object Quickly press and release the left button once This action is called clicking Startaprogramoropena file or folder Position the pointer over the object Pres...

Страница 28: ...ess device may be restricted or eliminated Airports hospitals and oxygen or flammable gas laden atmospheres are limited examples where use of wireless devices may be restricted or eliminated When in e...

Страница 29: ...drive to create CDs or DVDs Combination DVD CD RW drive Installing programs playing audio CDs playing DVDs accessing data and recording musicanddatatorecordableCDs Youcannotusethisdrivetocreate DVDs...

Страница 30: ...pen Important When you place a single sided disc in the tray make sure that the label side is facing up If the disc has two playable sides place the disc so the name of the side you want to play is fa...

Страница 31: ...assigned a different drive letter for example the E and F drives so data can be transferred from one media type to another Inserting a memory card To insert a memory card 1 Remove the protector from t...

Страница 32: ...y OR If you are removing a card from the right slot push the memory card into the notebook The memory card pops out slightly 2 Pull the memory card out of the notebook 3 Insert the protector into the...

Страница 33: ...Discard used batteries according to local hazardous material regulations The battery used in this device may present a fire or chemical burn hazard if mishandled Do not disassemble heat above 212 F 1...

Страница 34: ...lock to the unlocked position then slide and hold the battery release latch 5 Lift the battery out of the bay 6 Place a recharged battery into the bay and press down until it snaps into place 7 Slide...

Страница 35: ...a From the desktop right click on the power icon then select Adjust Power Properties b Click the Power Schemes tab c Click the arrow button to open the Power Schemes list then click Always On d Click...

Страница 36: ...accessories or supplies Memory Large programs such as multimedia games or graphics programs use a lot of memory If your programs are running more slowly than you think they should try adding more mem...

Страница 37: ...CHAPTER 3 33 MaintainingandUpgradingYourNotebook Preventing static electricity discharge Adding or replacing memory Replacing the DVD drive Replacing the hard drive kit Replacing the keyboard...

Страница 38: ...components on the outside of antistatic bags because only the inside of the bags provide electrostatic protection Always hold components by their edges Avoid touching the edge connectors Never slide...

Страница 39: ...is facing up then remove the battery For more information see Changing batteries on page 29 6 Remove the memory bay cover screw 7 Open the memory bay cover then remove it 8 Gently press outward on th...

Страница 40: ...network cable then turn on your notebook Replacing the DVD drive If your DVD drive becomes damaged you can replace it with a similar drive obtained from Gateway Important Replace the DVD drive only wi...

Страница 41: ...ightened paper clip into the DVD drive s manual eject hole push in the paper clip to eject the drive tray then pull the drive tray open 9 Carefully slide the drive out of the drive bay 10 Slide the ne...

Страница 42: ...te a Drivers and Applications Recovery disc For more information see Creating Drivers and Applications Recovery discs in the online User Guide 2 Print the Recovering Your System chapter from the onlin...

Страница 43: ...he hard drive kit screw 10 Slide the hard drive kit to remove it 11 If your new hard drive already includes the hard drive bracket go to Step 16 OR If you need to move the hard drive bracket from your...

Страница 44: ...CHAPTER 3 Maintaining and Upgrading Your Notebook www gateway com 40 12 Remove the four screws that secure the hard drive to the hard drive kit bracket Screw Screw Screw Screw...

Страница 45: ...the bracket to the drive 16 Slide the new hard drive kit into your notebook then replace the screw that secures the hard drive kit to your notebook 17 Insert the battery then turn your notebook over 1...

Страница 46: ...om Gateway Removing the keyboard To remove the keyboard 1 Follow the guidelines under Preventing static electricity discharge on page 34 2 Turn off your notebook 3 Disconnect the AC adapter modem cabl...

Страница 47: ...each hinge cover and gently loosen them Important Inserting a piece of cloth between the screwdriver and keyboard will help prevent damage to the notebook 10 Insert the small flat blade screwdriver un...

Страница 48: ...otebook www gateway com 44 12 Lift the back edge of the keyboard slightly then carefully push it toward the LCD panel to release the keyboard retaining tabs Be careful not to damage the LCD panel 13 L...

Страница 49: ...tebook Installing the keyboard To install the keyboard 1 Place the new keyboard keys down on your notebook with the space bar away from you Important The keyboard cable is correctly oriented if it is...

Страница 50: ...the two screws removed in Step 11 Caution If the cover is not correctly replaced your notebook could be damaged when you try to close the LCD panel 7 Place the keyboard cover on the notebook Press do...

Страница 51: ...APPENDIX A 47 Safety Regulatory andLegalInformation Important safety information Regulatory compliance statements Environmental information Notices...

Страница 52: ...hese openings Make sure you provide adequate space at least 6 inches 15 cm around the notebook for ventilation when you set up your work area Never insert objects of any kind into the notebook ventila...

Страница 53: ...power cord or plug is damaged Liquid has been spilled into the notebook The notebook does not operate properly when the operating instructions are followed The notebook was dropped or the cabinet is d...

Страница 54: ...a wireless device in the destination country Low power Radio transmitting type devices radio frequency RF wireless communicationdevices may bepresent embedded in your notebook system These devices may...

Страница 55: ...ts as set by the FCC The wireless devices installed in this system are intended to be used indoors In some areas use of these devices outdoors is prohibited Operation of this device is subject to the...

Страница 56: ...valence Number REN for this device If requested this information must be provided to the telephone company A telephone line cord with a modular plug is required for use with this device The modem is d...

Страница 57: ...radio LAN your notebook may have been equipped with operates in the same frequency range as high power radar which has priority use and may damage the radio LAN if both are present and being used in...

Страница 58: ...to certified equipment should be made by an authorized Canadian maintenance facility designated by the supplier Any repairs or alterations made by the user to this equipment or equipment malfunctions...

Страница 59: ...ing information on how you can responsibly recycle or reuse most of the materials in your end of life product Waste Electrical and Electronic Equipment commonly known as WEEE should never be disposed...

Страница 60: ...time Due to continuing system improvements Gateway is not responsible for inaccurate information which may appear in this manual For the latest product updates consult the Gateway Web site at www gat...

Страница 61: ...is protected by method claims of certain U S patents and other intellectual property rights owned by Macrovision Corporation and other rights owners Use of this copyright protection technology must be...

Страница 62: ...APPENDIX A Safety Regulatory and Legal Information www gateway com 58...

Страница 63: ...al up modem 13 external keyboard 18 keyboard 18 to cable modem 14 to DSL modem 14 to Ethernet 14 to network 14 connections audio 9 broadband Internet 9 14 cable modem 9 14 dial up modem 13 digital cam...

Страница 64: ...elease latch 6 switching display 19 LCD CRT system key 19 lock Kensington cable 9 M memory bay 10 installing 34 purchasing 32 removing 34 replacing 34 memory card reader locating 7 memory card types s...

Страница 65: ...battery charge 6 Caps Lock 17 drive activity 17 hard drive 17 location 11 Num Lock 20 numeric keypad 17 20 Pad Lock 17 power 6 toggle on or off 19 surge protector 13 Suspend 19 S Video TV out jack 9...

Страница 66: ...Index www gateway com 62...

Страница 67: ......

Страница 68: ...MAN SHADOW E K8 HW REF R0 11 05...

Отзывы: