background image

125

Using a recordable drive

www.gateway.com

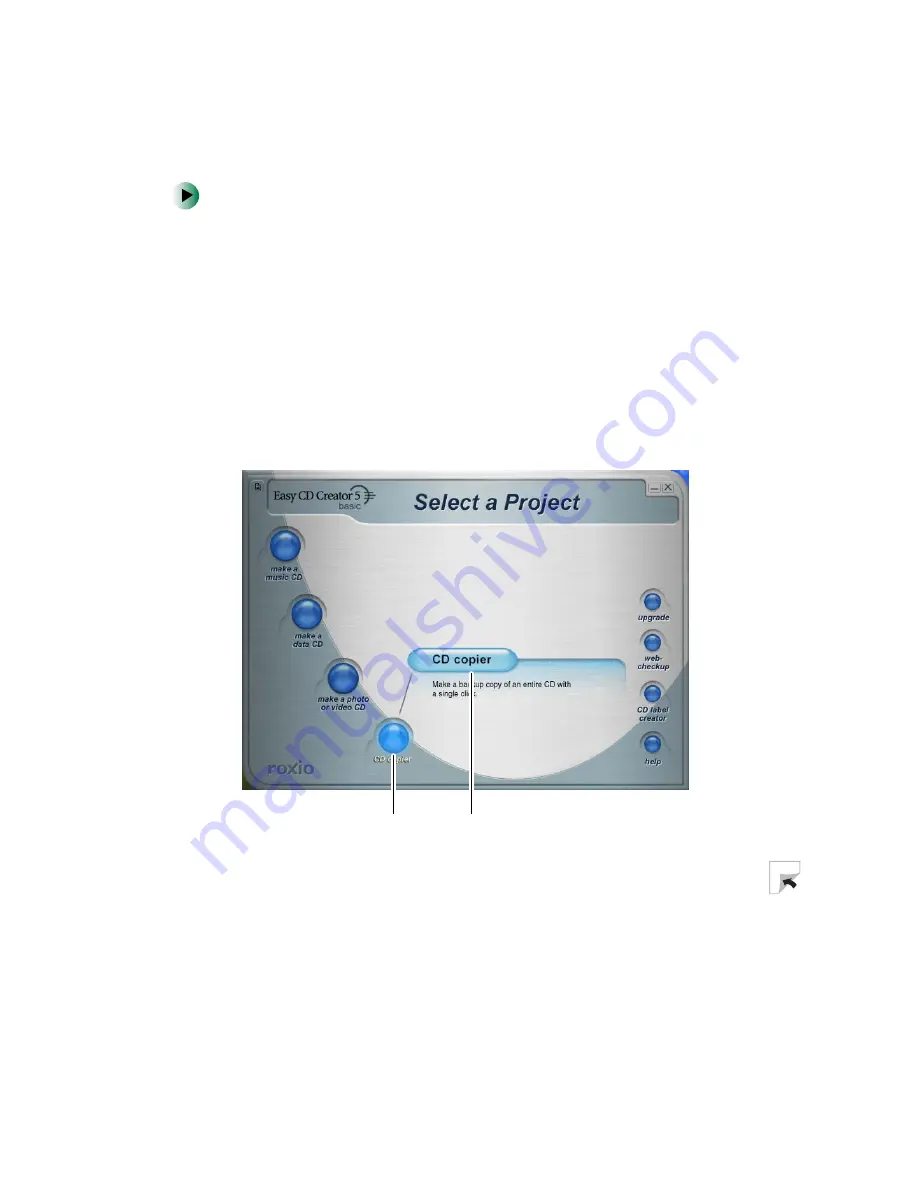
To copy a CD or DVD using two drives:

1

Insert the CD or DVD you want to copy into your non-recordable CD or 
DVD drive.

2

If a dialog box opens, click 

Take no action

.

3

Insert a blank, writable CD or DVD into your recordable CD or DVD drive.

4

If a 

CD Drive

 dialog box opens, click 

Create a CD using Roxio Easy CD Creator

then click 

OK

. The 

Select a Project

 window opens.

- OR -

If a dialog box does not open, click 

Start

All Programs

Roxio Easy CD Creator

then click 

Project Selector

. The 

Select a Project

 window opens.

CD copier

CD copier

Содержание Micro Tower

Страница 1: ......

Страница 2: ......

Страница 3: ...23 2 Getting Started 25 Working safely 26 Reducing eye strain 26 Setting up your computer desk and chair 27 Setting up your computer and computer accessories 27 Sitting at your computer 28 Avoiding d...

Страница 4: ...Creating a new document 65 Saving a document 66 Opening a document 67 Printing a document 68 Shortcuts 69 5 Using the Internet 71 Learning about the Internet 72 Setting up an Internet account 74 Acces...

Страница 5: ...and DVDs 122 7 Using PhoneTools 127 Using telephone features 128 Making a telephone call 129 Using Quick Dial memory keys 130 Using telephone book entries 132 Using voice mail 134 Recording a greetin...

Страница 6: ...ple wired Ethernet network 174 Equipment you need for a wired Ethernet network 175 Using a wireless Ethernet network 176 Example access point wireless Ethernet network 177 Equipment you need for an ac...

Страница 7: ...210 Reinstalling device drivers 211 Updating device drivers 213 Reinstalling programs 214 Reinstalling Windows 216 13 Upgrading Your Computer 219 Selecting a place to work 220 Gathering the tools you...

Страница 8: ...irst steps 274 Software support tools 275 Troubleshooting 276 Add in cards 276 CD DVD or recordable drives 276 Cleaning CDs and DVDs 278 Computer 278 Diskette drive 279 File management 280 Hard drive...

Страница 9: ...this chapter to learn How to identify your computer case style How to identify the features of your computer How to locate your computer s model and serial number How to locate the Microsoft Certifica...

Страница 10: ...the front For information on the Gateway Tower case see Gateway Tower Front on page 3 The Gateway Mid Tower case has an access door on the front that covers the drive bays and other components For in...

Страница 11: ...ur computer may contain any of the following components 3 5 inch drive bay cover CD DVD Recordable drive CD DVD eject button Diskette eject button Diskette drive Power button USB ports IEEE 1394 port...

Страница 12: ...this 4 pin IEEE 1394 port For more information see Installing a printer scanner or other peripheral device on page 38 Power button Press this button to turn the power on or off You can also configure...

Страница 13: ...rts PS 2 keyboard port PS 2 mouse port Voltage switch Power connector Audio input Line in jack Microphone jack Headphone analog speakers Line out 1 jack Case cover shipping screw USB 2 0 ports Etherne...

Страница 14: ...Microsoft Certificate of Authenticity Contains your Windows product key For more information see Microsoft Certificate of Authenticity on page 20 PS 2 mouse port Plug a Personal System 2 PS 2 mouse i...

Страница 15: ...your computer to an object by connecting a Kensington cable lock to this slot Case cover shipping screw Remove this screw before opening the case Ethernet network jack Plug a 10 100 Ethernet network...

Страница 16: ...ay Mid Tower Front Your computer may contain any of the following components 3 5 inch drive bay cover Access door CD DVD Recordable drive CD DVD eject button Diskette eject button Diskette drive Power...

Страница 17: ...E 1394 port optional Plug an IEEE 1394 also known as Firewire or i Link device such as a digital video camera into this 4 pin IEEE 1394 port For more information see Installing a printer scanner or ot...

Страница 18: ...or port Parallel port Serial port USB ports PS 2 keyboard port PS 2 mouse port Voltage switch Power connector Audio input Line in jack Microphone jack Headphone speakers Line out jack Case cover shipp...

Страница 19: ...this the voltage switch should be moved to 230 Kensington lock slot Secure your computer to an object by connecting a Kensington cable lock to this slot Case cover shipping screw Remove this screw be...

Страница 20: ...2 Microphone jack Plug a microphone into this jack This jack is color coded red or pink Headphone analog speakers Line out 1 jack Plug powered analog front speakers an external amplifier or headphones...

Страница 21: ...ateway Micro Tower Front Your computer may contain any of the following components CD DVD eject button CD DVD Recordable drive Power button Diskette drive Diskette eject button USB ports Cover release...

Страница 22: ...n see Installing a printer scanner or other peripheral device on page 38 Removable base Install this base when using your computer vertically Remove this base when using your computer horizontally or...

Страница 23: ...t PS 2 mouse port Modem jack Parallel port Serial port USB ports USB ports Monitor port Audio input Line in jack Microphone jack Headphone analog speakers Line out jack Ethernet network jack Add in ca...

Страница 24: ...is connector PS 2 mouse port Plug a Personal System 2 PS 2 mouse into this port PS 2 keyboard port Plug a PS 2 keyboard into this port USB ports USB 1 1 USB 2 0 Plug USB Universal Serial Bus devices s...

Страница 25: ...osoft Certificate of Authenticity on page 20 System label Includes your computer s model and serial number For more information see Identifying your model on page 19 Parallel port Plug a parallel devi...

Страница 26: ...Computer www gateway com Desktop to tower conversion You can convert your Gateway Micro Tower case from desktop to tower configuration using the accessory base included with your system For more infor...

Страница 27: ...ase contains information that identifies your computer model The label also contains your serial number Gateway Technical Support will need this information if you call for assistance Important The la...

Страница 28: ...ted on the customer invoice that came with your computer The invoice also contains your customer ID number Displayed in HelpSpot in Windows XP Click Start Help and Support then click View product seri...

Страница 29: ...rd drive size go to the My Computer Info link in HelpSpot or visit Gateway s eSupport page at support gateway com The eSupport page also has links to additional Gateway documentation and detailed spec...

Страница 30: ...more about your computer at the Gateway eSupport site Visit support gateway com To see an overview of the eSupport Web site click Take a Tour The tour guides you through the available features For mo...

Страница 31: ...ou take videos that you can view edit on your computer A scanner copies an image such as a graphic or document then stores the copy in a file You can view and edit scanner files on your computer You c...

Страница 32: ...ur entire system you probably need a tape backup TBU drive TBU drives like tape recorders use magnetic tape cartridges to store data Tape drive cartridges can store 2 GB 20 GB 40 GB 130 GB or more of...

Страница 33: ...This chapter provides basic information about your Gateway computer Read this chapter to find out how to Use your computer safely Start and turn off your computer Use the keyboard Use the mouse Instal...

Страница 34: ...can avoid glare on your screen and light shining directly into your eyes Reduce glare by installing shades or curtains on windows and by installing a glare screen filter on your monitor Use soft indir...

Страница 35: ...he keyboard is at or slightly below the level of your elbow This position lets your shoulders relax while you type Adjust the chair height adjust the forward tilt of the seat or use a footrest to dist...

Страница 36: ...t with your back straight so your knees hips and elbows form right angles when you work Take breaks to stand and stretch your legs Avoid twisting your torso or neck Avoiding discomfort and injury from...

Страница 37: ...a power failure Although you cannot run your computer for an extended period of time with a UPS a UPS lets you run your computer long enough to save your work and shut down your computer normally For...

Страница 38: ...sing the setup poster 2 Turn on the monitor 3 Turn on your computer and speakers 4 If you are starting your computer for the first time follow the on screen instructions to set up your computer 5 Turn...

Страница 39: ...your computer Tips Tricks When you turn off your computer certain components in the power supply and system board remain energized In order to remove all electrical power from your computer unplug th...

Страница 40: ...have to restart reboot your computer To close unresponsive programs and restart your computer 1 Press CTRL ALT DEL then click Task Manager The Task Manager window opens 2 Click the Applications tab t...

Страница 41: ...ent Indicators Show if your NUM LOCK CAPS LOCK or SCROLL LOCK keys are activated Press the corresponding key to activate the function Windows keys Press this key to open the Windows Start menu This ke...

Страница 42: ...xt Move to the next CD track or DVD chapter Volume down Decrease the volume Volume up Increase the volume Mute Turn off all sound Shortcut Open the program you assign to this button by default it is s...

Страница 43: ...mize this button to open another program For instructions see Programming the multifunction keyboard on page 156 Help Open online help You can customize this button to open another program For instruc...

Страница 44: ...n shows the standard mouse As you move the mouse the pointer arrow on the screen moves in the same direction You can use the left and right buttons on your mouse to select objects on the screen You ca...

Страница 45: ...pointer over the object Quickly press and release the left mouse button once This action is called clicking Start a program or open a file or folder Position the pointer over the object Quickly press...

Страница 46: ...vice whenever you plug it into the appropriate port When you use an IEEE 1394 or USB device for the first time your computer will prompt you to install any software the device needs After doing this y...

Страница 47: ...3 39 Getting Help This chapter tells you about additional information resources available to help you use your computer Read this chapter to learn how to access HelpSpot Online help Gateway Web site...

Страница 48: ...uickly discover and use the many features of your Gateway computer HelpSpot also has an area called Contact Gateway that helps you find the right resource at Gateway to answer your questions or help s...

Страница 49: ...om You can find help information by clicking a link performing a search or browsing the index To learn about using your Gateway computer your mouse and other tasks click the Using your computer link o...

Страница 50: ...you entered in the Search box Microsoft Knowledge Base These topics are located on the Microsoft Web site and contain the words you entered in the Search box You must be connected to the Internet to s...

Страница 51: ...contains several short videos to help introduce you to new concepts or show you how to perform various tasks To play a HelpSpot video To watch a video in HelpSpot click Video Tutorials on the HelpSpo...

Страница 52: ...or learn how to perform a task while you are using the program You can access most online help information by selecting a topic from a Help menu or by clicking a Help button You can search for inform...

Страница 53: ...pecifications tutorials and personalized information about your system Visit the Gateway eSupport Web site at support gateway com For more information about connecting to the Internet see Using the In...

Страница 54: ...an article specific to the question you have The Tutorials link lets you access an extensive library of how to articles and videos on topics such as making audio CDs and installing a hard drive Downlo...

Страница 55: ...4 47 Windows Basics Read this chapter to learn how to Use the Windows desktop Manage files and folders Work with documents Use shortcuts...

Страница 56: ...l desk Think of the desktop as your personalized work space where you open programs and perform other tasks Your desktop may be different from this example depending on how your computer is set up Hel...

Страница 57: ...e running Click a program s button on the taskbar to open the program s window The Start button provides access to programs files help for Windows and other programs and computer tools and utilities C...

Страница 58: ...1 Click the Start button on the lower left of the Windows desktop The Start menu opens showing you the first level of menu items 2 Click All Programs or Programs to see all programs and files in the...

Страница 59: ...e desktop 3 Click Send To then click Desktop create shortcut A shortcut icon for that program appears on the desktop Help and Support For more information about the Windows XP Start menu click Start t...

Страница 60: ...s When you double click the icon for a drive folder file or program a window opens on the desktop This example shows the Local Disk C window which opens after you double click the Local Disk C icon in...

Страница 61: ...the taskbar Clicking the program button in the taskbar opens the window again Clicking the maximize button expands the active window to fit the entire computer display Clicking the maximize button aga...

Страница 62: ...away information in a file cabinet Viewing drives Drives are like file cabinets because they hold files and folders A computer almost always has more than one drive Each drive has a letter usually Lo...

Страница 63: ...are much like the folders in a file cabinet They can contain files and other folders Files are much like paper documents letters spreadsheets and pictures that you keep on your computer In fact all in...

Страница 64: ...create a new folder inside an existing folder double click the existing folder If you do not see the contents of the drive or folder click Show the contents of this drive or Show the contents of this...

Страница 65: ...there To copy a file or folder to another folder 1 Locate the file or folder you want to copy For more information see Viewing drives on page 54 and Searching for files on page 62 2 Right click press...

Страница 66: ...ns on the desktop 3 Click Cut on the pop up menu 4 Open the destination folder 5 With the pointer inside the destination folder right click 6 Click Paste The file or folder you moved appears in its ne...

Страница 67: ...ee Shortcuts on page 69 If you cannot find the file you want to delete see Searching for files on page 62 2 Click File then click Delete Windows moves the files and folders to the Recycle Bin To recov...

Страница 68: ...the same way as a real file cabinet in that they may have many levels usually many more levels than a file cabinet in fact So you usually will have to search through levels of folders to find the fil...

Страница 69: ...der click Show the contents of this drive or Show the contents of this folder 3 Continue double clicking folders and their subfolders until you find the file or folder you want Help and Support For mo...

Страница 70: ...e they are stored on your hard drive you can use the Search utility to search by Name or part of a name Creation date Modification date File type Text contained in the file Time period in which it was...

Страница 71: ...In Windows 2000 click Start Search then click For Files or Folders The Search Results window opens 2 If you want to search by file or folder name type in all or part of the file or folder name in the...

Страница 72: ...earch options Search can find files meeting more criteria than file name You can narrow your search by selecting the search options that you want You can search by the Date the file was created or mod...

Страница 73: ...ate save open and print a document using Microsoft WordPad Similar procedures apply to other programs such as WordPerfect Microsoft Word and Microsoft Excel For more information about using a program...

Страница 74: ...to open the Save in list then click the folder where you want to save the file If you do not see the folder you want browse through the folders listed below the Save in list 3 Type a new file name in...

Страница 75: ...pen 3 Click the arrow button to open the Look in list then click the folder you want to open If you do not see the folder you want browse through the folders listed below the Look in list 4 Double cli...

Страница 76: ...documentation To print a document 1 Make sure that the printer is turned on and loaded with paper 2 Start the program and open the document 3 Click File then click Print The Print dialog box opens 4...

Страница 77: ...en click each of the remaining items Select multiple adjacent items in a list or window Click the first item in the list press and hold down the SHIFT key then click the last item in the list Permanen...

Страница 78: ...70 Chapter 4 Windows Basics www gateway com...

Страница 79: ...ion about the Internet and the World Wide Web Read this chapter to learn how to Set up and access an Internet account using America Online Connect to a Web site using a browser Download files from the...

Страница 80: ...ice provider ISP Cable and DSL modems a connection known as broadband use your TV cable or special telephone lines to connect to your ISP and access the Internet Cable and DSL modems connect to your c...

Страница 81: ...SL or cable line An Internet service provider a company that provides access to the Internet through an ISP server When you connect to an ISP the ISP server lets you access the Internet and your e mai...

Страница 82: ...ou After completing the setup you are ready to access the Internet To set up an Internet account with America Online 1 Click Start All Programs then click America Online 2 Follow the on screen instruc...

Страница 83: ...our ISP for the correct procedure for disconnecting Important Make sure that your computer disconnects correctly from your Internet account If you do not have an unlimited hours ISP account you may ha...

Страница 84: ...Navigator or the browser built into America Online Web pages can contain text animations music and other multimedia features A group of related Web pages is called a Web site You can access Web sites...

Страница 85: ...om then click GO on the browser address bar OR On the current Web page click a link to a Web site The Web browser locates the server computer on the Internet downloads transfers data to your computer...

Страница 86: ...ownload 3 Create or locate the folder where you want to store the file on your computer For more information see Working with files and folders on page 54 4 Click the link on the Web page for the file...

Страница 87: ...ider ISP or company that hosts that user Your e mail address is assigned when you sign up for an account with an ISP For example a person with an account with America Online might have an e mail addre...

Страница 88: ...lick Read 3 Double click the message you want to read For more information about managing and organizing your e mail messages see the online help in your e mail program Help and Support For general in...

Страница 89: ...ultimedia capabilities of your computer Read this chapter to learn how to Adjust the volume Record and play audio files Use Windows Media Player Use the diskette drive Use the CD or DVD drive Play CDs...

Страница 90: ...overall volume level using hardware controls If you are using external speakers turn the knob on the front of the speakers OR Use the volume control buttons on the keyboard For more information see Sp...

Страница 91: ...he Control Panel window opens If your Control Panel is in Category View click Sounds Speech and Audio Devices 2 Click Double click the Adjust the system volume or Sounds and Audio Devices The Sounds a...

Страница 92: ...ust does not appear in the window click Options Properties the check box next to the audio device you want to adjust then click OK 5 Drag the volume level and balance sliders for the device you want t...

Страница 93: ...additional volume controls available through the Start menu To adjust overall volume level using hardware controls If you are using external speakers turn the knob on the front of the speakers OR Use...

Страница 94: ...ice you want to adjust does not appear in the Volume Control window click Options Properties the audio device you want to adjust then click OK 2 Drag the volume level and balance sliders for the devic...

Страница 95: ...of the Microphone jacks see Checking Out Your Gateway Computer on page 1 2 Click Start All Programs Accessories Entertainment then click Sound Recorder The Sound Recorder opens 3 Click record then spe...

Страница 96: ...opens 3 Click the file you want to play then click Open 4 Play the file by clicking play then stop playing the file by clicking stop Help and Support For more information about making or playing an au...

Страница 97: ...DI MP3 AU AVI and MPEG formats For more information about the using the Windows Media Player click Help To play a file using the Windows Media Player 1 In Windows XP click Start All Programs then clic...

Страница 98: ...by clicking play then stop playing the file by clicking stop Important If the menu bar does not appear click the show menu bar button Help and Support For more information about playing audio and vid...

Страница 99: ...uses 3 5 inch diskettes sometimes called floppy disks Diskettes are useful for storing files or transferring files to another computer Warning Do not expose diskettes to water or magnetic fields Expos...

Страница 100: ...hapter 6 Using Multimedia www gateway com To use a diskette 1 Insert the diskette into the diskette drive with the label facing up OR Insert the diskette into the diskette drive with the label facing...

Страница 101: ...the drive letter for example the A drive then double click the file name OR To access a file on the diskette in Windows 2000 double click the My Computer icon the drive letter for example the A drive...

Страница 102: ...ting CDs You can only write to a CD R disc once You can write to and erase CD RW discs multiple times For more information see Using a recordable drive on page 111 DVD drive Use a DVD drive for instal...

Страница 103: ...or DVD drive www gateway com Inserting a CD or DVD Important Some music CDs have copy protection software You may not be able to play these CDs on your computer CD DVD Recordable drive Activity indica...

Страница 104: ...or DVD 1 Press the eject button next to the CD or DVD drive The CD or DVD drive tray opens 2 Place the disc in the tray with the label facing up OR Place the disc in the tray with the label facing le...

Страница 105: ...r more information see Using MusicMatch on page 100 You can use the special function buttons on the Multifunction keyboard to control how you play your CDs For more information see Special function bu...

Страница 106: ...click Windows Media Player The Windows Media Player opens 3 When the media player opens click play If you do not hear audio or you want to change the volume see Adjusting the volume in Windows XP on p...

Страница 107: ...trol how you play your CDs For more information see Special function buttons on page 34 To play a CD Insert a CD into the CD or DVD drive The CD Player opens and the CD plays OR If the CD does not sta...

Страница 108: ...c CDs Edit music track information Use your music files to build a music library Listen to Internet Radio For more information on using MusicMatch see its online help Playing CDs You can use the Music...

Страница 109: ...ur CD connect to the Internet before inserting your CD 2 Insert the music CD into the CD or DVD drive on your computer The first time you insert a music CD the Audio CD dialog box opens 3 Click Play A...

Страница 110: ...st and track names of your CD connect to the Internet before inserting your CD 2 Double click the musicmatch JUKEBOX icon on your desktop MusicMatch opens 3 Insert the music CD into the CD or DVD driv...

Страница 111: ...Match automatically list the album artist and track names of your CD then use that information for naming and storing your MP3 files connect to the Internet before inserting your CD 2 Insert a music C...

Страница 112: ...com 4 Click the record button The Recorder window opens 5 Click to clear the check box for any track you do not want to record rip 6 Click REC 7 When a message appears that tells you the CD drive need...

Страница 113: ...edit track information 1 In MusicMatch click My Library The library window opens 2 In the library window right click the file then click Edit Track Tag s The Edit Track Tag dialog box opens 3 Enter i...

Страница 114: ...e MP3 files from the tracks on your music CD MusicMatch automatically adds these files to your music library Dragging and Dropping Drag and drop files from Windows Explorer or your desktop to the musi...

Страница 115: ...c library display settings To change the music library display settings 1 In MusicMatch click Options then click Settings The Settings window opens 2 Click the Music Library tab 3 Click the categories...

Страница 116: ...ions The Radio window opens 3 To select one of the MusicMatch Internet radio stations click one of the Popular Stations MusicMatch connects to the station and plays the audio OR To play another Intern...

Страница 117: ...r data capacity Because of this increased capacity full length movies several albums of music or several gigabytes of data can fit on a single disc If your computer has a DVD drive you can play DVDs w...

Страница 118: ...Media Player opens 4 Insert a DVD into the DVD drive then click play The DVD plays Use the volume controls in the DVD player to adjust the volume For more information on using the DVD player see its o...

Страница 119: ...es such as tax records letters MP3s digital movies or photos For information on creating music CDs see Creating music CDs on page 117 Use your movie creator software to create video DVDs For more info...

Страница 120: ...CD or DVD drive 2 If a CD Drive dialog box opens click Create a CD using Roxio Easy CD Creator then click OK The Select a Project window opens OR If a dialog box does not open click Start All Programs...

Страница 121: ...roject The Easy CD Creator window opens 4 Click the arrow button to open the Select Source Files list then click the drive or folder where the files you want to add to the writable CD or DVD are locat...

Страница 122: ...114 Chapter 6 Using Multimedia www gateway com 5 Click the file you want to record hold down the CTRL or SHIFT key when you click to select multiple files in the Source pane then click Add record...

Страница 123: ...les click record The Record CD Setup dialog box opens 7 Click Start Recording Help and Support For more information about creating CDs in Windows XP click Start then click Help and Support Type the ke...

Страница 124: ...uch as Pinnacle Expression to create video DVDs For more information about using the program that came with your computer see its online help After you connect your digital camcorder to your computer...

Страница 125: ...ing CDs Important If you record copyrighted material on a CD or DVD you need permission from the copyright owner Otherwise you may be violating copyright law and be subject to payment of damages and o...

Страница 126: ...opens click Create a CD using Roxio Easy CD Creator then click OK The Select a Project window opens OR If a dialog box does not open click Start All Programs Roxio Easy CD Creator then click Project S...

Страница 127: ...CD Creator window opens 4 Click the arrow button to open the Select Source Files list then click the drive or folder where the music files that you want to add to the writable CD are located If you do...

Страница 128: ...T key when you click to select multiple files in the Source pane then click Add Tips Tricks You can add any combination of music tracks or MP3 files to a music CD project You can add up to 99 tracks a...

Страница 129: ...x opens 7 Click Start Recording When the recording is complete you may see a Record Complete dialog box Select the appropriate option Help and Support For more information about creating CDs in Window...

Страница 130: ...nd one of the drives is a recordable CD or DVD drive go to To copy a CD or DVD using two drives on page 125 Important We recommend that you do not use your computer for other tasks while creating a CD...

Страница 131: ...r DVD drive 2 If a dialog box opens click Take no action 3 If a CD Drive dialog box opens click Create a CD using Roxio Easy CD Creator then click OK The Select a Project window opens OR If a dialog b...

Страница 132: ...ck the arrow button to open the Copy from list then click the recordable drive 6 Click the arrow button to open the Record to list then click the recordable drive 7 Click Copy CD Copier copies the inf...

Страница 133: ...s click Take no action 3 Insert a blank writable CD or DVD into your recordable CD or DVD drive 4 If a CD Drive dialog box opens click Create a CD using Roxio Easy CD Creator then click OK The Select...

Страница 134: ...e CD or DVD 7 Click the arrow button to open the Record to list then click the drive that contains the blank CD or DVD this is your recordable CD or DVD drive 8 Click Copy The information on the sourc...

Страница 135: ...nd receive faxes using the modem Read this chapter to learn how to Make telephone calls Set up quick dial memory keys Set up a telephone book Use voice mail Record an answering machine message Set up...

Страница 136: ...elephone calls use your computer as an answering machine and send and receive faxes When PhoneTools is opened with the Phone controls visible you see this window From the Phone controls you can Make t...

Страница 137: ...handset on the screen You must have a telephone connected to your computer 4 To end the call click hangup Important Your modem cable must be installed before you can make telephone calls You cannot us...

Страница 138: ...ry entry The Add Quick Dial window opens If all the memory entries on the current page are in use click a memory page button to see more entries 4 In the Identifier box type the name you want to see i...

Страница 139: ...cking Speaker You must have external speakers and a microphone connected to your computer OR Make the call on the telephone handset by picking up the handset then clicking on the handset on the screen...

Страница 140: ...New The New Correspondent dialog box opens 5 Type the contact s name in the yellow entry fields 6 Click the Business or Home tab 7 Type the contact s telephone number and mailing information 8 Click O...

Страница 141: ...icking Speaker You must have external speakers and a microphone connected to your computer OR Make the call on the telephone handset by picking up the handset then clicking on the handset on the scree...

Страница 142: ...ering machine open PhoneTools and leave your computer on When PhoneTools is opened with the Voice Mail controls visible you see this window To listen to a voice mail message 1 If PhoneTools is not ope...

Страница 143: ...ick Voice Mail 3 In the Received Voice Messages list right click the message that you want to delete then click Delete 4 Click OK Recording a greeting PhoneTools comes with two pre recorded greetings...

Страница 144: ...box then click Next 8 Click start then speak your greeting into the microphone 9 Click stop when you have completed your recording then click Next 10 To listen to your greeting click start 11 Click Ne...

Страница 145: ...nformation Your fax cover sheets and fax headers will contain this information which is required by law Tips Tricks If your modem has voice capabilities see Using PhoneTools on page 127 to learn how t...

Страница 146: ...tab then type your personal information in the User boxes 5 Click the Fax tab then type your name and fax number in the Fax identifier text box This identifier information is required by law You can t...

Страница 147: ...box opens 8 If you do not want the PhoneTools logo on your cover page click the clear button OR If you want to replace the PhoneTools logo with one of your own click the import button then select a pi...

Страница 148: ...ools www gateway com Sending a fax To send a fax 1 If PhoneTools is not open click Start All Programs PhoneTools then click PhoneTools 2 If the Fax controls are not visible click Fax 3 Click Send Fax...

Страница 149: ...yped a message in the Message Text area you must select a cover page 7 Click Next 8 If you want to attach a file make sure that the file is not open then click browse click the file then click Open 9...

Страница 150: ...ick OK The Send Fax Wizard opens 3 Complete the wizard as instructed in Sending a fax on page 140 Receiving and viewing a fax To receive and view a fax 1 If PhoneTools is not open click Start All Prog...

Страница 151: ...y changing settings in Windows Read this chapter to learn how to Change screen and display settings Change the background and screen saver Adjust the mouse settings Program the multi function buttons...

Страница 152: ...ppearance For example simple color drawings may appear adequately in 256 colors while color photographs need millions of colors to be displayed with optimum quality Windows lets you choose from severa...

Страница 153: ...color depth you want 5 To save your changes in Windows XP click OK then click Yes OR To save your changes in Windows 2000 click OK then click OK again Help and Support For more information about adju...

Страница 154: ...maller individual components of the screen such as icons and menu bars appear To adjust the screen resolution 1 In Windows XP click Start then click Control Panel The Control Panel window opens If you...

Страница 155: ...s desktop items such as the background color and dialog box title bars To change desktop colors in Windows XP 1 Click Start then click Control Panel The Control Panel window opens If your Control Pane...

Страница 156: ...esktop OR If you want to create a new color scheme as part of a desktop theme a Click Advanced The Advanced Appearance dialog box opens b Click the the arrow button to open the Item list then click th...

Страница 157: ...tab 4 If you want to apply one of Windows color schemes click the arrow button to open the Scheme list click the scheme you want then click OK The new scheme appears on your desktop OR If you want to...

Страница 158: ...cument Windows provides several background pictures You can also use pictures or HTML documents that you have created or retrieved from other sources To change the desktop background in Windows XP 1 C...

Страница 159: ...e solid color behind the picture by clicking the arrow button to open the Color list then clicking a color 7 Click OK To change the desktop background in Windows 2000 1 Click Start Settings then click...

Страница 160: ...und picture from another location 5 If you want the picture you chose to cover the entire screen click the arrow button to open the Picture Display list then click Tile 6 If the picture you chose does...

Страница 161: ...saver to keep others from viewing your screen while you are away from your computer Windows supplies a variety of screen savers that you can choose from and many more are available from the Internet a...

Страница 162: ...ou cannot customize the screen saver you selected 6 In Windows XP if you want to display the Welcome Login screen whenever you exit the screen saver click the On resume display Welcome screen check bo...

Страница 163: ...ings 1 In Windows XP click Start then click Control Panel The Control Panel window opens If your Control Panel is in Category View click Printers and Other Hardware OR In Windows 2000 click Start Sett...

Страница 164: ...tons on the Gateway keyboard are pre programmed to start actions such as opening your Web browser Also you can program the buttons to open a program or start an action you choose To program your multi...

Страница 165: ...art button The Shopping cart button is pre programmed to open an Internet shopping site E mail lets you select a program or Web site that opens when you press the E mail button The E mail button is pr...

Страница 166: ...select the program name or Web address OR Type a path and file name or Web address in the Program path or Web page address box 5 Click OK then click Done Adding and modifying user accounts In Windows...

Страница 167: ...t Files created in one account are not accessible from other accounts unless the files are stored in the Shared Documents folder The Shared Documents folder is accessible from all accounts on that com...

Страница 168: ...ndows XP 1 Click Start then click Log Off The Log Off Windows dialog box opens 2 Click Switch User The Windows Welcome screen opens 3 Click the user account that you want to use When you switch betwee...

Страница 169: ...e power to most devices except memory However the information in the memory is not saved to the hard drive If power is interrupted the information is lost Hibernate also called save to disk writes all...

Страница 170: ...n different power saving modes to the power button Changing the power scheme To change the power scheme 1 In Windows XP click Start then click Control Panel The Control Panel window opens If your Cont...

Страница 171: ...the Power Schemes list then click the power scheme you want OR Click an arrow button for the System standby Turn off monitor or Turn off hard disks timer then click the time you want To save your cust...

Страница 172: ...your Control Panel is in Category View click Performance and Maintenance OR In Windows 2000 click Start Settings then click Control Panel The Control Panel window opens 2 Click Double click the Power...

Страница 173: ...nance OR In Windows 2000 click Start Settings then click Control Panel The Control Panel window opens 2 Click Double click the Power Options or Power Management icon The Power Options Properties dialo...

Страница 174: ...SHIFT then click Hibernate OR In Windows 2000 click Start then click Shut Down Click the arrow button to open the What do you want your computer to do list then click Hibernate Click OK Setting up an...

Страница 175: ...tion dialog box opens 5 Click the manufacturer and model of the UPS device 6 Click the serial port where the UPS device is attached 7 Click Finish then click OK Help and Support For more information a...

Страница 176: ...168 Chapter 8 Customizing Your Computer www gateway com...

Страница 177: ...ce computers lets you share drives printers and a single Internet connection among the connected computers Read this chapter to learn about Benefits of using a network in your home small office or hom...

Страница 178: ...g drives With a network you can copy files from computer to computer by copying and pasting or dragging and dropping You will no longer waste your time transferring files by using diskettes In additio...

Страница 179: ...s With a home network you can play multi player games Load a game like Microsoft Midtown Madness 2 on your computers and in minutes you and your friends can race in competing cars through the streets...

Страница 180: ...connect You are creating a network in an office or business where network speed is more important than moving about with your computer Your computer has an Ethernet jack for connecting to the network...

Страница 181: ...rks are typically built using Fast or Gigabit Ethernet components To create a wired Ethernet network you or your electrician must Install special Ethernet cables in your home or office Install an Ethe...

Страница 182: ...ntrol point for the network Attached to the router are all of your computers or Ethernet ready devices Also connected to the router is a cable or DSL modem that provides access to the Internet Tips Tr...

Страница 183: ...on your network from intruders trying to access your data over the Internet Built in switching with enough ports for all computers and devices on the network so you will not have to purchase a hub or...

Страница 184: ...s or approximately the same speed as standard wired Ethernet This type of network allows you the freedom to move about your home or office with your notebook For example you can take your notebook fro...

Страница 185: ...for the network Attached to the access point is the cable or DSL modem that provides access to the Internet Each of the computers or Ethernet ready devices communicate with the access point using rad...

Страница 186: ...eless Ethernet built in OR A wireless Ethernet PC Card installed in each notebook that does not have wireless Ethernet built in A wireless Ethernet access point to connect your wireless Ethernet netwo...

Страница 187: ...a peer to peer also known as ad hoc wireless Ethernet network if you are setting up or joining a temporary computer to computer network This type of network does not include access into a wired networ...

Страница 188: ...notebook that does not have wireless Ethernet built in For more information For more information about purchasing equipment for your home or office Ethernet network discuss your particular needs with...

Страница 189: ...printer or other peripheral devices and other unique computer settings that you want to move from your old computer to your new one Read this chapter to learn about Using the Windows XP Files and Set...

Страница 190: ...iles and Settings Transfer Wizard The wizard also moves specific files or entire folders such as My Documents My Pictures and Favorites To open the Files and Settings Transfer Wizard Click Start All P...

Страница 191: ...e Windows Find or Search to locate other personal data files For more information see Searching for files on page 62 To find files in the My Documents folder 1 In Windows XP click Start then click My...

Страница 192: ...es or Folders The Search Results window opens 2 Use Windows Find or Search to locate data files by file name or file type For help on finding files click Help then click Help and Support Center or Hel...

Страница 193: ...et setup program provided by your local ISP or contact your ISP to see if they have an updated version of their software and install it on your new computer If you use MSN as your ISP or if you know y...

Страница 194: ...r Microsoft Internet Explorer favorites For more information see your Internet browser program s online help Installing your old printer or scanner Windows may have built in support for older printers...

Страница 195: ...If your Control Panel is in Category View click Printers and Other Hardware OR In Windows 2000 click Start Settings then click Control Panel The Control Panel window opens 6 Click Double click the Pri...

Страница 196: ...contain any serial numbers or product ID keys that may be required for program installation and registration Remember to check the publisher s Web site for important program updates If you have troub...

Страница 197: ...sic information about maintaining your computer hardware and software Read this chapter to learn how to Care for your computer Create an emergency startup diskette Protect your computer from viruses M...

Страница 198: ...res Damage due to either extreme is not covered by your warranty As a general rule your computer is safest at temperatures that are comfortable for you Keep all liquids away from your computer When sp...

Страница 199: ...ter if Windows fails to start You should create a startup diskette as soon as you get your computer To create an emergency startup diskette in Windows XP 1 Insert a blank diskette labeled Startup into...

Страница 200: ...ens 4 Click to select the Create an MS DOS startup disk check box then click Start A message warns you that any information on the diskette will be erased 5 When you see the warning message click OK W...

Страница 201: ...www gateway com 7 Slide the write protect tab up to prevent the diskette from being erased or infected by viruses 8 Store your emergency startup diskette in a safe place with your other backup softwar...

Страница 202: ...check files and programs that are on diskettes attached to e mail messages or downloaded from the Internet Checking all programs for viruses before installing them Disabling macros on suspicious Micr...

Страница 203: ...an for viruses 1 Click Start All Programs Norton AntiVirus then click Norton AntiVirus 2003 Norton AntiVirus opens 2 Click Scan for Viruses 3 Click the type of scan you want to make in the Scan for Vi...

Страница 204: ...least 30 seconds 3 Turn on your computer and rescan for the virus To update Norton AntiVirus 1 Make sure that you are connected to the Internet 2 Click Start All Programs Norton AntiVirus then click L...

Страница 205: ...ve Checking hard drive space To check hard drive space 1 In Windows XP click Start then click My Computer The My Computer window opens OR In Windows 2000 double click the My Computer icon The My Compu...

Страница 206: ...program 1 In Windows XP click Start then click My Computer The My Computer window opens OR In Windows 2000 double click the My Computer icon The My Computer window opens 2 Right click the hard drive...

Страница 207: ...day you probably want to run Error checking once a week If you use your computer less frequently once a month may be adequate Also use Error checking if you encounter hard drive problems To check the...

Страница 208: ...al minutes After Windows has finished checking the drive for errors it provides a summary of the problems that it found 6 Correct any problems that are found by following the on screen instructions 7...

Страница 209: ...fferent areas of the drive Defragmenting the information stored on the drive can improve hard drive performance While the Disk Defragmenter program is running do not use your keyboard or mouse because...

Страница 210: ...progress on the computer display When finished Disk Defragmenter asks if you want to quit the program 6 Click Close or Yes then click the X in the top right corner to close the Disk Defragmenter windo...

Страница 211: ...a recordable drive on page 111 If you do not have a high capacity backup device and you want to purchase one you can contact Gateway s Add on Sales department or visit the Accessories Store at accesso...

Страница 212: ...ule and follow the on screen instructions to customize the task Important Your computer must be on during scheduled tasks If your computer is off scheduled tasks will not run Help and Support For more...

Страница 213: ...any components Use a damp lint free cloth to clean your computer and other parts of your system Do not use abrasive or solvent cleaners because they can damage the finish on components Your computer i...

Страница 214: ...k after it dries you may need to replace it Cleaning the computer screen If your computer screen is a flat panel display use a soft cloth and water to clean the computer screen Squirt a little water o...

Страница 215: ...ning the mouse will likely improve its accuracy Clean your optical mouse by wiping the bottom of the mouse with a damp lint free cloth To clean your trackball mouse 1 Turn the mouse upside down 2 Rota...

Страница 216: ...propyl alcohol 5 Replace the mouse ball and lock the retaining ring into place Help and Support For a video tutorial about cleaning the mouse in Windows XP click Start then click Help and Support Type...

Страница 217: ...12 209 Restoring Software Read this chapter to learn how to Reinstall device drivers Update device drivers Reinstall programs Reinstall Windows...

Страница 218: ...tried these steps first Use the diagnostics and troubleshooting tools found in HelpSpot For more information about diagnostics and troubleshooting tools in Windows XP click Start then click Help and...

Страница 219: ...irected to do so while troubleshooting or if a message tells you that there is a problem with a device driver reinstall the device drivers by following the steps in Reinstalling device drivers on page...

Страница 220: ...ice drivers to reinstall Grayed out drivers are not available for Automatic Installation To select these drivers click Manual Installation 7 Click Install 8 Follow any additional on screen instruction...

Страница 221: ...5 If this is the first time you have inserted the red Drivers CD accept the End User License Agreement EULA by clicking Yes I accept it then clicking Continue The Gateway Driver and Application Recov...

Страница 222: ...tings Control Panel then double click the Add or Remove Programs icon 3 In the Currently Installed Programs list click the program you want to uninstall then click Change Remove and follow the on scre...

Страница 223: ...es or other programs from a CD 1 If you just reinstalled Windows go to Step 4 Otherwise go to the next step 2 In Windows XP click Start Control Panel then click Add or Remove Programs OR In Windows 20...

Страница 224: ...rdware device drivers and some programs as well You can install any remaining programs by using the program CDs that came with your computer To reinstall your programs follow the instructions in Reins...

Страница 225: ...o NOT press any key to boot from CD 14 When prompted insert the red Drivers CD then click Continue 15 When prompted insert the yellow Applications CD s then click Continue The Gateway Application Load...

Страница 226: ...218 Chapter 12 Restoring Software www gateway com...

Страница 227: ...your case style Open the computer case Remove and install drives and components Remove and install add in cards Remove and install system boards Add memory Change the battery You must open the compute...

Страница 228: ...outlet so you can test your computer after installation Is near a telephone in case you need help from Gateway Technical Support The telephone must be directly connected to a telephone jack and cannot...

Страница 229: ...Remove components from their antistatic bags only when you are ready to use them Do not lay components on the outside of antistatic bags because only the inside of the bags provide electrostatic prote...

Страница 230: ...grading the Gateway Tower and Mid Tower cases on page 223 The Gateway Mid Tower case has an access door on the front that covers the drive bays and other components For instructions on upgrading your...

Страница 231: ...all peripheral device cables 4 Press the power button to drain any residual power from your computer 5 If the case cover has a shipping screw installed on the back of the case remove the screw For inf...

Страница 232: ...224 Chapter 13 Upgrading Your Computer www gateway com 6 Push in on the cover release handle...

Страница 233: ...225 Upgrading the Gateway Tower and Mid Tower cases www gateway com 7 Pull the side panel away from the case...

Страница 234: ...www gateway com Closing the case To close the computer case 1 Make sure that all of the internal cables are arranged inside the case so they will not be pinched when you close the case 2 Align the doo...

Страница 235: ...ateway Tower and Mid Tower cases www gateway com 3 Swing the side panel toward the case until the release handle locks 4 If you removed a case cover shipping screw replace the screw 5 Reconnect the ca...

Страница 236: ...ntify the computer case style For more information see Identifying the computer case style on page 222 2 Open the case using the instructions in Opening the case on page 223 3 If you are adding a driv...

Страница 237: ...screw installed next to the release lever remove the screw then slide the release lever toward the rear of the case 5 If you are replacing a drive slide the old drive forward and out of the drive bay...

Страница 238: ...9 Reconnect the drive cables using your notes from Step 3 The red striped edge of the data ribbon cable indicates Pin 1 and corresponds with Pin 1 on the drive typically on the side closest to the pow...

Страница 239: ...Disconnect the drive cables noting their locations and orientation You will reconnect the cables after you install the new drive See the drive documentation for further instructions 4 Slide the releas...

Страница 240: ...new drive in then slide the release lever toward the inside of the case 8 Reconnect the drive cables using your notes from Step 3 The red striped edge of the data ribbon cable indicates Pin 1 and corr...

Страница 241: ...For more information see Identifying the computer case style on page 222 2 Open the case using the instructions in Opening the case on page 223 3 For more stability place your computer on its side Pla...

Страница 242: ...on thumb screw that secures the card retention cover to the case then swing the add in card retention cover open 6 If you are replacing an add in card remove the old add in card You can slightly seesa...

Страница 243: ...from Step 4 See the add in card documentation for more information 10 Close the case using the instructions in Closing the case on page 226 11 See the documentation that came with the add in card for...

Страница 244: ...omputer on a towel or other non abrasive surface to avoid scratching the computer case 4 Disconnect the power supply cables from all components such as hard drives CD DVD or recordable drives and the...

Страница 245: ...teway com 5 Swing the power supply retention clip out 6 Slide the power supply toward the front of the case then up 7 Install the new power supply into the case then swing the power supply retention c...

Страница 246: ...board To replace the system board 1 Identify the computer case style For more information see Identifying the computer case style on page 222 2 Open the case using the instructions in Opening the case...

Страница 247: ...com 5 Disconnect the power and data cables from the system board noting their locations and orientation You will reconnect the cables after you install the new board 6 Remove the thumbscrew using a s...

Страница 248: ...ter 13 Upgrading Your Computer www gateway com 7 Slide the system board toward the front of the case then up and out of the case The system board standoffs slide out of the keyhole slots Standoff Keyh...

Страница 249: ...otes from Step 5 See the system board documentation for more information 10 Reinstall the add in cards using the instructions in Adding or replacing add in cards on page 233 11 Close the case using th...

Страница 250: ...rk and all peripheral device cables 4 Press the power button to drain any residual power from your computer 5 If your case cover has a shipping screw installed on the back of the case remove the screw...

Страница 251: ...your computer is standing in the base lift up on the front of the computer case then pull the case forward and off the base 7 For more stability place your computer on its side with the rubber feet r...

Страница 252: ...244 Chapter 13 Upgrading Your Computer www gateway com 9 Lift the side panel up...

Страница 253: ...245 Upgrading the Gateway Micro Tower Case www gateway com 10 Lift the side panel away from the case...

Страница 254: ...ateway com Closing the case To close the Gateway Micro Tower case 1 Make sure that all of the internal cables are arranged inside the case so they will not be pinched when you close the case 2 Align t...

Страница 255: ...case until the release handle locks 4 If you removed a case cover shipping screw replace the screw 5 Return the case to its normal position 6 If you removed the computer case from the base lower the c...

Страница 256: ...inch drives such as CD or DVD drives and 3 5 inch drives such as diskette drives To add or replace a CD DVD or diskette drive 1 Identify the computer case style For more information see Identifying t...

Страница 257: ...ease tab unlocks from the case then swing the front bezel outward and to the left until the left side bezel tab unhooks from the slot in the computer case 5 Disconnect the drive cables noting their lo...

Страница 258: ...ww gateway com 6 Slide the release lever back toward the rear of the case 7 Slide the old drive forward and out of the drive bay 8 Set any jumpers on the new drive to match the old drive See the drive...

Страница 259: ...from the power supply connection See the drive documentation for more information 12 Insert the left side bezel tab into the slot on the left side of the computer case then swing the right side of th...

Страница 260: ...ect the drive cables noting their locations and orientation You will reconnect the cables after you install the new drive See the drive documentation for further instructions 4 Slide the release lever...

Страница 261: ...rive then slide the release lever toward the front of the case to lock it into place 8 Reconnect the drive cables using your notes from Step 3 The red striped edge on the data ribbon cable indicates P...

Страница 262: ...fy the computer case style For more information see Identifying the computer case style on page 222 2 Open the case using the instructions in Opening the case on page 242 3 Disconnect any cables that...

Страница 263: ...en 6 If you are replacing an add in card remove the old add in card You can slightly seesaw the card end to end to loosen the card but do not bend the card sideways Warning Do not touch the contacts o...

Страница 264: ...cted any cables reconnect the add in card cables using your notes from Step 3 See the add in card documentation for more information 10 Close the case using the instructions in Closing the case on pag...

Страница 265: ...sconnect the power supply cables from all components such as hard drives CD DVD or recordable drives and the system board noting their locations and orientation You will reconnect the cables after you...

Страница 266: ...pply toward the front of the case then up 6 Install the new power supply into the case then rotate the power supply retention clip toward the power supply 7 Reconnect the power supply cables using you...

Страница 267: ...the case using the instructions in Opening the case on page 242 3 Remove all of the add in cards using the instructions in Adding or replacing add in cards on page 254 4 Disconnect the power and data...

Страница 268: ...rew 8 Reconnect the power and data cables using your notes from Step 4 For more information see the system board documentation 9 Install the add in cards using the instructions in Adding or replacing...

Страница 269: ...computer memory make sure that you install the correct type of memory module for your computer Your computer uses either DIMM or RIMM memory This section applies to all case styles The following illus...

Страница 270: ...For more information see Identifying the computer case style on page 222 2 Open the case using the instructions for your case style 3 Find the memory module banks on your system board 4 If you are rem...

Страница 271: ...le 7 Reconnect the cables and the power cord 8 Turn on your computer Windows starts and the Windows desktop appears 9 In Windows XP click Start Control Panel then click Performance and Maintenance if...

Страница 272: ...Rambus Interface Memory Modules RIMMs and Continuity RIMMs C RIMMs All memory slots must be filled with either a RIMM or a C RIMM RIMMs If your computer uses RIMM memory the memory has a metal cover o...

Страница 273: ...d the memory module banks on your system board 4 If you are removing a RIMM from the memory module bank gently pull the plastic tabs away from the sides of the memory module and remove it OR Tips Tric...

Страница 274: ...o slot bank RIMM BANK 0 install two identical RIMMs in RIMM BANK 0 and two C RIMMS in RIMM BANK 1 on the system board OR If you are installing four memory modules into two dual channel two slot banks...

Страница 275: ...se style 8 Reconnect the cables and power cord 9 Turn on your computer Windows starts and the Windows desktop appears 10 In Windows XP click Start Control Panel then click Performance and Maintenance...

Страница 276: ...up utility on page 270 2 Write down all the values in the menus and submenus then exit from the utility 3 Shut down your computer 4 Identify the computer case style For more information see Identifyin...

Страница 277: ...battery is facing up then press the new battery into the socket until it snaps into place 9 Close the case using the instructions for your case style 10 Reconnect all external cables and the power co...

Страница 278: ...ese settings are stored and saved even when the power is off To open BIOS Setup utility 1 Restart your computer 2 During the restart press and hold the F1 key The main menu of the BIOS Setup utility o...

Страница 279: ...ons BIOS Setup Utility Main Advanced Security Power Boot Exit Item Specific Help BIOS Version Processor Type Processor Speed Front Side Bus Speed Cache Ram System Memory Memory Bank 0 Memory Bank 1 Me...

Страница 280: ...272 Chapter 13 Upgrading Your Computer www gateway com...

Страница 281: ...s chapter to learn how to Troubleshoot typical hardware and software problems Get telephone support Use automated troubleshooting systems Get tutoring and training If the suggestions in this chapter d...

Страница 282: ...first before going to the following sections Make sure that the power cable is connected to your computer and an AC outlet and that the AC outlet is supplying power If you use a power strip make sure...

Страница 283: ...diagnostic and system information tool that can test your computer and determine its configuration PC Doctor provides 85 professional diagnostic tests directly from your computer This support tool is...

Страница 284: ...trying to play a DVD make sure that you have a DVD drive To identify your drive type see Identifying drive types on page 94 Your computer may be experiencing some temporary memory problems Shut down a...

Страница 285: ...on see Adjusting the volume on page 82 Make sure that the mute controls are turned off For more information see Adjusting the volume on page 82 Make sure that the speaker cables are connected correctl...

Страница 286: ...ode must match the regional code for the disc The regional code for the disc is on the disc disc documentation or disc packaging If the DVD movie does not play the disc s regional code and your DVD dr...

Страница 287: ...you see the message disk is full or write protected Make sure that the write protection tab on the upper right corner of the diskette is down unprotected Delete unnecessary files on the diskette and t...

Страница 288: ...hat the cables are connected correctly to the diskette drive and the system board The red striped edge of the data ribbon cable indicates Pin 1 and corresponds with Pin 1 on the diskette drive typical...

Страница 289: ...This may be the result of a defective area on the hard drive To fix hard drive problems run the Error checking program For more information see Checking the hard drive for errors on page 199 The hard...

Страница 290: ...er case and make sure that the IDE cable is connected to the system board IDE connector and the hard drive connector For more information about connecting the hard drive cables see the adding or repla...

Страница 291: ...This problem can occur when you have typed a URL Web address incorrectly you have lost your Internet connection or your ISP is having technical difficulties Double check the URL or try a different UR...

Страница 292: ...ch boxes Clean the keyboard by using an aerosol can of air with a narrow straw like extension to remove dust and lint trapped under the keys Try a keyboard that you know works to make sure that the ke...

Страница 293: ...r computer is connected to the telephone line and the telephone line has a dial tone Use the setup poster to make sure that the connections have been made correctly Make sure that the modem cable is l...

Страница 294: ...Properties The Dialing Properties dialog box opens 3 Make sure that all settings are correct Disconnect any answering machine fax machine or printer that is on the same line as the modem Do not connec...

Страница 295: ...echnical difficulties Contact your ISP technical support for help See if the modem works with a different communications program The problem may be with just one program Your 56K modem does not connec...

Страница 296: ...re that the line connected to the modem is working and plugged into the appropriate jack on the modem Use the setup poster to make sure that the connections have been made correctly If the modem share...

Страница 297: ...4 Click the Diagnostic tab click the COM port next to the name of the modem then click More Info The Modem Info dialog box opens If information about the modem appears the modem passed diagnostics If...

Страница 298: ...click Control Panel The Control Panel window opens If your Control Panel is in Category View click Printers and Other Hardware 2 Click Double click the Phone and Modem Options icon then click the Mode...

Страница 299: ...omputer case and reseat the video card For more information see the adding or replacing add in cards section for your case in Upgrading Your Computer on page 219 Connect a monitor that you know works...

Страница 300: ...r turn off your computer and monitor leave them off for at least a half hour then restart your computer Change the display settings For more information see Adjusting the screen and desktop settings o...

Страница 301: ...ng it on to test the outlet Make sure that all devices are connected securely to the surge protector and correctly switched on Printer Printer will not turn on Make sure that the power cord is plugged...

Страница 302: ...r you want to be the default printer then click Set as Default Make sure that the cable between the printer and your computer is connected securely to the correct port Check the port and cable for ben...

Страница 303: ...mark Wait until files have been printed before sending additional files to the printer If you print large files or many files at one time you may want to add additional memory to the printer See the p...

Страница 304: ...e volume on page 82 Make sure that mute controls are turned off For more information see Adjusting the volume on page 82 If you are using external speakers see the speaker setup poster to check your s...

Страница 305: ...om Gateway see the manufacturer s documentation and technical support resources If you have how to questions about using a program check Online Help Printed documentation The Microsoft Windows documen...

Страница 306: ...torial assistance for software issues billed by the minute 800 229 1103 charged to your credit card 900 555 4695 charged to your telephone bill Gateway Technical Support Talk to a Gateway Technical Su...

Страница 307: ...ny cases additional product information and online documents for Gateway supplied hardware can be found in our Web site s Documentation Library This user s guide The software publisher s Web site The...

Страница 308: ...rams including Microsoft Word Excel and PowerPoint www gateway com country Gateway Learning Libraries A variety of courses and tutorials are available on CD Select from several easy to use learning li...

Страница 309: ...oduct and in the documentation before you operate your system Retain all safety and operating instructions for future use Do not use this product near water or a heat source such as a radiator Set up...

Страница 310: ...st on it Do not spill anything on the system The best way to avoid spills is to avoid eating and drinking near your system Some products have a replaceable CMOS battery on the system board There is a...

Страница 311: ...er is encouraged to try to correct the interference by one or more of the following measures Reorient or relocate the receiving antenna Increase the separation between the equipment and receiver Conne...

Страница 312: ...ify you in advance that temporary discontinuance of service may be required The telephone company may request that you disconnect the equipment until the problem is resolved The telephone company may...

Страница 313: ...a single line individual service may be extended by means of a certified connector assembly The customer should be aware that compliance with the above conditions may not prevent degradation of servi...

Страница 314: ...lly grounded to provide some protection against voltage surges and static charges Article 810 of the National Electrical Code ANSI NFPSA 70 provides information with regard to proper grounding of the...

Страница 315: ...taken to keep from touching such power lines or circuits Contact with them could be fatal Reference Grounding component 1 Electric service equipment 2 Power service grounding electrode system NEC Art...

Страница 316: ...a friend in the business slogan are registered trademarks and black and white spotted box logo GATEWAY Gateway Astro Gateway Work Gateway Connected touch pad Gateway Connected music player Gateway Cy...

Страница 317: ...D adding tracks to library 106 cleaning 278 copying 122 creating 117 editing track information 105 playing 97 99 playing with MusicMatch 100 audio file streaming 171 audio in jack 7 12 17 AVI file 89...

Страница 318: ...278 computer exterior 205 computer screen 206 DVD 278 keyboard 206 mouse 207 clicking 37 clipboard 57 close button 53 closing computer case 226 246 program 53 69 unresponsive program 32 window 53 69 c...

Страница 319: ...60 69 198 voice messages 135 desktop 48 adding icons 51 adding shortcuts 51 adjusting settings 144 changing background 150 changing color depth 144 changing color scheme 147 changing number of colors...

Страница 320: ...ers 55 DSL modem 72 connecting 7 12 17 DVD controlling play with keyboard 33 creating data 111 creating video 116 inserting 95 playing 109 troubleshooting 276 DVD drive activity indicator 95 adding 22...

Страница 321: ...4 transferring 183 troubleshooting 280 types 184 viewing list 55 Files and Settings Transfer Wizard 182 finding files and folders 60 62 184 HelpSpot topics 42 specifications 21 Firewire port 4 7 9 14...

Страница 322: ...38 gateway your way dial up server 287 gigabit Ethernet 173 H hard drive backing up files 203 checking for errors 199 checking for free space 197 defragmenting 201 deleting files and folders 198 insta...

Страница 323: ...provider ISP 72 73 connecting to 74 disconnecting from 75 setting up account 74 transferring settings from old computer 185 InterVideo DVD Player 109 ISP See Internet service provider J jacks See conn...

Страница 324: ...listening to voice 134 sending e mail 79 microphone muted 129 microphone jack 7 12 16 Microsoft Certificate of Authenticity 6 11 17 20 Wordpad 65 MIDI file 89 minimize button 53 model number 19 modem...

Страница 325: ...05 listening to Internet radio 108 playing audio CD 100 muting sound 34 82 85 My Documents button 34 N navigation keys 33 network equipment shopping list 175 178 180 network jack 7 12 17 networking co...

Страница 326: ...Resume 4 9 14 surge protector 29 troubleshooting 293 turning off computer 31 turning on computer 30 using UPS 166 power button 4 9 14 power supply replacing 235 256 uninterruptible 166 previous butto...

Страница 327: ...io Easy CD Creator 111 S safety avoiding repetitive strain 28 caring for computer 190 general precautions 301 guidelines for troubleshooting 274 posture 28 reducing eye strain 26 setting up computer 2...

Страница 328: ...ng computer 4 9 14 30 programs 37 50 startup diskette 191 static electricity 221 stop button 34 streaming audio and video 171 support tool PC Doctor 275 surge protector 29 system board replacing 238 2...

Страница 329: ...ver 287 general guidelines 274 hard drive 281 Internet connection 283 287 keyboard 284 LCD panel 291 memory 285 modem 285 monitor 291 mouse 292 PC Doctor 275 power 293 printer 293 reinstalling drivers...

Страница 330: ...ows clipboard 57 desktop 48 Files and Settings Transfer Wizard 182 installing 216 Product Key 6 11 17 Product Key Code 20 reinstalling 216 reinstalling drivers 211 Search utility 63 updating drivers 2...

Страница 331: ......

Страница 332: ...MAN SYS US DT USR GDE R8 12 02...

Отзывы: