background image

CHAPTER 2: Getting Started

www.gateway.com

14

Protecting from power source problems

During a power surge, the voltage level of electricity coming into your computer 
can increase to far above normal levels and cause data loss or system damage. 
Protect your computer and peripheral devices by connecting them to a 

surge 

protector

, which absorbs voltage surges and prevents them from reaching your 

computer.


Warning

High voltages can enter your computer

through both the power cord and the

modem connection. Protect your

computer by using a surge protector. If

you have a telephone modem, use a

surge protector that has a modem jack. If

you have a cable modem, use a surge

protector that has an antenna/cable

TV jack. During an electrical storm,

unplug both the surge protector and the

modem.

An 

uninterruptible power supply

 (UPS) supplies battery power to your computer 

during a power failure. Although you cannot run your computer for an extended 
period of time with a UPS, a UPS lets you run your computer long enough to 
save your work and shut down your computer normally.

Checking the voltage selection


Caution

In the United States, the utility power is

supplied at a nominal 115 volts at 60 Hz.
The power supply should always be set to

this when your computer is operating in

the United States. In other areas of the

world, such as Europe, the utility power is

supplied at 230 volts at 50 Hz. If your

computer is operating in an environment
such as this, the voltage switch should be

moved to 230. If you set the voltage

selection switch incorrectly, your system

will be damaged. Make sure this switch is

set correctly for your location before

turning on your computer.

A power supply is integrated into your computer to provide power to the system 
board, add-in cards, and peripheral devices. The voltage selection for your 
location is typically set at the factory. Use the power selection switch on the back 
of your computer to set the power supply to 115V or 230V. To verify that your 
system has the correct setting for your environment, check the voltage selection 
switch.

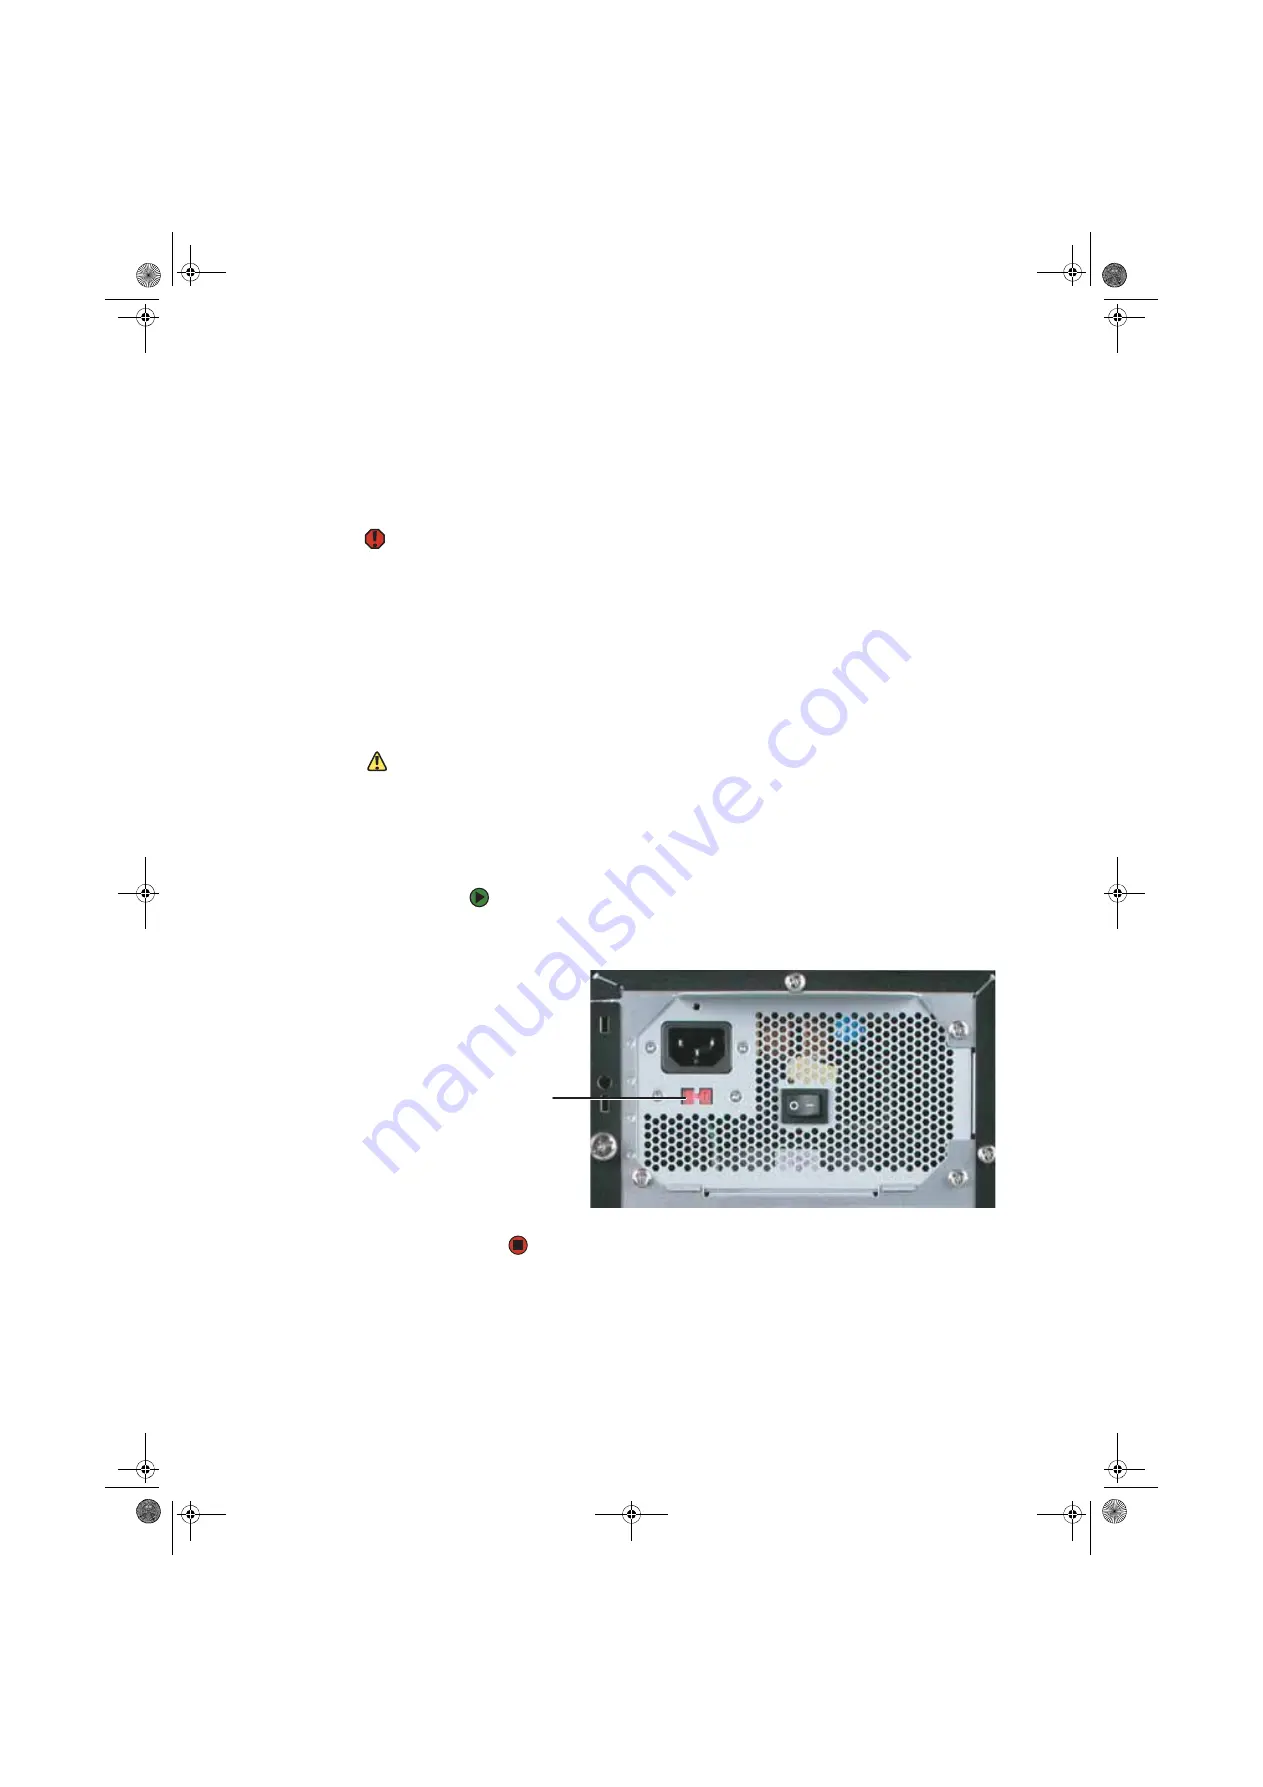
To set the voltage selection switch:


Use a tool such as an opened paper clip to slide the voltage selection 
switch to the correct voltage position.

Voltage

selection

switch

8511629.book  Page 14  Wednesday, July 19, 2006  9:38 AM

Содержание Desktops

Страница 1: ...USER GUIDE Gateway Computer 8511629 book Page a Wednesday July 19 2006 9 38 AM...

Страница 2: ...8511629 book Page b Wednesday July 19 2006 9 38 AM...

Страница 3: ...train 13 Protecting from power source problems 14 Checking the voltage selection 14 Starting your computer 15 Waking up your computer 15 Turning off your computer 15 Restarting your computer 16 Using...

Страница 4: ...g files 41 Using e mail 41 Sending e mail 42 Checking your e mail 42 Chapter 5 Sending and Receiving Faxes 43 Installing and configuring Microsoft Fax 44 Installing Fax 44 Configuring Fax 45 Setting u...

Страница 5: ...VD 76 Creating and copying data CDs and DVDs 80 Creating a data CD or DVD 80 Copying a CD or DVD 82 Using advanced multimedia features 84 Recording audio 84 Chapter 8 Customizing Your Computer 85 Adju...

Страница 6: ...user accounts 110 Setting limits with user accounts 112 Protecting your computer from viruses 112 Using Windows XP Security Center 114 Updating Windows XP 116 Chapter 11 Recovering Your System 117 Und...

Страница 7: ...ard Reader 143 Adding or replacing a hard drive 145 Replacing the front fan 147 Replacing the rear fan 148 Replacing the power supply 149 Replacing the heat sink and processor 150 Replacing the I O bo...

Страница 8: ...er 171 Printer 172 Sound 173 Telephone support 173 Before calling Gateway Customer Care 173 Telephone numbers 174 Self help 174 Appendix A Safety Regulatory and Legal Information 175 Index 181 8511629...

Страница 9: ...for purchasing our computer Using the Gateway Web site Using Help and Support Using Online help Finding your model and serial number Finding the Microsoft Certificate of Authenticity 8511629 book Page...

Страница 10: ...operating condition Gateway stands behind our value proposition to our customers to provide best of class service and support in addition to high quality brand name components at affordable prices If...

Страница 11: ...ds Click Downloads to get the latest software updates for BIOS and driver upgrades By entering your serial number you get drivers specific to your computer Click Browse All Downloads to walk through a...

Страница 12: ...hrase keyword in the Search box located at the top of any Help and Support screen then click the arrow button For each search you receive the following search result types Suggested Topics These topic...

Страница 13: ...The labels shown in this section are for informational purposes only Label information varies by model features ordered and location The label on the side of your computer case includes your computer...

Страница 14: ...CHAPTER 1 Getting Help www gateway com 6 8511629 book Page 6 Wednesday July 19 2006 9 38 AM...

Страница 15: ...ning off your computer Restarting your computer Using the keyboard Using the mouse Connecting the dial up modem Connecting to a cable or DSL modem or to an Ethernet network Installing a printer scanne...

Страница 16: ...es the following components your computer may differ from the computer shown below DVD CD drive Headphone jack Power button power indicator Diskette drive optional USB ports Microphone jack Hard drive...

Страница 17: ...Plug a USB Universal Serial Bus device such as a printer scanner camera keyboard or mouse into this port For more information see Installing a printer scanner or other peripheral device on page 22 Pow...

Страница 18: ...n below PS 2 keyboard port PS 2 mouse port Voltage switch Power connector Ethernet network jack DVI monitor port Audio in jack Case cover thumbscrew Headphone jack USB ports Cover release lever Case c...

Страница 19: ...ch as a stereo into this jack so you can record sound on your computer Ethernet network jack Plug a 10 100 Ethernet network cable or a device such as a DSL or cable modem for a broadband Internet conn...

Страница 20: ...reen and light shining directly into your eyes Reduce glare by installing shades or curtains on windows and by installing a glare screen filter on your monitor Use soft indirect lighting in your work...

Страница 21: ...it supports the lower curve of your spine You can use a pillow or cushion to provide extra back support Setting up your computer and computer accessories Set up the monitor so the top is no higher th...

Страница 22: ...your computer normally Checking the voltage selection Caution In the United States the utility power is supplied at a nominal 115 volts at 60 Hz The power supply should always be set to this when you...

Страница 23: ...eral minutes or have not turned off your computer it may enter a power saving mode called Standby While in Standby the power indicator flashes Tips Tricks For more information about changing the power...

Страница 24: ...L The Task Manager window opens 2 Click the Applications tab then click the program that is not responding 3 Click End Task 4 Click X in the top right corner of the Windows Task Manager dialog box 5 I...

Страница 25: ...home page search or e mail programs Audio playback buttons Press these buttons to play your audio files and to adjust the volume Navigation keys Press these keys to move the cursor to the beginning o...

Страница 26: ...ch the calculator program Audio playback buttons Press these buttons to play your audio files and to adjust the volume Indicators Show if your NUM LOCK CAPS LOCK or SCROLL LOCK keys are activated Pres...

Страница 27: ...he page down the page to the beginning of a document or to the end of a document Indicators Show if your NUM LOCK CAPS LOCK or SCROLL LOCK keys are activated Press the corresponding key to activate th...

Страница 28: ...mouse As you move the mouse the pointer arrow on the display moves in the same direction You can use the left and right buttons on the mouse to select objects on the display You can use the scroll whe...

Страница 29: ...on the mouse pad If you run out of space on your mouse pad and need to move the pointer farther pick up the mouse set it down in the middle of the mouse pad then continue moving the mouse Select an ob...

Страница 30: ...ng ports IEEE 1394 also known as Firewire or i Link Universal Serial Bus USB serial and parallel You use these ports to connect peripheral devices such as printers scanners and digital cameras to your...

Страница 31: ...dows XP Using the Windows desktop Identifying window items Working with files and folders Searching for files and folders Working with documents Using Windows shortcuts 8511629 book Page 23 Wednesday...

Страница 32: ...left and a clock on the right Other buttons on the taskbar represent programs that are running Click a program s button on the taskbar to open the program s window The Start button provides access to...

Страница 33: ...rmation about the Windows Start menu click Start then click Help and Support Type the keyword Windows Start menu in the Search box then click the arrow 3 Click a file or program to open it Adding icon...

Страница 34: ...ause each has its own menus icons and controls Most windows include these items Minimize Maximize Close Title bar Menu bar Window item Description The title bar is the horizontal bar at the top of a w...

Страница 35: ...because they hold files and folders A computer usually has more than one drive Each drive has a letter usually Local Disk C for the hard drive and 3 Floppy A for the diskette drive You may also have a...

Страница 36: ...f the drive or folder click Show the contents of this drive or Show the contents of this folder 4 Click File New then click Folder The new folder is created 5 Type a name for the folder then press ENT...

Страница 37: ...r appears in the new location To move a file or folder to another folder 1 Locate the file or folder you want to move For more information see Viewing drives on page 27 and Searching for files and fol...

Страница 38: ...olders to their original locations To empty the Recycle Bin Caution Emptying the Recycle Bin permanently erases any files or folders in the bin These files cannot be restored 1 Double click the Recycl...

Страница 39: ...r folder name in the name box in the left pane of the window If you type all of the name Search will list all files and folders of that name If you type part of the name Search will list all of the fi...

Страница 40: ...ders and files are organized in the same way as a real file cabinet in that they may have many levels usually many more levels than a file cabinet in fact So you will usually have to search through le...

Страница 41: ...document using Microsoft WordPad Similar procedures apply to other programs such as WordPerfect Microsoft Word and Microsoft Excel For more information about using a program click Help on its menu bar...

Страница 42: ...se through the folders listed below the Save in list Help and Support For more information about saving documents click Start then click Help and Support Type the keyword saving in the Search box then...

Страница 43: ...omputer or have access to a network printer For more information about installing or using your printer see the printer documentation or the Hardware Reference Guide For information on installing a pr...

Страница 44: ...ext or graphic Click inside the folder or window where you want to paste the object then press CTRL V Select multiple items in a list or window Click the first item press and hold down the CTRL key th...

Страница 45: ...CHAPTER 4 37 UsingtheInternet Learning about the Internet Setting up an Internet account Using the World Wide Web Using e mail 8511629 book Page 37 Wednesday July 19 2006 9 38 AM...

Страница 46: ...Ethernet jack on your computer see the Hardware Reference Guide or the setup poster An Internet service provider a company that provides access to the Internet through an ISPserver When you connect t...

Страница 47: ...ways connected service With this type of service your cost is the same regardless of the amount of time you use your Internet connection Accessing your Internet account Help and Support For general in...

Страница 48: ...com then click GO on the browser address bar OR On the current Web page click a link to a Web site Help and Support For general information about using Internet accounts click Start then click Help an...

Страница 49: ...The time that it takes to transfer the file to your computer depends on file size and Internet conditions 6 Open the folder that you created Help and Support Forinformationabout downloading files clic...

Страница 50: ...the Internet to the e mail address you specified Checking your e mail Tips Tricks To protect your computer from viruses check any e mail attachments using McAfee SecurityCenter For more information s...

Страница 51: ...CHAPTER 5 43 SendingandReceivingFaxes Installing and configuring Microsoft Fax Sending a fax Receiving and viewing a fax 8511629 book Page 43 Wednesday July 19 2006 9 38 AM...

Страница 52: ...ng and receiving faxes Installing Fax Microsoft Fax lets you send and receive faxes using your dial up modem When Windows was originally installed on your computer Fax may not have been installed To i...

Страница 53: ...ation Wizard screen click Next The Sender Information screen opens 3 Type the information about yourself that you want to appear on your fax cover page then click Next The SelectDevice forSendingorRec...

Страница 54: ...hen click Next This identifier information is required by law and can be the same identifier that you typed in Step 7 The Routing Options screen opens 10 If you set up your computer to receive faxes s...

Страница 55: ...zard or the Fax Configuration Wizard such as To or From add them to the page by using the Insert menu then move them to the appropriate place on your template You can also use the Insert menu to inclu...

Страница 56: ...he full ten digit fax number 5 If you want to send your fax to more than one recipient click Add and type the name and fax number of the next recipient 6 When you have added all your recipients click...

Страница 57: ...rd by following the instructions in Sending a fax on page 48 Automatically retry sending a fax You can set up Fax so it continues to try sending your fax if the receiving fax machine is busy Important...

Страница 58: ...nd Other Hardware Click View installed printers or fax printers The Printers and Faxes window opens OR If your Control Panel is in Classic View double click the Printersand Faxes icon The Printers and...

Страница 59: ...te drive Using the CD or DVD drive Using the memory card reader Configuring the audio jacks Connecting a projector or monitor Connecting a video camera Installing an uninterruptible power supply 85116...

Страница 60: ...e diskette into the diskette drive with the label facing up or right depending on your configuration 2 To access a file on the diskette click Start then click My Computer Double click the drive letter...

Страница 61: ...ccessing data CD RW drive Installing programs playing audio CDs accessing data and creating CDs DVD CD RW drive Installing programs playing audio CDs accessing data creating CDs and playing DVDs DVD d...

Страница 62: ...ht If the disc has two playable sides place the disc so the name of the side you want to play is up or to the right 3 Press the eject button to close the tray Using the memory card reader You can use...

Страница 63: ...memory card from the reader before you turn off the computer 2 To access a file on the memory card click Start then click My Computer Double click the drive letter for example the E drive then double...

Страница 64: ...Sound Effect Manager icon on the taskbar The Realtek dialog box opens 3 Configure the audio jacks for your speaker setup Connecting a projector or monitor If your computer s video card supports it it...

Страница 65: ...on or Color Quality if necessary 10 Click OK Connecting a video camera If your home video camera supports it it can be connected to your computer so that you can download video from the camera as data...

Страница 66: ...ions icon The Power Options Properties dialog box opens 3 Click the UPS tab Help and Support For more information about uninterruptible power supplies click Start then click Help and Support Type the...

Страница 67: ...laying music and movies Creating audio files and music libraries Creating and editing videos Creating music CDs and video DVDs Creating and copying data CDs and DVDs Using advanced multimedia features...

Страница 68: ...roperties dialog box opens 3 Click the Volume tab 4 Drag the Device Volume slider to change the volume or click to select the Mute check box then click OK Help and Support For more information about a...

Страница 69: ...ndow click Options Properties the check box next to the audio device you want to adjust then click OK 5 Drag the volume level and balance sliders for the device you want to adjust For more information...

Страница 70: ...tertainment then click Sound Recorder The Sound Recorder opens 2 Click File then click Open The Open dialog box opens 3 Click the file you want to play then click Open 4 Play the file by clicking play...

Страница 71: ...al or external drive visit the Accessory Store at accessories gateway com Help Support For more information about playing CDs or DVDs click Start then click Help and Support Type the phrases playing C...

Страница 72: ...re plugged in and that the volume is turned up 2 Insert a CD or DVD into the CD or DVD drive 3 If a dialog box opens with a list of CD players or DVD players click Windows Media Player Windows Media P...

Страница 73: ...werDVD then click PowerDVD Help 1 Make sure that the speakers are turned on or headphones are plugged in and that the volume is turned up 2 Click Start All Programs CyberLink PowerDVD then click Power...

Страница 74: ...aying an audio recording click Start then click Help and Support Type the phrases recording audio or playing audio in the Search box then click the arrow 1 Plug a microphone into one of the Microphone...

Страница 75: ...he file extension WMA and MP3 files end in the file extension MP3 To create WMA or MP3 files 1 Insert a music CD into your CD or DVD drive 2 If a dialog box opens with a list of CD players click Windo...

Страница 76: ...rting and add information to a music file You can add music tracks to your music library by Creating MP3 or WMA files When you create MP3 or WMA files from the tracks on your music CD Windows Media Pl...

Страница 77: ...wnload video from the camera as data files You can also create video from a Web cam attached to your computer For instructions on how to create video see your camera s user guide Editing videos Help S...

Страница 78: ...x opens with a list of video editing programs click Windows Movie Maker Windows Movie Maker opens OR If a dialog box does not open with a list of video editing programs click Start All Programs then c...

Страница 79: ...clude Splitting your video into more than one clip or combining two or more clips into one clip Trimming unwanted material from the beginning or end of your clip Inserting video transitions between cl...

Страница 80: ...d copyrighted material on a CD or DVD you need permission from the copyright owner Otherwise you may be violating copyright law and be subject to payment of damages and other remedies If you are uncer...

Страница 81: ...om 73 5 Click Edit Playlist The Edit Playlist dialog box opens 6 Click songs in the left column to add them to the playlist After all the songs are added to your list click OK 7 Click Start Burn 85116...

Страница 82: ...CD 1 Insert a blank writable CD into your CD or DVD drive 2 If a dialog box opens click Take no action then click OK 3 Click Start All Programs CyberLink DVD Solution Power2Go then click Power2Go Powe...

Страница 83: ...the files or folders you want to burn to the CD or DVD Click to select the file or folder Press and hold the CTRL key to select multiple files 6 Drag the files or folders into the bottom pane 7 After...

Страница 84: ...r or on a non Media Center computer that has a DVD player and DVD decoder software such as PowerDVD installed The non Media Center computer must also have Windows XP with Service Pack SP 1 or 2 Window...

Страница 85: ...r s Help icon Creating a video DVD with CyberLink Power2Go To create a video DVD 1 Insert a blank writable DVD into your DVD drive 2 If a dialog box opens click Take no action then click OK 3 Click St...

Страница 86: ...files you want to burn to the DVD Click to select the file s Press and hold the CTRL key to select multiple files 7 Click Import The video files appear in the Video pane 8 Click the icon next to the B...

Страница 87: ...If you have one DVD burner click Burn The Burning dialog box opens and Power2Go burns the files to the DVD OR If you have more than one DVD burner select the burner then click Burn The Burning dialog...

Страница 88: ...ta CDs or DVDs To create a data CD or DVD 1 Insert a blank writable CD or DVD into your CD or DVD drive 2 If a dialog box opens click Take no action then click OK 3 Click Start All Programs CyberLink...

Страница 89: ...s the files or folders you want to burn to the CD or DVD Click to select the file or folder Press and hold the CTRL key to select multiple files 6 Drag the files or folders into the bottom pane 7 Afte...

Страница 90: ...r DVD 9 When a message tells you that the recording is complete click OK to start the LabelPrint program or Cancel to return to Power2Go Copying a CD or DVD To copy a CD or DVD with CyberLink Power2Go...

Страница 91: ...ive 6 Click Copy The Burning dialog box opens If you are using one drive Power2Go copies the tracks or files to your hard drive If you are using two drives Power2Go copies the tracks from the source d...

Страница 92: ...ee your computer s setup poster or the Hardware Reference Guide 2 Click Start All Programs Accessories Entertainment then click Sound Recorder The Sound Recorder opens 3 Click record then speak into t...

Страница 93: ...8 85 CustomizingYourComputer Adjusting the screen and desktop settings Changing the mouse settings Using an extended desktop Adjusting power saving settings 8511629 book Page 85 Wednesday July 19 2006...

Страница 94: ...epthsforoptimum appearance Forexample simplecolor drawings may look satisfactory in 256 colors while color photographs need millions of colors to be displayed with optimum quality Windows letsyou choo...

Страница 95: ...the resolution the smaller individual components of the screen such as icons and menu bars appear To adjust the screen resolution 1 Click Start then click Control Panel The Control Panel window opens...

Страница 96: ...Click the arrow button to open the Color scheme list click the color scheme you want then click OK The new colors appear on your desktop OR If you want to create a new color scheme as part of a deskto...

Страница 97: ...background picture in the Background list OR Click Browse to select a background picture from another location 5 If you want the picture you chose to cover the entire screen click the arrow button to...

Страница 98: ...our Control Panel is in Category View click Appearance and Themes 2 Click Double click the Display icon The Display Properties dialog box opens 3 Click the Screen Saver tab 4 Click the arrow button to...

Страница 99: ...Panel window opens If your Control Panel is in Category View click Printers and Other Hardware 2 Click Double click the Mouse icon The Mouse Properties dialog box opens Help and Support For more infor...

Страница 100: ...ht click any empty space on the desktop then click Properties The Display Properties dialog box opens 2 Click the Settings tab 3 Click the second monitor icon labeled 2 then click Extend my Windows de...

Страница 101: ...View click Performance and Maintenance 2 Click Double click the Power Options icon The Power Options Properties dialog box opens 3 Click the arrow button to open the Power Schemes list then click the...

Страница 102: ...he Search box then click the arrow 4 Click the arrow button to open a Power buttons list then click the power setting mode you want to use 5 Click OK Activating and using Hibernate mode Hibernate also...

Страница 103: ...the Power Schemes tab Click the arrow button to open a System hibernates list then click the time you want to use OR Open the Power Options Properties dialog box then click the Advanced tab Hibernate...

Страница 104: ...CHAPTER 8 Customizing Your Computer www gateway com 96 8511629 book Page 96 Wednesday July 19 2006 9 38 AM...

Страница 105: ...tworkingYourComputer Introducing networking Creating an Ethernet network Testing your network Sharing resources Using the network Adding a printer to your network 8511629 book Page 97 Wednesday July 1...

Страница 106: ...Fast Ethernet components Business networks are typically built using Fast or Gigabit Ethernet components To create an Ethernet network you or your electrician must install special Ethernet cables in...

Страница 107: ...om unwanted intruders a 4 port switch to eliminate the need for additional network hardware and DHCP server dynamic IP address assignment to automatically configure network and IP addresses Determinin...

Страница 108: ...Click Double click System The System Properties dialog box opens 3 Click Computer Name 4 Click Change The Computer Name Changes dialog box opens 5 Type a unique computer name in the Computer name box...

Страница 109: ...a DHCP server 1 Click Start then click Control Panel The Control Panel window opens If your Control Panel is in Category View click Network and Internet Connections The Network and Internet Connection...

Страница 110: ...opper pins in the same order same colors left to right For a crossover cable the wires on each connector are attached to the copper pins in a different order different colors left to right We recommen...

Страница 111: ...ept the WAN port The WAN port is used to connect the router to the DSL or cable modem and is identified by a label or a switch Plug the other end of the cable into the network connector on the compute...

Страница 112: ...and printers With a network you can share drives for example hard drives and DVD drives and printers among the computers connected to the network After the drives and printers on each network compute...

Страница 113: ...folder on the network check box type a shared name in the Shared name box To let other users have full permissions to read and write to the shared drive or folder click to select the Allow network us...

Страница 114: ...on network printers Viewing shared drives and folders To view shared drives and folders 1 Click Start then click My Network Places The My Network Places window opens 2 Click Double click Entire Networ...

Страница 115: ...ick the drive letter you want to map this drive or folder to 4 Click Reconnect at Logon if you want to reconnect to this drive or folder each time you log on to the network 5 Click Finish Opening file...

Страница 116: ...to opentheprinter name list then click the network printer 4 Click OK Adding a printer to your network Instead of plugging a printer into your computer you can add a printer to your network To add a p...

Страница 117: ...CHAPTER 10 109 ProtectingYourComputer Securing your computer Securing your data Using Windows user accounts 8511629 book Page 109 Wednesday July 19 2006 9 38 AM...

Страница 118: ...t Use a startup and hard drive password to keep other people from using your computer You have to enter your password when you turn on your computer or access your files These passwords are set in you...

Страница 119: ...hen click the arrow 3 Follow the on screen instructions to add delete or modify a user account To change between user accounts 1 Click Start then click Log Off The Log Off Windows dialog box opens 2 C...

Страница 120: ...st viruses click Start then click Help and Support Type the keyword viruses in the Search box then click the arrow Protect your computer from a virus by Registering your copy of Norton AntiVirus and s...

Страница 121: ...ck Scan for Viruses 3 Click the type of scan you want to make in the Scan for Viruses area To remove a virus 1 IfNorton AntiVirus finds a virus follow allon screen instructions to remove the virus 2 T...

Страница 122: ...update your Norton AntiVirus program with the latest virus protection files 4 When the program has finished click Finish Using Windows XP Security Center Windows Security Center helps protect your co...

Страница 123: ...schedule automatic updates Windows can routinely check for the latest important updates for your computer and install them automatically To schedule automatic updates 1 Click Start Control Panel then...

Страница 124: ...and provides you with a tailored selection of updates that apply onlyto the software andhardwareon yourcomputer For additionalinformation on Windows Update see To keep your computer secure you need to...

Страница 125: ...CHAPTER 11 117 RecoveringYourSystem Understanding system recovery options Recovering your system 8511629 book Page 117 Wednesday July 19 2006 9 38 AM...

Страница 126: ...alled software and device drivers Finally in order to recover your system you may need to reinstall everything including the operating system so your computer has its original factory settings Recover...

Страница 127: ...n click Application Driver Recovery OR Turn on your computer then insert the driver and application recovery disc 1 if available into the CD or DVD drive The Application Recovery program opens 2 Click...

Страница 128: ...Restore takes a snapshot of your system settings and saves it as a restore point In most cases of hard to resolve software problems you canreturn to one oftheserestorepoints to get your system runnin...

Страница 129: ...ystem Recovery See Recovering your system from the hard drive on page 121 for instructions Recovering your system from the hard drive Caution Because of virus and spyware activity on the Internet you...

Страница 130: ...les Full System Restore with Backup recommended moves the contents of the hard drive to the C My Backup folder and installs a new copy of Windows XP This option saves your existing data files but all...

Страница 131: ...CHAPTER 12 123 MaintainingYourComputer Caring for your computer Managing hard drive space Moving from your old computer 8511629 book Page 123 Wednesday July 19 2006 9 38 AM...

Страница 132: ...ning kit Cleaning the exterior Warning When you shut down your computer the power turns off but some electrical currentstillflows throughyour computer To avoid possible injury from electrical shock un...

Страница 133: ...cloth To clean a CRT monitor use a soft cloth and glass cleaner to clean the monitor screen Squirt a little cleaner on the cloth never directly on the screen and wipe the screen with the cloth Cleanin...

Страница 134: ...use to manage your hard drive Checking hard drive space To check hard drive space 1 Click Start then click My Computer The My Computer window opens 2 Right click the drive that you want to check for a...

Страница 135: ...lick Properties The Properties dialog box opens at the General tab 3 Click Disk Cleanup The Disk Cleanup dialog box opens 4 Make sure that the check box beside each file type you want to delete is sel...

Страница 136: ...My Computer The My Computer window opens 2 Right click the hard drive that you want to check for errors for example Local Disk C then click Properties The Properties dialog box opens 3 Click the Tool...

Страница 137: ...op and restart the defragmenting process Also if you are connected to a network log off before starting Disk Defragmenter Network communication may stop the defragmentation process and cause it to sta...

Страница 138: ...if you have a recordable drive or to diskettes if you have a diskette drive Use a backup device such as a recordable drive or Zip drive to do a complete hard drive backup For more information see Usin...

Страница 139: ...box then click the arrow 3 Click Next then click the task or program you want to schedule and follow the on screen instructions to customize the task Moving from your old computer Using the Files and...

Страница 140: ...ck Start then click My Documents The My Documents window opens and displays many of your saved personal data files Go to Step 4 OR In Windows 98 Windows Me or Windows 2000 double click the My Computer...

Страница 141: ...tware is not pre installed on your new computer locate the original Internet setup program provided by your local ISP or contact your ISP to see if they have an updated version of their software and i...

Страница 142: ...de Installing a parallel port printer You can usually install parallel port printers by following these steps To install your old printer 1 Shut down and turn off your computer 2 Connect your parallel...

Страница 143: ...to install on your new computer Locate your original program installation discs and installation guides Your original discs and guides should contain any serial numbers or product ID keys that may be...

Страница 144: ...CHAPTER 12 Maintaining Your Computer www gateway com 136 8511629 book Page 136 Wednesday July 19 2006 9 38 AM...

Страница 145: ...battery Replacing a CD DVD or Diskette Drive or a Memory Card Reader Adding or replacing a hard drive Replacing the front fan Replacing the rear fan Replacing the power supply Replacing the heat sink...

Страница 146: ...network cables Before working with computer components follow these guidelines Avoid static causing surfaces such as carpeted floors plastic and packing foam Remove components from their antistatic b...

Страница 147: ...g the front bezel To remove the front bezel 1 After removing the side panel press the three black plastic tabs positions indicated by the arrows to release the right side of the bezel 2 Swing the righ...

Страница 148: ...the right side of the computer 3 Press the right side of the bezel firmly until it snaps into place Replacing the side panel To replace the side panel 1 Make sure that all of the internal cables are a...

Страница 149: ...e 138 2 For more stability place your computer on its side To avoid scratching the case place it on a towel or other non abrasive surface 3 Find the memory module banks on your system board 4 If you a...

Страница 150: ...cing the system battery Warning Danger of explosion if battery is incorrectly replaced Replace only with the same or equivalent type recommended by the manufacturer Dispose of used batteries following...

Страница 151: ...all external cables and the power cord 12 Turn on your computer 13 Open the BIOS Setup utility 14 In the BIOS Setup utility restore any settings that you wrote down in Step 3 15 Save all your setting...

Страница 152: ...eir locations and orientation You will reconnect the cables after you install the new component CD DVD drive shown If you areinstalling a new drive go to Step 7 4 Slide the drive release latch toward...

Страница 153: ...he side panel on page 140 Adding or replacing a hard drive To add or replace a hard drive Tips Tricks You need a Phillips screwdriver to add or replace a hard drive 1 Back up files any files you want...

Страница 154: ...ut of the drive bay 6 Remove the hard drive 7 Note any jumper settings on the old drive and set the jumper on the new drive to be the same 8 Slide the new drive into the drive bay then slide the drive...

Страница 155: ...ndows using the CD that came with your computer then install the drivers and applications using the CD provided Follow any instructions that may be printed on the Windows CD Replacing the front fan Ti...

Страница 156: ...rear fan 1 Remove the side panel by following the instructions in Removing the side panel on page 138 2 Disconnect the fan from the system board 3 Remove the four screws that secure the fan to the bac...

Страница 157: ...the side panel on page 138 2 For more stability place your computer on its side To avoid scratching the case place it on a towel or other non abrasive surface 3 Disconnect the power supply cables fro...

Страница 158: ...nel by following the instructions in Replacing the side panel on page 140 Replacing the heat sink and processor Tips Tricks You need a Phillips screwdriver to replace the heat sink To replace the heat...

Страница 159: ...n the bottom of it Use caution when you remove the old heat sink or unpack the new heat sink so you do not damage the TIM 5 Loosen the four screws that secure the heat sink to the system board then re...

Страница 160: ...rd then insert the fan into place 11 Replace the side panel by following the instructions in Replacing the side panel on page 140 Replacing the I O board Important The color and shape of your replacem...

Страница 161: ...move the side panel by following the instructions in Removing the side panel on page 138 2 For more stability place your computer on its side To avoid scratching the case place it on a towel or other...

Страница 162: ...the card sideways 8 Reconnect the expansion card cables if any using your notes from Step 4 or the manufacturer s instructions 9 Replace the side panel Replacing the system board To replace the system...

Страница 163: ...card retention lever 5 Remove any expansion cards You can slightly seesaw the card end to end to loosen the card but do not bend the card sideways 6 Remove the fan by pulling it away from the system b...

Страница 164: ...e banks on your system board 9 Gently pull the plastic tabs away from the sides of the memory modules then remove them 10 Disconnect the power and data cables from the system board noting their locati...

Страница 165: ...he power supply to the computer 12 Slide the power supply away from the back of the computer then pull it down and remove it 13 Remove the seven system board screws 14 Lift the system board up and out...

Страница 166: ...new system board making sure that Pin 1 on the processor indicated by the silk screened arrow on the corner of the processor aligns with Pin 1 on the processor socket indicated by the absence of a pin...

Страница 167: ...CHAPTER 14 159 Troubleshooting Safety guidelines First steps Solving problems Telephone support 8511629 book Page 159 Wednesday July 19 2006 9 38 AM...

Страница 168: ...computer try these things first Make sure that the AC power adapter is connected to your computer and an AC outlet and that the AC outlet is supplying power If you use a power strip or surge protecto...

Страница 169: ...ve a DVD drive To identify your drive type see Identifying drive types on page 53 Your computer may be experiencing some temporary memory problems Shut down and restart your computer Some music CDs ha...

Страница 170: ...disc distribution To be able to play a DVD the disc s regional code and your DVD drive s regional code must match The regional code on your DVD drive is determined by your computer s delivery address...

Страница 171: ...diskette from the drive If the light stays on try restarting your computer DVD drives See CD drives on page 161 Ethernet You cannot see the other computers on your network Make sure that your Ethernet...

Страница 172: ...more information about restoring your system click Start then click Help and Support Type the keyword System Restore in the Search box then click the arrow 2 Right click the file you want to restore t...

Страница 173: ...ly Contact your ISP technical support for help Make sure that you do not have a problem with your modem For more information Modem dial up on page 167 Help and Support For more information about troub...

Страница 174: ...oard stuck or key failure error message Make sure that nothing is resting on the keyboard Make sure that a key is not stuck Press each key to loosen a key that might be stuck then restart your compute...

Страница 175: ...lick Control Panel The Control Panel window opens If your Control Panel is in Category View click Printers and Other Hardware 2 Click Double clickthe PhoneandModemOptionsicon thenclick the Dialing Rul...

Страница 176: ...is limited to 48K Your ISP may not support 48K uploads Your fax communications program only sends and receives faxes at 14 400 bps when you have a 56K modem Current fax technology only supports a max...

Страница 177: ...b 3 Click the modem you want to adjust then click Properties 4 Click the Modem tab then adjust the Speaker volume control 5 Click OK twice to close the Phone and Modem Options dialog box Monitor The s...

Страница 178: ...uter and monitor leave them off for at least a half hour then restart your computer Change the display settings Tips Tricks For more information see Adjusting the screen and desktop settings on page 8...

Страница 179: ...d Shut down and restart your computer Make sure that you have installed the required software For more information see the documentation that came with your Ethernet card Reseat the card Formoreinform...

Страница 180: ...u want to be the default printer then click Set as Default Printer Reinstall the printer driver See the guide that came with your printer for instructions on installing the printer driver You see a Pr...

Страница 181: ...arning To avoid bodily injury do not attempt to troubleshoot your computer problem if power cords or plugs are damaged if liquid has been spilled into your computer if your computer was dropped or if...

Страница 182: ...out using your Gateway supplied hardware or software see the following resources The printed or online documentation that came with your hardware or software In many cases additional product informati...

Страница 183: ...PPENDIX A 175 Safety Regulatory andLegalInformation Important safety information Regulatory compliance statements Environmental information Notices 8511629 book Page 175 Wednesday July 19 2006 9 38 AM...

Страница 184: ...Ifyouuseanextensioncordwiththissystem makesurethatthetotalampereratingontheproductspluggedintotheextension cord doesnotexceedtheextensioncordampererating IfyoursystemisfittedwithaTVTuner cable orsatel...

Страница 185: ...nia Proposition 65 Warning Warning This product contains chemicals including lead known to the State of California to cause cancer birth defects or reproductive harm Telecommunications per Part 68 of...

Страница 186: ...ngle lineindividualservicemaybeextendedbymeansofacertifiedconnectorassembly Thecustomershouldbe awarethatcompliancewiththeaboveconditionsmaynotpreventdegradationofserviceinsomesituations Repairstocert...

Страница 187: ...ght 2006Gateway Inc AllRightsReserved 7565IrvineCenterDrive Irvine CA 92618 2930 USA All Rights Reserved Thispublicationisprotectedbycopyrightandallrightsarereserved Nopartofitmaybereproducedortransmi...

Страница 188: ...APPENDIX A Safety Regulatory and Legal Information www gateway com 180 8511629 book Page 180 Wednesday July 19 2006 9 38 AM...

Страница 189: ...ansion 153 slots 54 troubleshooting add in card 161 troubleshooting memory card 166 types of memory cards supported 55 case closing 140 opening 138 CD adding tracks to your library 68 cleaning 125 cop...

Страница 190: ...lacing 143 troubleshooting 162 using 52 display changing resolution 87 properties 56 92 troubleshooting 163 using screen saver 90 documentation help 4 Help and Support 4 online help 5 documents creati...

Страница 191: ...acing 147 front I O panel replacing 152 function keys 17 18 19 G Gateway Web address 2 Web site 2 Gigabit Ethernet 98 H hard drive adding 145 backing up files 130 checking for errors 128 checking for...

Страница 192: ...hone jack 9 11 Microsoft Fax 43 Internet Explorer 38 Outlook 38 Outlook Express 38 Windows Media Player 62 Windows Movie Maker 69 Wordpad 33 Microsoft Certificate of Authenticity 5 MIDI file 62 minimi...

Страница 193: ...esolution 57 PS 2 port keyboard 11 mouse 11 R radio listening with Windows Media Player 84 RAM See memory rear fan replacing 148 rebooting computer 16 recordable drive 9 locating 9 troubleshooting 161...

Страница 194: ...cover page template 49 using Fax 43 telephone jack 11 telephone support 173 television watching with Windows Media Player 84 testing network 104 title bar 26 transferring files from Internet 41 files...

Страница 195: ...library 68 creating music files 67 creating WMA files 67 editing tack information 69 listening to Internet radio 84 playing audio CD 63 playing audio file 62 viewing video file 62 watching Internet TV...

Страница 196: ...Index www gateway com 188 8511629 book Page 188 Wednesday July 19 2006 9 38 AM...

Страница 197: ...8511629 book Page 189 Wednesday July 19 2006 9 38 AM...

Страница 198: ...MAN 6BAY MBTX PRO USR GDE R1 7 06 8511629 book Page 190 Wednesday July 19 2006 9 38 AM...

Отзывы: