background image

www.gateway.com

41

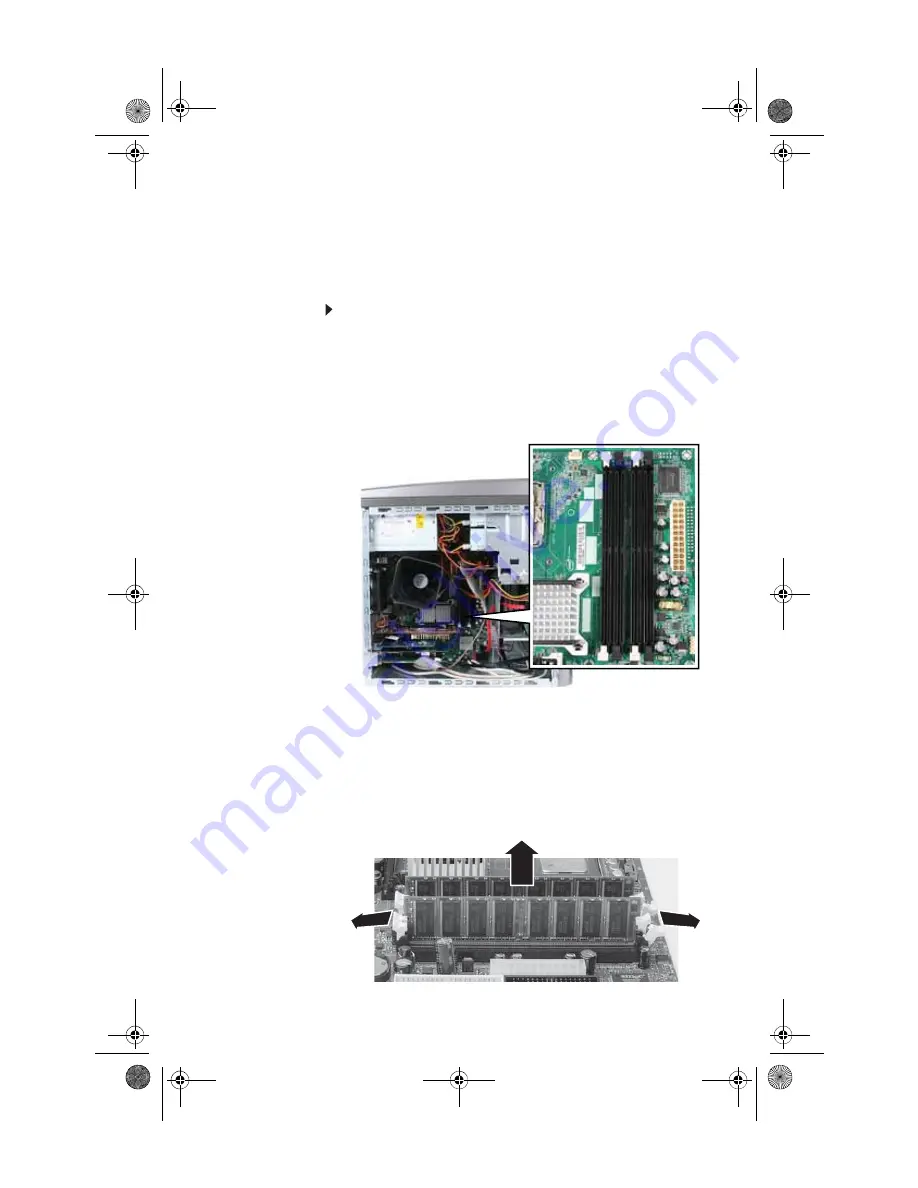
Installing memory

When you upgrade the computer memory, make sure that you 
install the correct type of memory module for your computer. 
Your computer uses DIMM memory.

To install or replace DIMM memory:


1

Remove the side panel by following the instructions in 

“Removing the side panel” on page 35

.

2

For more stability, place your computer on its side. To 
avoid scratching the case, place it on a towel or other 
non-abrasive surface.

3

Find the memory module banks on your system board.

4

If you are removing a DIMM from the memory module 
bank, gently pull the plastic tabs away from the sides of 
the memory module and remove it.

- OR -

If you are adding a DIMM to an empty memory module 
bank, gently pull the plastic tabs away from the sides of 
the memory module bank.

8512980.book  Page 41  Thursday, March 6, 2008  1:30 PM

Содержание Computer

Страница 1: ...REFERENCEGUIDE 8512980 book Page a Thursday March 6 2008 1 30 PM...

Страница 2: ...8512980 book Page b Thursday March 6 2008 1 30 PM...

Страница 3: ...om repetitive strain 14 Preparing power connections 14 Protecting from power source problems 14 Checking the voltage selection 15 Connecting to a broadband modem or network 15 Connecting a dial up mod...

Страница 4: ...acing the color panel 38 Installing memory 41 Adding or replacing an optical disc drive 43 Replacing the memory card reader 45 Adding or replacing a hard drive 47 Replacing the heat sink and processor...

Страница 5: ...tomatically 70 Transferring files and settings manually 70 Chapter 6 Troubleshooting 73 Safety guidelines 74 First steps 74 Troubleshooting 75 Add in cards 75 Audio 75 CD or DVD drives 75 Display 77 D...

Страница 6: ...anding system recovery options 90 Recovering your system 91 Telephone support 98 Before calling Gateway Customer Care 98 Telephone numbers 99 Self help 99 Appendix A Legal Notices 101 Index 111 851298...

Страница 7: ...1 About This Reference About this guide Accessing your online User Guide Gateway contact information Microsoft Certificate of Authenticity For more information 8512980 book Page 1 Thursday March 6 200...

Страница 8: ...dress shown on your computer s label The Support page also has links to additional Gateway documentation and detailed specifications Accessing your online User Guide In addition to this guide your Use...

Страница 9: ...all for assistance Microsoft Certificate of Authenticity The Microsoft Certificate of Authenticity label found on the back or side of your computer includes the product key code for your operating sys...

Страница 10: ...CHAPTER 1 About This Reference 4 8512980 book Page 4 Thursday March 6 2008 1 30 PM...

Страница 11: ...CHAPTER2 5 Checking Out Your Computer Front Back 8512980 book Page 5 Thursday March 6 2008 1 30 PM...

Страница 12: ...D drive Microphone jack Power button power indicator DVD CD drive optional Headphone jack IEEE 1394 FireWire port USB ports Video jack optional Audio left jack optional Audio right jack optional Porta...

Страница 13: ...these 6 pin IEEE 1394 ports Portable media drive bay Use this bay to connect a removable hard drive Headphone jack Plug powered analog front speakers an external amplifier or headphones into this jac...

Страница 14: ...keyboard port Plug a PS 2 keyboard into this port PS 2 mouse port PS 2 keyboard port Voltage switch Power connector Ethernet network jack Audio in side speaker jack Case cover thumbscrew Headphone fro...

Страница 15: ...k antenna optional and connectors Connect this antenna to your wireless network antenna card Case cover thumbscrew Remove this screw before opening the case PS 2 mouse port Plug a PS 2 mouse into this...

Страница 16: ...side left and right speakers into this jack For more information see Configuring the audio jacks on page 30 Video card optional Plug a VGA blue connector or DVI white connector monitor into a port on...

Страница 17: ...k Connecting a dial up modem Starting your computer Turning off your computer Restarting rebooting your computer Using the keyboard Using the mouse Using optical drives Using the memory card reader Ad...

Страница 18: ...llel to the floor Adjust the screen so it is perpendicular to your line of sight and the top of the screen is no higher than eye level Place your feet flat on the floor or on a footrest Keep ventilati...

Страница 19: ...is the appropriate height and the chair helps you maintain good posture Select a flat surface for your computer desk Adjust the height of the computer desk so your hands and arms are positioned paral...

Страница 20: ...o your computer can increase to far above normal levels and cause data loss or system damage Protect your computer and peripheral devices by connecting them to a surge protector which absorbs voltage...

Страница 21: ...le or DSL modem or to a wired Ethernet network To connect to a broadband modem or to an Ethernet network 1 Insert one end of the network cable into the network jack on the back of your computer 2 Inse...

Страница 22: ...nnections 3 If you are starting your computer for the first time follow the on screen instructions to select the language and time zone and to create your first user account 4 Attach and turn on any U...

Страница 23: ...does turn off or slow down most system operations to save power and saves your desktop layout so the next time you restore power the programs are laid out just as you left them Waking your computer f...

Страница 24: ...se input you may need to restart reboot your computer To restart your computer Click Start Shut Down then click Restart Your computer turns off then turns on again OR If your computer does not turn of...

Страница 25: ...se buttons to launch your Internet home page an Internet search page or e mail programs Audio playback buttons Press these buttons to play your audio files and to adjust the volume Navigation keys Pre...

Страница 26: ...ther keys to open utilities like F Find Search R Run and E Computer Application key Press this key to access shortcut menus and help assistants in Windows Directional keys Press these keys to move the...

Страница 27: ...r SCROLL LOCK keys are activated Press the corresponding key to activate the function Windows keys Press one of these keys to open the Windows Start menu These keys can also be used in combination wit...

Страница 28: ...nt on the screen This illustration shows the standard mouse As you move the mouse the pointer arrow on the screen moves in the same direction You can use the left and right buttons on the mouse to sel...

Страница 29: ...he mouse Select an object on the screen Position the pointer over the object Quickly press and release the left mouse button This is called clicking Start a program or open a file or folder Position t...

Страница 30: ...cal disc drive 2 Place the disc in the tray with the label facing up 3 Press the eject button to close the tray Important When you place a single sided disc in the tray make sure that the label side i...

Страница 31: ...s playing audio CDs playing DVDs and accessing data DVD RW Installing programs playing audio CDs playing DVDs accessing data and recording video and data to CDs and DVD R or DVD RW discs DVD RW R Inst...

Страница 32: ...y full length movies several albums of music or several gigabytes of data can fit on a single disc DVDs can be played on a DVD player or a DVD drive equipped computer For more information about playin...

Страница 33: ...ive is a recordable drive you can use the disc burning program on your computer to copy tracks from a music CD to your hard drive copy or create data discs create music CDs create video DVDs and more...

Страница 34: ...our card reader and the slots to use for each type of card examine the face plate of the reader Each slot is assigned a different drive letter for example the E and F drives so data can be transferred...

Страница 35: ...n page 19 To adjust the volume from Windows 1 Double click the speaker icon on the taskbar The volume control slider opens 2 Click and drag the slider up to increase volume and down to decrease volume...

Страница 36: ...aker Settings The Advanced Audio Properties dialog box opens OR If your computer has the Realtek Sound Effect Manager installed double click the Sound Effect Manager icon on the taskbar The Realtek di...

Страница 37: ...use an IEEE 1394 or USB device for the first time your computer will prompt you to install any software the device needs After doing this you can disconnect and reconnect the device at any time Help F...

Страница 38: ...CHAPTER 3 Setting Up and Getting Started 32 8512980 book Page 32 Thursday March 6 2008 1 30 PM...

Страница 39: ...e color panel Installing memory Adding or replacing an optical disc drive Replacing the memory card reader Adding or replacing a hard drive Replacing the heat sink and processor Adding or replacing an...

Страница 40: ...tistatic bags only when you are ready to use them Do not lay components on the outside of antistatic bags because only the inside of the bags provide electrostatic protection Always hold expansion car...

Страница 41: ...al device cables 3 Press the power button for ten seconds to drain any residual power from your computer 4 Loosen the two captive thumbscrews on the back edge of the side panel These screws cannot be...

Страница 42: ...front bezel 1 Remove the side panel by following the instructions in Removing the side panel on page 35 2 Press the three bezel retention tabs then swing the left side of the bezel away from the comp...

Страница 43: ...zel into the slots on the right side of the computer 2 Swing the left side of the bezel in to insert the release tabs on the left side of the bezel into the slots on the left side of the computer 3 Pr...

Страница 44: ...n the two thumbscrews on the back edge of the side panel then reconnect the cables and power cord Replacing the color panel To replace the color panel on the front bezel 1 Find the panel release lever...

Страница 45: ...bezel You should press the two points against the computer until you hear or feel a click which is the sound of the panel s internal locking tabs unlocking 3 Swing the bottom of the panel away from th...

Страница 46: ...abs You should press the two points against the computer until you hear or feel a click which is the sound of the panel s internal locking tabs locking the panel partially into place 6 While pressing...

Страница 47: ...2 For more stability place your computer on its side To avoid scratching the case place it on a towel or other non abrasive surface 3 Find the memory module banks on your system board 4 If you are rem...

Страница 48: ...he module is secure you hear a click 6 Replace the side panel by following the instructions in Replacing the side panel on page 38 7 Return your computer to its upright position 8 Reconnect the cables...

Страница 49: ...to Step 8 For the location of the screws see the photo in Step 6 4 If you are replacing an existing drive disconnect the cables from the drive noting their locations and orientation You will reconnect...

Страница 50: ...on the drive then replace the two drive retention screws 9 Reconnect the drive cables using your notes from Step 4 or according to the manufacturer s instructions 10 Replace the front bezel by follow...

Страница 51: ...the front bezel on page 36 3 Slide the top bezel toward the front of the computer about 3 4 inch then remove it from your computer 4 Remove the two screws that secure the card reader to the computer T...

Страница 52: ...oved previously 7 Plug the cable into the card reader 8 Place the top bezel on top of the computer then slide bezel toward the back of the computer until it clicks into place 9 Reinstall the bezel by...

Страница 53: ...side panel on page 35 2 Disconnect and label all hard drive cables noting their locations and orientation You will reconnect the cables after you install the new drive 3 Disconnect the hard drive cage...

Страница 54: ...e cage 7 If you are replacing a drive note any jumper settings on the old drive and set the jumper on the new drive to be the same OR If you are adding a new drive set the jumper as instructed by the...

Страница 55: ...the new hard drive as your primary drive install Windows using the operating system DVD that came with your computer For more information on restoring your system see Recovering your system on page 9...

Страница 56: ...release lever down lift it completely up then lift the processor retention bracket 6 Remove the processor from the system board 7 Install the new processor onto the system board Make sure that Pin 1 o...

Страница 57: ...to the system board 10 Connect the heat sink fan cable to the system board 11 Replace the side panel by following the instructions in Replacing the side panel on page 38 Adding or replacing an expans...

Страница 58: ...ys 6 If you have just replaced an expansion card reconnect the expansion card cables if any using your notes from Step 2 If you have added a new expansion card connect its cables according to its user...

Страница 59: ...s then exit from the utility 4 Shut down your computer 5 Remove the side panel by following the instructions in Removing the side panel on page 35 6 For more stability place your computer on its side...

Страница 60: ...socket until it snaps into place 10 Replace the side panel by following the instructions in Replacing the side panel on page 38 11 Reconnect all external cables and the power cord 12 Turn on your com...

Страница 61: ...owing the directions in Installing memory on page 41 4 Disconnect all the power and data cables from the system board noting their locations and orientation You will reconnect the cables after you ins...

Страница 62: ...essor on page 49 then install it and the heat sink into the new system board by following the directions in the same procedure 10 Slide the power supply back into the case then install the four screws...

Страница 63: ...ng up a maintenance schedule Caring for your computer Cleaning your computer Updating Windows Using BigFix Managing hard drive space Scheduling maintenance tasks Moving from your old computer 8512980...

Страница 64: ...ce schedule Maintenance task Weekly Monthly When needed Check for viruses X X X Run Windows Update X X Manage hard drive space X Clean up hard drives X X Scan hard drive for errors X X Defragment hard...

Страница 65: ...easy to break in cold temperatures and can melt or warp in high temperatures Damage due to either extreme is not covered by your warranty As a general rule your computer is safest at temperatures tha...

Страница 66: ...int free cloth to clean your computer and other parts of your system Do not use household abrasive or solvent cleaners because they can damage the finish on components Your computer is cooled by air c...

Страница 67: ...use a soft cloth and water to clean the screen Dampen the cloth never apply liquid directly to the screen then wipe the screen with the cloth To clean a CRT monitor use a soft cloth and glass cleaner...

Страница 68: ...n always get the most recent updates and fixes to protect your computer and keep it running smoothly Windows Update scans your computer and provides you with a tailored selection of updates that apply...

Страница 69: ...ates from BigFix sites on the Internet Whenever BigFix detects a problem it alerts you by flashing the blue taskbar icon To fix the problem click on that icon to open BigFix To start BigFix 1 Click St...

Страница 70: ...nnecessary files defragment files and back up files Checking hard drive space To check hard drive space 1 Click Start then click My Computer The My Computer window opens 2 Right click the drive that y...

Страница 71: ...d drive that you want to delete files from for example Local Disk C then click Properties The Properties dialog box opens at the General tab 3 Click Disk Cleanup The Disk Cleanup dialog box opens 4 Ma...

Страница 72: ...encounter hard drive problems To check the hard drive for errors 1 Click Start then click My Computer The My Computer window opens 2 Right click the drive that you want to check for errors for exampl...

Страница 73: ...them may continuously stop and restart the defragmenting process Also if you are connected to a network log off before starting Disk Defragmenter Network communication may stop the defragmentation pro...

Страница 74: ...s on the screen When finished Disk Defragmenter asks if you want to quit the program 6 Click Close then click the in the top right corner to close the Disk Defragmenter window Help For more informatio...

Страница 75: ...disc drive to do a complete hard drive backup Scheduling maintenance tasks The Scheduled Task Wizard lets you schedule maintenance tasks such as running Disk Defragmenter and Error checking To start t...

Страница 76: ...s from your old computer 1 Click Start All Programs Accessories System Tools then click Files and Settings Transfer Wizard 2 Follow the on screen instructions to complete the transfer Transferring fil...

Страница 77: ...onal data files For more information see Using Windows in your online User Guide You can often identify different data file types by looking at the file s extension the part of the file name following...

Страница 78: ...Computer 72 2 Type the filename or part of a filename you want to search for then press ENTER The search results are displayed 3 To learn about more search options click Help 8512980 book Page 72 Thu...

Страница 79: ...CHAPTER6 73 Troubleshooting Safety guidelines First steps Troubleshooting Recovering your system Telephone support 8512980 book Page 73 Thursday March 6 2008 1 30 PM...

Страница 80: ...re that you followed each instruction If an error occurs in a program see the program s printed documentation or the online help Warning Never open your computer case while your computer is turned on...

Страница 81: ...tify your drive type see Identifying optical drive types on page 25 Your computer may be experiencing some temporary memory problems Shut down and restart your computer Some music CDs have copy protec...

Страница 82: ...e that the disc label is facing up then try again Try a different disc Occasionally discs are flawed or become scratched and cannot be read by the DVD drive Clean the disc For more information see Cle...

Страница 83: ...nect a monitor that you know works to your computer Reinstall the device driver The color is not uniform Make sure that the display warms up for at least 30 minutes before making a final judgment abou...

Страница 84: ...network have the same workgroup name Make sure that all computers are using the same Subnet Mask If you assigned IP addressesto the computers make sure that all computers have different IP addresses F...

Страница 85: ...stored to the place where it was originally deleted from If the Recycle Bin was emptied before you try to restore a file the file cannot be restored You need to restore your computer to a working cond...

Страница 86: ...e Recovering your system on page 90 Internet See also Modem dial up on page 83 You cannot connect to the Internet If you are using a dial up modem make sure that the modem cable is plugged into the mo...

Страница 87: ...e lines in your residence or at your local telephone service The condition of the Internet computers to which you connect and the number of users accessing those computers The complexity of graphics a...

Страница 88: ...lure error message Make sure that nothing is resting on the keyboard Make sure that a key is not stuck Press each key to loosen a key that might be stuck then restart your computer Liquid spilled in t...

Страница 89: ...ged into the modem jack and not the Ethernet network jack See your setup poster to make sure that the connections have been made correctly Make sure that your computer is connected to the telephone li...

Страница 90: ...e abort downloads or even disconnect The faster the modem the less line noise it can tolerate and still work correctly Listen to the line using your telephone Dial a single number such as 1 When the d...

Страница 91: ...e sure that the connections have been made correctly see your setup poster or Connecting a dial up modem on page 16 If the modem shares the telephone line with another device make sure that the teleph...

Страница 92: ...he modems first connect If the handshaking sounds are too loud you can turn down the modem volume To turn down the modem volume 1 Click Start then click Control Panel The Control Panel window opens If...

Страница 93: ...d Networks You cannot connect to your company network Every network is unique Contact your company computer department or network administrator for help For more information about setting up a network...

Страница 94: ...ke sure that the power cable is plugged into an AC power source The printer is on but will not print Check the cable between the printer and your computer Make sure that it is connected to the correct...

Страница 95: ...Panel window opens If your Control Panel is in Category View click Printers and Other Hardware 2 Click Double click the Printers and Faxes icon The Printers and Faxes window opens 3 Right click the na...

Страница 96: ...ter s software also called recovering or restoring your system Gateway provides everything you need to recover your system under most conditions A backup copy of your operating system may be provided...

Страница 97: ...y restore device drivers or programs see Recovering specific files and software on page 91 OR To recover your system to a previous condition when software and device drivers were working correctly see...

Страница 98: ...nto the CD or DVD drive The Application Recovery program opens 2 Click the driver or application you want to install To select multiple items press and hold CTRL while clicking each item 3 Click Next...

Страница 99: ...rivers or software and every 24 hours while your computer is turned on Microsoft System Restore takes a snapshot of your system settings and saves it as a restore point In most cases of hard to resolv...

Страница 100: ...stem Restore dialog box opens 3 Click Restore my computer to an earlier time then click Next The Select a Restore Point dialog box opens 4 Click a bold date on the calendar Step 1 on the screen then c...

Страница 101: ...ected and read all notices on the screen 7 Click Next then follow the on screen instructions to finish the restoration If completing Microsoft System Restore does not solve your problem restart Gatewa...

Страница 102: ...en the System Recovery program starts OR Turn on or restart your computer and press F11 while your computer is starting 3 Insert the Operating System Recovery CD DVD when prompted The System Recovery...

Страница 103: ...ormat and Recover dialog box opens 6 Click Yes Files are restored to your hard drive When file recovery has finished the System Restore dialog box opens 7 Click Restart Your computer restarts and Wind...

Страница 104: ...turer s documentation and technical support resources If you have how to questions about using a program see Online Help Printed documentation The Microsoft Windows documentation The software publishe...

Страница 105: ...software see the following resources The printed or online documentation that came with your hardware or software In many cases additional product information and online documentation for Gateway sup...

Страница 106: ...CHAPTER 6 Troubleshooting 100 8512980 book Page 100 Thursday March 6 2008 1 30 PM...

Страница 107: ...APPENDIXA 101 Legal Notices Important safety information Regulatory compliance statements Environmental information Notices 8512980 book Page 101 Thursday March 6 2008 1 30 PM...

Страница 108: ...gs Make sure you provide adequate space at least 6 inches 15 cm around the system for ventilation when you set up your work area Never insert objects of any kind into the computer ventilation openings...

Страница 109: ...to comply with the limits for a Class B digital device pursuant to Part 15 of the FCC rules These limits are designed to provide reasonable protection against harmful interference in a residential ins...

Страница 110: ...ils The Ringer Equivalence Number REN is used to determine the number of devices which may be connected to the telephone line Excessive RENs on a telephone line may result in the devices not ringing i...

Страница 111: ...rotective operation and safety requirements The Department does not guarantee the equipment will operate to the users satisfaction Before installing this equipment users should make sure that it is pe...

Страница 112: ...to an antenna discharge unit size of grounding conductors location of antenna discharge unit connection to grounding electrodes and requirements for the grounding electrode Cable distribution system s...

Страница 113: ...to keep from touching such power lines or circuits Contact with them could be fatal Reference Grounding component 1 Electric service equipment 2 Power service grounding electrode system NEC Art 250 P...

Страница 114: ...andingand using the energy saving features of this product where applicable recycling the inner and outer packaging including shipping containers this product was delivered in and by disposing of or r...

Страница 115: ...gistered trademarks of their respective companies Macrovisionstatement If your computer has a DVD compatible drive and an analog TV Out port the following paragraph applies This product incorporates c...

Страница 116: ...APPENDIX A Legal Notices 110 8512980 book Page 110 Thursday March 6 2008 1 30 PM...

Страница 117: ...ons 19 21 B backing up files 69 battery replacing 53 bezel removing 36 replacing 37 BigFix 63 Blu ray playing 27 recording 27 Blu ray drive locating drive 7 broadband connection 15 modem 15 broadband...

Страница 118: ...2 mouse 9 to Ethernet network 9 15 to Internet 9 to network 9 15 connections analog speakers 9 audio in 10 cable modem 15 center speaker 9 dial up modem 10 16 digital camera 7 9 30 digital video came...

Страница 119: ...ecordable CD 25 recordable DVD 25 troubleshooting 75 77 79 DSL modem 15 connecting 9 troubleshooting 83 DVD cleaning 62 copying 27 drive 25 inserting 24 playing 26 recording 27 troubleshooting 75 77 D...

Страница 120: ...21 power 7 Scroll Lock 19 21 installing battery 53 devices 30 digital camera 30 digital video camera 30 front bezel 36 memory 41 peripheral devices 30 printer 30 scanner 30 side panel 35 system batte...

Страница 121: ...d reader 7 inserting card 28 locating 6 memory card types supported 28 removing card 29 replacing 45 using 28 Memory Stick 28 microphone jack 7 9 Microsoft Certificate of Authenticity 3 model number 3...

Страница 122: ...y devices IEEE 1394 support for 30 USB support for 30 pointer moving 22 23 ports See connections power button 7 connector 8 Hibernate mode 7 indicator 7 source problems 14 Standby Resume 7 troubleshoo...

Страница 123: ...rtcut menus accessing 23 shortcuts opening menu 23 shutting down computer 17 18 side panel removing 35 replacing 35 sleep button 21 sleep mode 17 using 18 SmartMedia 28 sound adjusting 29 controls 29...

Страница 124: ...98 telephone support 98 Web site connection speed 81 turning off computer 7 17 18 turning on computer 7 16 tutoring fee based 99 TV tuner card 10 U uninterruptible power supply UPS 14 updating Windows...

Страница 125: ...8512980 book Page 119 Thursday March 6 2008 1 30 PM...

Страница 126: ...MAN GERSHWIN XP HW REF GDE R0 3 08 8512980 book Page 120 Thursday March 6 2008 1 30 PM...

Отзывы: