background image


14 

Operation 

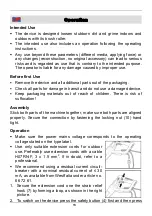
the ON/OFF trigger (6). Release the safety button. 


With the speed adjusting wheel (3) you can steplessly set the speed of 
the bush roller. 

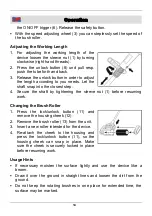
Adjusting the Working Length 

1.  For  adjusting  the  working  length  of  the 

device  loosen  the  sleeve  nut (1)  by  turning 
clockwise (right hand threads). 

2.  Press  the  unlock  button  (8)  und  pull  resp. 

push the tube forth and back. 

3.  Release the unlock button in order to adjust 

the  length  according  to  you  needs.  Let  the 
shaft snap into the closest step. 

4.  Secure  the  shaft  by  tightening  the  sleeve  nut  (1)  before  resuming 

work. 

Changing the Brush Roller 

1.  Press  the  lock/unlock  button  (11)  and 

remove the housing cheek (12). 

2.  Remove the brush roller (13) from the unit. 
3.  Insert a new roller intended for the device. 
4.  Re-attach  the  cheek  to  the  housing  and 

press  the  lock/unlock  button  (11),  so  the 
housing  cheek  can  snap  in  place.  Make 
sure  the  cheek  is  securely  locked  in  place 
before resuming work. 

Usage Hints 


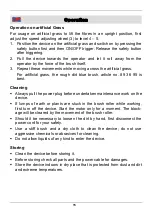
If  necessary  moisten  the  surface  lightly  and  use  the  device  like  a 
broom. 


Draw  it  over  the  ground  in  straight  lines  and  loosen  the  dirt  from  the 
ground. 


Do  not  keep  the  rotating  brushes  in  one  place  for  extended  time,  the 
surface may be marked. 


Содержание 94 60 24

Страница 1: ...Article No 94 60 24 Multi Brush GMXB1020 2 Multi B rste GMXB1020 2 Artikel Nr 94 60 24 Originalanleitung Original Instructions...

Страница 2: ...and keep it for future reference Bedienungsanleitungen enthalten wichtige Hinweise f r den Umgang mit Ihrem neuen Ger t Sie erm glichen Ihnen alle Funktionen zu nutzen und sie helfen Ihnen Missverst...

Страница 3: ...III bersicht Overview bersicht Overview 3 4 5 7 8 2 1 11 12 13 6 9 10...

Страница 4: ...fmutter Sleeve Nut 2 Zusatzhandgriff Auxiliary Handle 3 Geschwindigkeit Einstellrad Speed Adjusting Wheel 4 Sicherungsknopf Safety Button 5 Handgriff Handle 6 EIN AUS Schalter ON OFF Trigger 7 Zugentl...

Страница 5: ...ge 15 Storing Page 15 Technical Data Page 16 Sicherheitshinweise Seite 2 Bestimmungsgem er Gebrauch Seite 9 Vor der ersten Benutzung Seite 9 Zusammenstecken Seite 9 Inbetriebnahme Seite 9 Einstellung...

Страница 6: ...dern Lassen Sie das eingeschaltete Ger t niemals unbeaufsichtigt Beachten Sie die entsprechenden nationalen Vorschriften wenn Sie das Ger t auf Stra en Wegen Grundst cken etc betreiben Verwenden Sie d...

Страница 7: ...r B rstenwalze Es besteht Stromschlaggefahr Halten Sie das Ger t w hrend des Betriebs gut fest Verwenden Sie das Ger t nur bei Tageslicht oder bei Verwen dung ausreichend starker Kunstlichtquellen Nic...

Страница 8: ...n gen und benutzen Sie das Ger t niemals wenn es besch digt ist Lassen Sie es durch einen Fachmann instand setzen oder wenden Sie sich an unsere Kundenbetreuung Zerlegen Sie das Ger t nicht und untern...

Страница 9: ...r und dem Design dieses Produkts k nnen folgende Gefahren auftreten Gesundheitssch den aufgrund von Schwingungsemissionen wenn das Produkt ber l ngere Zeit nicht oder nur unzureichend benutzt oder gew...

Страница 10: ...when in use Please observe the corresponding national regulations if you intend to use the device on streets paths property etc Do not operate the device while third parties are in the danger zone Th...

Страница 11: ...e take care that the brush roller does not jam during operation A long term jam can damage the device If the rotat ing brush roller is blocked by an obstacle immediately release the ON OFF trigger dis...

Страница 12: ...g parts Keep the extension power cord away from the device Do not operate the device if the power cable is damaged Rest Risks Even if you are operating this product in accordance with all the safety r...

Страница 13: ...kung berpr fen Sie alle Teile auf evtl Transportsch den Benutzen Sie das Ger t nicht wenn es besch digt ist Halten Sie die Verpackungsmaterialien von Kleinkindern fern Es besteht Erstickungsgefahr Zus...

Страница 14: ...bzw schieben Sie das Rohr vor und zur ck 3 Lassen Sie die Entriegelungstaste los um die L nge nach Ihren Bed rfnissen einzu stellen Lassen Sie den Schaft in die n chstm gliche Raste einrasten 4 Siche...

Страница 15: ...ich und lassen Sie es danach durch die Rotationskraft der B rste wieder von Ihnen wegbewegen 3 Wiederholen Sie diesen Vorgang w hrend Sie sich ber den Kunstrasen bewegen F r Kunstrasen eignet sich am...

Страница 16: ...das Ger t vor jeder Lagerung berpr fen Sie vor der Lagerung des Ger tes alle Teile und das Netzkabel auf Besch digungen Lagern Sie das Ger t im Innenbereich an einem trockenen vor Staub Schmutz und ex...

Страница 17: ...Keep packaging materials out of reach of children There is risk of suffocation Assembly Stick both parts of the machine together make sure both parts are aligned properly Secure the connection by fas...

Страница 18: ...ecure the shaft by tightening the sleeve nut 1 before resuming work Changing the Brush Roller 1 Press the lock unlock button 11 and remove the housing cheek 12 2 Remove the brush roller 13 from the un...

Страница 19: ...9 36 95 is best Cleaning Always pull the power plug before undertaken maintenance work on the device If lumps of earth or plants are stuck in the brush roller while working first turn off the device S...

Страница 20: ...d IPX0 Protection Standard Schalldruckpegel LpA 89 8 dB A KpA 3 dB A Sound Pressure Level Schallleistungspegel LwA 100 8 dB A KwA 3 dB A Sound Power level Vibration Hauptgriff ah M 6 817 m s2 K 1 5 m...

Страница 21: ...r usche so gering wie m glich zu halten Beispielhafte Ma nahmen zur Verringerung der Vibrationsbe lastung sind das Tragen von Handschuhen beim Gebrauch des Werkzeugs die Begrenzung der Arbeitszeit und...

Страница 22: ...ez l outil hors de port e des enfants Ne laissez jamais l appareil sans surveillance Respectez les r glements en vigueur si vous utilisez votre appareil dans les rues sur les routes terrains etc N uti...

Страница 23: ...areil en cas de mauvaise visibilit N utilisez pas l appareil pr s des tangs de jardin piscines ou autres tendues d eau Assurez vous que le rouleau de la brosse ne s arr te pas pendant le fonctionnemen...

Страница 24: ...ructions avant de faire fonctionner l appareil Tenir l cart toute personne de la zone de travail lors de l utilisation Attention aux objets volants Attention au risque d tre pris par la machine Lors d...

Страница 25: ...tilis ou entretenu pendant longtemps Blessures et dommages mat riels caus s par des outils bris s ou l impact soudain d objets dissimul s pendant l utilisation Risque de blessures et de dommages mat r...

Страница 26: ...ore Tenere il prodotto lontano dalla portata dei bambini Non lasciare mai l apparecchio accesso incustodito Rispettare le norme nazionali vigenti se si adopera l apparecchio su strade sentieri terreni...

Страница 27: ...rno o in presenza di sorgenti di luce artificiali sufficientemente forti Non utilizzare in condizioni di scarsa visibilit Non utilizzare vicino a laghetti da giardino piscine o altri corsi d acqua Non...

Страница 28: ...o Farlo riparare da uno specialista o contattare il nostro servizio clienti Non smontare il dispositivo e non tentare la riparazione per conto proprio Spiegazione dei Simboli Rispettare le istruzioni...

Страница 29: ...I seguenti rischi possono verificarsi con la struttura e il design di questo prodotto Danni alla salute dovuti alle emissioni di vibrazioni se il prodotto non viene utilizzato o mantenuto per lungo t...

Страница 30: ...Notizen Notes 26...

Страница 31: ...Notizen Notes 27...

Страница 32: ...Notizen Notes 28...

Страница 33: ...their amendments 2011 65 EU 2011 65 EU Beschr nkung der Verwendung bestimmter gef hrlicher Stoffe in Elektro und Elektronikger ten RoHS Restriction of the Use of certain hazardous Substances in electr...

Страница 34: ...u vermeiden Sollten Sie sich einmal von diesem Artikel trennen wollen so bedenken Sie bitte dass viele seiner Komponenten aus wertvollen Rohstoffen bestehen und wiederverwertet werden k nnen Entsorgen...

Отзывы: