background image

Attaching the Base Plate to the Motorcycle Mount

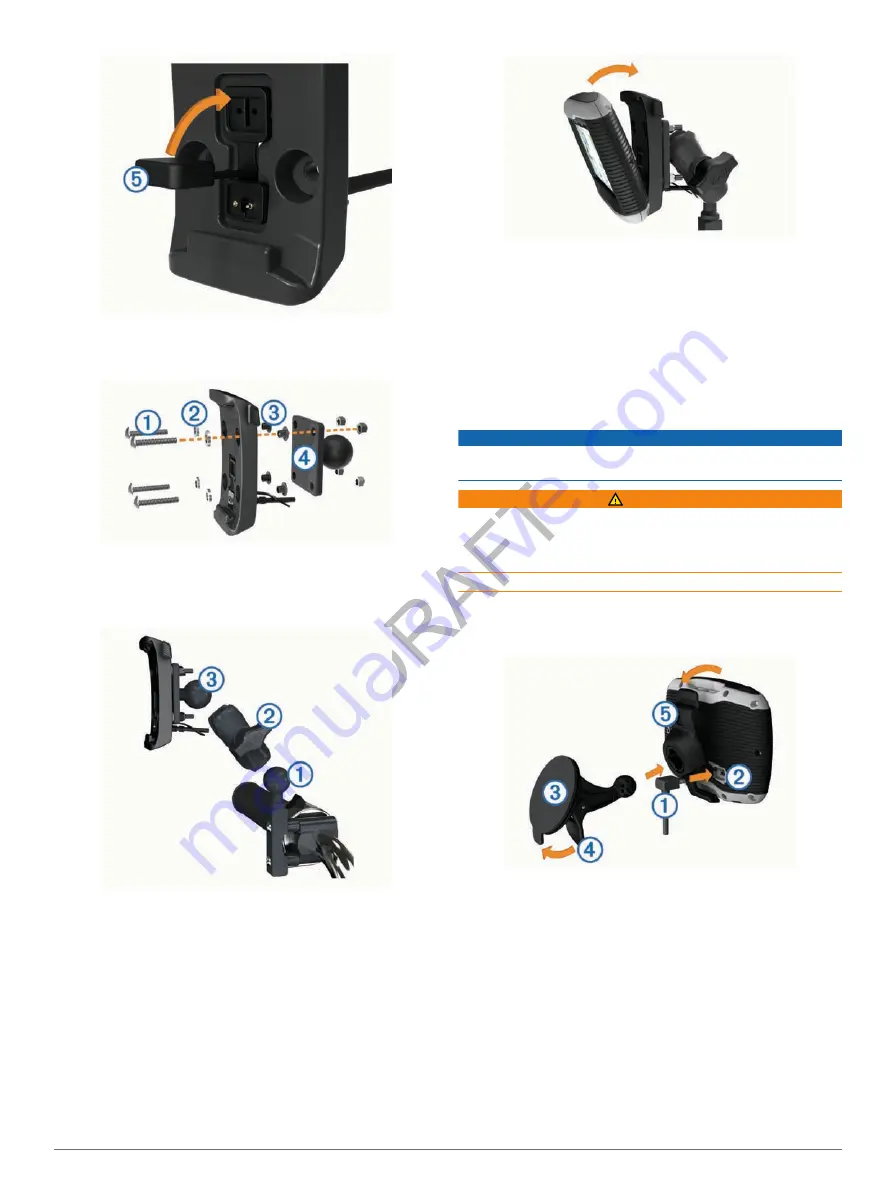
1

Thread the M4 x 40 mm panhead screws 

 through the 

washers 

, cradle , spacers 

, and base plate 

.

2

Tighten the nuts to secure the base plate.

Attaching the Base Plate to the Handlebar Base

1

Align the ball of the handlebar base 

 and the ball of the 

base plate 

 with the double-socket arm 

.

2

Insert the ball into the double-socket arm.

3

Tighten the knob slightly.

4

Adjust for optimal viewing and operation.

5

Tighten the knob to secure the mount.

6

Align the ball of the base plate attached to the cradle 

 with 

the other end of the double-socket arm.

7

Repeat steps 2–4.

Installing Your Device in the Motorcycle Mount

1

Fit the bottom of your device into the cradle.

2

Tilt the device back until it snaps into place.

Removing Your Device from the Motorcycle 

Mount

1

Press the button on the side of the mount.

2

Lift out the device.

3

On the motorcycle mount, place the weather cap on the 

power connector in the center of the cable (

page 1

).

Mounting Your Device in an Automobile

NOTICE

Before mounting the device, check the local laws pertaining to 

windshield mounting.

 WARNING

This product contains a lithium-ion battery. To prevent the 

possibility of personal injury or product damage caused by 

battery exposure to extreme heat, store the device out of direct 

sunlight.
Do not use the suction cup mount on a motorcycle.

1

Pull back the weather cap on the back of the cradle.

2

Plug the automotive power cable 

 into the mini-USB 

connector 

 under the weather cap.

3

Remove the clear plastic from the suction cup.

4

Clean and dry your windshield and the suction cup with a 

lint-free cloth.

5

Press the suction cup 

 to the windshield, and flip the lever 

 back toward the windshield.

6

Snap the cradle 

 onto the suction cup arm.

7

Fit the bottom of your device into the cradle.

8

Tilt the device back until it snaps into place.

9

Plug the other end of the automotive power cable into a 

power outlet.

2

Getting Started

Содержание ZUMO 340

Страница 1: ...z mo 300 Series Owner s Manual Models zumo 340 350 March 2012 190 01457 00 Printed in Taiwan...

Страница 2: ...the USA and other countries BaseCamp HomePort myGarmin myTrends n Maps Guarantee n Maps Lifetime and trafficTrends are trademarks of Garmin Ltd or its subsidiaries These trademarks may not be used wi...

Страница 3: ...Saved Location 6 Assigning Categories to a Saved Location 6 Sharing a Saved Location 6 Sending a Location to the Device 6 Loading Photos for Navigation 6 Deleting a Saved Location 6 Navigation 6 Start...

Страница 4: ...o Your Computer 13 Transferring Data From Your Computer 13 Disconnecting the USB Cable 13 Deleting Files 13 Customizing the Device 13 Map and Vehicle Settings 13 Enabling Maps 13 Navigation Settings 1...

Страница 5: ...ebar Base The device includes parts for two handlebar installation solutions Custom mounts can require additional hardware www ram mount com Installing the U bolt and Handlebar Base 1 Place the U bolt...

Страница 6: ...3 On the motorcycle mount place the weather cap on the power connector in the center of the cable page 1 Mounting Your Device in an Automobile NOTICE Before mounting the device check the local laws p...

Страница 7: ...you hold the Power key for less than 5 seconds the device enters sleep mode page 3 2 Select Off Resetting the Device You can reset your device if it stops functioning Hold the Power key for 10 second...

Страница 8: ...age 6 About Locations The detailed maps loaded in your device contain locations such as restaurants hotels and auto services You can use categories to browse for nearby businesses and attractions Find...

Страница 9: ...and select Save 3 Select the latitude coordinate 4 Enter the new coordinate and select Done 5 Select the longitude coordinate 6 Enter the new coordinate and select Done 7 Select View on Map Finding a...

Страница 10: ...onnect garmin com 1 Connect your device to your computer page 3 2 If necessary install the Garmin Communicator Plugin Go to www garmin com communicator for more information 3 On your computer find a l...

Страница 11: ...om the map select Set Speed Limit 2 Select and to set the speed limit Using Suggested Routes Before you can use this feature you must save at least one location and enable the travel history feature p...

Страница 12: ...a different icon Removing Buttons from the Map You can remove all buttons from the right side of the map 1 Select Settings Map Vehicle Map Buttons 2 Select an icon and select OK 3 Select Save Changin...

Страница 13: ...each other 2 On your device enable wireless technology 3 Select an option Select Add Headset If you have already paired a different headset select Settings Bluetooth Add Headset 4 On your headset enab...

Страница 14: ...s Routes and Destinations Before you can use this feature you must enable the travel history feature page 14 You can view your previous routes and places you have stopped on the map Select Apps Where...

Страница 15: ...to view a list of the offers you have received Disabling Traffic and Offers 1 Select Traffic Traffic 2 Clear the Traffic check box The device no longer receives live traffic data but automobile routes...

Страница 16: ...nderstanding Traffic Data The traffic legend explains the icons and colors used on the traffic map 1 From the map select Traffic 2 Select Traffic Legend Traffic Subscriptions Subscription Activation Y...

Страница 17: ...p and Vehicle Settings Select Settings Map Vehicle Vehicle Changes the icon to represent your position on the map Go to www garmingarage com for more icons Driving Map View Sets the perspective on the...

Страница 18: ...Allows you to select a 12 hour 24 hour or UTC display time Units Sets the unit of measure used for distances Language and Keyboard Settings Select Settings Language Keyboard Voice Language Sets the l...

Страница 19: ...com for more information 1 Clean and dry the dashboard where you are placing the disk 2 Remove the backing from the adhesive on the bottom of the disk 3 Place the disk on the dashboard 4 Remove the c...

Страница 20: ...the vehicle is turned on and is supplying power to the power outlet Your device can only charge between 32 F and 113 F between 0 C and 45 C My battery does not stay charged for very long To maximize t...

Страница 21: ...ard 14 voice language 14 latitude and longitude coordinates 5 loading pictures 6 locations See also locations current 6 9 recently found 5 saving 6 searching for 5 setting home 5 simulated 5 See also...

Страница 22: ...s 8 alternate route 12 avoiding 12 data 12 disabling 11 12 icons 12 incidents 12 lifetime subscriptions 3 recalculating routes 12 receiver 11 route recalculations 12 searching for delays 12 trafficTre...

Страница 23: ......

Страница 24: ...2 3669 9699 0800 0233937 815 69 555 00800 4412 454 44 2380 662 915 00 35 1214 447 460 00 34 902 007 097 00 46 7744 52020 Garmin International Inc 1200 East 151st Street Olathe Kansas 66062 USA Garmin...

Отзывы: