background image

Steering Actuator Installation and Connection Considerations

NOTICE

You must install the steering actuator in a tilt tube made of stainless steel. Installing the steering actuator in a 
tilt tube made of a material other than stainless steel will cause rust to develop inside of the tilt tube, and 
eventually the steering actuator will seize. Mechanical damage to the steering actuator caused by attempting to 
free a seized push rod is not covered by the product warranty.

• The steering actuator mounts in the tilt tube of your motor and uses a steering arm and linkage system to 

steer.

• You can install the steering actuator from either side of the tilt tube.
• You must install the steering actuator before permanently mounting the ECU.
• You cannot extend the cable that connects the steering actuator to the ECU.
• Popular motor manufacturers such as Honda

®

 and Yamaha

®

 commonly use tilt tubes made of steel that is not 

stainless. You must replace the original tilt tube with a stainless steel tilt tube before installing the steering 
actuator.

• Even when installing the steering actuator in a stainless steel tilt tube, if you use your boat in saltwater, you 

should perform the routine maintenance at least twice per year (

Steering Actuator Routine Maintenance and 

Storage Information, page 19

).

Throttle Actuator Mounting and Connection Considerations

• The throttle actuator mounts inside the motor housing and connects to the throttle to control the speed.
• You should follow the instructions provided with the throttle actuator for assembly and mounting details.
• You must install the throttle actuator before permanently mounting the ECU.
• You cannot extend the cable that connects the throttle actuator to the ECU.

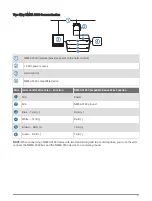
NMEA 2000 Connection Considerations

• The CCU and the helm control must connect to a NMEA 2000 network.
• If your boat does not already have a NMEA 2000 network, one can be built using the included NMEA 2000 

cables and connectors (

Building a Basic NMEA 2000 Network for the Autopilot System, page 17

).

• To use the advanced features of the autopilot, optional NMEA 2000 devices, such as a wind sensor, a water-

speed sensor, or a GPS device, can be connected to the NMEA 2000 network.

Installation Procedures

 CAUTION

To avoid possible personal injury, always wear safety goggles, ear protection, and a dust mask when drilling, 
cutting, or sanding.

NOTICE

When drilling or cutting, always check what is on the opposite side of the surface to avoid damaging the vessel.

After you have planned the autopilot installation on your boat and satisfied all of the mounting and wiring 
considerations for your particular installation, you can begin mounting and connecting the components.

Helm Control Installation

A dedicated helm control is not included in all autopilot packages. If you install the autopilot without a dedicated 
helm control, the autopilot CCU must be connected to the same NMEA 2000 network as a compatible Garmin 
chartplotter to configure and control the autopilot system.
Detailed mounting instructions are included in the helm control box.

6

Содержание Reactor 40

Страница 1: ...and other boats CAUTION When in use beware of hot surfaces on the heat sink motor and solenoid components When in use beware the risk of entrapment or pinching from moving parts Failure to install and maintain this equipment in accordance with these instructions could result in damage or injury Installation Preparation The autopilot system consists of multiple components You should familiarize you...

Страница 2: ...eat gun Dielectric grease Marine sealant Portable or handheld compass to test for magnetic interference White lithium grease Stainless steel tilt tube required if the vessel does not have a stainless steel tilt tube installed Thin cloth or small sponge for cleaning the inside of the tilt tube NOTE Mounting screws are provided for the main components of the autopilot system If the provided screws a...

Страница 3: ...autopilot to optional NMEA 0183 devices such as a wind sensor a water speed sensor or a GPS device NMEA 0183 Connection Considerations page 20 NMEA 2000 power cable You should install this cable only if you are building a NMEA 2000 network Do not install this cable if there is an existing NMEA 2000 network on your boat You must connect the NMEA 2000 power cable to a 9 to 16 Vdc power source NMEA 2...

Страница 4: ...bles reach each component and that each component is in an acceptable location before mounting or wiring any components CCU Mounting and Connection Considerations The CCU is the primary sensor of the Reactor 40 Kicker autopilot system For best performance observe these considerations when selecting a mounting location A handheld compass should be used to test for magnetic interference in the area ...

Страница 5: ...rence You can use a handheld compass to test a mounting location for magnetic interference 1 Hold a handheld compass in the CCU mounting location 2 Move the compass six inches to the left of the location then six inches to the right observe the needle and select an action If the compass needle moves more than three degrees during this step magnetic interference is present Select a new mounting loc...

Страница 6: ...hrottle to control the speed You should follow the instructions provided with the throttle actuator for assembly and mounting details You must install the throttle actuator before permanently mounting the ECU You cannot extend the cable that connects the throttle actuator to the ECU NMEA 2000 Connection Considerations The CCU and the helm control must connect to a NMEA 2000 network If your boat do...

Страница 7: ... remove the in line fuse holder To prevent the possibility of injury or product damage caused by fire or overheating the appropriate fuse must be in place as indicated in the product specifications In addition connecting the power cable without the appropriate fuse in place voids the product warranty You should connect the ECU power cable directly to the boat battery if possible Although it is not...

Страница 8: ...ice should not need additional chassis grounding in most installation situations If you experience interference you can use the grounding screw on the housing to connect the device to the water ground of the boat to help avoid the interference 8 ...

Страница 9: ...nd the power cable using the appropriate wire gauge for the length of the extension Item Description Fuse Battery 9 ft 2 7 m no extension Item Description Splice 10 AWG 5 26 mm extension wire Fuse 8 in 20 3 cm Battery 8 in 20 3 cm Up to 15 ft 4 6 m 9 ...

Страница 10: ...tem Description Splice 8 AWG 8 36 mm extension wire Fuse 8 in 20 3 cm Battery 8 in 20 3 cm Up to 23 ft 7 m Item Description Splice 6 AWG 13 29 mm extension wire Fuse 8 in 20 3 cm Battery 8 in 20 3 cm 10 ...

Страница 11: ...ary see your motor manual or contact the manufacturer for instructions on removing the tiller lock Preparing the Tilt Tube NOTICE You must install the steering actuator in a tilt tube made of stainless steel Installing the steering actuator in a tilt tube made of material other than stainless steel will cause rust to develop inside of the tilt tube and eventually the steering actuator will seize M...

Страница 12: ... Screw the steering actuator onto the end of the tilt tube 4 Rotate the steering actuator until the connector is facing the best direction for your installation 5 Using the included 5 mm hex wrench tighten the screw to prevent the steering actuator from rotating on the tilt tube 6 Slide the seal onto the other end of the steering actuator and rotate it clockwise to attach it to the tilt tube 12 ...

Страница 13: ...Needed Honda Right angle Mercury Right angle Yamaha Flat 2 Select an action If your installation requires a right angle bracket follow the instructions for assembling and installing the right angle bracket and linkage arm Installing the Right Angle Bracket and Linkage Arm page 14 If your installation requires a flat bracket follow the instructions for assembling and installing the flat bracket and...

Страница 14: ...to tighten the bolts after the linkage is assembled you may find it easier to secure the bracket to the kicker motor tiller arm after you have assembled the linkage on the bracket On some Mercury motors removing the bolts allows the tiller arm to separate from the motor You should place the bracket between the tiller arm and the motor when securing it with the bolts 4 With the wrench flats on the ...

Страница 15: ...or for you to tighten the bolts after the linkage is assembled you may find it easier to secure the bracket to the kicker motor tiller arm after you have assembled the linkage 4 Place the black nylon washer over the threaded rod on the bracket 5 With the wrench flats on the bushing pointing away from the bracket screw the bushing onto the threaded rod on the bracket 6 Using an 11 mm 7 16 in wrench...

Страница 16: ... grease to the pin holes on the cable connector to prevent corrosion especially if you are using the autopilot system in saltwater Connecting the Drive Actuator and Throttle Actuator You should install the drive actuator and throttle actuator on the motor before connecting them to the ECU 1 Route the drive actuator cable to the drive actuator and to the ECU and make sure there is enough slack in t...

Страница 17: ...ls on the product page for your device at www garmin com Building a Basic NMEA 2000 Network for the Autopilot System NOTICE If you are installing a NMEA 2000 power cable you must connect it to the boat ignition switch or through another in line switch NMEA 2000 devices will drain your battery if the NMEA 2000 power cable is connected to the battery directly A dedicated helm control is not included...

Страница 18: ... by connecting it to the side of the disconnected T connector or backbone extension cable 5 Route the included drop cable to the CCU and to the bottom of the T connector added in step 4 If the included drop cable is not long enough you can use a drop cable up to 6 m 20 ft long not included 6 Connect the drop cable to the CCU and the T connector 7 If needed repeat steps 2 through 6 for the helm con...

Страница 19: ...y When you store the boat for the off season you should complete these actions Turn the motor fully to one side so the push rod on the steering actuator is fully extended out of the tilt tube Clean the extended push rod and cover it with white lithium grease Freeing a Seized Steering Actuator NOTICE If the steering actuator becomes stuck inside the tilt tube you must not attempt to force the steer...

Страница 20: ...ion The corresponding A and B wires of each internal port should be connected to the A and B wires of the NMEA 0183 device You can connect one NMEA 0183 device to the Rx port to input data to this chartplotter and you can connect up to three NMEA 0183 devices in parallel to the Tx port to receive data output by this chartplotter See the NMEA 0183 device installation instructions to identify the tr...

Страница 21: ...re Helm Control Wire Color Function NMEA 0183 Compatible Device Wire Function N A Power N A NMEA 0183 ground Blue Tx A Rx A White Tx B Rx B Brown Rx A Tx A Green Rx B Tx B NOTE When connecting a NMEA 0183 device with two transmitting and two receiving lines you do not need to connect the NMEA 2000 bus and the NMEA 0183 device to a common ground 21 ...

Страница 22: ...twork provides power to the helm control 12 Vdc power source Helm control NMEA 0183 compatible device Wire Helm Control Wire Color Function NMEA 0183 Compatible Device Wire Function N A Power N A NMEA 0183 ground Blue Tx A Rx White unconnected N A Brown Rx A Tx A Green Rx B Tx B NOTE When connecting a NMEA 0183 device with only one receiving Rx line you must connect the NMEA 2000 bus and the NMEA ...

Страница 23: ...00 network provides power to the helm control 12 Vdc power source Helm control NMEA 0183 compatible device Wire Helm Control Wire Color Function NMEA 0183 Compatible Device Wire Function N A Power Green Rx B connect to NMEA 0183 ground NMEA 0183 ground Blue Tx A Rx A White Tx B Rx B Brown Rx A Tx A NOTE When connecting a NMEA 0183 device with only one transmitting Tx line you must connect the NMEA...

Страница 24: ... high impact plastic Water rating IEC 60529 IPX7 CCU cable length 5 m 16 ft NMEA 2000 input voltage From 9 to 16 Vdc NMEA 2000 LEN 4 200 mA The device withstands incidental exposure to water of up to 1 m for up to 30 min For more information go to www garmin com waterrating ECU Dimensions W H D 175 142 64 5 mm 6 9 5 6 2 5 in Weight 680 g 24 oz Temperature range From 15 to 60 C from 5 to 140 F Mate...

Страница 25: ...64 Transmit Receive PGN list group function 126996 Product information 127257 Transmit Receive attitude data 127251 Transmit Receive rate of turn Transmit only 127250 Vessel heading Receive only 127258 Magnetic variation 127488 Engine parameters Rapid update 128259 Water speed 129025 Position Rapid update 129026 COG SOG Rapid update 129283 Cross track error 129284 Navigation data 130306 Wind data ...

Страница 26: ...259 Water speed 129025 Position Rapid update 129026 COG SOG Rapid update 129283 Cross track error 129284 Navigation data 129540 GNSS satellites in view 130306 Wind data Receive only 127245 Rudder data 127250 Vessel heading 127488 Engine parameters Rapid update 128259 Water speed 129025 Position Rapid update 129029 GNSS position data 129283 Cross track error 129284 Navigation data 129285 Navigation...

Страница 27: ...formation When connected to optional NMEA 0183 compatible devices the autopilot uses the following NMEA 0183 sentences Type Sentence Transmit hdm Receive wpl gga grme gsa gsv rmc bod bwc dtm gll rmb vhw mwv xte 27 ...

Страница 28: ...has risen above 100 C 212 F The ECU shuts down Error Lost Communication Between ECU and CCU when the autopilot is engaged Communication between the CCU and the ECU has timed out The helm control or chart plotter beeps and the autopilot transitions to standby Contacting Garmin Support Go to support garmin com for help and information such as product manuals frequently asked questions videos and cus...

Отзывы: