background image

2

If necessary, select a settings category.

3

Select   > 

Restore

.

Appendix

Power Cables

Your device can be powered various ways.
• Vehicle power cable
• USB cable
• AC adapter (optional accessory)

Charging the Device

You can charge the battery in the device using any of these 

methods.
• Connect the device to the vehicle power cable.
• Connect the device to a computer using the included USB 

cable.

• Connect the device to an optional power adapter accessory, 

such as a wall power adapter.

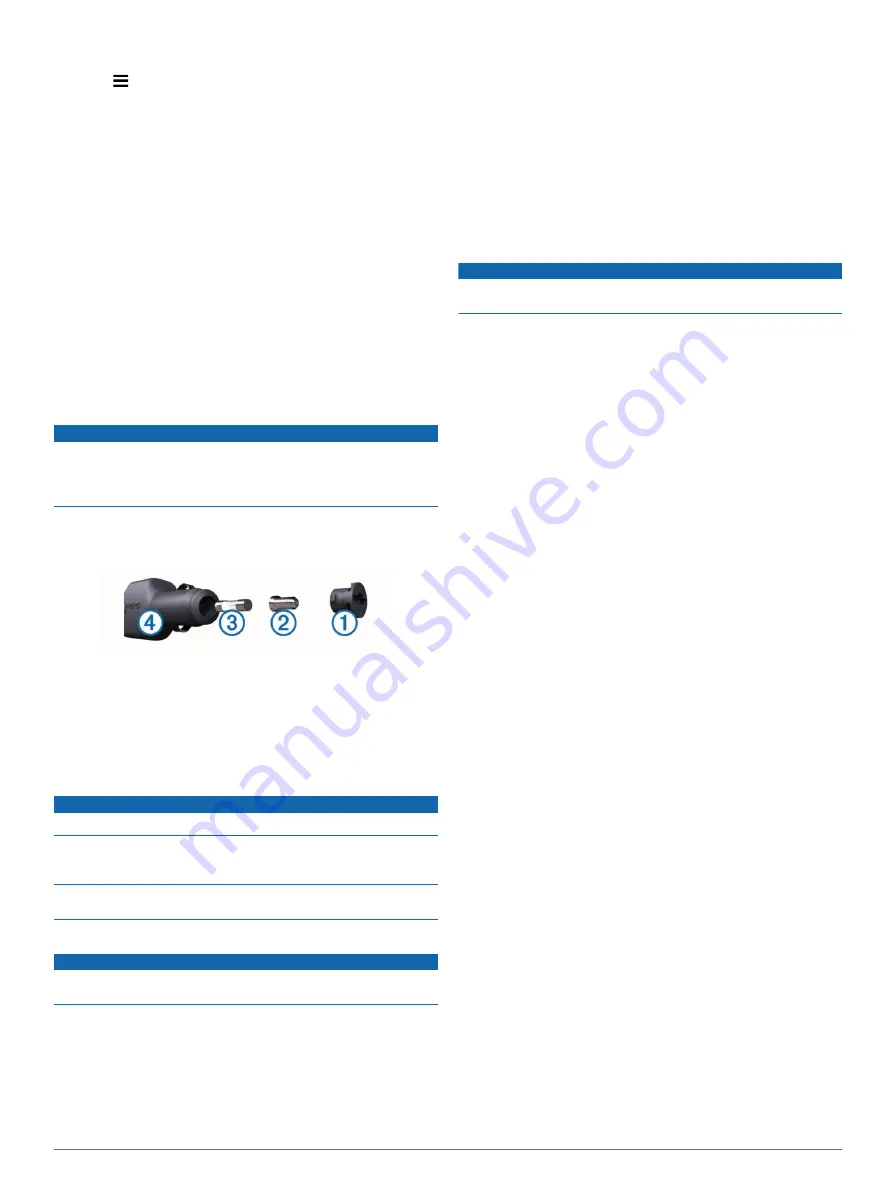
Changing the Fuse in the Vehicle Power Cable

NOTICE

When replacing the fuse, do not lose any of the small pieces 

and make sure they are put back in the proper position. The 

vehicle power cable does not work unless it is assembled 

correctly.

If your device does not charge in your vehicle, you may need to 

replace the fuse located at the tip of the vehicle adapter.

1

Unscrew the end piece 

À

.

TIP: 

You may need to use a coin to remove the end piece.

2

Remove the end piece, the silver tip 

Á

, and the fuse 

Â

.

3

Install a 2 A fast-blow fuse.

4

Place the silver tip in the end piece.

5

Screw the end piece back into the vehicle power cable 

Ã

.

Device Care

NOTICE

Avoid dropping your device.
Do not store the device where prolonged exposure to extreme 

temperatures can occur, because it can cause permanent 

damage.
Never use a hard or sharp object to operate the touchscreen, or 

damage may result.

Cleaning the Outer Casing

NOTICE

Avoid chemical cleaners and solvents that can damage plastic 

components.

1

Clean the outer casing of the device (not the touchscreen) 

using a cloth dampened with a mild detergent solution.

2

Wipe the device dry.

Cleaning the Touchscreen

1

Use a soft, clean, lint-free cloth.

2

If necessary, lightly dampen the cloth with water.

3

If using a dampened cloth, turn off the device and disconnect 

the device from power.

4

Gently wipe the screen with the cloth.

Avoiding Theft

• Remove the device and mount from sight when not in use.
• Remove the residue left on the windshield by the suction 

cup.

• Do not keep your unit in the glove compartment.
• Register your device at 

http://my.garmin.com

.

Mounting on Your Dashboard

NOTICE

The permanent mounting adhesive is extremely difficult to 

remove after it is installed.

Use the mounting disk to mount your device to the dashboard 

and comply with certain state regulations. See 

www.garmin.com 

for more information.

1

Clean and dry the dashboard where you are placing the disk.

2

Remove the backing from the adhesive on the bottom of the 

disk.

3

Place the disk on the dashboard.

4

Remove the clear plastic cover from the top of the disk.

5

Place the suction cup mount on top of the disk.

6

Flip the lever down (toward the disk).

Removing the Device, Mount, and Suction 

Cup

Removing the Device from the Mount

1

Grip the device by the top and bottom.

2

Pull the bottom edge of the device toward you until it 

releases from the magnet.
Pulling the device straight toward you may cause the mount 

to release from the suction cup.

Removing the Mount from the Suction Cup

1

Turn the device mount to the right or left.

2

Apply pressure until the socket on the mount releases the 

ball on the suction cup.

Removing the Suction Cup from the Windshield

1

Flip the lever on the suction cup toward you.

2

Pull the tab on the suction cup toward you.

Purchasing Additional Maps

1

Go to your device product page at (

www.garmin.com

).

2

Click the 

Maps

 tab.

3

Follow the on-screen instructions.

Purchasing Accessories

Go to 

http://buy.garmin.com

.

Troubleshooting

The suction cup will not stay on my 

windshield

1

Clean the suction cup and windshield with rubbing alcohol.

2

Dry with a clean, dry cloth.

3

Mount the suction cup (

page 1

).

14

Appendix

Содержание nuvi 3597LMTHD

Страница 1: ...n vi 3507 3508 Series Owner s Manual March 2013 190 01580 00_0A Printed in Taiwan...

Страница 2: ...d without the express permission of Garmin BaseCamp HomePort MapSource myGarmin ecoRoute myTrends trafficTrends n Maps Guarantee and n Maps Lifetime are trademarks of Garmin Ltd or its subsidiaries Th...

Страница 3: ...Information 5 Viewing Trip Data from the Map 5 Viewing the Trip Information Page 6 Viewing the Trip Log 6 Resetting Trip Information 6 Using Suggested Routes 6 Viewing Current Location Information 6 F...

Страница 4: ...ute Preferences 13 Display Settings 13 Bluetooth Settings 13 Disabling Bluetooth 13 Traffic Settings 13 Units and Time Settings 13 Language and Keyboard Settings 13 Device and Privacy Settings 13 Prox...

Страница 5: ...e may be eligible for a free map update within 90 days of first acquiring satellites while driving Go to www garmin com numaps for terms and conditions Lifetime Subscriptions Some models include subsc...

Страница 6: ...eturn to the main menu Select or to see more choices Hold or to scroll faster Select to see a menu of options for the current screen Using the On Screen Keyboard See Language and Keyboard Settings to...

Страница 7: ...location is saved as a parking spot Select Apps Last Spot Search Tools Search tools allow you to search for specific types of locations by responding to on screen prompts Finding an Intersection 1 Se...

Страница 8: ...an create or download custom POI lists on your computer and install them on your device using POI Loader software 1 Go to www garmin com poiloader 2 Follow the on screen instructions Using the POI Loa...

Страница 9: ...image of the junction appears for junctions on major roadways Viewing the Entire Route on the Map 1 While navigating a route select the navigation bar at the top of the map 2 Select Map Viewing the Ne...

Страница 10: ...From the map select the vehicle Finding Nearby Services You can use the Where Am I page to find nearby services such as fuel hospitals or police stations 1 From the map select the vehicle 2 Select a...

Страница 11: ...vehicle power to receive traffic information through a traffic receiver The powered traffic receiver and the device may need to be in data range of a station transmitting traffic data to receive traf...

Страница 12: ...scriptions Select Settings Traffic Subscriptions Adding a Subscription You can purchase traffic subscriptions for other regions or countries 1 From the main menu select Traffic 2 Select Subscriptions...

Страница 13: ...6 Select your phone from the list and select OK 7 If necessary on your phone confirm that the device is allowed to connect 8 If necessary enter the device Bluetooth PIN into your phone Tips After Pai...

Страница 14: ...your phone 1 From your phone select the button to start navigating to a location see the owner s manual for your phone 2 From the application menu select Smartphone Link The next time you connect you...

Страница 15: ...route that you drive If you stop a route on your device a mileage report is created for the distance you traveled Viewing a Mileage Report You can view saved mileage reports on the device TIP You can...

Страница 16: ...tes waypoints and custom POIs Installing a Memory Card The device supports microSD and microSDHC memory cards 1 Insert a memory card into the slot on the device 2 Press it in until it clicks Connectin...

Страница 17: ...ur devices with Bluetooth wireless technology Disabling Bluetooth 1 Select Settings Bluetooth 2 Select Bluetooth Traffic Settings To open the traffic settings page from the main menu select Settings T...

Страница 18: ...using a dampened cloth turn off the device and disconnect the device from power 4 Gently wipe the screen with the cloth Avoiding Theft Remove the device and mount from sight when not in use Remove th...

Страница 19: ...ia Transfer Protocol MTP In MTP mode the device appears as a portable device and not as a removable drive MTP mode is supported by Windows 7 Windows Vista and Windows XP Service Pack 3 with Windows Me...

Страница 20: ...Route fuel price changing 11 fuse changing 14 G Garmin Express 1 registering the device 1 updating software 1 Garmin Live Services 10 subscribing to 10 geocaching 3 going home 3 GPS 1 2 H hands free p...

Страница 21: ...criptions Garmin Live Services 10 n Maps Lifetime 1 traffic 1 suction cup 14 T theft avoiding 14 time settings 2 13 traffic 7 8 13 activating a subscription 8 adding subscriptions 8 alternate route 8...

Страница 22: ...699 0800 023 3937 035 539 3727 47 815 69 555 00800 4412 454 44 2380 662 915 35 1214 447 460 34 902 007 097 46 7744 52020 Garmin International Inc 1200 East 151st Street Olathe Kansas 66062 USA Garmin...

Отзывы: