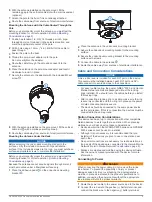
3
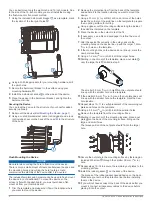
Install the locking ring and o-ring on the end of the power
cable.
4
Connect the power cable to the device by turning the locking
ring clockwise.
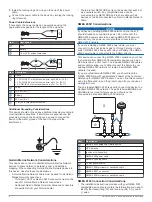
Power Cable Extensions
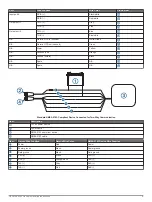
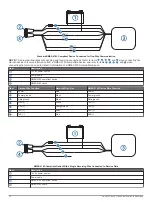
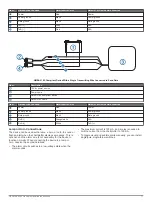
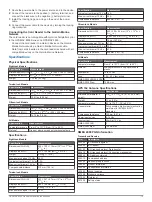
If necessary, the power cable can be extended using the
appropriate wire gauge for the length of the extension.
Item
Description
Fuse
Battery
1.8 m (6 ft.) without extension
Item Description
Splice
• 12 AWG (3.31 mm²) extension wire, up to 4.6 m (15 ft.)
• 10 AWG (5.26 mm²) extension wire, up to 7 m (23 ft.)
• 8 AWG (8.36 mm²) extension wire, up to 11 m (36 ft.)
Fuse
20.3 cm (8 in.)
Battery
20.3 cm (8 in.)
11 m (36 ft.) maximum extension
Additional Grounding Considerations
This device should not need any additional chassis grounding in
most installation situations. If interference is experienced, the
grounding screw on the housing can be used to connect the
device to the water ground of the boat to help avoid the
interference.
Garmin Marine Network Considerations
This device can connect to additional Garmin Marine Network
devices to share data such as radar, sonar, and detailed
mapping. When connecting Garmin Marine Network devices to
this device, observe these considerations.
• A Garmin Marine Network cable must be used for all Garmin
Marine Network connections.
◦ Third-party CAT5 cable and RJ45 connectors must not be
used for Garmin Marine Network connections.
◦ Additional Garmin Marine Network cables and connectors
are available from your Garmin dealer.
• There are four NETWORK ports on the device that each act
as a network switch. Any compatible device can be
connected to any NETWORK port to share data with all
devices on the boat connected by a Garmin Marine Network
cable.
NMEA 2000
®
Considerations
NOTICE
If you have an existing NMEA 2000 network on your boat, it
should already be connected to power. Do not connect the
NMEA 2000 power cable to an existing NMEA 2000 network,
because only one power source should be connected to a
NMEA 2000 network.
If you are installing a NMEA 2000 power cable, you must
connect it to the boat ignition switch or through another in-line
switch. NMEA 2000 devices will drain your battery if the NMEA
2000 power cable is connected to the battery directly.
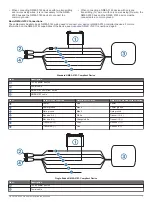
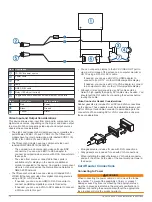
This device can connect to a NMEA 2000 network on your boat
to share data from NMEA 2000 compatible devices such as a
GPS antenna or a VHF radio. The included NMEA 2000 cables
and connectors allow you to either connect the device to your
existing NMEA 2000 network or create a basic NMEA 2000
network if needed.
If you are unfamiliar with NMEA 2000, you should read the
“NMEA 2000 Network Fundamentals” chapter of the
Technical
Reference for NMEA 2000 Products
. You can find this document
using the “Manuals” link on the product page for your device at
.
The port labeled NMEA 2000 is used to connect the device to a
standard NMEA 2000 network. The ports labeled ENGINE and
HOUSE are reserved for future use and should not be
connected to a standard NMEA 2000 network.
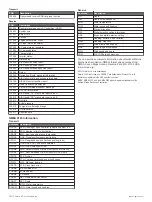
Item
Description
NMEA 2000 compatible Garmin device
GPS antenna
Ignition or in-line switch
NMEA 2000 power cable
NMEA 2000 drop cable
12 Vdc power source
NMEA 2000 terminator or backbone cable
NMEA 2000 T-connector
NMEA 2000 terminator or backbone cable
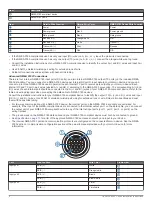
NMEA 0183 Connection Considerations
• The installation instructions provided with your NMEA 0183
compatible device should contain the information you need to
identify the transmitting (Tx) and receiving (Rx) A (+) and B
(-) wires.
6
GPSMAP 8000 Series Installation Instructions

