background image

GPSMAP 396 Owner’s Manual 

101

M

AIn

 M

enu

 > 

W

eAther


And

 XM t

Abs

Weather Tab

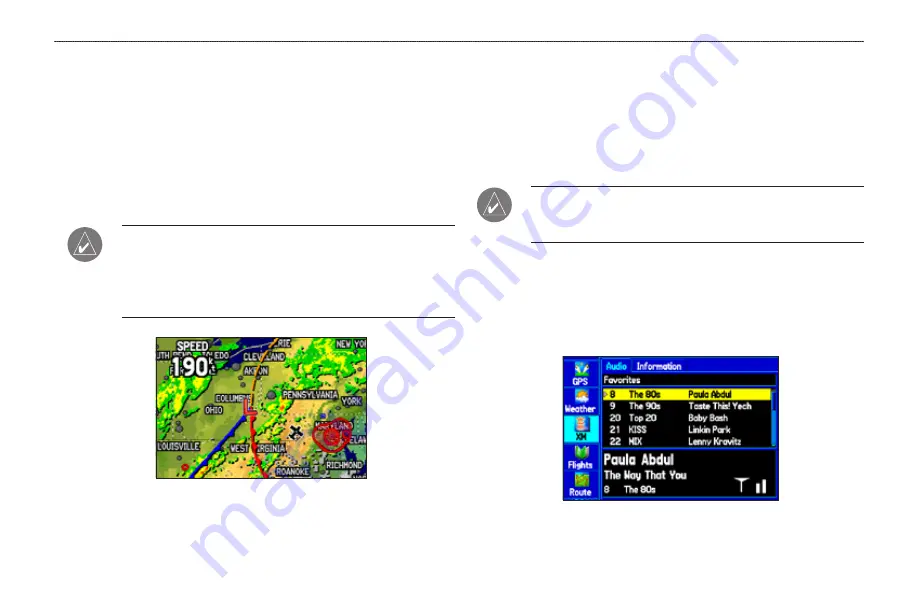
Use the Weather tab to view individual weather features without 

turning all other weather features on or off. For example, you can 

select Storm Cells to view only storm cell data on the Map window 

that appears on the Weather tab. When you close the Main Menu 

and return to the Map Page, all of your previously selected weather 

features still appear on the Map Page. Information on the Weather 

tab is located on 

pages 125–130

.


notE: 

You must have a subscription to XM WX Weather and 

the GXM 30/30A antenna must be plugged in to the USB port 

on the back of the unit to use features described in this section. 

For more information about subscribing to XM WX Weather, see 

page 178

.

Map Page with XM WX Weather

XM Tab

The XM tab is where you can view and select XM Radio channels, 

add or delete favorites, and obtain radio ID and XM WX Satellite 

Weather service level information. The XM tab is divided into two 

sub tabs: Audio and Information. Information on the XM tab is 

located on 

pages 50–53

.


notE: 

The XM tab always appears on the Main Menu, 

regardless of whether the XM Audio Page is turned on or off. 

For more information about the XM Audio Page, see 

page 113

.

Audio Sub Tab

The Audio sub tab shows XM Radio channel categories, a list of 

available channels, information about the selected channel, and the 

strength of the XM signal.

XM Tab Audio Sub Tab

Содержание GPSMAP 396 - Aviation GPS Receiver

Страница 1: ...Owner s Manual portable aviation receiver GPSMAP 396...

Страница 2: ...this manual or of any revision hereto provided that such electronic or printed copy of this manual must contain the complete text of this copyright notice and provided further that any unauthorized co...

Страница 3: ...sing contact your Garmin dealer immediately About This Manual To get the most out of your new navigation system read this manual and learn the operating procedures for your unit Manual Conventions Thi...

Страница 4: ...Finding Points on Land 24 Marking a Waypoint 25 Creating a Flight Plan Route 26 Following your Flight Plan 27 Aviation Mode Pages 28 Map Page 28 Terrain Page 36 Panel Page 39 Active Route Page 43 Posi...

Страница 5: ...und Tab 114 Setup Tab 115 Location Sub Tab 119 Using XM WX Weather 125 Viewing XM WX Weather 125 Setting XM WX Weather Options 126 Using the Weather Tab 129 Finding Weather Information 132 Setting up...

Страница 6: ...s Installation Information 157 Learning About GPS 162 LORAN TD Setup 164 Map Datums and Location Formats 166 Digital Selective Calling DSC 167 Jeppesen Database Information 169 Messages 170 Data Field...

Страница 7: ...een while driving and use voice prompts when possible Do not input destinations change settings or access any functions requiring prolonged use of the unit s controls while driving Pull over in a safe...

Страница 8: ...battery pack Using another battery presents a risk of fire or explosion To purchase a replacement battery see your Garmin dealer or the Garmin Web site Warning This product its packaging and its compo...

Страница 9: ...es featuring more than 150 digital channels of commercial free music more than 30 channels of news sports talk and entertainment and more than 20 dedicated channels of XM Instant Traffic Weather Detac...

Страница 10: ...craft vehicle boat battery Information about Charge Mode Applying external power to the GPSMAP 396 automatically turns on the unit for full operation If the battery is present and needs to be charged...

Страница 11: ...the red POWER key When the unit turns on a tone sounds and the Warning Page appears 2 Read and be sure you understand the warning Press ENTER to continue 3 To turn off the GPSMAP 396 press and hold th...

Страница 12: ...n Viewing GPS Status With the GPS Tab The GPS tab provides a visual reference of satellite acquisition receiver status and accuracy The sky view and signal strength bars give an indication of what sat...

Страница 13: ...ellite whose almanac has been collected which can take up to 5 minutes Acquiring Satellites the receiver is looking for and collecting data from satellites visible at its last known or initialized loc...

Страница 14: ...New Location allows you to enter a new location automatically or using the map When in Aviation Mode you can enter the airport identifier GPS Tips While the receiver is gathering information your loc...

Страница 15: ...r off on the Map Page POWER Key Press and hold to turn the unit on or off Press and release to adjust the backlighting and external speaker volume IN OUT Keys Press to zoom in or out on the Map Page R...

Страница 16: ...t is controlled by the ROCKER The following features are referred to throughout this manual Highlight move the highlighted area on the screen up down left or right with the ROCKER to select individual...

Страница 17: ...art an option 1 Press MENU on any page An options menu appears with a list of optional features for that page 2 Use the ROCKER to move the highlight up down right or left on the menu to your selection...

Страница 18: ...our GPSMAP 396 comes with Jeppesen database Obstacle database Terrain database and Voice Guidance database You also should update your Jeppesen database to use the most current data Refer to page 169...

Страница 19: ...de When the unit is set to Simulator Mode the GPS receiver is turned off Any Satellite Signal Strength Bars shown are only simulations and do not represent the strength of actual satellite signals Sta...

Страница 20: ...p you want and press ENTER You can also select a New Location by entering an airport identifier code Select Use Identifier from the GPS tab options menu Enter the airport code using the ROCKER Refer t...

Страница 21: ...y page press MENU Aviation Mode features five main pages Map Page Terrain Page Panel Page Active Route Page Position Data Page and an optional XM Audio Page The XM Audio Page must be turned on using t...

Страница 22: ...and Remove Point Go To Page Aviation Tab Airport identifier Facility name City To go to an airport or navaid 1 Press Direct To to show the Go To Page Use the ROCKER to show the Aviation tab 2 Press up...

Страница 23: ...lected destination Viewing Details for the Destination The Show Details option shows detailed information for your destination waypoint or the next waypoint in a route This feature is handy for retrie...

Страница 24: ...roach for which you would like to view additional information Viewing Frequency Restrictions The Comm tab on the Airport Details Page provides a list of communication frequencies for that airport Some...

Страница 25: ...information Airport nearest 15 identifier bearing distance length of the longest runway and common traffic advisory CTAF or tower frequency Wx Airport Weather Sources nearest 15 airport weather sourc...

Страница 26: ...lect the nearest airport as your destination 1 Press NRST twice to show the Airport tab and highlight the nearest airport 2 Press ENTER to view airport information 3 Verify the Go To button is highlig...

Страница 27: ...TCC Tab 4 Select the numbered item that you want from the list and press Enter to show the communication information The lowest numbers on the list are the closest communication points Viewing Airspac...

Страница 28: ...arest Pages use the ROCKER to select the Airspace tab Nearest Pages Airspace Tab 2 Use the ROCKER to select the airspace alert entry on the page and press Enter An information page opens to show the c...

Страница 29: ...Minimum Runway Length allows you to enter a specific length for the shortest runway allowed To enter airport criteria 1 Press Nearest and open the Airport tab 2 Press Menu to show the options menu 3 S...

Страница 30: ...a route the selected approach for the destination airport overrides your current route The original route is saved in the Route tab You can select an approach several ways Press Direct To and press Me...

Страница 31: ...s selected for the Vectors option the GPSMAP 396 creates a straight line course directly to the first waypoint in the approach from wherever you are when you initiate the approach This works much like...

Страница 32: ...s menu Go To Page Options Menu 3 Highlight Find Land Points and press Enter The Find Menu opens Find Menu 4 Press Menu to select the search method For example if you want to find a land point near you...

Страница 33: ...ing Waypoints section beginning on page 77 To mark your present location 1 Press and hold Enter Mark until the Mark Waypoint Page appears 2 To accept the waypoint with the default name Waypoint use th...

Страница 34: ...u Use the ROCKER to highlight New Route and press Enter or highlight the first blank line and press Enter 4 Press Menu to show the options menu Use the ROCKER to highlight Add Waypoint and press Enter...

Страница 35: ...dated to your present location For complete information about the Map Page and the features of the Map Page see Map Page beginning on page 28 Terrain and Obstacle Changes Press Page to open the Terrai...

Страница 36: ...le symbol in Marine and Automotive modes The GPSMAP 396 always turns on in location mode with the last known location centered on the map When you press the ROCKER the GPSMAP 396 enters pan mode which...

Страница 37: ...w Note The range value represents the distance between the ends of the range bar To select a map zoom range zoom in and out Press the Out key to zoom out Press the In key to zoom in The system uses op...

Страница 38: ...om in pan mode the arrow stays centered on the screen When the arrow is stationary fixed coordinates appear in the location field and the distance and bearing from your present location update as you...

Страница 39: ...age Airport Information Page Airspace Information Pan mode can also be used to retrieve information on airspaces depicted on the map Airspace Information Highlighted airspace area Information box with...

Страница 40: ...ars below the map range 4 Press Enter again to return ALL detail to the map In Marine and Automotive Modes press Menu highlight Declutter On or Declutter Off and press Enter Measuring Distance You can...

Страница 41: ...sual cue of an important heading for current or future use You can also turn the Bug Indicator off here 4 Highlight the option from the list and press Enter You can also set the Bug Indicator on the H...

Страница 42: ...nu to open the options menu 3 Highlight Set up Page Layout and press Enter Changing the layout of the Map Page 4 Select the option you want and press Enter The options vary between the three usage mod...

Страница 43: ...shown on the Map Page To change the setting for a Map Family highlight the box next to the Map Family name and press Enter to select check mark or deselect no check mark the Show setting 4 To view the...

Страница 44: ...llow are between 1 000 feet and 100 feet below the aircraft The black areas are further than the Caution Elevation A projected point of impact is marked with an X symbol Obstacle Information Obstacles...

Страница 45: ...age Additional Terrain Page Options Access the Terrain Page options menu by pressing Menu while you are on the Terrain Page Terrain Page Options Menu Press Enter to quickly declutter the map just as y...

Страница 46: ...you reach the terrain or obstacle Alert Sensitivity The three Alert Sensitivity settings Terrain Obstacle and Descent Rate determines what level of alerts are annunciated The GPSMAP 396 defaults to H...

Страница 47: ...our current ground track at the top of the page The course pointer and course deviation needle indicate the course and whether you are on the course A bug indicator provides information to guide you b...

Страница 48: ...window appears at the center of the HSI showing the scale settings The current setting is highlighted 3 Use the ROCKER to select the scale and press Enter Manually Setting a Course Use the Set OBS and...

Страница 49: ...altitude the Approaching Target Altitude message appears the time to vertical navigation goes blank and the VNAV indicator disappears from the Panel Page Caution The GPSMAP 396 is a VFR navigation too...

Страница 50: ...utomatically changes to your destination after you begin navigating to a destination Target Altitude enter the altitude you want to be at when you reach your target location Select Above Waypoint to u...

Страница 51: ...ions Press Menu while on the Active Route Page to open the options menu You can edit the route using many of the options in the menu such as Edit on Map see page 76 for information Add Waypoint and In...

Страница 52: ...Downtown KMKC airport is the nearest airport and you are 6 3 nm S of KMKC Position Data Page Options With the Position Data Page open press Menu to open the options menu You can set up the layout of t...

Страница 53: ...nuously updated as your flight progresses If you land and groundspeed drops below 30 knots the flight entry is saved and a new entry is recorded when you depart the airport A touch and go or brief sto...

Страница 54: ...Page The maximum speed is used to define the range for airspeed on the Panel Page and is automatically updated if you exceed this figure To enter an aircraft profile 1 From the Aircraft Profile tab us...

Страница 55: ...our airplane which also notes the weight limitations and fore aft CG limits Compare those figures to the values calculated by the GPSMAP 396 To perform weight and balance calculations 1 Press Menu twi...

Страница 56: ...nit is receiving XM weather information the field automatically updates to the barometric pressure of the nearest METAR If XM weather information is not available you need to enter the current baromet...

Страница 57: ...Density Altitude are shown in the designated fields E6B Tab Calculated figures Calculated figure Calculated or user entered figure Barometric pressure from the nearest METAR To calculate winds aloft...

Страница 58: ...vided into three panes The first pane contains a list of XM Radio categories into which XM Radio channels are grouped Classical Decades Traffic and so on For a complete list of available categories an...

Страница 59: ...Page Options Use the options menu to customize the XM Audio Page When the XM Audio Page is open press MENU to open the options menu XM Audio Page Options Menu The following options are available on t...

Страница 60: ...ites 2 Press up or down on the ROCKER to highlight the channel you want to select from your list of favorites and press ENTER A triangle appears to the left of the newly selected channel To view and s...

Страница 61: ...ls to scan all channels OR Select Category to scan only channels in the selected category OR Select Favorites to scan only channels in your Favorites list 4 Press ENTER Each channel plays for five sec...

Страница 62: ...dditional pages appear during active navigation while in Automotive Mode a Current Route Page appears if you are navigating a turn by turn route and an Active Route Page appears if you are navigating...

Страница 63: ...e through the Routes tab on the Main Menu For more information refer to page 60 To go to a highlighted map item 1 Use the ROCKER to highlight the item you would like to navigate to on the Map Page 2 P...

Страница 64: ...ivating a Go To using the Find Menu 5 The Waypoint Page automatically opens With the Go To button highlighted press Enter to begin navigation To search for an item and route to it 1 Press Nrst Find to...

Страница 65: ...Feature The Find option also supports a find from feature that allows you to center your search around an item that you have just found To find an item from another location on the map 1 Open the Map...

Страница 66: ...em 1 Press Nrst Find 2 From the Find Menu highlight the item you want to Find From 3 Press Nrst Find with the item highlighted The Find Menu opens again with items near the previously selected item Se...

Страница 67: ...ress Enter to perform that operation Find Menu Options To view additional options for the Find Menu press Nrst FInd and then press Menu Enable Auto Arrange automatically arranges the Find Menu Disable...

Страница 68: ...he Find Menu 1 Press Menu twice to show the Main Menu 2 Use the ROCKER to highlight Route from the vertical list of tabs 3 Press Menu to show the Route options menu Select New Route and press Enter OR...

Страница 69: ...perties of this waypoint as you can with any waypoint Creating a New Route on the Map 5 Repeat until you have added all points to the route 6 When finished press Quit twice to return to the Route Revi...

Страница 70: ...n from the map show using the ROCKER Text Entry allows you to enter a new waypoint s location coordinates manually Marking Your Present Location The Enter Mark key lets you quickly capture your presen...

Страница 71: ...ation or map feature 3 Press and quickly release Enter Mark to capture the arrow location Pressing and holding Enter Mark marks your present location not the arrow s location If you have highlighted a...

Страница 72: ...ypoint or use your favorite method discussed in previous sections The new waypoint is created with the next available waypoint number and the receiver s last known location as the default location To...

Страница 73: ...g Your Route Watch your Trip Data Use the Trip Computer Page to view your trip data You can track your speed here as well as other information related to your trip Current Route Page in Automotive Mod...

Страница 74: ...r navigation Custom Avoids apply to all routes but Detours apply to only the active route Custom Avoids can be added while you are navigating a route or before you navigate To enter a custom avoid 1 P...

Страница 75: ...when planning a long trip Add Edit Vias Page Showing the original route without via points To add Via Points to your route 1 While navigating your route press Direct To to open the Navigate menu 2 Us...

Страница 76: ...an mode which moves the map to keep the white arrow map pointer within the screen area In Automotive Mode by default four user selectable data fields appear on the right side of the screen that can be...

Страница 77: ...ight the Display tab 3 Highlight the Highway Page field and press Enter 4 Select Off to hide or On to show and press Enter Using the Highway Page To stay on course steer toward the violet bar or arrow...

Страница 78: ...repeatedly until the Highway Page appears 2 Press Menu 3 Use the ROCKER to highlight the option 4 Press Enter Highway Page Options Menu The following options are available from the Highway Page menu...

Страница 79: ...t Route Page You can scroll through the entire list by pressing the ROCKER up or down Highlight any of the turns on the list and press Enter to view the Next Turn Page for that turn The Current Route...

Страница 80: ...Some options are only available if you have changed the page layout from the default Set Up Page Layout allows you to choose the layout and number of data fields You can also select a graphical Dashb...

Страница 81: ...ong with a descriptive name for each route Highlight a route and press Menu to open the options menu From here you can start a route copy it delete it delete all routes and create a new route You can...

Страница 82: ...elect Route Select route from list 4 Press Menu to open the options menu 5 Highlight Follow Roads and press Enter to create a turn by turn route auto route which appears in the Current Route Page Edit...

Страница 83: ...Page see the Editing and Managing Waypoints section on page 77 When you return to the Route Review Page the next point in the route is automatically highlighted This allows you to review each point o...

Страница 84: ...t OK and press Enter 7 Repeat steps 4 through 6 until all points are added to the route Press Quit to finish To set speed and fuel plan your route 1 Open the Route Review Page options menu 2 Highlight...

Страница 85: ...ess Enter to show the Waypoint Review Page If the waypoint is located on a map feature or MapSource or BlueChart feature the Waypoint Review Page can include additional tabs containing information abo...

Страница 86: ...e or highlight another field you want to change and press Enter 3 Use the ROCKER to select the symbol or enter data and press Enter To view the waypoint on the map 1 From the Waypoint Page highlight S...

Страница 87: ...e options menu The Select Route window appears 3 Highlight the route or select New Route and press Enter 4 With OK highlighted press Enter to save the waypoint Averaging the Waypoint s Location Averag...

Страница 88: ...on Menu Enter the distance bearing and location to project from 6 To change the location from which you are projecting the new waypoint highlight the From field and press Enter The Find Menu opens Sel...

Страница 89: ...category by pushing a few buttons You can create up to 15 categories To create a waypoint category 1 From any of the waypoint pages or the Points tab press Menu to open the options menu 2 Select Edit...

Страница 90: ...atures two sub tabs User and Proximity that let you edit waypoints and manage a large number of waypoints quickly and efficiently For more information about creating editing and deleting waypoints ref...

Страница 91: ...mation on reviewing and editing waypoints Deleting Waypoints You can delete waypoints from the waypoint list in the Points tab or from the Waypoint Pages To delete a waypoint from the Waypoint Page us...

Страница 92: ...using the ROCKER 4 You can select a waypoint or point of interest as the From location Highlight the From field and press Enter From the Find Menu select the location and press Enter When OK is highl...

Страница 93: ...The Find Menu appears 2 Select the waypoint or point of interest from the Find Menu With OK highlighted press Enter to select that point For complete information about the Find Menu see Finding an Ite...

Страница 94: ...ck points save the track log when it approaches the 99 mark You must first save the track log before you can use the Navigate Track feature The Save feature allows you to store up to 15 track logs fro...

Страница 95: ...se the ROCKER to select Save and press Enter 4 A window pops up asking if you want to save the entire track log To save the entire track highlight Yes and press Enter To save a portion of the track lo...

Страница 96: ...he Main Menu 2 Highlight the Track tab Press the ROCKER right to highlight the Saved sub tab 3 Highlight the track you want to edit and press Enter The Track Review Page opens Make changes you want Tr...

Страница 97: ...ant to navigate to TracBack to and press Enter TracBack Tips When a TracBack has been started the GPSMAP 396 divides the track into segments called legs Up to 300 temporary turns are created to mark t...

Страница 98: ...utomotive or Marine and press Enter Marine Mode Page Sequence Marine Mode features five main pages the Map Compass Highway Active Route and Position Data Page as well as an optional XM Audio Page If y...

Страница 99: ...rom your current location to the destination on the Map Page You can use the Map Page Compass Page Highway Page and Position Data Page to help navigate to your destination Man OverBoard MOB The Man Ov...

Страница 100: ...96 enters pan mode which moves the map to keep the white arrow map pointer within the screen area In Marine Mode by default five user selectable data fields appear on the right side of the screen that...

Страница 101: ...to the waypoint If the arrow points any direction other than up turn toward the arrow until it points up then continue in that direction Note You must be moving for the compass to accurately update a...

Страница 102: ...To use the Marine Timer 1 Press the ROCKER up or down to select the time you want to count Five 5 minutes is the default 2 Press Enter to start the timer Use the ROCKER during the timing to quickly se...

Страница 103: ...escuer receives the DSC signal an alarm sounds and they immediately receive the location of the caller The rescuer can then choose to navigate to the caller s location to assist or forward the call on...

Страница 104: ...t and Log The Notification page contains information about the call including the type of call distress or position report the MMSI number of the caller a user definable name the time and date of the...

Страница 105: ...d call is received from the same vessel it replaces the first call in the Call List Press Menu to sort the list and delete entries DSC Call List DSC Log When DSC calls are received they are automatica...

Страница 106: ...ectory list and press Enter OR Press Menu highlight New Item and press Enter 3 Enter the MMSI number the name and any comments 4 When finished highlight OK and press Enter New Directory Item Page Ente...

Страница 107: ...a Position Report or Distress Call using the Call List or Log 1 Highlight the call on the Call List or Log and press Direct To 2 With Go To MMSI Name or DSC highlighted press Enter Navigating to a DS...

Страница 108: ...ound and Setup To restore defaults 1 Press Menu twice to open the Main Menu 2 Use the ROCKER to highlight a tab 3 Press Menu to open the options menu 4 Highlight Restore Default 5 Press Enter to resto...

Страница 109: ...rt on the back of the unit to use features described in this section For more information about subscribing to XM WX Weather see page 178 Map Page with XM WX Weather XM Tab The XM tab is where you can...

Страница 110: ...Information Sub Tab Flights Tab The Flights tab shows a list of any recorded flights including date route of flight and flight time The GPSMAP 396 saves up to 50 recorded flights while in Aviation Mo...

Страница 111: ...bottom of the User sub tab Proximity Sub Tab Use the Proximity sub tab to shows an alarm circle around a stored waypoint location Track Tab Use the Track tab to specify whether or not to record a trac...
Страница 112: ...U twice to open the Main Menu 2 Use the ROCKER to highlight the Sonar tab Sonar Tab Aircraft Tab The Aircraft tab is divided into two sub tabs Aircraft Profile and Weight Balance Information on the Ai...

Страница 113: ...acknowledge the alarm To set a persistent alarm 1 Press Menu twice to open the Main Menu 2 Use the ROCKER to select the Alarms tab 3 Highlight the box next to the alarm you would like to make persist...

Страница 114: ...ecific distance Select Time to enter a specific time before the destination for the alarm to go off Select Auto for the unit to provide an Arrival alarm at its discretion Off Course sets an alarm to s...

Страница 115: ...sets an alarm to sound when you enter an area where a marine warning is in effect Sonar Alarms Sub Tab Marine Mode Only You must be receiving sonar NMEA data for Sonar alarms to work Sonar Alarms Sub...
Страница 116: ...n phase is also shown You can view Sun Moon information for any date or location You can also use the play fast forward and stop buttons to view an animation of the Sun Moon sub tab To view Sun Moon i...

Страница 117: ...nformation in a 24 hour span starting at midnight station time You can choose from different dates and more than 3 000 tide stations Height of tide Smallest and largest tides for the AM hours Select t...

Страница 118: ...press Enter 2 Enter the date with the ROCKER and press Enter You can also use the Zoom In and Out keys to view information for another date Press and hold In or Out to scroll quickly through dates 3...

Страница 119: ...you want You can also use the Zoom In and Out keys to view information for another date Press and hold In or Out to scroll quickly through dates 3 Press Enter when finished The unit shows the informa...

Страница 120: ...he vertical list of tabs Message Log Tab 3 Use the ROCKER to highlight a message Press Enter to view detailed information about that message To show or hide messages using the Log Filter 1 Press Menu...

Страница 121: ...ght times Backlight Timeout sets the backlight to stay on when it is turned on or to time out after a selected period of time has elapsed when using the battery The backlight stays on regardless of th...

Страница 122: ...e turns audible terrain alerts on and off Also enables or disables the audible Five hundred altitude reminder that occurs when you descend through 500 feet above the destination airport TIS Audio Avia...

Страница 123: ...r On allows you to enter a value in seconds Text Language allows you to select from various languages for the unit s pages and menus WAAS allows you to Disable and Enable WAAS from this field External...

Страница 124: ...but can take more time to drive Off Road creates a direct line from your current location to your destination This is useful when you are travelling outside of detailed map coverage areas or where no...

Страница 125: ...you to avoid or use Major Medium and Minor roads using a slider scale This is especially nice if you want to avoid major highways for example Guidance Sub Tab To open the Guidance sub tab press Menu...
Страница 126: ...on since midnight This resets if you restore All Unit Defaults from the System tab Time Sub Tab The Time sub tab allows you to set the time format and time zone You can also set the unit to conform t...

Страница 127: ...fer to the Appendix of this guide for more information about location formats and map datums Also visit the National Imagery and Mapping Agency at www nima mil for more information on grids and datums...

Страница 128: ...omatically calculate and update the magnetic variation at your present location You must update the magnetic variation as your location changes Failure to update this setting can result in substantial...

Страница 129: ...rmin DGPS beacon receiver Garmin Remote Sonar supports the input output of a Garmin remote sonar device NMEA In NMEA Out supports the input output of standard NMEA 0183 version 3 01 data and sonar NME...

Страница 130: ...can control a differential beacon receiver directly from your GPSMAP 396 using the Interface sub tab You can have the unit automatically scan for the DGPS beacon signal or you can enter the beacon fre...

Страница 131: ...o highlight the Beacon field and press Enter 2 Highlight User and press Enter 3 Highlight the Frequency or Bit Rate field press Enter and enter a frequency or bit rate Press Enter when done When the u...

Страница 132: ...nu 2 Use the ROCKER to select Setup from the vertical tab list 3 Select Interface from the row of tabs along the top 4 Highlight the field below Serial Data Format Press Enter 5 Select NMEA In NMEA Ou...

Страница 133: ...r feature such as NEXRAD Radar or Storm Cells for example you can use the Weather tab on the Main Menu For more information see page 101 To view current weather conditions and forecast information for...

Страница 134: ...weather features see the GXM 30 30 30A Owner s Manual You can view a specific weather feature such as NEXRAD Radar or Storm cells through the Weather Explorer tab on the Main Menu For more informatio...

Страница 135: ...lorer tab Weather Data toggles XM WX Weather data on or off on the Map Page NEXRAD Radar Satellite Mosaic Lightning Storm Cells Hurricanes sets the zoom range at which the feature first appears on scr...

Страница 136: ...Surface Pressure Fronts Visibility County Warnings sets the zoom range at which each feature first appears on screen Select Auto Off or 20 ft to 800 nm Mrn Wx Tab Use the Mrn Wx tab on the Map Page Op...

Страница 137: ...iew a specific XM WX Weather Information Type 1 Press MENU twice to show the Main Menu 2 Use the ROCKER to highlight the Weather Explorer tab 3 Press right on the ROCKER to highlight the Weather Infor...

Страница 138: ...ptions for the Map window on the Weather Explorer tab To select weather options 1 Press MENU twice to open the Main Menu 2 Highlight the Weather Explorer tab and press MENU Declutter On Off allows you...

Страница 139: ...o XM to activate your XM subscription Service Level shows the XM WX Weather subscription plan you purchased Weather Products shows a list of all weather features you can access based on your subscript...

Страница 140: ...weather bulletins For more information about the Find menu see Finding an Item beginning on page 57 To find weather information for your current location 1 From any page press FIND 2 Select Weather Da...

Страница 141: ...tin You can find weather forecast information for a different location To find weather data for a different location 1 Press MENU on the Weather From Current Location Page 2 With Near Other highlighte...

Страница 142: ...the Map Page to show a split screen to show the sonar and Map Page You must be in Marine Mode to use the sonar feature To show the Sonar Page on the Map Page 1 Press and hold Page Highlight Marine an...

Страница 143: ...hat reflects the depth of the area being shown The top left corner shows the Adjustment Option the depth and the water temperature Sonar Page The sonar returns show as red strongest then orange strong...

Страница 144: ...ment options When the adjustment option is shown press Enter Press Menu highlight Adjustments and press Enter Use the ROCKER to highlight the adjustment and press Enter When you have selected an adjus...

Страница 145: ...an available when a Zoom scale other than No Zoom is selected The View or Span setting is used to change the viewing range of a zoomed screen If the screen is 2X or 4X split only the zoomed portion on...

Страница 146: ...3 Move the horizontal double arrow left or right using the ROCKER until the vertical width line shows then press Enter 4 If you want to cancel this operation press Quit or press Menu highlight Stop R...

Страница 147: ...te updates quicker and is recommended for low noise water deeper than 50 feet Auto is best for shallow water or high noise areas has a slower screen update and is best used if you travel a wide variet...

Страница 148: ...Speed and press Enter 2 Bring the boat to a cruising speed Both the top ground and uncalibrated water speeds are shown at the bottom of the calibration window Note your top speed then stop the boat an...

Страница 149: ...pth scale shown Color Bar select On to show a gradient scale of the current Target Level setting on the Sonar Setup tab Flasher select On to show a graphic Flasher representation on the far right side...

Страница 150: ...er and sets the bottom level Weaker secondary returns provide the detailed data Stronger returns appear on the screen in darker colors with red being the strongest return Understanding the Sonar Displ...

Страница 151: ...right the 40 cone angle produces a coverage area of approximately a 20 foot diameter circle at a 30 foot depth The narrow cone angles 10 associated with the high frequencies 200 kHz provide better bo...

Страница 152: ...bottom The unit uses the whiteline function to make the bottom layer information easier to distinguish Whiteline Off Whiteline On Thick Whiteline Hard bottom Thermoclines A rough definition of a therm...

Страница 153: ...row of tabs on the left then select Temperature from the row of tabs along the top of the screen Changing the Temperature Screen The graph adjusts and shown the temperatures changes according to the T...

Страница 154: ...rcraft Refer to page 158 for information on connecting your GPSMAP 396 to a GTX 330 Mode S transponder Note How TCAS differs from TIS the main difference between TIS and TCAS is the source of surveill...

Страница 155: ...talled TIS relies on surveillance of the Mode S radar which is a secondary surveillance radar similar to the ATCRBS TIS operation may be intermittent during turns or other maneuvering TIS is dependent...

Страница 156: ...ing aircraft stabilizes When a rapidly closing intruder is on a course that crosses the client aircraft course at a shallow angle either overtaking or head on and either aircraft abruptly changes cour...

Страница 157: ...shown on an alert window and on the moving Map Page A Traffic Advisory TA symbol appears as a solid yellow circle All other traffic is shown as a hollow white diamond Altitude deviation from own aircr...

Страница 158: ...o alerts can be turned off in the Main Menu Sound tab Traffic Ground Track Traffic ground track is indicated on the GPSMAP 396 screen by a target track vector a short line shown in 45 degree increment...

Страница 159: ...ghlight Set Up Map and press ENTER 4 Highlight the Map sub tab 5 Select TIS Traffic and use the ROCKER to change the Zoom range Highlighting TIS Traffic Using Map Page Panning Another Map Page feature...

Страница 160: ...aft they should contact ATC to obtain any information that may assist concerning the intruder aircraft Based on the above procedures minor adjustment to the vertical flight path consistent with air tr...

Страница 161: ...e the ROCKER to select TIS In NMEA VHF Out or Aviation In NMEA VHF out These comm modes send both NMEA data and VHF frequency information The following features are now available on the radio Remote f...

Страница 162: ...5 C to 60 C Power Battery Rechargeable lithium ion Battery Life 4 to 15 hours based on the XM antenna and backlight usage Source 11 35 VDC Fuse 3AG 1 5 Amp Performance Receiver Differential ready 12 p...

Страница 163: ...and then wipe dry Avoid chemical cleaners and solvents that may damage plastic components Storing the GPSMAP 396 Do not store the GPSMAP 396 where prolonged exposure to temperature extremes can occur...

Страница 164: ...able Connects the unit to a serial port on your PC Power Data Cable Allows you to connect the unit to the electrical system using the bare wires Programmable Data Cards Blank data cards available in a...

Страница 165: ...Unit Data Out Blue Ground Black Voice Orange Alarm White Power Red Voice Brown Data In Yellow Note The Alarm pin is used in Marine installations only Note The Voice and Voice pins are intended for a...

Страница 166: ...o to the GPSMAP 396 s Data In pin Set the GPSMAP 396 s Serial Data Format to TIS In NMEA VHF Out or Aviation In NMEA VHF Out This configuration allows you to simultaneously receive TIS traffic data an...

Страница 167: ...e connect the larger end of the cable to an available USB data port see illustration on the left When using a PC Interface Cable connect the larger end of the cable to a serial communications port on...

Страница 168: ...roof should not be exposed to moisture or excessive static charges and should be stored in the case supplied with the card To install a data card 1 Insert the card into the slot on the bottom of the u...

Страница 169: ...sentences Garmin s proprietary communication protocol is available from the Web site www garmin com Removing the GPS Antenna You can remove the antenna to use an external antenna After the antenna is...

Страница 170: ...p of waypoints entered into the GPS receiver in the sequence you want to navigate them Waypoint a location you store in your GPS What is Differential GPS DGPS The United States and Canadian government...

Страница 171: ...ding to the FAA s Web site testing in September 2002 WAAS confirmed an accuracy performance of 1 2 meters horizontal and 2 3 meters vertical throughout the majority of the continental United States an...

Страница 172: ...nates can be showed as TDs and all navigation functions can be used as if the unit was actually receiving LORAN signals Using the LORAN TD Format When creating new waypoints using LORAN TD coordinates...

Страница 173: ...ffsets were changed since the waypoint was created the waypoint now references the active GRI chain and secondary stations and adjust the TD coordinates accordingly Remember that the GPS is not relyin...

Страница 174: ...ce the map datum in the GPS unit should be set to the same datum as the map to ensure the most accurate navigation What is a Location Format Your current location can be viewed on the GPS in the form...

Страница 175: ...to assist or forward the call on to the Coast Guard When the Coast Guard receives the call they can immediately access the caller s information such as who they are and the type of vessel in their da...

Страница 176: ...agency radio spectrum management office These procedures are currently under review by the National Telecommunications and Information Administration NTIA User Outside the United States Users can obt...

Страница 177: ...Bs identifier facility name city state country location latitude longitude and frequency Intersections identifier nearest VOR radial and distance from nearest VOR location latitude longitude and regio...

Страница 178: ...t Contact your dealer or Garmin Product Support to have the unit repaired Deep Water the water is deeper than the amount set in the Deep Water Alarm Detail Maps Don t Support Routing maps that are loa...

Страница 179: ...route from another device has more than 300 waypoints Route Waypoint Memory Full no additional route waypoints can be saved Saving XM Program Information an XM Radio channel lineup change has occurre...

Страница 180: ...Cancelled VNAV function has been cancelled due to a change in the active route Water Speed Sensor is Not Working the speed sensor is not detected Check the connections Water Temperature Alarm sonar ha...

Страница 181: ...reach your destination ETA Next Estimated Time of Arrival The estimated time you will reach the next point on your route ETE Destination Estimated Time Enroute The estimated time required to reach you...

Страница 182: ...the number of degrees you should turn User Timer the timer you set in the Main Menu Velocity Made Good the rate of closure on a destination based on your current speed and course of travel Shown as VM...

Страница 183: ...export or re export the Software to any country in violation of the export control laws of the United States of America Product Registration Help us better support you by completing our online regist...

Страница 184: ...Products sold through online auctions are not eligible for rebates or other special offers from Garmin Online auction con rmations are not accepted for warranty veri cation To obtain warranty service...

Страница 185: ...CULAR PURPOSE TITLE AND NON INFRINGEMENT ARE HEREBY DISCLAIMED b LIMITATIONS OF LIABILITY WE ARE NOT RESPONSIBLE FOR ANY SPECIAL INCIDENTAL OR CONSEQUENTIAL DAMAGES OR LOSSES RELATING TO THE USE OF TH...

Страница 186: ...terference and 2 this device must accept any interference received including interference that may cause undesired operation This equipment has been tested and found to comply with the limits for a Cl...

Страница 187: ...43 ARTCC 17 assign category 82 asterisk 16 audio connector 1 AutoLocate 3 5 automotive route 65 average location 79 avoids 66 117 B backlight 3 113 baro pressure 49 battery charge 2 4 level 4 pack 1 2...

Страница 188: ...nformation 111 fish symbols 139 flasher 141 FlightBook 45 169 flight log 45 flight plan 26 creating 26 following 27 locked 26 flight records 45 follow roads 61 FSS 17 fuel flow 43 46 76 G GARMIN DGPS...

Страница 189: ...80 next turn 106 117 NMEA 121 123 124 160 north up 6 29 no beacon signal 163 O OBS 40 obstacle alert 27 odometer 72 off route recalculation 117 off course 106 off road 116 on screen button 8 options...

Страница 190: ...itch modes 13 54 90 system alarms 106 System tab 115 T temperature 119 145 terrain alert 27 Terrain Page aviation mode 36 38 declutter 32 terrain warning 37 text language 115 thermoclines 144 tide cha...

Страница 191: ...g 25 62 63 64 80 marking underwater 138 name 78 projecting 80 proximity 85 symbol 78 transition 73 weather information finding 132 Weather tab 129 options menu 130 weight balance 47 whiteline 137 144...

Страница 192: ...w garmin com 2006 2007 Garmin Ltd or its subsidiaries Garmin International Inc 1200 East 151st Street Olathe Kansas 66062 USA Garmin Europe Ltd Liberty House Hounsdown Business Park Southampton Hampsh...

Отзывы: