background image

GPS 400 Pilot’s Guide and Reference

190-00140-60  Rev. E

7-3

SECTION 7 

NRST PAGES

Navigating to a Nearby Waypoint

The NRST pages can be used in conjunction with the 

GPS 400’s direct-to function to quickly set a course to a 
nearby facility, and can provide navigation to the nearest 
airport in case of an in-flight emergency.

Selecting a nearby airport, VOR, NDB, 
intersection, or user waypoint as a direct-
to destination:

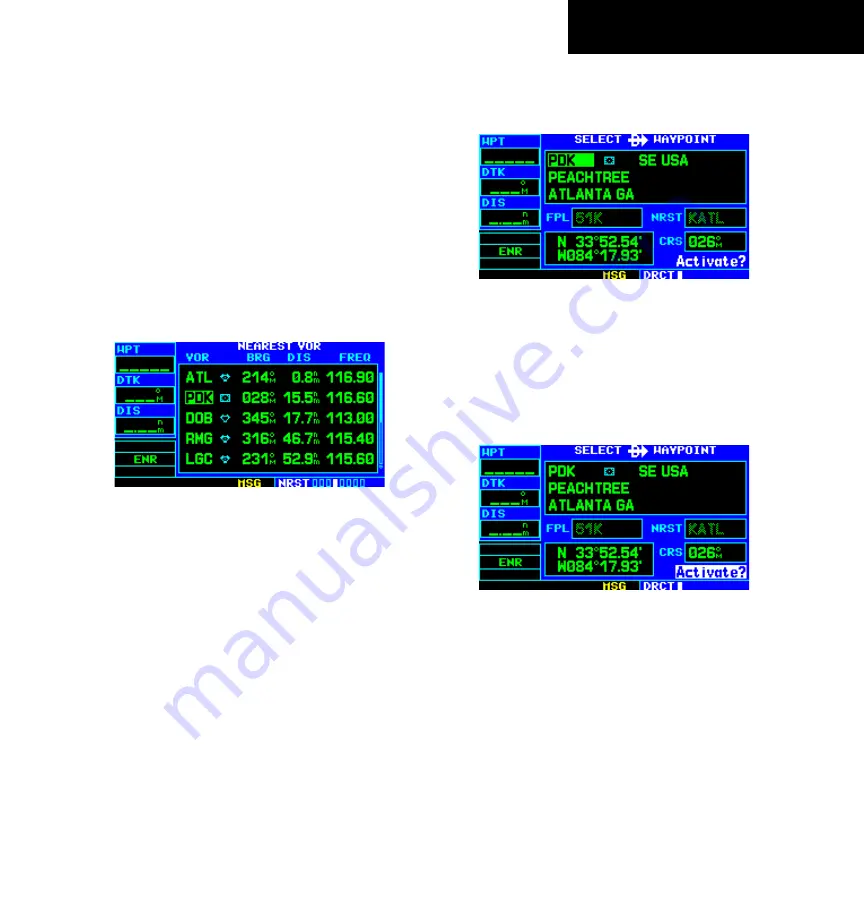
1)  Use the flashing cursor to scroll through a NRST 

page list (Figure 7-5) and highlight the desired 
nearest waypoint, as outlined in Section 7.1.

Figure 7-5  Nearest VOR Page

2)  Press the 

Direct-to

 Key to display the select 

Direct-to Waypoint Page (Figure 7-6).

Figure 7-6  Direct-to Waypoint Page

3)  Press  the 

ENT

  Key  to  accept  the  selected 

waypoint’s identifier and press the 

ENT

 Key 

a  second  time  (Figure  7-7)  with ‘Activate?’ 
highlighted to begin navigating to the selected 
waypoint.

Figure 7-7  ‘Activate?’ Highlighted

Содержание GPS 400

Страница 1: ...GPS 400 Pilot s Guide and Reference...

Страница 2: ......

Страница 3: ...REVISIONS Revision Date of Revision Description A 8 99 Initial Release B 8 00 Revised and Redrawn C 11 06 Changed to 8 inch x 8 5 inch format Added TERRAIN Additional Features section and misc changes...

Страница 4: ...and other Garmin products Except as expressly provided herein no part of this manual may be reproduced copied transmitted disseminated downloaded or stored in any storage medium for any purpose witho...

Страница 5: ...ort Departure Page 6 12 6 8 Intersection Page 6 13 6 9 NDB Page 6 14 6 10 VOR Page 6 14 6 11 User Waypoint Page 6 15 SECTION 7 NRST PAGES 7 1 7 1 NRST Page Group 7 1 7 2 Nearest Airport Page 7 4 7 3 N...

Страница 6: ...titude displayed by pressure altimeters in aircraft GPS altitude should never be used for vertical navigation Always use pressure altitude displayed by pressure altimeters in the aircraft WARNING The...

Страница 7: ...r anti re ective coatings CAUTION The Garmin GPS 400 does not contain any user serviceable parts Repairs should only be made by an authorized Garmin service center Unauthorized repairs or modi cations...

Страница 8: ...ER ANY WARRANTY OF MERCHANTABILITY OR FITNESS FOR A PARTICULAR PURPOSE STATUTORY OR OTHERWISE THIS WARRANTY GIVES YOU SPECIFIC LEGAL RIGHTS WHICH MAY VARY FROM STATE TO STATE IN NO EVENT SHALL GARMIN...

Страница 9: ...erence Guide Database Subscription Packet Warranty Registration Card GPS 400 Simulator CD ROM The Garmin dealer installs and con gures the GPS 400 The GPS 400 is secured in the installation rack with...

Страница 10: ...nctions of the GPS 400 Figure 1 1 Keys and Knobs P 6 8 4 5 7 2 15 10 12 13 14 9 1 3 11 NavData Card Slot 1 RNG map range 6 MSG message 11 Power 2 MENU 7 FPL ight plan 12 TERRAIN Data Card Slot 3 ENT e...

Страница 11: ...ete data entry It is also used to con rm information during power on The large right knob CRSR is used to select page groups NAV WPT AUX or NRST With the on screen cursor enabled the large right knob...

Страница 12: ...next waypoint Pressing the OBS Key again returns the unit to normal operation with automatic sequencing of waypoints When OBS mode is selected the pilot may set the desired course to from a waypoint u...

Страница 13: ...ut interruption This takeoff tour is intended to provide a brief introduction of the GPS 400 s major features Sections 2 through 12 of this manual describe these features and others in additional deta...

Страница 14: ...that the GPS 400 and any connected instruments are working properly check for the following indications on the CDI HSI RMI external annunciators and other connected instruments Course deviation half l...

Страница 15: ...ches the fuel capacity CAP gure Fuel on board is reduced over time based on the fuel ow FF gure Viewing the Checklists Page 1 Turn the large right knob to highlight Go To Chklist Figure 1 9 and press...

Страница 16: ...the satellites and the relative signal strength of each satellite received as a bar graph reading Searching Sky indicates that satellite almanac data is not available or has expired if the unit hasn t...

Страница 17: ...Page within Current Page Group Selecting the desired page group and page 1 Turn the large right knob until a page from the desired page group is displayed Figure 1 12 2 Turn the small right knob until...

Страница 18: ...n terms While viewing the Map Page the pilot can quickly declutter and remove many of the background map details by pressing the CLR Key repeatedly until the desired detail is depicted To change the m...

Страница 19: ...tive Leg of Flight Plan User selectable Data Fields The Default NAV Page displays a graphic course deviation indicator CDI the active leg of the ight plan as de ned by the current from and to waypoint...

Страница 20: ...osition and the destination airport Displaying the frequency list for the desired ight plan or direct to airport 1 Press the small right knob to activate the cursor on the airport identi er eld in the...

Страница 21: ...the ENT Key to display a list of available procedures for the departure when using SIDs or arrival when using approaches or STARs airport 3 Turn the small right knob to select the desired procedure an...

Страница 22: ...oup Nearest Airport Page Nearest NDB Page Nearest User Waypoint Page Nearest FSS Page Nearest Intersection Page Nearest VOR Page Nearest ARTCC Page Nearest Airspace Page The communication frequencies...

Страница 23: ...rse to a nearby facility in an in ight emergency Selecting a nearby airport as a direct to destination overrides the ight plan or cancels a previously selected direct to destination The pilot will sti...

Страница 24: ...27 Nearest Airspace Page By default airspace alert messages are turned off When turned on the message MSG annunciator located directly above the MSG Key ashes to alert the pilot to the airspace messa...

Страница 25: ...of the GPS 400 it will only be discussed brie y here with focus on creating a new ight plan and activating it to use for navigation After reading through this brief introduction answers to additional...

Страница 26: ...tivated from the Flight Plan Catalog Page Menu Activating the ight plan places it into ight plan 00 a copy of it still resides in the original catalog location and replaces any ight plan which current...

Страница 27: ...the number of pages available within that group indicated by the square icons and the placement of the current page within that group indicated by a highlighted square icon The bottom right corner of...

Страница 28: ...ckly selected from any page by pressing and holding the CLR Key Figure 2 3 Default NAV Page Course Deviation Indicator CDI User selectable Data Fields Active Leg of Flight Plan TO FROM Flag Number of...

Страница 29: ...e Right Left hand Holding Pattern Right hand Holding Pattern Table 2 2 NAV Page Symbols Selecting Desired On Screen Data At the bottom of the Default NAV Page there are six user de nable elds which di...

Страница 30: ...press the ENT Key to select this option 3 Use the large right knob to highlight the data eld to be changed Figure 2 5 Figure 2 5 DIS Field Highlighted 4 Turn the small right knob to display the list...

Страница 31: ...additional details on using the cross ll option 2 4 MAP PAGE The second NAV page is the Map Page Figure 2 8 which displays the present position using an airplane symbol along with nearby airports NAVA...

Страница 32: ...to a smaller map area and more detail An autozoom feature is available which automatically adjusts from an enroute range of 2000 nm through each lower range stopping at a range of 1 0 nm as the aircr...

Страница 33: ...t DIS and ground speed GS Any of these data elds may be changed to display a different data type as outlined in Section 2 4 The pilot may also remove the four data elds from the map to show a larger m...

Страница 34: ...e target pointer on a waypoint Figure 2 11 2 Press the ENT Key to display the Waypoint Information Page s for the selected waypoint Figure 2 12 Figure 2 12 Information for On Screen Waypoint 3 Press t...

Страница 35: ...area is congested and it is dif cult to select an open area the pilot may need to zoom in or press the CLR Key to make the selection easier Figure 2 14 Figure 2 14 Select Airspace with Target Pointer...

Страница 36: ...the settings available for each group Group Available Settings Map Orientation AutoZoom Land Data Aviation Data Weather Lightning Mode Symbol when applicable Traf c Traf c Mode Symbol Label when appli...

Страница 37: ...2 17 Map Setup Window 3 Turn the large right knob to highlight the Orientation eld 4 Turn the small right knob to select the desired option a Select DTK up to x the top of the Map Display to the desi...

Страница 38: ...ct Map and press the ENT Key 3 Turn the large right knob to highlight the appropriate eld 4 Turn the small right knob to select On or Off 5 Press the ENT Key to accept the selected option Displaying a...

Страница 39: ...earing and distance between two points 1 Turn the large right knob to highlight Measure Dist Figure 2 20 Figure 2 20 Map Page Menu 2 Press the ENT Key an on screen reference pointer appears on the Map...

Страница 40: ...igure 2 23 and press the ENT Key Figure 2 23 Map Page Menu 2 Turn the large right knob to highlight the data eld to be changed 3 Turn the small right knob to select the desired type of data Figure 2 2...

Страница 41: ...g Indicator The heading indication on the TERRAIN Page always displays TRK for Track up unless there is no valid heading Obstacles Potential Impact Points Figure 2 26 TERRAIN Page 120 View GPS derived...

Страница 42: ...the display range Select theTERRAIN Page and press up or down on the RNG Key to select the desired range 1 nm 2 nm 5 nm 10 nm 25 nm 50 nm 100 nm Figure 2 29 Display Range Field Figure 2 29 TERRAIN Di...

Страница 43: ...d by default 2 Press the ENT Key The TERRAIN system is functional again TERRAIN Symbols NOTE See Section 9 2 for a complete description of TERRAIN symbology The following symbols Figure 2 33 are used...

Страница 44: ...quencies for the airport nearest the departure position Figure 2 34 NAV COM Page Frequency Type Departure Enroute or Arrival Airport Assigned Frequency and Usage Information when applicable Number of...

Страница 45: ...croll Bar Figure 2 36 Scroll Bar NAV COM frequencies are shown for reference only Some listed frequencies may include designations for limited usage as follows TX transmit only RX receive only PT part...

Страница 46: ...cator for quick at a glance ground track information Directly below are three user selectable elds which by default display track ground speed and altitude Barometric pressure BARO settings and minimu...

Страница 47: ...t Change Fields and press the ENT Key 3 Turn the large right knob to highlight the waypoint type eld bottom left corner of the page default setting shows APT see Figure 2 42 Figure 2 42 Waypoint Type...

Страница 48: ...dow 8 Press the small right knob momentarily to remove the cursor from the page Restoring Factory Settings A Restore Defaults option allows the pilot to reset all data elds to their original factory d...

Страница 49: ...ion of Current Page within Current Page Group 10 As the GPS receiver locks onto satellites a signal strength bar appears for each satellite in view with the appropriate satellite number 01 32 undernea...

Страница 50: ...es should be in view 2D Navigation The GPS receiver is in 2D navigation mode Altitude data is provided by an altitude serializer 3D Navigation The GPS receiver is in 3D navigation mode and computes al...

Страница 51: ...Distance 2 Altitude Reference AGL or MSL 3 Target Reference 4 Vertical Speed Desired 5 Vertical Speed Required 6 Current Page Group 7 Number of Pages in Current Page Group 8 Position of Current Page...

Страница 52: ...ure 2 53 Reference Distance Selected 6 Turn the small right knob to select Before or After and press the ENT Key This setting designates whether the offset distance de nes a point before the aircraft...

Страница 53: ...roper descent or climb angle At 500 feet above or below for a climb the target altitude an Approaching Target Altitude message is provided The VSR readout on the Default NAV Page and the Map Page is b...

Страница 54: ...GPS 400 Pilot s Guide and Reference 190 00140 60 Rev E SECTION 2 NAV PAGES 2 28 Blank Page...

Страница 55: ...with the waypoint identi er eld highlighted Figure 3 1 Select Direct to Waypoint Page 2 Use the small and large right knobs to enter the identi er of the desired destination waypoint Figure 3 2 Figure...

Страница 56: ...lighted 2 Turn the large right knob to highlight the facility name second line or the city third line eld 3 Use the small and large right knobs to enter the facility name or city location of the desir...

Страница 57: ...y again to activate the direct to function Selecting the Nearest Airport as a Direct to Destination The Select Direct to Waypoint Page always displays the nearest airports from the present position in...

Страница 58: ...airports and NAVAIDs or from pages that display a list of waypoints e g the Nearest Airport Page Selecting an on screen waypoint as a direct to destination 1 If a single airport NAVAID or user waypoin...

Страница 59: ...me is highlighted Figure 3 11 Press the Direct to Key and the ENT Key twice to navigate to the waypoint Figure 3 11 Panning Pointer Placed on Waypoint 4 If the panning pointer is placed on an open loc...

Страница 60: ...se the small and large right knobs to select the destination waypoint 3 Press the ENT Key to con rm the selected waypoint then turn the large right knob to highlight the course CRS eld Figure 3 13 Fig...

Страница 61: ...The Flight Plan Catalog Page Figure 4 1 allows the pilot to create edit activate delete and copy ight plans Flight plans numbered from 1 through 19 are used to save ight plans for future use Flight p...

Страница 62: ...1 Press the FPL Key and turn the small right knob to display the Flight Plan Catalog Page 2 Press the small right knob to activate the cursor 3 Turn the large right knob to highlight the desired ight...

Страница 63: ...n to the Flight Plan Catalog Page A one line user comment may be added to any ight plan which is displayed on the Flight Plan Catalog Page next to the ight plan s number By default as the ight plan is...

Страница 64: ...Catalog Page Menu 3 Turn the large right knob to highlight Activate Flight Plan and press the ENT Key Figure 4 9 Figure 4 9 Flight Plan Catalog Page Menu Inverting Flight Plans After travelling along...

Страница 65: ...By default the next empty catalog location is offered To select a different location turn the large right knob to select the ight plan number use the small and large right knobs to enter a different...

Страница 66: ...ation or active ight plan on one unit is seen on the other For additional information see following procedure in this section or Section 8 2 Flight Planning Page Cross ll Copy Flight Plan Allows the p...

Страница 67: ...he large right knob to select the Transfer eld then turn the small right knob to select the type of information to transfer between units active ight plan ight plan all user waypoints or a single user...

Страница 68: ...gure 4 16 Flight Plan Catalog Page Menu 2 A con rmation window appears Figure 4 17 With Yes highlighted press the ENT Key Figure 4 17 Delete All Flight Plans Window Sorting the catalog listing by numb...

Страница 69: ...lan the Active Flight Plan Page shows each waypoint for the ight plan or a single waypoint for a direct to Figure 4 19 along with the desired track DTK and distance DIS for each leg Figure 4 19 Active...

Страница 70: ...g the PROC Key as described in Section 5 1 Select Arrival Allows the pilot to select a published standard terminal arrival route STAR for the destination airport or replace the current arrival with a...

Страница 71: ...l right knob to select the desired data item Figure 4 22 and press the ENT Key Figure 4 22 Select Field Type Window 5 Press the small right knob to remove the cursor Restoring factory default settings...

Страница 72: ...knob to highlight the desired transition waypoint and press the ENT Key The Vectors option assumes the pilot will receive vectors to the nal course segment of the approach and will provide navigation...

Страница 73: ...g available transitions Figure 4 29 for the arrival Turn the small right knob to highlight the desired transition waypoint and press the ENT Key Figure 4 29 Transitions Window 4 With Load highlighted...

Страница 74: ...ctive Flight Plan Page Menu Figure 4 31 and press the ENT Key Figure 4 31 Active Flight Plan Page Menu 2 A window appears with the reference waypoint eld highlighted Use the small and large right knob...

Страница 75: ...ighlight the title for the approach Figure 4 33 departure or arrival to be deleted Titles appear in light blue directly above the procedure s waypoints Figure 4 33 Highlight Item To Be Deleted 3 Press...

Страница 76: ...display an Activate Leg con rmation window Figure 4 37 Figure 4 37 Activate Leg Window 3 With Activate highlighted press the ENT Key When using instrument procedures this feature can be used not only...

Страница 77: ...orts must have published procedures associated with them Selecting an approach departure or arrival 1 Press the PROC Key to display the Procedures Page 2 Turn the large right knob to highlight Select...

Страница 78: ...name Figure 5 4 indicates the procedure can be own using the GPS receiver Some procedures do not have this designation meaning the GPS receiver may be used for supplemental navigation guidance only I...

Страница 79: ...the full approach using the Activate Approach option 5 2 NON PRECISION APPROACH OPERATIONS The GPS 400 provides non precision approach guidance using its built in GPS receiver The GPS receiver can al...

Страница 80: ...e ight plan but retains course guidance in the enroute section until the approach is activated 4 Activate the full approach or vectors to nal as appropriate In some scenarios it may be more convenient...

Страница 81: ...w theATIS frequency from the list on the NAV COM Page Section 2 6 and Figure 5 10 The ATIS frequency may be used to tune an external COM transceiver Figure 5 10 NAV COM Page 3 Press the PROC Key Figur...

Страница 82: ...igure 5 14 Figure 5 14 CDI Scale at 1 0 nm 2 Several miles prior to reaching the IAF LYH the pilot may wish to review the approach sequence Press the FPL Key to display the Active Flight Plan Page Pre...

Страница 83: ...Map Page and indicated as the active leg on the Default NAV Page and theActive Flight Plan Page The CDI needle starts moving to the right 7 When turning to intercept the inbound course the GPS 400 se...

Страница 84: ...ower right corner 13 After crossing the MAP SUSP appears above the OBS Key Figure 5 20 indicating that automatic sequencing of approach waypoints is suspended at the MAP A from indication is displayed...

Страница 85: ...along the 053 radial from LYH VOR 3 An alert message in the lower right hand corner of the screen recommends entry procedures for the holding pattern i e HOLD DIRECT HOLD PARALLEL or HOLD TEARDROP se...

Страница 86: ...aypoint Page 3 Press the ENT Key twice This time the pilot selects the GPS runway 21 approach into Farmville Regional The GPS runway 21 approach begins with a holding pattern at the IAF BODRY intersec...

Страница 87: ...y Figure 5 31 HOLD DIRECT or HOLD PARALLEL may be offered on other similar approaches Figure 5 31 HOLD TEARDROP Annunciation 9 As mentioned in the missed approach example the Default NAV Page displays...

Страница 88: ...lready been passed re activate the holding pattern using the steps described in Section 5 2 DO NOT USE FOR NAVIGATION Figure 5 33 Approach Mode Refer to Figure 5 33 for the following steps 11 When app...

Страница 89: ...is displayed in magenta the active leg of the ight plan always appears in magenta and a dashed line extends the course beyond the MAP Do not follow this extended course Instead follow published misse...

Страница 90: ...Figure 5 37 Enroute Mode NOTE As this manual was being written the letter number DME arc names were being replaced with standard ve letter intersection names Either naming convention may be used for a...

Страница 91: ...rom 5 0 to 1 0 nm full scale de ection 4 If the approach has not yet been activated in step 2 do so when cleared for the approach Figure 5 42 Figure 5 42 Procedures Page 5 WhenapproachingtheIAF D258G...

Страница 92: ...ory TURNTO 205 Dial this course into the CDI or HSI using the OBS knob Figure 5 44 Intermediate Approach Fix 8 At 2 0 nm from the FAF TOP VOR the GPS 400 switches from terminal mode to approach mode C...

Страница 93: ...e but course guidance along the nal approach course continues Do not follow this extended course Follow published missed approach procedures using the OBS Key to initiate the missed approach sequence...

Страница 94: ...Key or as the last waypoint in a ight plan 2 Press the PROC Key and select the VOR 22 approach using the steps outlined in Section 5 1 3 From the Transitions Window select D258G as the IAF Figure 5 5...

Страница 95: ...lows the GPS 400 to provide guidance to the nal approach course 3 ATC instructs the pilot to turn left to a heading of 025 This places the aircraft parallel to the nal approach course in the opposite...

Страница 96: ...igure 5 58 Figure 5 58 Waypoint Alert 8 After crossing the FAF the destination sequences to the MAP RW22 9 When approaching the MAP a waypoint alert APPRCHINGWPT appears in the lower right corner 10 A...

Страница 97: ...gure 5 60 Figure 5 60 Active Flight Plan Page DO NOT USE FOR NAVIGATION Palmdale CA AF Plant 42 VOR DME or GPS Rwy 25 Figure 5 61 KPMD Approach This example uses the VOR DME RWY 25 approach into Palmd...

Страница 98: ...terminal mode to approach mode APR appears in the lower left corner of the screen replacing TERM CDI scaling is tightened from 1 0 to 0 3 nm full scale de ection 6 When approaching the FAF NEXT DTK 2...

Страница 99: ...A AF Plant 42 VOR DME or GPS Rwy 25 Figure 5 66 Palmdale Missed Approach In this instance the leg corresponds to the initial phase of the missed approach which reads Climb to 5000 outbound via PMD VOR...

Страница 100: ...MD VOR Intercept and y the inbound course Figure 5 68 Waypoint Alert 6 When approaching PMD VOR the missed approach holding point an alert message in the lower right hand corner of the screen recommen...

Страница 101: ...er departure From over HFD VOR proceed via the HFD R 143 to Thumb Int then via the HTO R 010 to Yoder Int then via the CCC R 057 to CCC VOR Then via transition or assigned route Figure 5 69 Coastal On...

Страница 102: ...oint along the remainder of the departure route including the selected transition 5 3 POINTS TO REMEMBER FOR ALL APPROACHES The GPS 400 is designed to complement printed approach plates and vastly imp...

Страница 103: ...y viewing any of the main pages 2 Turn the large right knob to select the WPT Page Group WPT appears in the lower right corner of the screen 3 Turn the small right knob to select the desired WPT page...

Страница 104: ...ess the small right knob Entering a waypoint facility name or city location 1 Select the Airport Location Page NDB Page or VOR Page from the WPT Page Group as described on the preceding page 2 Press t...

Страница 105: ...ty name or city location 2 When spelling the facility name or location using the small and large right knobs the GPS 400 s Spell N Find feature selects the rst entry Figure 6 5 in the database based u...

Страница 106: ...s 6 Airspace Type 7 Best Available Approach 8 Current Page Group 9 Position of Current Page within Current Page Group 10 Number of Pages in Current Page Group Figure 6 8 Airport Location Page The foll...

Страница 107: ...pe Runway Designations Runway Length and Width Surface and Lighting Number of Pages in Current Page Group Position of Current Page within Current Page Group Current Page Group Displaying information f...

Страница 108: ...d frequency types for the selected airport as well as sector and altitude restrictions where applicable If the selected airport has an ILS approach the localizer frequency ies are also listed on the A...

Страница 109: ...irectly to the left of the desired frequency Figure 6 14 Figure 6 14 Info Designation Highlighted 2 Press the ENT Key to display the restriction information Figure 6 15 Figure 6 15 Restriction Informa...

Страница 110: ...ent Page Group Scrolling through the available approaches and transitions 1 Press the small right knob to activate the cursor 2 Turn the large right knob to place the cursor on the approach APR proced...

Страница 111: ...d approach into the active ight plan without activating it This performs the same operation as selecting Load from the Procedures Page Select Approach option See Section 5 1 Load and Activate Allows t...

Страница 112: ...nt Page within Current Page Group Number of Pages in Current Page Group Current Page Group Scrolling through the available arrivals 1 Press the small right knob to activate the cursor 2 Turn the large...

Страница 113: ...ess the small right knob Airport Arrival Page Options The following option is available for the Airport Arrival Page by pressing the MENU Key Load into Active FPL allows the pilot to load the selected...

Страница 114: ...o place the cursor on the departure DEP procedure name eld Figure 6 26 3 Turn the small right knob to display a window of available departures for the selected airport Figure 6 27 Continue turning the...

Страница 115: ...Intersection Page Figure 6 30 displays the latitude longitude region and country for the selected intersection The Intersection Page also displays the identi er radial and distance from the nearest V...

Страница 116: ...t on the selected facility s frequency 6 10 VOR PAGE The VOR Page Figure 6 32 displays the facility name city region country magnetic variation latitude and longitude for the selected VOR The VOR Page...

Страница 117: ...agnetic or degrees true depending upon unit con guration DIS Distance from reference waypoint in nautical miles statute miles kilometers depending upon unit con guration Position Latitude Longitude de...

Страница 118: ...or 2 Use the small and large right knobs to enter a name for the new waypoint and press the ENT Key 3 Turn the large right knob to highlight the rst reference waypoint REF WPT eld 4 Use the small and...

Страница 119: ...this eld displays a radial from the nearest VOR However the pilot can select any waypoint by identi er to use as a reference in this eld The GPS 400 can store user de ned waypoints which are generated...

Страница 120: ...new position information directly over the old information Modifying a user waypoint by changing its latitude longitude position 1 With the User Waypoint Page displayed press the small right knob to...

Страница 121: ...ld Selected 5 The cursor moves to the radial RAD eld Figure 6 43 Use the small and large right knobs to change the radial from the reference waypoint if desired Press the ENT Key to accept the selecte...

Страница 122: ...ntly used and available memory Figure 6 46 If more user waypoints are stored than can be displayed on a single screen turn the large right knob to scroll through the UserWaypoint List Figure 6 46 User...

Страница 123: ...om this page the pilot may review all information de ning the waypoint and its position 4 To modify the waypoint s position or reference waypoint information follow the steps described in this section...

Страница 124: ...point Window 4 With Yes highlighted press the ENT Key to delete the selected user waypoint Deleting all user waypoints from memory 1 Select the User Waypoint List as described in this section 2 Press...

Страница 125: ...nclude the ve nearest Flight Service Station FSS and center ARTCC FIR points of communication plus alerts the pilot to any nearby Special Use SUA or Controlled Airspaces Page Groups NAV Group WPT Grou...

Страница 126: ...the desired NRST page using the steps outlined on the preceding page 2 Press the small right knob to activate the cursor 3 Turn the large right knob to scroll through the list The scroll bar along the...

Страница 127: ...ntersection or user waypoint as a direct to destination 1 Use the ashing cursor to scroll through a NRST page list Figure 7 5 and highlight the desired nearest waypoint as outlined in Section 7 1 Figu...

Страница 128: ...s or undesirable runway surface types so that the corresponding airports do not appear on the list The pilot may wish to use this feature to exclude seaplane bases or runway lengths which would be dif...

Страница 129: ...the Nearest Airport Page verify that Done is highlighted by the ashing cursor and press the ENT Key or press the CLR Key 7 3 NEAREST INTERSECTION PAGE The Nearest Intersection Page Figure 7 12 display...

Страница 130: ...7 5 NEAREST VOR PAGE The Nearest VOR Page Figure 7 14 displays the identi er symbol bearing and distance to the nine nearest VORs within 200 nm of the present position For each VOR listed the nearest...

Страница 131: ...ENT Key or press the CLR Key 6 Press the small right knob to remove the ashing cursor 7 6 NEAREST USER WAYPOINT PAGE The Nearest User Waypoint Page Figure 7 16 displays the name bearing and distance t...

Страница 132: ...Page Group 7 8 NEAREST FLIGHT SERVICE STATION FSS PAGE The Nearest Flight Service Station Page Figure 7 18 displays the facility name bearing to and distance to the ve nearest FSS points of communicat...

Страница 133: ...st Airspace Page shows Within 2nm of airspace If the aircraft is within two nautical miles of an airspace and the current course will not take the aircraft inside the message Near airspace less than 2...

Страница 134: ...tion of Current Page within Current Page Group Number of Pages in Current Page Group Viewing additional details for an airspace listed on the Nearest Airspace Page 1 Select the Nearest Airspace Page u...

Страница 135: ...of what may appear as vertical limits for an airspace 5000 ft msl 5000 feet mean sea level 5000 ft agl 5000 feet above ground level MSL at mean sea level Notam Notice to Airmen Unknown Unlimited See...

Страница 136: ...GPS 400 Pilot s Guide and Reference 190 00140 60 Rev E 7 12 SECTION 7 NRST PAGES Blank Page...

Страница 137: ...pages see Section 7 Table 8 1 Page Groups Figure 8 1 AUX Pages Flight Planning Utility Setup 1 Setup 2 NOTE The AUX Page Group may have ve AUX pages available when the GPS 400 installation includes c...

Страница 138: ...page appears providing additional information and features Figure 8 4 Flight Planning Page Current Page Group Menu Options to Select Highlight with Cursor and Press the ENT Key Position of Current Pa...

Страница 139: ...ding the heating effect of speed read on a standard outside temperature gauge This menu option computes true airspeed TAS based upon the factors above and the calibrated airspeed CAS Also this menu op...

Страница 140: ...e the Change Fields option to review separate fuel information for left and right engines 3 For point to point fuel planning Figure 8 9 turn the small and large right knobs to enter the identi er of t...

Страница 141: ...Use the small and large right knobs to enter the ground speed Press the ENT Key when nished 9 With all variables entered the following information is provided see also Figure 8 12 REQ Quantity of fuel...

Страница 142: ...forming trip planning operations 1 Select Trip Planning from the Flight Planning Page using the steps described in this section 2 The current trip planning leg mode is displayed at the top of the page...

Страница 143: ...rse DIS Distance ETE Estimated time enroute ESA Enroute safe altitude ETA Estimated time of arrival Figure 8 16 Trip Planning Page Flight Planning Page Density Alt TAS Winds Calculating density altitu...

Страница 144: ...T Key when nished Figure 8 19 Heading Field Highlighted 7 With all variables entered the following information is provided DEN ALT Density altitude TAS True airspeed WIND Wind direction and speed HEAD...

Страница 145: ...messages data transfer error or data transfer cancelled are received during an automatic or manual transfer the pilot must force another transfer Transferring ight plans or user waypoints to from a se...

Страница 146: ...flight plan number field is highlighted Turn the small right knob to select the desired ight plan and press the ENT Key 6 For a speci ed user waypoint UserWaypoint data option the waypoint identi er e...

Страница 147: ...anningPage using the steps described at the beginning of this section 2 The ashing cursor highlights the rst message eld 3 To edit the message text turn the large right knob to highlight the desired m...

Страница 148: ...n Current Page Group Number of Pages in Current Page Group Selecting a menu option from the Utility Page 1 Press the small right knob momentarily to activate the ashing cursor Figure 8 29 2 Turn the l...

Страница 149: ...reen Figure 8 32 indicates that satellite coverage is insuf cient to pass built in RAIM tests When this occurs the GPS receiver continues to provide navigation information but should not be used for p...

Страница 150: ...mall and large right knobs to enter each checklist item followed each time by the ENT Key Each checklist may contain up to 30 line items of as much as 16 characters long Executing a checklist 1 With t...

Страница 151: ...n the large right knob to select Copy Checklist and press the ENT Key to copy the checklist to an empty checklist memory location Sorting the checklists by name or entry 1 With the Checklists Page dis...

Страница 152: ...he desired reset mode Figure 8 38 Pwr on records a departure time when the GPS 400 is turned on GS 30kt records a departure time once the GPS computed ground speed exceeds 30 knots Figure 8 38 Reset M...

Страница 153: ...readout only Reset All Resets all trip statistics readouts Figure 8 41 Trip Statistics Page Menu 3 Turn the large right knob to select the desired reset option and press the ENT Key Utility Page RAIM...

Страница 154: ...on precision approaches Figure 8 44 Compute RAIM Highlighted NOTE RAIM computations predict satellite coverage within 15 minutes of the speci ed arrival date and time Refer to Section 8 3 for speci c...

Страница 155: ...e from this page Figure 8 48 Software Versions Page Utility Page Database Versions The Database Versions Page Figure 8 49 displays the navigation database type and version information as well as the l...

Страница 156: ...ed special use airspace message alerts on or off This does not affect the alerts listed on the Nearest Airspace Page or the airspace boundaries depicted on the Map Page It simply turns on off the warn...

Страница 157: ...ion Auto oceanic 4 0 nm 5 0 nm or Auto enroute 2 0 nm 1 0 nm or Auto terminal 1 0 nm 0 3 nm or Auto approach 0 3 nm Table 8 3 CDI Scales An arrival alarm provided on the CDI Alarms Page may be set to...

Страница 158: ...used to de ne current local time UTC also called GMT or Zulu date and time are calculated directly from the GPS satellites signals and cannot be changed To use local time simply designate the offset b...

Страница 159: ...Scale Alarms Changing the CDI scale 1 Select CDI Alarms from the Setup 1 Page Figure 8 58 using the steps described at the beginning of this section Figure 8 58 CDI Alarms Highlighted 2 The ashing cur...

Страница 160: ...en nished NOTE The CDI scale is always measured in nautical miles regardless of the current distance units of measure selected on the Units Mag Var Page Setup 1 Page Units Mag Var Setting the magnetic...

Страница 161: ...FUEL Fuel units in Gallons Imperial Gallons Kilograms Liters or Pounds 3 Turn the small right knob to select the desired units of measure for the selected category Press the ENT Key to accept the sele...

Страница 162: ...8 66 Map Datum WGS 84 Setup 1 Page Date Time Displaying local time or UTC 1 Select Date Time from the Setup 1 Page using the steps described at the beginning of this section 2 The ashing cursor highli...

Страница 163: ...nus or behind UTC 4 Press the ENT Key to accept the selected offset Restoring Factory Settings When making changes to any Setup 1 Page option a RestoreDefaults menuselectionallowsthepilottorestore the...

Страница 164: ...adjust the display for optimum viewing in any condition Automatic backlighting is available which uses a built in photocell at the top left corner of the display bezel to make the proper display adjus...

Страница 165: ...f Manual is selected the ashing cursor moves to the backlight level eld Turn the small right knob to select the desired level Press the ENT Key to accept the selection Changing the display contrast 1...

Страница 166: ...runway surface selection 4 The ashing cursor moves to the minimum runway length eld Figure 8 77 To enter a different minimum runway length use the small and large right knobs to enter the desired len...

Страница 167: ...ure 8 79 Select Field Type Window 3 Press the ENT Key to accept the data type 4 Press the small right knob to remove the cursor and return to the Setup 2 Page Setup 2 Page Auxiliary Con guration Con g...

Страница 168: ...up 2 Page NOTE The Traf c selection in the Auxiliary Con guration Field is only available if the GPS 400 is con gured for interface with a traf c information device see Section 10 Restoring Factory Se...

Страница 169: ...tained in the TERRAIN databases comes from government agencies Garmin accurately processes and cross validates the data but cannot guarantee the accuracy and completeness of the data TERRAIN displays...

Страница 170: ...re the GPS position and GPS MSL altitude are used to calculate and predict the aircraft s ight path in relation to the surrounding terrain and obstacles In this manner TERRAIN can provide advanced ale...

Страница 171: ...Projected Flight Path 1000 ft 100 ft Threshold Terrain more than 1000 ft below the aircraft altitude Black Terrain between 100 ft and 1000 ft below the aircraft altitude Yellow Terrain above or withi...

Страница 172: ...ded according to Table 9 2 Figure 9 2 TERRAIN Annunciation Field TERRAIN Annunciation NOTE TERRAIN Advisory Alerts are displayed as constant black text on a yellow background TERRAIN CautionAlerts are...

Страница 173: ...ble None Required Terrain Clearance RTC Advisory Required Terrain Clearance RTC Caution FLASHING FLASHING Imminent Terrain Impact ITI Advisory Imminent Terrain Impact ITI Caution FLASHING FLASHING Req...

Страница 174: ...TC or ROC alert is issued a potential impact point is displayed on the TERRAIN Page Imminent Terrain Impact ITI and Imminent Obstacle Impact IOI These alerts are issued when the aircraft is below the...

Страница 175: ...7 8 9 10 11 12 13 14 15 Too Low Terrain Too Low Terrain Runway Threshold Figure 9 5 PDA Alerting Threshold TERRAIN Inhibit TERRAIN also has an inhibit mode that deactivates the FLTA PDA visual alerts...

Страница 176: ...RRAINNOTAVAILABLE isgeneratedontheTERRAIN Page Figure 9 8 When the GPS signal is re established and the aircraft is within the database coverage area the TER N A visual annunciation is removed Figure...

Страница 177: ...ntee the accuracy and completeness of the data The terrain obstacle databases are contained on a datacard which is inserted in the right most slot of the GPS 400 units Appendix A NOTE Obstacles 200 an...

Страница 178: ...ta card from and insert the new card into the right most slot of the GPS 400 4 Turn on the GPS 400 and verify that the TERRAIN system passes self test Terrain Obstacle Database Areas of Coverage Table...

Страница 179: ...and Weather Data Link displays are available only when GPS 400 units are con gured with the GTX 330 Mode STransponder and a GDL 49 or GDL 69 A Data Link Satellite Receiver 10 1 TRAFFIC INFORMATION SER...

Страница 180: ...ion of the Aeronautical Information Manual Section 1 3 5 TIS is not intended to be used as a collision avoidance system and does not relieve the pilot responsibility to see and avoid other aircraft TI...

Страница 181: ...ce and altitude remain relatively accurate and may be used to assist see and avoid Some of the more common examples of these errors follow When client or intruder aircraft maneuver excessively or abru...

Страница 182: ...a dedicated Traf c page and on the moving Map Page The symbology is shown in Table 10 1 and Figures 10 2 10 3 and 10 4 The symbology is described in Table 10 2 A Traf c Advisory TA symbol appears as a...

Страница 183: ...lay range that does not meet the criteria for a TA or PA Traf c Ground Track The target track vector is a short line displayed in 45 increments The vector protrudes from each target symbol in the appr...

Страница 184: ...ransponder Figure 10 9 No Data Message OPER When the Traf c Page displays OPER in the upper right hand corner of the display Figure 10 11 the TIS system is in operational mode and available to display...

Страница 185: ...ssing the ENT Key or go back to the previous page by pressing the CLR Key Figure 10 13 Traf c Warning Window NOTE The Traf c Warning Window is disabled when the aircraft ground speed is less than 30 k...

Страница 186: ...TA PA Only traf c advisories and proximity advisories are displayed on the Map Page TA only Only traf c advisories are displayed on the Map Page TRAFC SMBL Allows the user to select the map range at...

Страница 187: ...TIS Traf c Using Map Page Panning Another Map Page feature is panning which allows the pilot to move the map beyond its current limits without adjusting the map scale Press the small right knob to sel...

Страница 188: ...ng mode from the standby mode to display TIS traf c 1 Press the small right knob to activate the cursor and highlight STBY 2 Turn the small right knob to select OPER 3 Press the ENT Key to con rm Plac...

Страница 189: ...XRAD and METAR data is collected by the National Weather Service and disseminated to Meteorlogix a weather information provider This data is then delivered to a weather server in the Echo Flight Messa...

Страница 190: ...tenna points directly at the sun Military aircraft deploy metallic dust chaff which can cause alterations in radar scans Interference from buildings or mountains which may cause shadows NEXRAD Limitat...

Страница 191: ...ur Source of NEXRAD Echo GDL 49 GDL 69 Atmos Cloud Rain Snow Sleet Hail 10 00 00 10 00 00 5 00 trace 0 00 trace 05 Very Light GREEN 5 00 trace 10 Light GREEN 10 0 trace 10 Light Light 15 01 1 2 Light...

Страница 192: ...t NEXRAD data from a speci c waypoint identi er If From ID is selected as the reference point for the request the WPT eld is displayed in place of Position The WPT eld is used to enter a waypoint iden...

Страница 193: ...he NEXRAD Request Page 5 Select Manual Send or Update Request and press the ENT Key The request has been sent Note that selecting Auto Request and pressing the ENT Key does not send the request until...

Страница 194: ...ther Page The pilot can customize the NEXRAD data on the Weather Page from the Page Options Menu Customizing the NEXRAD data on the Weather Page 1 From the Weather Page press the MENU Key to display t...

Страница 195: ...to the Map Page 5 Highlight the NEXRAD Density eld use the small right knob to set the density desired i e the transparency see Table 10 5 of the NEXRAD cells The density values are LOW MED HIGH Press...

Страница 196: ...g the Airport Location Page Use the small and large right knobs to select the Airport Location Page from the WPT Group of pages On the Map Page move the target pointer to highlight an on screen airpor...

Страница 197: ...ed Figure 10 28 Figure 10 28 Data Link Request Log Page Sending Position Reports GDL 49 Only The Data Link allows for accurate location tracking of the aircraft by sending the aircraft s position manu...

Страница 198: ...nd This eld is used to send out a current single position report Figure 10 30 Figure 10 30 Position Report Page Requesting Graphical METARs Graphical METAR data can be requested from the Data Link Pag...

Страница 199: ...the reference point for the request Radius Graphical requests only This eld selects a request radius from 50 to 250 nm from the selected position Position also WPT or Flight Plan Current Posn Position...

Страница 200: ...ent Note that selecting Auto Request and pressing the ENT Key does not send the request until after the auto time period 6 To exit from the METAR Request Page press the small right knob The Map Page i...

Страница 201: ...yed Figure 10 34 for the type of data that was selected Use the small right knob and scroll through the various descriptions for the symbols that are shown Press the small right knob to return to the...

Страница 202: ...ld ashes 3 Turn the small right knob and select TEMP DP 4 Press the small right knob The Temperature Dewpoints are displayed on the NAV Weather Page NOTE See a complete description of all METAR Wind a...

Страница 203: ...SAT ID CONNECTIVITY FIELD MESSAGE DESCRIPTION _ _ _ RS 232 communication with the GDL 49 has been lost Data Link has failed There is a disconnect inside the GDL 49 Linked to sat Can exchange data wit...

Страница 204: ...r 2 good and 3 excellent XM GDL 69 69A not yet communicating with internal satellite radio hardware normal during power up X0 X1 X2 or X3 X Satellite radio service activated Satellite signal quality i...

Страница 205: ...tion xxxx are numbers PRESFR Pressure falling rapidly PRESRR Pressure rising rapidly RA Rain RMK Remarks SCT Scattered clouds SLP Sea Level Pressure SM Statue Miles SN Snow TEMPO Occasionally Trrn Ter...

Страница 206: ...bility Station Identi er Data Age Figure 10 37 METAR Symbol Winds Wind Vector The wind vector indicates the direction of the surface wind to the nearest 30 increment e g 30 60 90 120 etc Wind Speed In...

Страница 207: ...on of 300 at a speed of 25 knots gusting to 36 knots or greater The data age is 11 20 minutes old Gust Offset Wind Speed Wind Vector Data Age Figure 10 38 Wind Symbol Temperature Dewpoints The Tempera...

Страница 208: ...GPS 400 Pilot s Guide and Reference 190 00140 60 Rev E 10 30 SECTION 10 ADDITIONAL FEATURES Blank Page...

Страница 209: ...n the exclusion function excludes one or more failed satellites and prevents them from being used during navigation This allows the GPS receiver to return to normal performance without interruption Th...

Страница 210: ...Standard Termi nal Arrival Routes STARs if a NOTAM indicates a GPS satellite or satellites is scheduled to be out of service per FAA AC 90 100 U S Terminal and En Route Area Navigation RNAV Operations...

Страница 211: ...referenced to True North The GPS 400 has not detected a NavData Card in the left data card slot Altitude input failure The GPS 400 is con gured to receive altitude serializer data Icarus Rosetta or S...

Страница 212: ...lighting temperature The backlighting has been automatically dimmed to reduce the temperature Check for adequate ventilation or check cooling air ow Contact a Garmin dealer for assistance Data card fa...

Страница 213: ...lso appears when an approach has been deleted from a stored ight plan because an approach could not be found These conditions may occur upon power up when a database change increases the number of way...

Страница 214: ...detected a failure in the main system processor The GPS 400 is not usable and should be taken to a Garmin dealer for service Memory battery low The internal battery that sustains user memory is low an...

Страница 215: ...and re initialize The GPS 400 cannot calculate a position due to abnormal satellite conditions The unit is unusable until power has been cycled off and back on Abnormal satellite conditions may exist...

Страница 216: ...lete list of TERRAIN related Alerts and Annunciations Terrain con guration con ict The hardware con guration does not match the terrain software con guration The operational status of the terrain comp...

Страница 217: ...90 00140 60 Rev E SECTION 12 MESSAGES ABBREVIATIONS NAV TERMS 12 7 Message Description Waypoint memory is full All 1000 user waypoint locations in the GPS 400 s memory have been used Delete unwanted w...

Страница 218: ...se Deviation Indicator CLR Clear COM Communications Transceiver CRSR Cursor CTA ICAO Control Area CTAF Common Traf c Advisory Frequency CTR Center ARTCC CTS Course To Steer CUM Cumulative DB Database...

Страница 219: ...ph Kilometers Per Hour kt Knots LAT LON Latitude Longitude lb Pounds LCL Local LFOB Left over Fuel On Board LOC Localizer LRES Left over Fuel Reserve Time Lrg Large lt Liters M Degrees Magnetic m Mete...

Страница 220: ...ival Route SUA Special Use Airspace T Degree True TACAN Tactical Air Navigation TAS True Airspeed TAT Total Air Temperature TEMP Temperature TERM Terminal TKE Track Angle Error TMA ICAO Terminal Contr...

Страница 221: ...e present position to a destination waypoint CAS calibrated airspeed Indicated airspeed corrected for instrument errors CTS course to steer The recommended direction to steer in order to reduce course...

Страница 222: ...indicated altitude LFOB left over fuel onboard The amount of fuel remaining on board after the completion of a one or more legs of a ight plan or a direct to LRES left over fuel reserve The amount of...

Страница 223: ...nitializes Pressing the ENT Key will manually re initialize the unit GNC 420 Figure A 1 Data Card Slot Locations Terrain Data Card Slot right hand slot NavData Card Slot left hand slot NOTE There are...

Страница 224: ...d motion at the front center of the data card This partially deploys the swing arm handle 2 Rotate the swing arm handle upward and outward until it locks into place perpendicular to the face of the GP...

Страница 225: ...F to 131 F Humidity 95 non condensing Altitude 1 500 ft to 50 000 ft 457 m to 15 240 m GPS PERFORMANCE Receiver 12 parallel channel PhaseTrac12 Acquisition Time 12 seconds warm 45 seconds cold Update...

Страница 226: ...GPS 400 Pilot s Guide and Reference 190 00140 60 Rev E APPENDIX B SPECIFICATIONS B 2 Blank Page...

Страница 227: ...sion approaches During oceanic enroute and terminal phases of ight RAIM is available nearly 100 of the time Because of the tighter protection limit on approaches there may be times when RAIM is not av...

Страница 228: ...procedure has not been modi ed If an approach departure or arrival procedure is no longer available the ight plan becomes locked until the procedure is deleted from the ight plan or the correct datab...

Страница 229: ...ossed the active waypoint provided the active waypoint is not the last waypoint Refer to Section 5 2 for an example using the OBS Key One application for the OBS Key is holding patterns The OBS Key is...

Страница 230: ...sequencing is enabled i e no OBS or SUSP annunciation directly above the OBS Key For automatic sequencing to occur the aircraft must also cross the bisector of the turn being navigated The bisector is...

Страница 231: ...dpoint of the turn For more information on waypoint alerts and turn advisories see Sections 5 2 and 5 3 When does the CDI scale change and what does it change to If Auto mode is selected for the CDI s...

Страница 232: ...en press the ENT Key twice How do I re select the same approach or activate a new approach after a missed approach After ying all missed approach procedures the pilot may reactivate the same approach...

Страница 233: ...2 7 2 13 2 14 2 21 2 22 4 10 4 14 7 4 7 5 7 6 7 7 7 8 12 8 12 11 C CDI Scale 2 2 5 11 5 15 5 19 8 20 8 21 8 23 8 24 C 5 C 6 Ceiling and Visibility Graphics 10 28 Checklists 1 7 8 12 8 14 8 15 Closest...

Страница 234: ...rack 1 10 1 11 2 3 2 20 12 12 Gust Offset Graphics 10 28 H Hold in an approach 5 9 5 23 C 3 Holding pattern 4 16 5 9 5 10 5 11 5 12 5 24 C 3 Hold waypoint 5 9 5 11 5 24 I IFR procedures 1 13 Insert th...

Страница 235: ...5 12 5 13 5 17 5 20 5 22 5 23 5 26 12 1 12 5 12 6 C 2 C 6 Odometer 8 17 Overzoom 2 6 P Packing list 1 1 Page groups 1 3 2 1 7 1 8 1 PDA premature descent alert 9 5 Pointer panning 2 7 2 8 2 9 2 13 3 5...

Страница 236: ...f c Advisory 10 4 Traf c coasting 10 6 Traf c Page 10 5 Traf c Warning Window 10 7 Transitions 4 12 4 13 5 1 5 5 5 10 5 18 6 8 6 10 6 12 12 3 C 5 Trip planning 8 1 8 2 8 3 8 6 Trip statistics 8 12 8 1...

Страница 237: ......

Страница 238: ...U S A p 503 391 3411 f 503 364 2138 Garmin Europe Ltd Liberty House Bulls Copse Road Hounsdown Business Park Southampton SO40 9RB U K p 44 0 870 8501241 f 44 0 870 8501251 Garmin Corporation No 68 Ja...

Отзывы: