device. After submersion, be certain to wipe dry and air dry the
device before using or charging.
Thoroughly rinse the device with fresh water after exposure to
chlorinated or salt water environments.
Cleaning the Device
NOTICE
Even small amounts of sweat or moisture can cause corrosion
of the electrical contacts when connected to a charger.
Corrosion can prevent charging and data transfer.
1
Wipe the device using a cloth dampened with a mild
detergent solution.
2
Wipe it dry.
After cleaning, allow the device to dry completely.
Data Management
You can store files on your device. The device has a memory
card slot for additional data storage.
NOTE:
The device is compatible with Windows 7 and newer,
and Mac OS 10.4 and newer.
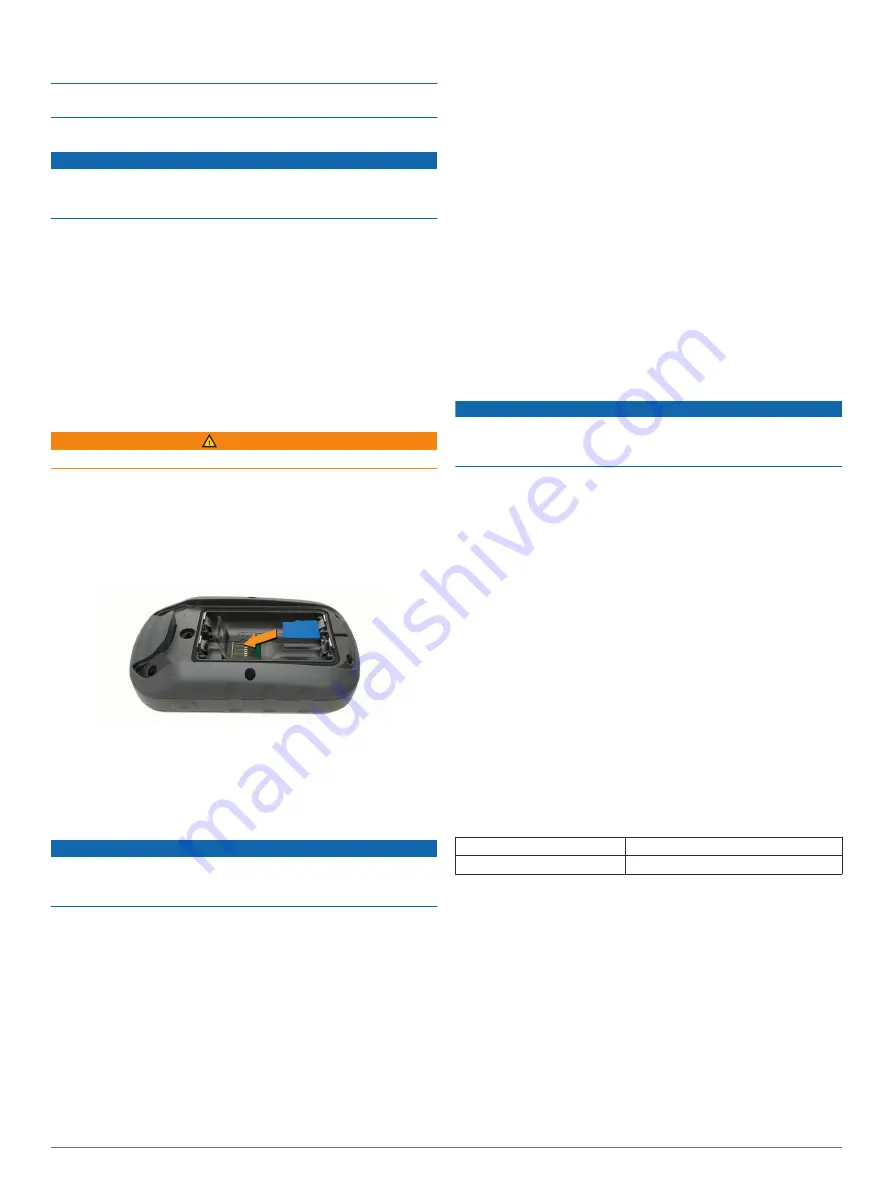
Installing a Memory Card
WARNING
Do not use a sharp object to remove user-replaceable batteries.
You can install a microSD
®
memory card in the handheld device
for additional storage or pre-loaded maps.
1
Turn the D-ring counter-clockwise, and pull up to remove the
cover.
2
Remove the battery.
3
Slide the card holder to the left and lift up.
4
Place the memory card with the gold contacts facing down.
5
Close the card holder.
6
Slide the card holder to the right to lock it.
7
Replace the battery and cover.
Connecting the Device to Your Computer
NOTICE
To prevent corrosion, thoroughly dry the USB port, the weather
cap, and the surrounding area before charging or connecting to
a computer.
Before you can operate your device while connected to your
computer, you must install batteries. The computer USB port
may not provide enough power to operate the device.
1
Pull up the weather cap from the mini-USB port.
2
Plug the small end of the USB cable into the mini-USB port.
3
Plug the large end of the USB cable into a computer USB
port.
On Windows computers, the device appears as a removable
drive or a portable device, and the memory card may appear
as a second removable drive. On Mac computers, the device
and memory card appear as mounted volumes.
Transferring Files to Your Device
1
Connect the device to your computer.
On Windows computers, the device appears as a removable
drive or a portable device, and the memory card may appear
as a second removable drive. On Mac computers, the device
and memory card appear as mounted volumes.
NOTE:
Some computers with multiple network drives may not
display device drives properly. See your operating system
documentation to learn how to map the drive.
2
On your computer, open the file browser.
3
Select a file.
4
Select
Edit
>
Copy
.
5
Open the portable device, drive, or volume for the device or
memory card.
6
Browse to a folder.
7
Select
Edit
>
Paste
.
The file appears in the list of files in the device memory or on
the memory card.
Deleting Files
NOTICE
If you do not know the purpose of a file, do not delete it. Your
device memory contains important system files that should not
be deleted.
1
Open the
Garmin
drive or volume.
2
If necessary, open a folder or volume.
3
Select a file.
4
Press the
Delete
key on your keyboard.
NOTE:
If you are using an Apple
®
computer, you must empty
the Trash folder to completely remove the files.
Disconnecting the USB Cable
If your device is connected to your computer as a removable
drive or volume, you must safely disconnect your device from
your computer to avoid data loss. If your device is connected to
your Windows computer as a portable device, it is not necessary
to safely disconnect the device.
1
Complete an action:
• For Windows computers, select the
Safely Remove
Hardware
icon in the system tray, and select your device.
• For Apple computers, select the device, and select
File
>
Eject
.
2
Disconnect the cable from your computer.
Specifications
Operating temperature range
From -20° to 70°C (from -4° to 158°F)
Wireless frequency/protocol
2.4 GHz @ -1.13 dBm nominal
Appendix
Optional Accessories
Optional accessories, such as mounts, maps, fitness
accessories, and replacement parts, are available at
or from your Garmin dealer.
Pairing Your ANT+ Sensors
Before you can pair, you must put on the heart rate monitor or
install the sensor.
Pairing is the connecting of ANT+ wireless sensors, for example,
connecting a heart rate monitor with your device.
1
Bring the device within 3 m (10 ft.) of the sensor.
10
Appendix
Содержание ETREX 22X
Страница 1: ...ETREX 22X 32X Owner sManual...
Страница 4: ......
Страница 17: ......
Страница 18: ...support garmin com May 2019 190 02552 00_0A...


