


2
Okostelefon és a készülék párosítása
A készülék vezeték nélküli funkcióinak teljes körű kihasználásához a készülé-
ket ne az okostelefon Bluetooth
®
beállításaiból, hanem a Garmin Connect™ al-
kalmazáson keresztül csatlakoztassuk az okostelefonhoz.
1.
Az okostelefon alkalmazás tárából telepítsük, majd nyissuk meg a Garmin
Connect alkalmazást.
2.
Válasszunk az alábbi párosítási módok közül:
• A kezdeti beállítás során válasszuk az
Igen
t, amikor a készülék felszó-
lít, hogy párosítsuk okostelefonunkat.
• Amennyiben korábban átugrottuk a párosítási eljárást, nyomjuk le
hosszan a
MENU
gombot, majd válasszuk a
Telefon párosítása
pon-
tot.
2.
A készülék Garmin Dive fiókhoz történő hozzáadásához válasszunk az
alábbi lehetőségek közül:
• Amennyiben első alkalommal párosítunk eszközt a Garmin Dive alkal-
mazáson keresztül, kövessük a képernyőn megjelenő utasításokat.
• Amennyiben egy másik eszközt már párosítottunk a Garmin Dive alkal-
mazáson keresztül, válasszuk a
Hozzáad
>
Készülékek
pontot, majd
kövessük a képernyőn megjelenő utasításokat.
Készülék töltése
Vigyázat!
A készüléket egy beépített lítium-ion akkumulátor táplálja. A termékkel kap-
csolatos figyelmeztetésekért és egyéb fontos információkért lásd a
Fontos
Biztonsági és Termékinformációk
útmutatót a termék dobozában.
Figyelem!
A rozsdásodást megelőzendő minden egyes töltés vagy számítógéphez tör-
ténő csatlakoztatás előtt töröljük szárazra az érintkezőket és az azokat öve-
ző részeket (
„Tisztítás, ápolás”; 41. oldal
).
1.
Az USB-kábel kisebbik végét illesszük a készüléken található töltő aljzat-
ba.
Pairing Your Smartphone
To use the connected features on your watch, you must pair it
directly through the Garmin Connect
™
app, instead of from the
Bluetooth
®
settings on your smartphone.
1
From the app store on your smartphone, install and open the
Garmin Connect app.
2
Select an option to enable pairing mode on your watch:
• During the initial setup, select
Yes
when you are prompted
to pair with your smartphone.
• If you previously skipped the pairing process, hold
MENU
,
and select
Pair Phone
.
3
Select an option to add your watch to your account:
• If this is the first time you are pairing a device with the
Garmin Connect app, follow the on-screen instructions.
• If you already paired another device with the Garmin
Connect app, from the or menu, select
Garmin
Devices
>
Add Device
, and follow the on-screen
instructions.
Charging the Device
WARNING
This device contains a lithium-ion battery. See the
Important
Safety and Product Information
guide in the product box for
product warnings and other important information.
NOTICE
To prevent corrosion, thoroughly clean and dry the contacts and
the surrounding area before charging or connecting to a
computer. Refer to the cleaning instructions (
Device Care
,
page 41
).
1
Plug the small end of the USB cable into the charging port on
your device.
2
Plug the large end of the USB cable into a USB charging
port.
3
Charge the device completely.
On your computer, install Garmin Express
™
(
www.garmin.com
/express
). On your smartphone, install the Garmin Connect app.
This provides easy access to these services for Garmin
®
devices:
• Software updates
• Course updates
• Data uploads to Garmin Connect
• Product registration
Setting Up Garmin Express
1
Connect the device to your computer using a USB cable.
2
Go to
3
Follow the on-screen instructions.
Solar Charging
Watch models with solar charging capability allow you to charge
your watch while you use it.
Viewing the Solar Widget
1
From the watch face, press
UP
or
DOWN
to scroll to the solar
widget.
2
Press to view a graph of the intensity of solar input for the
last 6 hours.
Tips for Solar Charging
To maximize the battery life of your watch, follow these tips.
• When you are wearing the watch, avoid covering the face
with your sleeve.
• When you are not wearing the watch, point the face toward a
source of bright light, such as sunlight or fluorescent light.
The watch will charge faster when exposed to sunlight,
because the solar charging lens is optimized for the spectrum
of sunlight.
• For maximum battery performance, charge the watch in
bright sunlight.
NOTE:
The watch protects itself from overheating and stops
charging automatically if the internal temperature exceeds
the solar charging temperature threshold (
Specifications
,
page 40
).
NOTE:
The watch does not solar charge when connected to
an external power source or when the battery is full.
Activities and Apps
Your device can be used for indoor, outdoor, athletic, and fitness
activities. When you start an activity, the device displays and
records sensor data. You can save activities and share them
with the Garmin Connect community.
You can also add Connect IQ
™
activities and apps to your
device using the Connect IQ app (
Connect IQ Features
For more information about activity tracking and fitness metric
accuracy, go to
garmin.com/ataccuracy
Starting an Activity
When you start an activity, GPS turns on automatically (if
required).
1
From the watch face, press .
2
If this is the first time you have started an activity, select the
checkbox next to each activity to add to your favorites, and
select
Done
.
3
Select an option:
• Select an activity from your favorites.
• Select , and select an activity from the extended activity
list.
4
If the activity requires GPS signals, go outside to an area with
a clear view of the sky, and wait until the device is ready.
2
Solar Charging
2.
Az USB-kábel nagyobbik végét illesszük egy USB-s töltő csatlakozóhoz.
3.
Teljesen töltsük fel a készüléket.
Terméktámogatás és frissítések
Számítógépünkön telepítsük a Garmin Express™ (
) programot, vagy az okostelefonon telepítsük a Garmin Connect al-
kalmazást, melyek gyors hozzáférést biztosítanak az alábbi, Garmin® készü-
lékek használatát segítő szolgáltatásokhoz:
• Szoftver frissítések;
• Térképfrissítések;
• Pálya frissítések;
• Adatfeltöltés a Garmin Dive fiókba;
• Termékregisztráció.
Garmin Express felület beállítása
1.
Csatlakoztassuk az USB-kábellel a készüléket a számítógéphez.
2.
3.
Kövessük a számítógép képernyőjén megjelenő utasításokat.
Napelemes töltés
A napelemes modellek egy átlátszó napelemes töltőlencsével rendelkeznek,
amelyek használat közben töltik fel a készüléket.
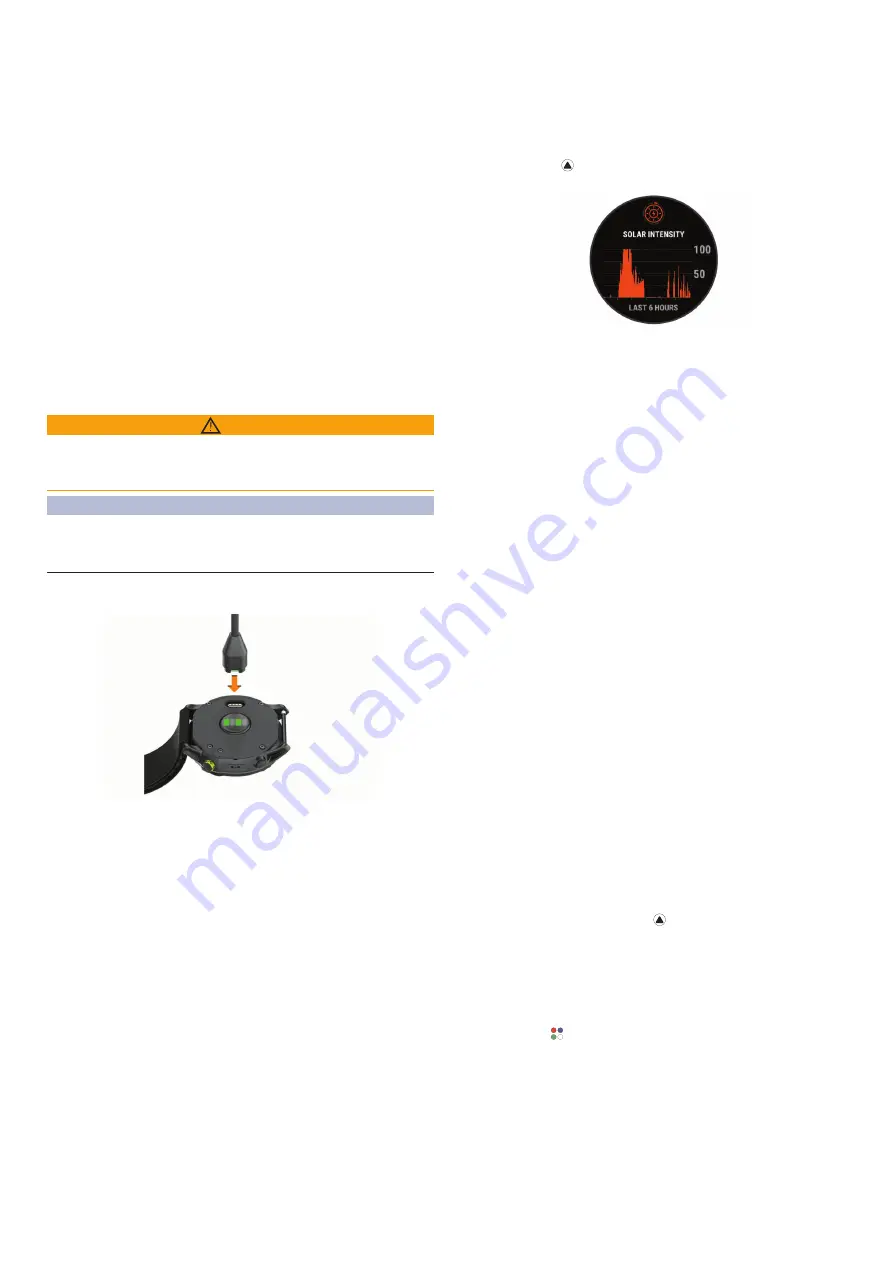
Napenergia widget megtekintése
1.
Az óra számlapon az
UP
vagy
DOWN
gombokkal léptessünk a napener-
gia widgethez.
2.
Nyomjuk meg a
Introduction
WARNING
See the
Important Safety and Product Information
guide in the
product box for product warnings and other important
information.
Always consult your physician before you begin or modify any
exercise program.
Getting Started
When using your watch the first time, you should complete these
tasks to set it up and get to know the basic features.
1
Press
LIGHT
to turn on the watch (
Buttons
, page 1
).
2
Follow the on-screen instructions to complete the initial
setup.
During the initial setup, you can pair your smartphone with
your watch to receive notifications, sync your activities, and
more (
Pairing Your Smartphone
, page 2
).
3
Charge the device (
Charging the Device
, page 2
).
4
Start an activity (
Starting an Activity
, page 2
).
Buttons
LIGHT
• Press to turn the backlight on and off.
• Press to turn the device on.
• Hold to view the controls menu.
UP·MENU
• Press to scroll through the widget loop and menus.
• Hold to view the menu.
DOWN
• Press to scroll through the widget loop and menus.
• Press to view the activity list and start or stop an activity.
• Press to choose an option in a menu.
BACK·LAP
• Press to return to the previous screen.
• Press to record a lap, rest, or transition during a multisport
activity.
• Hold to view the watch face from any screen.
Using the Watch
• Hold
LIGHT
to view the controls menu.
The controls menu provides quick access to frequently used
functions, such as turning on do not disturb mode, saving a
location, and turning the watch off.
• From the watch face, press
UP
or
DOWN
to scroll through
the widget loop.
Your watch comes preloaded with widgets that provide at-a-
glance information. More widgets are available when you pair
your watch with a smartphone.
• From the watch face, press to start an activity or open an
app (
Activities and Apps
, page 2
).
• Hold
MENU
to customize the watch face, adjust settings, and
pair wireless sensors.
Viewing the Controls Menu
The controls menu contains options, such as turning on do not
disturb mode, locking the keys, and turning the device off. You
can also open the Garmin Pay
™
wallet.
NOTE:
You can add, reorder, and remove the options in the
controls menu (
Customizing the Controls Menu
, page 36
).
1
From any screen, hold
LIGHT
.
2
Press
UP
or
DOWN
to scroll through the options.
Enabling Airplane Mode
You can enable airplane mode to disable all wireless
communications.
NOTE:
You can add options to the controls menu (
Customizing
the Controls Menu
, page 36
).
1
Hold
LIGHT
.
2
Select .
Viewing Widgets
Your device comes preloaded with several widgets, and more
are available when you pair your device with a smartphone.
• Press
UP
or
DOWN
.
The device scrolls through the widget loop and displays
summary data for each widget.
• Press to view widget details.
TIP:
You can press
DOWN
to view additional screens for a
widget, or press to view additional options and functions
for a widget.
• From any screen, hold
BACK
to return to the watch face.
• If you are recording an activity, press
BACK
to return to the
activity data pages.
Customizing the Watch
• From the watch face, hold
MENU
to change the watch face.
• From the widget screens, hold
MENU
to customize the
widget options.
• From the controls menu, hold
MENU
to add, remove, and
reorder the controls.
• From any screen, hold
MENU
to change additional settings.
Introduction
1
gombot a legutóbbi 6 óra bejövő napenergia intenzi-
tás grafikonjának megtekintéséhez.
Pairing Your Smartphone
To use the connected features on your watch, you must pair it
directly through the Garmin Connect
™
app, instead of from the
Bluetooth
®
settings on your smartphone.
1
From the app store on your smartphone, install and open the
Garmin Connect app.
2
Select an option to enable pairing mode on your watch:
• During the initial setup, select
Yes
when you are prompted
to pair with your smartphone.
• If you previously skipped the pairing process, hold
MENU
,
and select
Pair Phone
.
3
Select an option to add your watch to your account:
• If this is the first time you are pairing a device with the
Garmin Connect app, follow the on-screen instructions.
• If you already paired another device with the Garmin
Connect app, from the or menu, select
Garmin
Devices
>
Add Device
, and follow the on-screen
instructions.
Charging the Device
WARNING
This device contains a lithium-ion battery. See the
Important
Safety and Product Information
guide in the product box for
product warnings and other important information.
NOTICE
To prevent corrosion, thoroughly clean and dry the contacts and
the surrounding area before charging or connecting to a
computer. Refer to the cleaning instructions (
Device Care
,
page 41
).
1
Plug the small end of the USB cable into the charging port on
2
Plug the large end of the USB cable into a USB charging
port.
3
Charge the device completely.
Product Updates
On your computer, install Garmin Express
™
(
). On your smartphone, install the Garmin Connect app.
This provides easy access to these services for Garmin
®
devices:
• Software updates
• Course updates
• Data uploads to Garmin Connect
• Product registration
Setting Up Garmin Express
1
Connect the device to your computer using a USB cable.
2
Go to
www.garmin.com/express
.
3
Follow the on-screen instructions.
Solar Charging
Watch models with solar charging capability allow you to charge
your watch while you use it.
Viewing the Solar Widget
1
From the watch face, press
UP
or
DOWN
to scroll to the solar
widget.
2
Press to view a graph of the intensity of solar input for the
last 6 hours.
Tips for Solar Charging
To maximize the battery life of your watch, follow these tips.
• When you are wearing the watch, avoid covering the face
with your sleeve.
• When you are not wearing the watch, point the face toward a
source of bright light, such as sunlight or fluorescent light.
The watch will charge faster when exposed to sunlight,
because the solar charging lens is optimized for the spectrum
of sunlight.
• For maximum battery performance, charge the watch in
bright sunlight.
NOTE:
The watch protects itself from overheating and stops
charging automatically if the internal temperature exceeds
the solar charging temperature threshold (
NOTE:
The watch does not solar charge when connected to
an external power source or when the battery is full.
Activities and Apps
Your device can be used for indoor, outdoor, athletic, and fitness
activities. When you start an activity, the device displays and
records sensor data. You can save activities and share them
with the Garmin Connect community.
You can also add Connect IQ
™
activities and apps to your
device using the Connect IQ app (
Connect IQ Features
,
page 13
).
For more information about activity tracking and fitness metric
accuracy, go to
garmin.com/ataccuracy
.
Starting an Activity
When you start an activity, GPS turns on automatically (if
required).
1
From the watch face, press .
2
If this is the first time you have started an activity, select the
checkbox next to each activity to add to your favorites, and
select
Done
.
3
Select an option:
• Select an activity from your favorites.
• Select , and select an activity from the extended activity
list.
4
If the activity requires GPS signals, go outside to an area with
a clear view of the sky, and wait until the device is ready.
2
Solar Charging
Tippek a napelemes töltéshez
Az akkumulátor működési idejének meghosszabbítása érdekében kövessük
az alábbi tippeket.
• Amikor a készüléket viseljük, ügyeljünk arra, hogy ingujjunkkal ne takar-
juk el a számlapot.
• Amikor nem viseljük a készüléket, úgy tegyük le, hogy a számlap vala-
mely világos fényforrás (pl. napfény vagy fluoreszkáló fény) felé nézzen.
Az óra gyorsabban töltődik, ha napfény éri, mivel a napelemes töltőlencse
a nap fényspektrumának kihasználására van optimalizálva.
•
Az akkumulátor működési idejének maximális növeléséhez erős napfény
alatt töltsük fel a készüléket.
MEGJEGYZÉS!
A készülék megvédi magát a túlmelegedéssel szem-
ben, és a töltés automatikusan leáll, amennyiben a készülék belső hő-
mérséklete meghaladja a töltési hőmérsékleti küszöbértéket (
MEGJEGYZÉS!
A készülék nem használja a napelemes töltést, amikor
külső akkumulátorhoz van csatlakoztatva, vagy a készülék akkumulátora
teljesen feltöltött állapotban van.
Tevékenységek és alkalmazások
A készülék számtalan beltéri, szabadtéri, atlétikai és fitnesz tevékenységhez
használható. Amikor elindítunk egy tevékenységet, a készülék megjeleníti és
rögzíti a mérési adatokat. Elmenthetjük az adatokat, illetve megoszthatjuk
azokat a Garmin Connect közösségi oldalon.
A Garmin Connect IQ alkalmazáson keresztül a Connect IQ
™
tevékenysé
-
gekkel és alkalmazásokkal is bővíthetjük az eszközünket (
).
További információkért a tevékenységek nyomon követéséről és a fitnesz
metrikus pontossági adatokról lásd a
.
Tevékenység indítása
Tevékenység indításakor a GPS-vevő automatikusan bekapcsol (amennyi-
ben ez szükséges).
1.
Az óra számlapon nyomjuk meg a
Introduction
WARNING
See the
Important Safety and Product Information
guide in the
product box for product warnings and other important
information.
Always consult your physician before you begin or modify any
exercise program.
Getting Started
When using your watch the first time, you should complete these
tasks to set it up and get to know the basic features.
1
Press
LIGHT
to turn on the watch (
Buttons
, page 1
).
2
Follow the on-screen instructions to complete the initial
setup.
During the initial setup, you can pair your smartphone with
your watch to receive notifications, sync your activities, and
more (
Pairing Your Smartphone
, page 2
).
3
Charge the device (
Charging the Device
, page 2
).
4
Start an activity (
Starting an Activity
, page 2
).
Buttons
LIGHT
• Press to turn the backlight on and off.
• Press to turn the device on.
• Hold to view the controls menu.
UP·MENU
• Press to scroll through the widget loop and menus.
• Hold to view the menu.
DOWN
• Press to scroll through the widget loop and menus.
• Press to view the activity list and start or stop an activity.
• Press to choose an option in a menu.
BACK·LAP
• Press to return to the previous screen.
• Press to record a lap, rest, or transition during a multisport
activity.
• Hold to view the watch face from any screen.
Using the Watch
• Hold
LIGHT
to view the controls menu.
The controls menu provides quick access to frequently used
functions, such as turning on do not disturb mode, saving a
location, and turning the watch off.
• From the watch face, press
UP
or
DOWN
to scroll through
the widget loop.
Your watch comes preloaded with widgets that provide at-a-
glance information. More widgets are available when you pair
your watch with a smartphone.
• From the watch face, press to start an activity or open an
app (
Activities and Apps
, page 2
).
• Hold
MENU
to customize the watch face, adjust settings, and
pair wireless sensors.
Viewing the Controls Menu
The controls menu contains options, such as turning on do not
disturb mode, locking the keys, and turning the device off. You
can also open the Garmin Pay
™
wallet.
NOTE:
You can add, reorder, and remove the options in the
controls menu (
Customizing the Controls Menu
, page 36
).
1
From any screen, hold
LIGHT
.
2
Press
UP
or
DOWN
to scroll through the options.
Enabling Airplane Mode
You can enable airplane mode to disable all wireless
communications.
NOTE:
You can add options to the controls menu (
Customizing
the Controls Menu
, page 36
).
1
Hold
LIGHT
.
2
Select .
Viewing Widgets
Your device comes preloaded with several widgets, and more
are available when you pair your device with a smartphone.
• Press
UP
or
DOWN
.
The device scrolls through the widget loop and displays
summary data for each widget.
• Press to view widget details.
TIP:
You can press
DOWN
to view additional screens for a
widget, or press to view additional options and functions
for a widget.
• From any screen, hold
BACK
to return to the watch face.
• If you are recording an activity, press
BACK
to return to the
activity data pages.
Customizing the Watch
• From the watch face, hold
MENU
to change the watch face.
• From the widget screens, hold
MENU
to customize the
widget options.
• From the controls menu, hold
MENU
to add, remove, and
reorder the controls.
• From any screen, hold
MENU
to change additional settings.
Introduction
1
gombot.
2.
Amennyiben első alkalommal indítunk tevékenységet, azon tevékenysé-
gek mellé, melyeket a kedvencekhez hozzá kívánunk adni, tegyünk egy
pipát, majd válasszuk a
Kész
t.
3.
Válasszunk az alábbi lehetőségek közül:
• Válasszunk egy tevékenységet a kedvencek közül.
• Válasszuk a
2
If this is the first time you have started an activity, select the
checkbox next to each activity to add to your favorites, and
select
Done
.
3
Select an option:
• Select an activity from your favorites.
• Select , and select an activity from the extended activity
list.
4
If the activity requires GPS signals, go outside to an area with
a clear view of the sky, and wait until the device is ready.
The device is ready after it establishes your heart rate,
acquires GPS signals (if required), and connects to your
wireless sensors (if required).
5
Press to start the activity timer.
The device records activity data only while the activity timer is
running.
Tips for Recording Activities
• Charge the device before starting an activity (
Charging the
Device
, page 2
).
• Press
LAP
to record laps.
• Press
UP
or
DOWN
to view additional data pages.
Changing the Power Mode
You can change the power mode to extend battery life during an
activity.
1
During an activity, hold
MENU
.
2
Select
Power Mode
.
3
Select an option.
The watch displays the hours of battery life gained with the
selected power mode.
Stopping an Activity
1
Press .
2
Select an option:
• To resume your activity, select
Resume
.
• To save the activity and return to watch mode, select
Save
>
Done
.
• To suspend your activity and resume it at a later time,
select
Resume Later
.
• To mark a lap, select
Lap
.
• To navigate back to the starting point of your activity along
the path you traveled, select
Back to Start
>
TracBack
.
NOTE:
This feature is available only for activities that use
GPS.
• To navigate back to the starting point of your activity by
the most direct path, select
Back to Start
>
Route
.
NOTE:
This feature is available only for activities that use
GPS.
• To discard the activity and return to watch mode, select
Discard
>
Yes
.
NOTE:
After stopping the activity, the device saves it
automatically after 30 minutes.
Adding or Removing a Favorite Activity
The list of your favorite activities appears when you press
from the watch face, and it provides quick access to the
activities you use most frequently. The first time you press to
start an activity, the device prompts you to select your favorite
activities. You can add or remove favorite activities at any time.
1
Hold
MENU
.
2
Select
Activities & Apps
.
Your favorite activities appear at the top of the list with a
white background. Other activities appear in the extended list
with a black background.
3
Select an option:
• To add a favorite activity, select the activity, and select
Set as Favorite
.
• To remove a favorite activity, select the activity, and select
Remove from Favorites
.
Creating a Custom Activity
1
From the watch face, press .
2
Select
Add
.
3
Select an option:
• Select
Copy Activity
to create your custom activity
starting from one of your saved activities.
• Select
Other
to create a new custom activity.
4
If necessary, select an activity type.
5
Select a name or enter a custom name.
Duplicate activity names include a number, for example:
Bike(2).
6
Select an option:
• Select an option to customize specific activity settings. For
example, you can customize the data screens or auto
features.
• Select
Done
to save and use the custom activity.
7
Select
Yes
to add the activity to your list of favorites.
Indoor Activities
The fēnix device can be used for training indoors, such as
running on an indoor track or using a stationary bike. GPS is
turned off for indoor activities.
When running or walking with GPS turned off, speed, distance,
and cadence are calculated using the accelerometer in the
device. The accelerometer is self-calibrating. The accuracy of
the speed, distance, and cadence data improves after a few
outdoor runs or walks using GPS.
TIP:
Holding the handrails of the treadmill reduces accuracy.
You can use an optional foot pod to record pace, distance, and
cadence.
When cycling with GPS turned off, speed and distance are not
available unless you have an optional sensor that sends speed
and distance data to the device (such as a speed or cadence
sensor).
Calibrating the Treadmill Distance
To record more accurate distances for your treadmill runs, you
can calibrate the treadmill distance after you run at least 1.5 km
(1 mi.) on a treadmill. If you use different treadmills, you can
manually calibrate the treadmill distance on each treadmill or
after each run.
1
Start a treadmill activity (
Starting an Activity
, page 2
), and run
at least 1.5 km (1 mi.) on the treadmill.
2
After you complete your run, select .
3
Select an option:
• To calibrate the treadmill distance the first time, select
Save
.
The device prompts you to complete the treadmill
calibration.
• To manually calibrate the treadmill distance after the first-
time calibration, select
Calibrate & Save
>
Yes
.
4
Check the treadmill display for the distance traveled, and
enter the distance on your device.
Activities and Apps
3
pontot, majd válasszunk egyet a kibővített tevékenysé-
gi listából.
4.
Amennyiben a tevékenységhez GPS-vétel szükséges, menjünk ki sza-
badtérre, majd várjunk, amíg a készülék készen áll.


