


When the device memory is full, a message appears. The
device does not automatically delete or overwrite your history.
Upload your history to Garmin Connect periodically to keep
track of all your ride data.
Viewing Your Ride
1
From the home screen, select >
Rides
.
2
Select
Last Ride
or
All Rides
.
3
Select an option.
Deleting History
1
From the home screen, select >
Delete
.
2
Select an option:
• Select
All Rides
to delete all saved activities from the
history.
• Select
Old Rides
to delete activities recorded more than
one month ago.
• Select
All Totals
to reset all distance and time totals.
NOTE:
This does not delete any saved activities.
• Select
All Courses
to delete all courses you have saved
or transferred to the device.
• Select
All Workouts
to delete all workouts you have
saved or transferred to the device.
• Select
All Personal Records
to delete all personal
records saved to the device.
NOTE:
This does not delete any saved activities.
3
Select .
ANT+ Sensors
Your device can be used with wireless ANT+ sensors. For more
information about compatibility and purchasing optional
sensors, go to
.
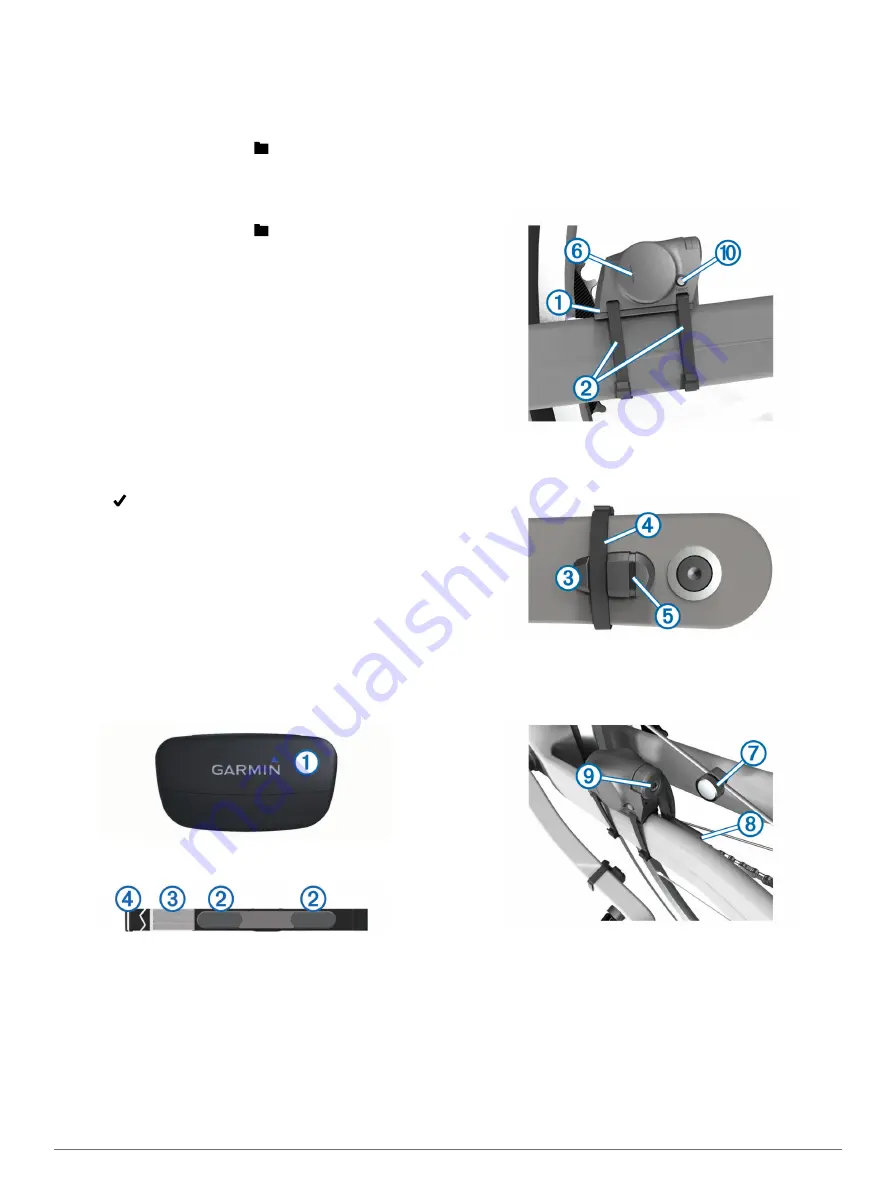
Putting On the Heart Rate Monitor
NOTE:
If you do not have a heart rate monitor, you can skip this
task.
You should wear the heart rate monitor directly on your skin,
just below your breastplate. It should be snug enough to stay in
place during your activity.
1
Snap the heart rate monitor module
À
onto the strap.
2
Wet both electrodes
Á
on the back of the strap to create a
strong connection between your chest and the transmitter.
3
If the heart rate monitor has a contact patch
Â
, wet the
contact patch.
4
Wrap the strap around your chest, and connect the strap
hook
Ã
to the loop.
The Garmin logo should be right-side up.
5
Bring the device within range (3 m) of the heart rate monitor.
After you put on the heart rate monitor, it is on standby and
ready to send data.
TIP:
If the heart rate data is erratic or does not appear, you may
have to tighten the strap on your chest or warm up for 5–10
minutes.
Installing the GSC 10
NOTE:
If you do not have a GSC 10, you can skip this task.
Both magnets must be aligned with their respective indication
lines for the Edge to receive data.
1
Place the GSC 10 on the rear chain stay (on the side
opposite the drive train).
2
If necessary, place the flat rubber pad
À
or the triangle-
shaped rubber pad between the GSC 10 and the chain stay
for stability.
3
Loosely attach the GSC 10 using two cable ties
Á
.
4
Attach the pedal magnet
Â
to the crank arm using the
adhesive mount and a cable tie
Ã
.
The pedal magnet must be within 5 mm of the GSC 10. The
indication line
Ä
on the pedal magnet must line up with the
indication line
Å
on the GSC 10.
5
Unscrew the spoke magnet
Æ
from the plastic piece.
6
Place the spoke in the groove of the plastic piece, and
tighten it slightly.
The spoke magnet can face away from the GSC 10 if there is
not enough room between the sensor arm and the spoke.
The spoke magnet must line up with the indication line
Ç
on
the sensor arm.
7
Loosen the screw
È
on the sensor arm.
8
Move the sensor arm to within 5 mm of the spoke magnet.
You can also tilt the GSC 10 closer to either magnet to
improve alignment.
9
Select
Reset
É
on the GSC 10.
5
Содержание Edge 810
Страница 1: ...Edge 810 Quick Start Manual November 2012 190 01510 01_0B Printed in Taiwan...
Страница 7: ......


