background image

Enable All

: Enables all segments currently loaded on the 

device.

Disable All

: Disables all segments currently loaded on the 

device.

Edit Multiple

: Allows you to enable or disable multiple 

segments loaded on the device.

Deleting a Segment

1

Select   > 

Segments

.

2

Select a segment.

3

Select   >  .

Personal Records

When you complete a ride, the device displays any new 

personal records you achieved during that ride. Personal 

records include your fastest time over a standard distance, 

longest ride, and most ascent gained during a ride.

Restoring Your Personal Records

You can revert a personal record back to the previous saved 

record.

1

From the home screen, select   > 

Personal Records

.

2

Select  .

3

Select a record, and select  .

NOTE: 

This does not delete any saved activities.

Training Zones

• Heart rate zones (

Setting Your Heart Rate Zones

, page 6

)

• Power zones (

Setting Your Power Zones

, page 8

)

• Speed zones (

Setting Your Speed Zones

, page 6

)

Setting Your Speed Zones

Your device contains several different speed zones, ranging 

from very slow to your maximum speed. The values for the 

zones are default values and may not match your personal 

abilities. You can customize your zones on the device or using 

Garmin Connect.

1

From the home screen,   > 

Training Zones

 > 

Speed

.

2

Select a zone.
You can enter a custom name for the zone.

3

Enter the minimum and maximum speed values.

4

Repeat steps 2–3 for each zone.

ANT+ Sensors

Your device can be used with wireless ANT+ sensors. For more 

information about compatibility and purchasing optional sensors, 

go to 

http://buy.garmin.com

.

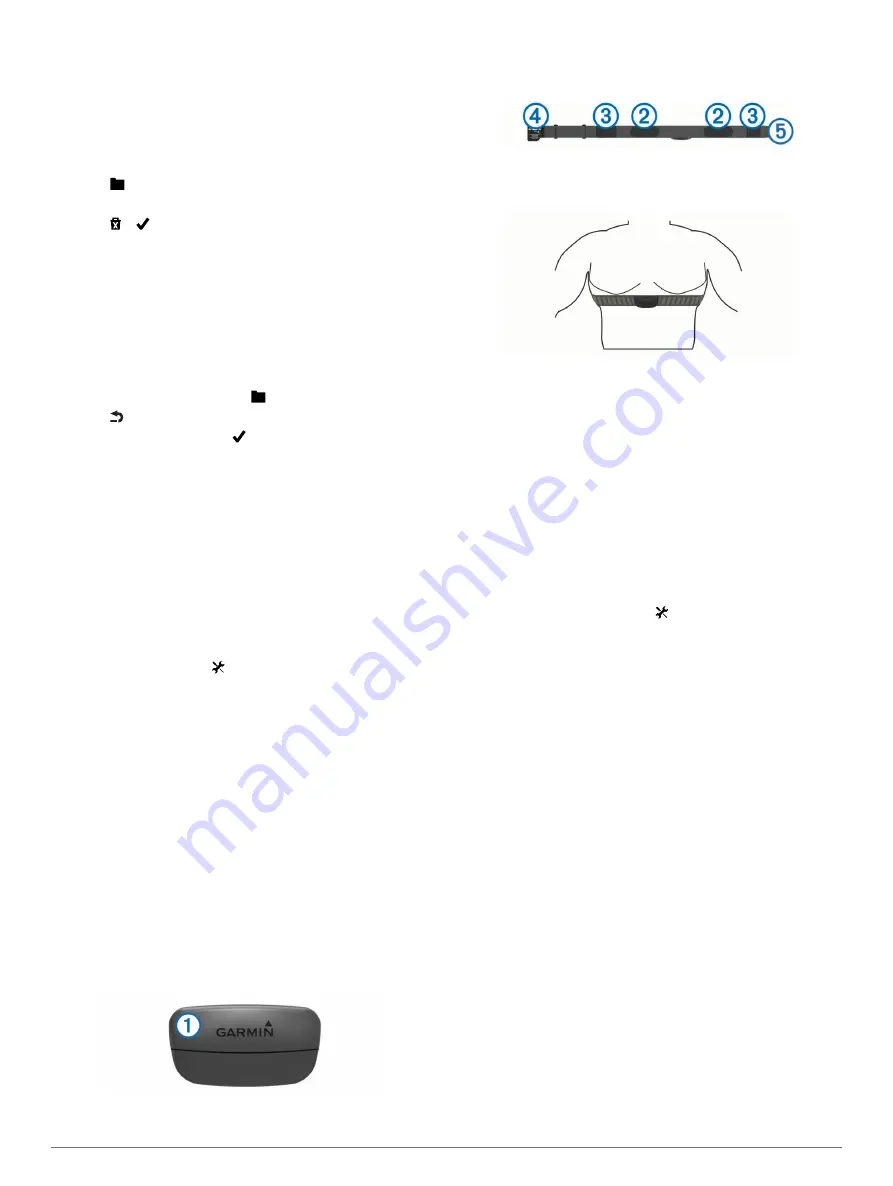
Putting On the Heart Rate Monitor

NOTE: 

If you do not have a heart rate monitor, you can skip this 

task.
You should wear the heart rate monitor directly on your skin, just 

below your sternum. It should be snug enough to stay in place 

during your activity.

1

Snap the heart rate monitor module 

À

 onto the strap.

The Garmin logos on the module and the strap should be 

right-side up.

2

Wet the electrodes 

Á

 and the contact patches 

Â

 on the back 

of the strap to create a strong connection between your chest 

and the transmitter.

3

Wrap the strap around your chest, and connect the strap 

hook 

Ã

 to the loop 

Ä

.

NOTE: 

The care tag should not fold over.

The Garmin logos should be right-side up.

4

Bring the device within 3 m (10 ft.) of the heart rate monitor.

After you put on the heart rate monitor, it is active and sending 

data.

TIP: 

If the heart rate data is erratic or does not appear, see the 

troubleshooting tips (

Tips for Erratic Heart Rate Data

page 7

).

Setting Your Heart Rate Zones

The device uses your user profile information from the initial 

setup to determine your heart rate zones. You can manually 

adjust the heart rate zones according to your fitness goals 

(

Fitness Goals

, page 6

). For the most accurate calorie data 

during your activity, set your maximum heart rate, minimum 

heart rate, resting heart rate, and heart rate zones.

1

From the home screen, select   > 

Training Zones

 > 

Heart 

Rate

.

2

Enter your maximum, minimum, and resting heart rate 

values.
The zone values update automatically, but you can also edit 

each value manually.

3

Select 

Based On:

.

4

Select an option:
• Select 

BPM

 to view and edit the zones in beats per 

minute.

• Select 

% Max.

 to view and edit the zones as a percentage 

of your maximum heart rate.

• Select 

% HRR

 to view and edit the zones as a percentage 

of your resting heart rate.

About Heart Rate Zones

Many athletes use heart rate zones to measure and increase 

their cardiovascular strength and improve their level of fitness. A 

heart rate zone is a set range of heartbeats per minute. The five 

commonly accepted heart rate zones are numbered from 1 to 5 

according to increasing intensity. Generally, heart rate zones are 

calculated based on percentages of your maximum heart rate.

Fitness Goals

Knowing your heart rate zones can help you measure and 

improve your fitness by understanding and applying these 

principles.
• Your heart rate is a good measure of exercise intensity.
• Training in certain heart rate zones can help you improve 

cardiovascular capacity and strength.

• Knowing your heart rate zones can prevent you from 

overtraining and can decrease your risk of injury.

6

ANT+ Sensors

Содержание Edge 810

Страница 1: ...Edge 810 Owner s Manual August 2016 190 01510 00_0E...

Страница 2: ...hese trademarks may not be used without the express permission of Garmin Android is a trademark of Google Inc Apple and Mac are trademarks of Apple Inc registered in the U S and other countries The Bl...

Страница 3: ...no Di2 Shifters 8 Situational Awareness 8 Pairing Your ANT Sensors 9 Pairing a Heart Rate Monitor 9 Using the Weight Scale 9 Garmin Index Smart Scale Data 9 History 9 Viewing Your Ride 9 Viewing Data...

Страница 4: ...g the GSC 10 Battery 16 Troubleshooting 16 Resetting the Device 16 Clearing User Data 16 Maximizing Battery Life 16 Decreasing the Backlight 16 Adjusting the Backlight Timeout 17 Using the Auto Power...

Страница 5: ...Charge the device completely A fully charged battery can run for up to 15 hours before it must be recharged About the Battery WARNING This device contains a lithium ion battery See the Important Safe...

Страница 6: ...the setup menu Using the Touchscreen When the timer is running tap the screen to view the timer overlay The timer overlay allows you to use the settings and search features during a ride Select to sa...

Страница 7: ...u every 30 minutes 1 From the home screen select Activity Profiles 2 Select an activity profile 3 Select Alerts 4 Select Time Distance or Calorie 5 Turn on the alert 6 Enter a value 7 Select Each time...

Страница 8: ...lan from Garmin Connect you must have a Garmin Connect account Garmin Connect page 9 You can browse Garmin Connect to find a training plan schedule workouts and courses and download the plan to your d...

Страница 9: ...p for a Strava membership go to the segments widget in your Garmin Connect account For more information go to www strava com The information in this manual applies to both Garmin Connect segments and...

Страница 10: ...n the back of the strap to create a strong connection between your chest and the transmitter 3 Wrap the strap around your chest and connect the strap hook to the loop NOTE The care tag should not fold...

Страница 11: ...for clearance The sensor should not contact other parts of your bike NOTE The LED flashes green for five seconds to indicate activity after two revolutions Installing the Cadence Sensor NOTE If you do...

Страница 12: ...nes to match your goals and abilities Setting Your Power Zones page 8 Use range alerts to be notified when you reach a specified power zone Setting Range Alerts page 3 Customize the power data fields...

Страница 13: ...ANT sensor information NOTE History is not recorded while the timer is stopped or paused When the device memory is full a message appears The device does not automatically delete or overwrite your hi...

Страница 14: ...o Select All Totals to reset all distance and time totals NOTE This does not delete any saved activities Select All Courses to delete all courses you have saved or transferred to the device Select All...

Страница 15: ...the top of the map 4 Select the information bar at the top of the screen 5 Select to save the location Navigating to a Location 1 From the home screen select 2 Select an option Select Locations to na...

Страница 16: ...ation and select RIDE Finding Nearby Locations 1 From the home screen select 2 Select an option For example select A Recent Find to search for a restaurant near the address you recently searched for 3...

Страница 17: ...ages when the timer is running Using Auto Scroll page 14 Select Navigation to customize your map Map Settings page 12 and route Route Settings page 12 settings Any changes you make are saved to the ac...

Страница 18: ...easure page 14 Configuration Settings Changing the Configuration Settings page 15 Language Settings Changing the Device Language page 15 Tone Settings Setting the Device Tones page 15 GPS Settings Tra...

Страница 19: ...Battery life Approximately 12 months 1 hour per day Operating temperature range From 20 to 60 C from 4 to 140 F Radio frequency protocol 2 4 GHz ANT wireless communications protocol Water rating 1 ATM...

Страница 20: ...on the side of the GSC 10 2 Use a coin to twist the cover counter clockwise until it is loose enough to remove the arrow points to unlocked 3 Remove the cover and the battery 4 Wait 30 seconds 5 Inse...

Страница 21: ...average left right power balance for the current activity Balance Lap The average left right power balance for the current lap Battery Level The remaining battery power Battery Status The remaining b...

Страница 22: ...lap Power Max The top power output for the current activity Power NP The Normalized Power for the current activity Power NP Lap The average Normalized Power for the current lap Power NP Last Lap The...

Страница 23: ...roved aerobic capacity optimal cardiovascular training 4 80 90 Fast pace and a bit uncomfortable breathing forceful Improved anaerobic capacity and threshold improved speed 5 90 100 Sprinting pace uns...

Страница 24: ...are valuable trade secrets of Garmin and or its third party providers and that the Software in source code form remains a valuable trade secret of Garmin and or its third party providers You agree no...

Страница 25: ...on 12 purchasing 12 settings 12 topographical 12 zoom 12 memory card 10 microSD card See memory card mounting the device 1 N navigation 11 back to start 11 stopping 11 O O rings bands 15 on screen but...

Страница 26: ...69 33 99 39 02 36 699699 52 001 855 792 7671 0800 427 652 0800 0233937 47 815 69 555 00800 4412 454 44 2380 662 915 35 1214 447 460 386 4 27 92 500 0861 GARMIN 427 646 27 0 11 251 9800 34 93 275 44 97...

Отзывы: