Garmin echomap chirp 40 series Скачать руководство пользователя страница 39

• Keep the original sales receipt, or a photocopy, in a safe 

place.

Cleaning the Screen

NOTICE

Cleaners containing ammonia will harm the anti-reflective 

coating.
The device is coated with a special anti-reflective coating which 

is very sensitive to waxes and abrasive cleaners.

1

Apply an eyeglass lens cleaner specified as safe for anti-

reflective coatings to the cloth.

2

Gently wipe the screen with a soft, clean, lint-free cloth.

Screenshots

You can capture a screenshot of any screen shown on your 

chartplotter as a bitmap (.bmp) file. You can transfer the 

screenshot to your computer.

Capturing Screenshots

1

Insert a memory card into the card slot.

2

Select 

Settings

 > 

System

 > 

Display

 > 

Screenshot Capture 

On

.

3

Go to a screen you want to capture.

4

Hold 

HOME

 for at least six seconds.

Copying Screenshots to a Computer

1

Remove the memory card from the chartplotter, and insert it 

into a card reader that is attached to a computer.

2

From Windows

®

 Explorer, open the Garmin\scrn folder on the 

memory card.

3

Copy a .bmp file from the card and paste it to any location on 

the computer.

Troubleshooting

My device will not acquire GPS signals

If the device is not acquiring satellite signals, there could be a 

few causes. If the device has moved a large distance since the 

last time it has acquired satellites or has been turned off for 

longer than a few weeks or months, the device may not be able 

to acquire the satellites correctly.
• Ensure the device is using the latest software. If not, update 

the device software (

Updating the Device Software

, page 1

).

• Make sure the device has a clear view of the sky so the 

antenna can receive the GPS signal. If it is mounted inside of 

a cabin, it should be close to a window so it can receive the 

GPS signal.

My device will not turn on or keeps turning off

Devices erratically turning off or not turning on could indicate an 

issue with the power supplied to the device. Check these items 

to attempt to troubleshoot the cause of the power issue.
• Make sure the power source is generating power.

You can check this several ways. For example, you can 

check whether other devices powered by the source are 

functioning.

• Check the fuse in the power cable.

The fuse should be located in a holder that is part of the red 

wire of the power cable. Check that the proper size fuse is 

installed. Refer to the label on the cable or the installation 

instructions for the exact fuse size needed. Check the fuse to 

make sure there is still a connection inside of the fuse. You 

can test the fuse using a multimeter. If the fuse is good, the 

multimeter reads 0 ohm.

• Check to make sure the device is receiving is at least 10 V, 

but 12 V is recommended.

To check the voltage, measure the female power and ground 

sockets of the power cable for DC voltage. If the voltage is 

less than 10 V, the device will not turn on.

• If the device is receiving enough power but does not turn on, 

contact Garmin product support at 

www.garmin.com/support

.

My device is not creating waypoints in the correct 

location

You can manually enter a waypoint location to transfer and 

share data from one device to the next. If you have manually 

entered a waypoint using coordinates, and the location of the 

point does not appear where the point should be, the map 

datum and position format of the device may not match the map 

datum and position format originally used to mark the waypoint.
Position format is the way in which the GPS receiver's position 

appears on the screen. Commonly displayed as latitude/

longitude in degrees and minutes, with options for degrees, 

minutes and second, degrees only, or one of several grid 

formats.
Map datum is a math model which depicts a part of the surface 

of the earth. Latitude and longitude lines on a paper map are 

referenced to a specific map datum.

1

Find out which map datum and position format was used 

when the original waypoint was created.
If the original waypoint was taken from a map, there should 

be a legend on the map that lists the map datum and position 

format used to create that map. Most often this is found near 

the map key.

2

On the chartplotter, select 

Settings

 > 

Units

.

3

Select the correct map datum and position format settings.

4

Create the waypoint again.

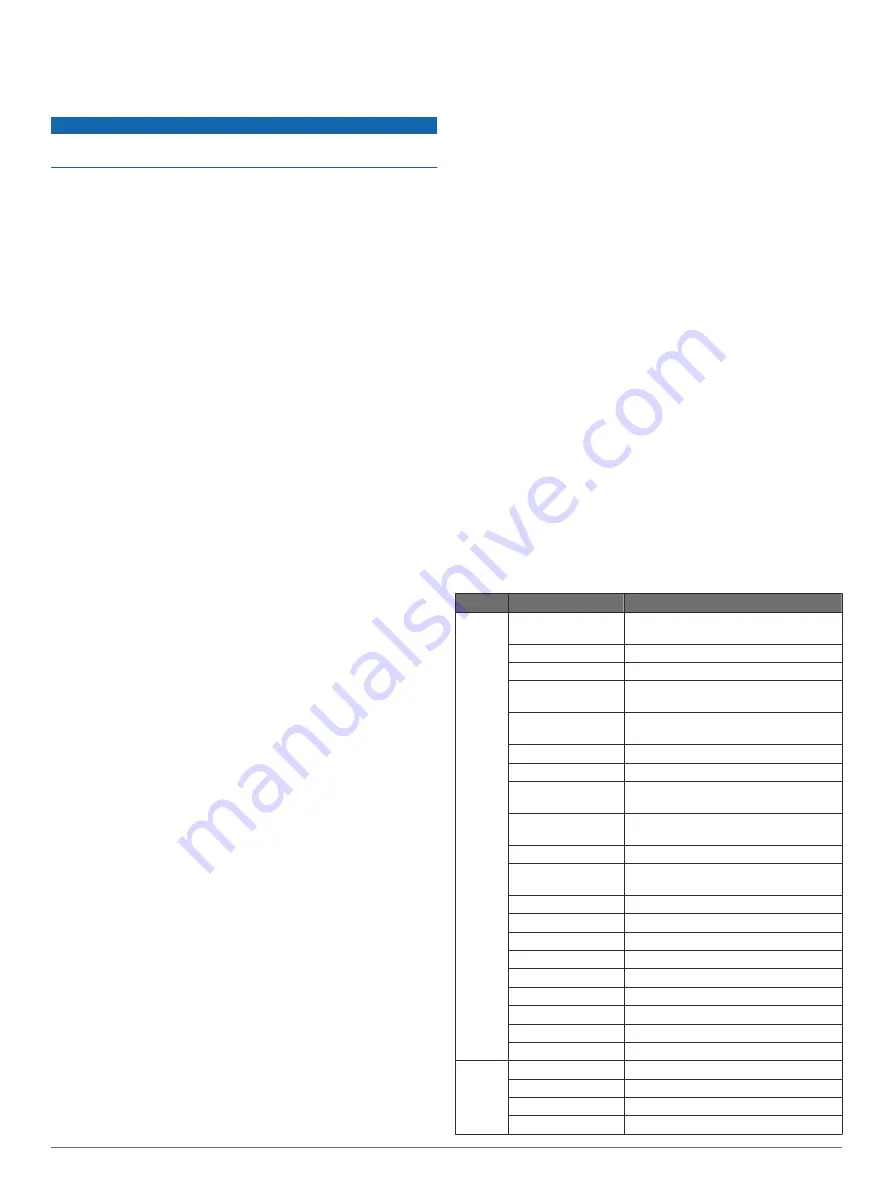
NMEA 0183 Information

Type

Sentence

Description

Transmit GPAPB

APB: Heading or track controller 
(autopilot) sentence "B"

GPBOD

BOD: Bearing (origin to destination)

GPBWC

BWC: Bearing and distance to waypoint

GPGGA

GGA: Global positioning system fix 
data

GPGLL

GLL: Geographic position (latitude and 
longitude)

GPGSA

GSA: GNSS DOP and active satellites

GPGSV

GSV: GNSS satellites in view

GPRMB

RMB: Recommended minimum 
navigation information

GPRMC

RMC: Recommended minimum specific 
GNSS data

GPRTE

RTE: Routes

GPVTG

VTG: Course over ground and ground 
speed

GPWPL

WPL: Waypoint location

GPXTE

XTE: Cross track error

PGRME

E: Estimated error

PGRMM

M: Map datum

PGRMZ

Z: Altitude

SDDBT

DBT: Depth below transducer

SDDPT

DPT: Depth

SDMTW

MTW: Water temperature

SDVHW

VHW: Water speed and heading

Receive DPT

Depth

DBT

Depth below transducer

MTW

Water temperature

VHW

Water speed and heading

Appendix

33

Содержание echomap chirp 40 series

Страница 1: ...echoMAP CHIRP 40 50 70 90 Series Owner s Manual September 2016 190 01951 10_0A...

Страница 2: ...e Garmin logo BlueChart g2 Vision and Ultrascroll are trademarks of Garmin Ltd or its subsidiaries registered in the USA and other countries echoMAP HomePort Panoptix Garmin ClearV and Garmin Quickdra...

Страница 3: ...9 Sharing Your Garmin Quickdraw Contours Maps with the Garmin Quickdraw Community 9 Downloading Garmin Quickdraw Community Maps 9 Garmin Quickdraw Contours Settings 9 Navigation with a Chartplotter 9...

Страница 4: ...3 Wind Hold 23 Tack and Gybe 23 Gauges and Graphs 23 Viewing the Compass 23 Viewing Trip Gauges 24 Resetting Trip Gauges 24 Viewing Engine and Fuel Gauges 24 Selecting the Number of Engines Shown in G...

Страница 5: ...gs 31 Setting Alarms 31 Navigation Alarms 31 System Alarms 31 Setting the Fuel Alarm 31 Units Settings 31 Navigation Settings 31 Other Vessel Settings 32 Restoring the Original Chartplotter Factory Se...

Страница 6: ......

Страница 7: ...xactly Getting More Information If you have any questions about your device you can contact Garmin Product Support The website www garmin com support offers many different troubleshooting tips to help...

Страница 8: ...o the Home screen select Add and select the new item To remove an item you have added to the Home screen select Remove and select the item Combinations The Combination screen shows a combination of di...

Страница 9: ...ion screen select SELECT Selecting an Item on the Map Using the Device Keys 1 From a chart or 3D chart view select or to move the cursor 2 Select SELECT Measuring a Distance on the Chart 1 From a char...

Страница 10: ...cle and bottom clearance Carefully compare the course to all visual sightings and avoid any land shallow water or other obstacles that may be in your path NOTE Not all models support all charts Option...

Страница 11: ...bols Symbol Description AIS vessel The vessel is reporting AIS information The direction in which the triangle is pointing indicates the direction in which the AIS vessel is moving Target is selected...

Страница 12: ...one For example to be notified of a pending intersection 10 minutes before it will likely occur set Time To to 10 and the alarm will sound 10 minutes before the vessel intersects the safe zone AIS Dis...

Страница 13: ...tings page 21 World Map Uses either a basic world map or a shaded relief map on the chart These differences are visible only when zoomed out too far to see the detailed charts Spot Depths Turns on spo...

Страница 14: ...een select MENU Overlay Numbers Edit Layout Sets the layout of the data overlay or data fields You can select the data to be shown within each data field Nav Inset Shows the navigation inset when the...

Страница 15: ...Community page 9 3 Select Search for Contours 4 Use the map and search features to locate an area to download The red dots represent Garmin Quickdraw Contours maps that have been shared for that regi...

Страница 16: ...Auto Guidance Path page 13 How do I change the Auto Guidance settings for my boat See Auto Guidance Path Configurations page 14 Destinations You can select destinations using various charts and 3D ch...

Страница 17: ...nt by entering position coordinates select Enter Coordinates and enter the coordinates To create the waypoint using a chart select Use Chart select the location and select SELECT Marking an MOB or SOS...

Страница 18: ...y the magenta line 6 Follow the magenta line along each leg in the route steering to avoid land shallow water and other obstacles 7 If you are off course follow the purple line corrected course to go...

Страница 19: ...rack Log You can indicate the frequency at which the track plot is recorded Recording more frequent plots is more accurate but fills the track log faster The resolution interval is recommended for the...

Страница 20: ...tion through a narrow waterway 8 Select an option If the placement of the Auto Guidance line is satisfactory select MENU Stop Navigation and proceed to step 10 If the Auto Guidance line is too close t...

Страница 21: ...m to sound when your boat is a specified distance from the boundary of an area that you want to avoid select Entering Deleting a Boundary 1 Select User Data Boundaries 2 Select a boundary 3 Select Edi...

Страница 22: ...can make to each sonar view vary depending on the view you are in and the chartplotter model and transducer you have connected Sonar Views The sonar views available vary depending on the type of tran...

Страница 23: ...hools in front of or below your boat The LiveV sonar views provide you a view of the live movement either in front of or below your boat The screen updates very quickly producing sonar views that look...

Страница 24: ...compass the transducer must be installed on the shaft far enough away from the trolling motor to avoid magnetic interference and deployed in the water Calibration must be of sufficient quality to enab...

Страница 25: ...magnified area To set the depth and zoom automatically select Auto To cancel the zoom select No Zoom Setting the Scroll Speed You can set the rate at which the sonar image moves across the screen A hi...

Страница 26: ...show the color legend on the side of the screen select Sonar Setup Color Key Adjusting the RealV Sweep Speed You can update how quickly the transducer sweeps back and forth A faster sweep rate creates...

Страница 27: ...s the sensitivity to reduce the effects of interference from nearby sources of noise The lowest interference setting that achieves the desired improvement should be used to remove interference from th...

Страница 28: ...point is past the start line the line is red This indicates the boat must reduce speed to avoid a penalty for reaching the start line before the timer expires When the end point is on the start line t...

Страница 29: ...ld Before you can enable the wind hold type you must connect a NMEA 2000 or NMEA 0183 wind sensor to the autopilot When the autopilot is in standby mode select Wind Hold Engaging Wind Hold from Headin...

Страница 30: ...of the fuel tanks Synchronizing the Fuel Data with the Actual Vessel Fuel You can synchronize the fuel levels in the chartplotter with the actual fuel in the vessel when you add fuel to your vessel 1...

Страница 31: ...o If your radio is capable GPS position information is transmitted with DSC calls The chartplotter can receive digital selective calling DSC distress and position information from the radio The chartp...

Страница 32: ...nt channel the chartplotter uses that channel for subsequent calls until you call using another channel 1 Select Nav Info Other Vessels DSC List 2 Select a vessel or a station to call 3 Select Call wi...

Страница 33: ...edia screen select MENU Installation Tuner Region 2 Select an option Changing the Radio Station 1 From the media screen select an applicable source such as FM 2 Select or to tune to a station Changing...

Страница 34: ...subscribe in the United States Contact SiriusXM by phone at 877 438 9677 or go to www siriusxm ca activatexm to subscribe in Canada 4 Provide the Radio ID The activation process usually takes 10 to 15...

Страница 35: ...satellites in the sky WAAS EGNOS Turns on or off WAAS in North America or EGNOS in Europe which can provide more accurate GPS position information When using WAAS or EGNOS the device may take longer...

Страница 36: ...nsor is not registering a speed a message appears 3 Select OK and safely increase the boat speed 4 If the message appears again stop the boat and ensure the speed sensor wheel is not stuck 5 If the wh...

Страница 37: ...alarm to sound when the GPS location accuracy falls outside the user defined value Setting the Fuel Alarm Before you can set a fuel level alarm a compatible fuel flow sensor must be connected to the N...

Страница 38: ...ices 1 Select Nav Info User Data Data Transfer File Type 2 Select GPX To transfer data with Garmin devices again select the ADM file type Sharing Waypoints and Routes Across Devices Before you can sha...

Страница 39: ...here is still a connection inside of the fuse You can test the fuse using a multimeter If the fuse is good the multimeter reads 0 ohm Check to make sure the device is receiving is at least 10 V but 12...

Страница 40: ...6 Wind data 130312 Temperature Transmit 126464 Transmit and receive PGN list group function 127258 Magnetic Variance 129025 Position Rapid update 129026 COG and SOG Rapid update 129029 GNSS position d...

Страница 41: ...8 fishing chart 3 panning 3 setup 7 FM 27 fuel alarm 24 31 fuel capacity 24 29 30 fuel gauges 24 30 status alarm 24 31 synchronizing with actual fuel 24 30 G Garmin ClearV 16 Garmin Marine Network 30...

Страница 42: ...ding 21 22 scroll speed 20 SideV 16 surface noise 21 suspended targets 21 views 16 18 waypoint 18 whiteline 21 zoom 19 SOS 11 suspended targets 8 symbols 5 system information 29 32 T tacking and gybin...

Страница 43: ......

Страница 44: ...5 69 33 99 39 02 36 699699 52 001 855 792 7671 0800 427 652 0800 0233937 47 815 69 555 00800 4412 454 44 2380 662 915 35 1214 447 460 386 4 27 92 500 0861 GARMIN 427 646 27 0 11 251 9800 34 93 275 44...

Страница 45: ...September 2016 GARMIN echoMAP CHIRP 40 50 70 90 Series Quick Start Manual Printed in Taiwan 190 01951 11_0A...

Страница 46: ...rmin com aboutGPS Adjusting the Backlight 1 Select Settings System Display Backlight TIP Press 6 from any screen to open the backlight settings 2 Adjust the backlight Adjusting the Color Mode 1 Select...

Страница 47: ...ion It should be the turn closest to your vessel 6 If necessary select MENU Quick Start Manual 7 Select Navigate Route 8 Review the course indicated by the magenta line 9 Follow the magenta line steer...

Страница 48: ...01 GARMIN 427 646 1 0 27 0 11251 9800 J4 m _ 8 2 4 42rr s r Garmin and the Garmin logo are trademarks of Garmin Ltd or its subsidiaries registered in the USA and other countries echoMAP Garmin ClearVu...

Страница 49: ...FH 6RIWZDUH HIRUH RX FDQ XSGDWH WKH VRIWZDUH RX PXVW REWDLQ D VRIWZDUH XSGDWH PHPRU FDUG RU ORDG WKH ODWHVW VRIWZDUH RQWR D PHPRU FDUG 7XUQ RQ WKH FKDUWSORWWHU IWHU WKH KRPH VFUHHQ DSSHDUV LQVHUW WKH...

Страница 50: ...GHYLFH 6HFXUH WKH WHPSODWH WR WKH PRXQWLQJ ORFDWLRQ 8VLQJ D PP LQ GULOO ELW GULOO RQH RU PRUH RI WKH KROHV LQVLGH WKH FRUQHUV RI WKH VROLG OLQH RQ WKH WHPSODWH WR SUHSDUH WKH PRXQWLQJ VXUIDFH IRU FXWW...

Страница 51: ...I WKH FUDGOH 10 RQVLGHUDWLRQV 127 I RX KDYH DQ H LVWLQJ 10 QHWZRUN RQ RXU ERDW LW VKRXOG DOUHDG EH FRQQHFWHG WR SRZHU R QRW FRQQHFW WKH 10 SRZHU FDEOH WR DQ H LVWLQJ 10 QHWZRUN EHFDXVH RQO RQH SRZHU V...

Страница 52: ...FH FP LQ OO 0RGHOV 7HPSHUDWXUH UDQJH URP WR IURP WR 0DWHULDO 3RO FDUERQDWH SODVWLF HYLFH 6SHFLILFDWLRQ 0HDVXUHPHQW DWHU UDWLQJ 3 7UDQVPLW SRZHU 506 0D LPXP GHSWK P IW DW N UHTXHQFLHV 7UDGLWLRQDO RU N...

Страница 53: ...7 07 DWHU WHPSHUDWXUH 6 9 9 DWHU VSHHG DQG KHDGLQJ 5HFHLYH 37 HSWK 7 HSWK EHORZ WUDQVGXFHU 07 DWHU WHPSHUDWXUH 50 36 SRVLWLRQ 9 DWHU VSHHG DQG KHDGLQJ 3 D SRLQW ORFDWLRQ 6 LJLWDO VHOHFWLYH FDOOLQJ LQI...

Страница 54: ...DUPLQ WG RU LWV VXEVLGLDULHV ZZZ JDUPLQ FRP VXSSRUW...

Страница 55: ...late and therefore an incorrect cutout too large or too small on the mounting surface of your boat 1 Select File Print 2 Select None for Page Scaling 3 Ensure the check mark is next to Auto Rotate and...

Страница 56: ...November 2014 190 01835 03_0B Printed in Taiwan echoMAP 70 Series Flush Mount Template 232 7 mm 9 19 in 122 4 mm 4 81 in 3 2 mm 125 in...

Страница 57: ...DG LSH WKH WUDQVGXFHU DQG PRXQWLQJ KDUGZDUH ZLWK LVRSURS O DOFRKRO SSO ZDWHU EDVHG DQWL IRXOLQJ SDLQW WR WKH WUDQVGXFHU DQG PRXQWLQJ KDUGZDUH 0RXQWLQJ RQVLGHUDWLRQ 7R HQVXUH SHDN SHUIRUPDQFH ZLWK WKH...

Страница 58: ...K KROH IHHG LW WKURXJK WKH KROH RX GULOOHG LQ VWHS DQG LQVWDOO WKH FDEOH HQWU FRYHU QVWDOOLQJ WKH DEOH QWU RYHU SDJH I RX DUH QRW URXWLQJ WKH FDEOH XVLQJ D SDVV WKURXJK KROH URXWH WKH FDEOH XS DQG RYH...

Страница 59: ...WKHVH SUHFDXWLRQV 7KH FDEOH VKRXOG QRW EH URXWHG FORVH WR HOHFWULFDO ZLUHV RU RWKHU VRXUFHV RI HOHFWULFDO LQWHUIHUHQFH 7KH FDEOH PXVW QRW EH SLQFKHG ZKHQ WKH WUROOLQJ PRWRU LV GHSOR HG RU VWRZHG 6RIW...

Страница 60: ...VWUDWLRQ WRGD R WR P JDUPLQ FRP HHS WKH RULJLQDO VDOHV UHFHLSW RU D SKRWRFRS LQ D VDIH SODFH RQWDFWLQJ DUPLQ 3URGXFW 6XSSRUW R WR ZZZ JDUPLQ FRP VXSSRUW IRU LQ FRXQWU VXSSRUW LQIRUPDWLRQ Q WKH 86 FDOO...

Страница 61: ...o HV LPSRUWDQWHV VREUH VHJXUDQoD H R SURGXWR HODQJULMNH YHLOLJKHLGV HQ SURGXFWLQIRUPDWLH 9LJWLJH SURGXNW RJ VLNNHUKHGVLQIRUPDWLRQHU 7lUNHLWl WXUYDOOLVXXV MD WXRWHWLHWRMD 9LNWLJ VLNNHUKHWV RJ SURGXNWLQ...

Страница 62: ...UW ULJKWV LQ DQG WR WKH 6RIWZDUH UHPDLQ LQ DUPLQ DQG RU LWV WKLUG SDUW SURYLGHUV RX DFNQRZOHGJH WKDW WKH 6RIWZDUH LV WKH SURSHUW RI DUPLQ DQG RU LWV WKLUG SDUW SURYLGHUV DQG LV SURWHFWHG XQGHU WKH 8QL...

Страница 63: ...conjunction with any other transmitter or antenna FCC Compliance This device complies with part 15 of the FCC Rules Operation is subject to the following two conditions 1 this device may not cause har...

Страница 64: ...CLUSIVE REMEDY FOR ANY BREACH OF WARRANTY To obtain warranty service contact your local Garmin authorized dealer or call Garmin Product Support for shipping instructions and an RMA tracking number Sec...

Страница 65: ...adresse www garmin com support si vous avez des questions au sujet de votre appareil Garmin equi per aiutarti In caso di domande sui dispositivo visita il sito Web dell assistenza per prodotti Garmin...

Отзывы: