


Viewing a Position Report
1
Select
Nav Info
>
Other Vessels
>
DSC List
.
2
Select a position-report call.
3
Select an option:
• To switch to position report details, select .
• To switch to a Navigation chart marking the location,
select .
• To switch to a Navigation chart marking the location,
select
Next Page
.
• To view the position report details, select
Previous Page
.
Navigating to a Tracked Vessel
1
Select
Nav Info
>
Other Vessels
>
DSC List
.
2
Select a position-report call.
3
Select
Navigate To
.
4
Select
Go To
or
Route To
.
Creating a Waypoint at the Position of a Tracked
Vessel
1
Select
Nav Info
>
Other Vessels
>
DSC List
.
2
Select a position-report call.
3
Select
Create Waypoint
.
Editing Information in a Position Report
1
Select
Nav Info
>
Other Vessels
>
DSC List
.
2
Select a position-report call.
3
Select
Edit
.
• To enter the name of the vessel, select
Name
.
• To select a new symbol, select
Symbol
, if available.
• To enter a comment, select
Comment
.
• To show a trail line for the vessel if your radio is tracking
the position of the vessel, select
Trail
.
• To select a color for the trail line, select
Trail Line
.
Deleting a Position-Report Call
1
Select
Nav Info
>
Other Vessels
>
DSC List
.
2
Select a position-report call.
3
Select
Edit
>
Clear Report
.
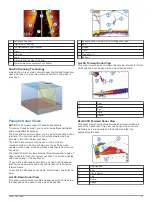
Viewing Vessel Trails on the Chart
You can view trails for all tracked vessels on some chart views.
By default, a black line indicates the path of the vessel, a black
dot indicates each previously reported position of a tracked
vessel, and a blue flag indicates the last reported position of the
vessel.
1
From a chart or 3D chart view, select
MENU
>
Other
Vessels
>
DSC Trails
.
2
Select the number of hours to show tracked vessels on the
chart.
For example, if you select 4 Hours, all trail points that are
less than four hours old appear for all tracked vessels.
Individual Routine Calls
When you connect the chartplotter to a Garmin VHF radio, you
can use the chartplotter interface to set up an individual routine
call.
When setting up an individual routine call from your chartplotter,
you can select the DSC channel on which you want to
communicate. The radio transmits this request with your call.
Selecting a DSC Channel
NOTE:
The selection of a DSC channel is limited to those
channels that are available in all frequency bands. The default
channel is 72. If you select a different channel, the chartplotter
uses that channel for subsequent calls until you call using
another channel.
1
Select
Nav Info
>
Other Vessels
>
DSC List
.
2
Select a vessel or a station to call.
3
Select
Call with Radio
>
Channel
.
4
Select an available channel.
Making an Individual Routine Call
NOTE:
When initiating a call from the chartplotter, if the radio
does not have an MMSI number programmed, the radio will not
receive call information.
1
Select
Nav Info
>
Other Vessels
>
DSC List
.
2
Select a vessel or a station to call.
3
Select
Call with Radio
.
4
If necessary, select
Channel
, and select a new channel.
5
Select
Send
.
The chartplotter sends information about the call to the radio.
6
On your Garmin VHF radio, select
Call
.
Making an Individual Routine Call to an AIS Target
1
From a chart or 3D chart view, select an AIS target.
2
Select
AIS Vessel
>
Call with Radio
.
3
If necessary, select
Channel
, and select a new channel.
4
Select
Send
.
The chartplotter sends information about the call to the radio.
5
On your Garmin VHF radio, select
Call
.
Media Player
NOTE:
The media player feature is not compatible with all
chartplotter models.
NOTE:
Not all features are available on all connected media
players.
If you have a compatible stereo connected to the NMEA 2000
network, you can control the stereo using the chartplotter. The
chartplotter should automatically detect the media player when it
is first connected.
You can play media from sources connected to the media player
and sources connected to the NMEA 2000 network.
Opening the Media Player
Before you can open the media player, you must connect a
compatible device to the chartplotter.
Select
Media
.
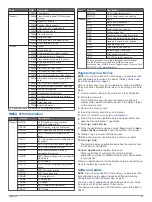
Icons
NOTE:
Not all devices have these icons.
Icon
Description
Saves or deletes a channel as a preset
Repeats all songs
Repeats one song
Scans for stations
Searches for stations or skips songs
Shuffles
Selecting the Media Source
When you have multiple media devices connected on a network,
such as the NMEA 2000 network, you can select the media
source you want to control from your chartplotter.
30
Media Player
Содержание ECHOMAP 60 Series
Страница 1: ...ECHOMAP 40 60 70 90SERIES Owner sManual...
Страница 49: ......
Страница 50: ...support garmin com October 2017 190 02242 00_0A...