background image

Restarting the Device

You can restart your device if it stops functioning.

Hold the power key for 12 seconds.

Removing the Device, Mount and Suction Cup

Removing the Device from the Mount

Press the release tab or button on the mount.
Tilt the bottom of the device upward, and lift the device from the mount.

Removing the Mount from the Suction Cup

If necessary, loosen the nut that secures the mount to the suction cup ball.
Turn the device mount to the right or left.
Apply pressure until the socket on the mount releases the ball on the suction cup.

Removing the Suction Cup from the Windscreen

Flip the lever on the suction cup towards you.
Pull the tab on the suction cup towards you.

Changing the Fuse in the Vehicle Power Cable

NOTICE

When replacing the fuse, do not lose any of the small pieces and make sure they are put back in the proper 
position. The vehicle power cable does not work unless it is assembled correctly.

If your device does not charge in your vehicle, you may need to replace the fuse located at the tip of the vehicle 
adapter.
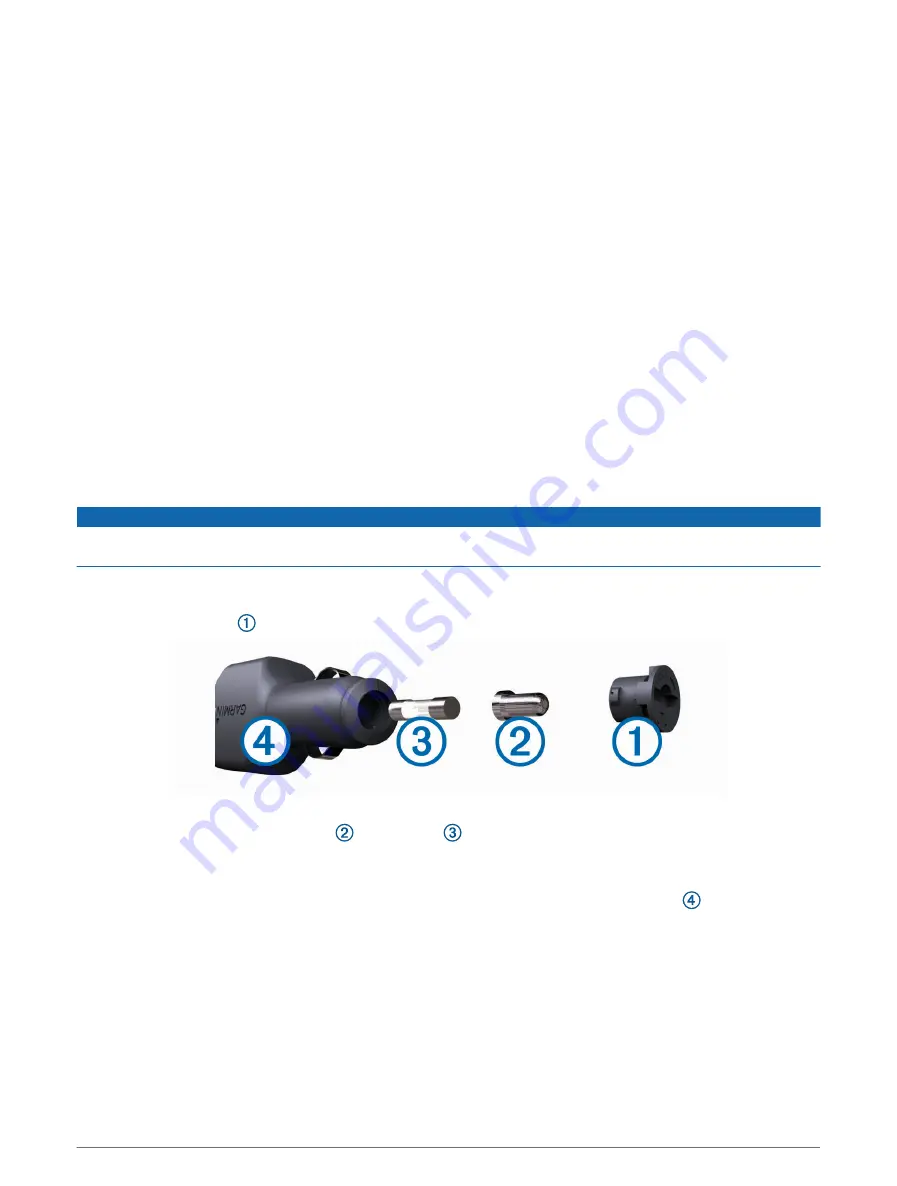
Rotate the end piece   anti-clockwise to unlock it.

TIP: you may need to use a coin to remove the end piece.

Remove the end piece, the silver tip   and the fuse  .
Insert a new fast-blow fuse that has the same current, such as 1 A or 2 A.
Place the silver tip in the end piece.
Push in the end piece and rotate it clockwise to lock it back into the vehicle power cable  .

Troubleshooting

The suction cup will not stay on my windscreen

Clean the suction cup and windscreen with surgical spirit.
Dry with a clean, dry cloth.
Mount the suction cup (

Mounting Considerations, page 2

).

Troubleshooting

61

Содержание DEZL OTR610

Страница 1: ...D ZL OTR610 OTR710 LGV610 LGV710 Owner smanual...

Страница 2: ...ubsidiaries These trademarks may not be used without the express permission of Garmin Android is a trademark of Google LLC Apple iPhone and Mac are trademarks of Apple Inc registered in the U S and ot...

Страница 3: ...to points of interest within a venue 17 Custom points of interest 17 Installing POI Loader 17 Finding custom POIs 17 Search tools 17 Finding a junction 17 Finding a location using coordinates 17 Park...

Страница 4: ...re status icons 34 Smart Notifications 34 Receiving notifications 35 Viewing the list of notifications 35 Going to an address or location using the d zl app 36 Hands free calling 36 Placing a call 36...

Страница 5: ...to the Map 48 Garmin PowerSwitch App 49 Activating a Power Switch 49 Turning Off All Switches 49 Customising a Button 50 Assigning a Switch to a Control Input 50 Adding a Custom Layout 50 Routines 51...

Страница 6: ...Garmin PowerSwitch 62 Mounting Considerations 62 Mounting the Device 63 Opening the Front Cover 64 Connecting Accessories 65 Connecting a Control Input 66 Connecting the Device to Vehicle Power 66 Pa...

Страница 7: ...unt the device in your vehicle and connect it to power Mounting Considerations page 2 Acquire GPS signals Acquiring GPS signals page 8 Adjust the volume Adjusting the volume page 9 and display brightn...

Страница 8: ...and does not block your view of the road during the safe operation of your vehicle Choose a location that allows you to route the power cable safely WARNING When installing the device in a vehicle ins...

Страница 9: ...onal injury or product damage caused by battery exposure to extreme heat store the device out of direct sunlight Before you use your device on battery power you should charge it 1 Press the suction cu...

Страница 10: ...end of the vehicle power cable into the vehicle power adapter 5 Plug the vehicle power adapter into a power outlet in your vehicle 6 Fit the tab on the top of the mount into the slot on the back of t...

Страница 11: ...onal injury or product damage caused by battery exposure to extreme heat store the device out of direct sunlight Before you use your device on battery power you should charge it 1 Press the suction cu...

Страница 12: ...end of the vehicle power cable into the vehicle power adapter 5 Plug the vehicle power adapter into a power outlet in your vehicle 6 Fit the tab on the top of the mount into the slot on the back of t...

Страница 13: ...f and the device uses very little power but it can wake instantly for use TIP you can charge your device faster by putting it in power saving mode while charging the battery To turn off the device com...

Страница 14: ...PS signal status Hold to view GPS accuracy and acquired satellite information Viewing GPS signal status page 69 Bluetooth technology status Select to view the Bluetooth settings Wireless network setti...

Страница 15: ...ile is indicated by an icon in the status bar The navigation and map settings on your device can be customised separately for each vehicle type When you activate a lorry vehicle profile the device avo...

Страница 16: ...ly used trailers 1 From the home screen select the vehicle profile widget 2 Select the lorry vehicle profile to use with the trailer 3 Select 4 Select an option To use a recent trailer configuration s...

Страница 17: ...e to indicate an upcoming level crossing Animal crossing the device plays a tone to indicate an upcoming animal crossing area Bends the device plays a tone to indicate a bend in the road Slower traffi...

Страница 18: ...et information The Where To menu helps you find your destination by providing several methods to browse search and save this information From the main menu select Where To To quickly search all locati...

Страница 19: ...r and street name To search for an address in another town enter the house number street name town and county To search for a town enter the town and county To search for coordinates enter latitude an...

Страница 20: ...s on the map You can scroll down to view more results Select a location to view the option menu Select to view detailed information about the location Go Select to start navigating to the location usi...

Страница 21: ...NOTICE You are responsible for understanding and complying with any applicable rules laws or regulations associated with points of interest A point of interest is a place that you may find useful or...

Страница 22: ...To Categories 2 Select a category 3 Select an option Select a destination from the quick search list on the right side of the screen The quick search list provides a list of recently found locations i...

Страница 23: ...ad custom POI lists on your computer and install them on your device using POI Loader software 1 Go to www garmin com poiloader 2 Follow the on screen instructions Finding custom POIs Before you can f...

Страница 24: ...pecified Location NOTE this feature is available only when you are using the car vehicle profile 1 Select Where To 2 Search for a location 3 From the location search results select a location 4 Select...

Страница 25: ...vice can give you a list of directions 1 From the map select the vehicle 2 Select Directions to Me 3 Select a starting location 4 Select Select Saving Locations Saving a location 1 Search for a locati...

Страница 26: ...appropriate for the active vehicle profile You can start navigating to your destination quickly using the recommended route or you can select an alternative route Starting a route page 20 If there are...

Страница 27: ...lect a location marker Select a point such as a street junction or address location 4 Select Go Going home The first time you start a route home the device prompts you to enter your home location 1 Se...

Страница 28: ...eet or exit associated with the next action Route highlighted on the map Next action in the route Arrows on the map indicate the location of upcoming actions Vehicle speed Name of the road on which yo...

Страница 29: ...ute To view the complete list of turns and directions for the entire route select the text bar at the top of the map 2 Select a turn or direction optional Detailed information appears An image of the...

Страница 30: ...lorry vehicle profile the device automatically prompts you to find a lorry destination such as a loading dock or lorry parking You can select a suggested point on the map and then select Go to navigat...

Страница 31: ...nation in your route select Add as Next Stop To add the location to the end of your route select Add as Last Stop Add as Last Stop To add the location and edit the order of destinations in your route...

Страница 32: ...iving traffic information By default the device optimises your route to avoid traffic delays automatically If you have disabled this option in the traffic settings Traffic Settings page 55 you can vie...

Страница 33: ...t Settings Navigation Custom Avoidances 2 Select a created avoidance 3 Select Disable Deleting custom avoidances 1 Select Settings Navigation Custom Avoidances 2 Select an option To delete all custom...

Страница 34: ...ormation from the Garmin eLog app Music Controls displays media controls and media information PrePass shows notifications for upcoming weighbridges and bypass decisions PrePass page 44 Environmental...

Страница 35: ...and Exit Services 1 From the map select Towns Ahead While you are travelling along a motorway or an active route the map tool shows information about upcoming towns and exits 2 Select a town The devic...

Страница 36: ...o Trailers Allowed Material Restrictions No Flammables or Explosives Allowed No Water Pollutants Allowed No Left Turn No Right Turn No U Turn Road condition warnings Risk of grounding Lateral wind Nar...

Страница 37: ...use the trip data map tool to show customised trip information on the map 1 From the map select Trip Data 2 Select an option Select a data field in the trip data tool and select the information to sh...

Страница 38: ...est upcoming traffic incident appears in a panel on the right side of the map 2 Select the traffic incident to view additional details Viewing traffic on the map The traffic map shows colour coded tra...

Страница 39: ...r Smartphone You can pair your d zl device with your smartphone and the d zl app to enable additional features and access live information Live services traffic and smartphone features page 33 1 From...

Страница 40: ...es TIP and appear coloured when the services are active 3 Select Smart Notifications 4 Select the check box next to each notification to show Bluetooth Feature status icons Status icons appear in the...

Страница 41: ...viewing the map WARNING Do not read or interact with notifications while driving because doing so can cause distraction that could lead to an accident resulting in serious personal injury or death Be...

Страница 42: ...ranteed that a particular phone can be used All features may not be available for your phone Using Bluetooth wireless technology your device can connect to your mobile phone to become a hands free dev...

Страница 43: ...t TIP you can use this feature if you want to disconnect the Bluetooth connection and remain on the call or if you need privacy To use the dial pad select the caller ID and select Keypad TIP you can u...

Страница 44: ...gs Traffic and verify that the Traffic option is selected Receiving traffic data using a traffic receiver NOTICE Heated metallised windscreens could degrade the performance of the traffic receiver A t...

Страница 45: ...ore than one incident use the arrows to view additional incidents Vehicle and driver tools Break Planning NOTICE This device by itself is NOT an approved substitute for logbook recording requirements...

Страница 46: ...rrier to comply with hours of service logging and break requirements When a Garmin eLog adapter is paired with your compatible mobile device you can view hours of service information on your d zl devi...

Страница 47: ...displays a notification on the device screen Select the diagnostic or malfunction notification to view details about the event NOTE you can view additional information about diagnostic and malfunctio...

Страница 48: ...rts folder on the device Editing and exporting trip reports 1 From the main menu select IFTA Trip Reports 2 If necessary select a lorry 3 If necessary select a quarter 4 Select a report 5 Select an op...

Страница 49: ...es When you delete a service category all service records in the category are also deleted 1 Select Srvice History 2 Select Delete Categories 3 Select the service categories to delete 4 Select Delete...

Страница 50: ...oice Activated Navigation may not achieve desired performance when in a noisy environment Voice command allows you to use your device by saying words and commands The voice command menu provides voice...

Страница 51: ...wing the Weather Forecast NOTICE Garmin is not responsible for the accuracy or timeliness of the weather data Before you can use this feature your device must be receiving weather data You can connect...

Страница 52: ...dding suggested attractions and adding shaping points You can also use the route planner to edit and save your active route Planning a Route A route can include many locations and it must include at l...

Страница 53: ...any of the route planner features The route recalculates each time you make a change 3 Select Save to save your route which you can navigate again later optional photoLive traffic cameras Before you c...

Страница 54: ...must enable the travel history feature Device and privacy settings page 55 You can view your previous routes and places where you have stopped on the map Select Trip History Music Player The media pl...

Страница 55: ...Garmin PowerSwitch device Displays the device name Displays Garmin PowerSwitch device tabs and custom layout tabs Activating a Power Switch Before you can use the Garmin PowerSwitch app to activate a...

Страница 56: ...ntrol input select a control input 4 Select 5 Select Done Assigning a Switch to a Control Input Before you can use control input functions you must connect a control input to your Garmin PowerSwitch d...

Страница 57: ...als 10 If applicable use the slider to set the brightness of lights 11 Select 12 If necessary select Add Action to add additional actions to the button You can add one action for every switch on the G...

Страница 58: ...add an action to the routine select Add Action and enter information about the action 4 Select Save Deleting a Routine 1 From the Garmin PowerSwitch app select Routines 2 Select on the routine you wa...

Страница 59: ...er Calculation Mode Settings Select Navigation Calculation Mode The route calculation is based on road speeds and vehicle acceleration data for a given route Faster Time calculates routes that are fas...

Страница 60: ...a break and shows upcoming services after you drive for an extended time You can enable or disable break reminders and upcoming service suggestions Proximity Alerts alerts you when you approach speed...

Страница 61: ...tically using GPS information select Auto To set the time manually drag the numbers up or down Language and Keyboard Settings To open the Language and Keyboard settings from the main menu select Langu...

Страница 62: ...ing temperature range From 20 to 55 C from 4 to 131 F Charging temperature range From 0 to 45 C from 32 to 113 F Wireless frequencies and transmit power d zl OTR710 LGV710 2 4 GHz 16 dBm maximum 5 1 G...

Страница 63: ...ce recommended This option allows you to update your device conveniently without connecting it to a computer You can connect the device to a computer and update it using the Garmin Express application...

Страница 64: ...n option To install all available updates select Install All To install only map updates select Map Install All To install only software updates select Software Install All 4 Read the licence agreemen...

Страница 65: ...end of the cable connects to the USB port on your d zl device and the large end connects to an available USB port on your computer 4 From your d zl device select Tap to Connect to Computer 5 When you...

Страница 66: ...equirements To install on a Windows computer select Download for Windows To install on a Mac computer select Download for Mac 3 Open the downloaded file and follow the on screen instructions to comple...

Страница 67: ...le Power Cable NOTICE When replacing the fuse do not lose any of the small pieces and make sure they are put back in the proper position The vehicle power cable does not work unless it is assembled co...

Страница 68: ...My device does not connect to my phone Select Wireless Networks Bluetooth The Bluetooth option must be enabled Enable Bluetooth wireless technology on your phone and bring your phone within 10 m 33 ft...

Страница 69: ...holes and attaching the mount to the vehicle Garmin is not responsible for any damages or consequences arising from the installation 1 Place the mount on the selected location 2 Using the mount as a t...

Страница 70: ...Opening the Front Cover You must open the front cover to make electrical connections 1 Lift the front cover latch and rotate it anticlockwise 2 Pull the front cover off of the device 64 Appendix...

Страница 71: ...to 30 A for each channel and a maximum of 100 A for the entire system Use 10 AWG 6 mm2 wires for accessories that use 20 to 30 A Use 12 AWG 4 mm2 wires for accessories that use 10 to 20 A Use 14 AWG...

Страница 72: ...ly each time you start your vehicle The control terminals detect a signal from 3 3 V to 18 V You can configure output functions with the Garmin PowerSwitch app Connect the control wire from the contro...

Страница 73: ...are turned on and within range Garmin PowerSwitch Specifications Dimensions D x W x H 75 x 125 x 32 mm 2 95 x 4 92 x 1 26 in Operating temperature range From 25 to 85 C from 13 to 185 F Wireless frequ...

Страница 74: ...mory cards from 4 to 256 GB Memory cards must use the FAT32 file system format Memory cards greater than 32 GB must be formatted using the device 1 Locate the map and data memory card slot on your dev...

Страница 75: ...removable drive or volume you must safely disconnect your device from your computer to avoid data loss If your device is connected to your Windows computer as a portable device it is not necessary to...

Страница 76: ...support garmin com GUID CB6B72DC B946 4D6C 84F3 440DCE3A7256 v1 June 2022...

Отзывы: