background image


Page 5-74 

G1000 / GFC 700 System Maintenance Manual - 300/B300 Series King Air 

Revision 1 

190-00716-01 

5.16  GDC 7400 Troubleshooting 

5.16.1 

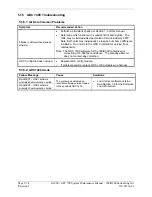
Air Data Common Problems 

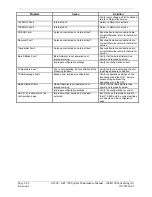
Symptom Recommended 

Action 

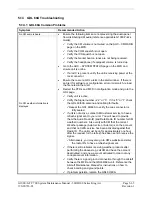
Altitude is different than standby 
altimeter 


Perform a pitot/static check per Section 7.6 of this manual.   


Determine which instrument is outside limits and replace.  The 
GDC may be field adjusted per Garmin Service Advisory 0720.  
Note: Both units may individually be in spec but show a difference 
in altitude.  Do not return the GDC to Garmin for service if not 
outside limits.


Note:  The GDC 7400 software for the 300/B300 contains error 

correction at 19,000 feet and above.  The standby altimeter 
does not contain any correction.  


GDC Config file does not load.


Replace GDC config module. 

9


If problem persists, replace GDC config module wire harness.


5.16.2 

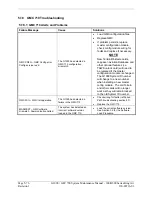
GDC 7400 Alerts 

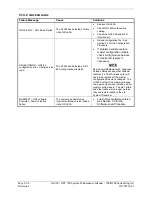
Failure Message 

Cause 

Solutions 

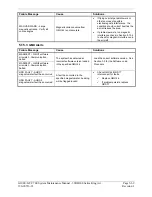
MANIFEST – GDC1 software 
mismatch Communication halted. 

The system has detected an 
incorrect software version loaded 
in the specified GDC 7400.   


Load correct software version.   
See Section 3.9 for the Software 
Load Procedure.


MANIFEST – GDC2 software 
mismatch Communication halted. 


Содержание Cessna Caravan G1000

Страница 1: ...60 100 150 200 250 40 80 1013 190 00716 01 May 2012 Revision 1 G1000 GFC 700 System Maintenance Manual Hawker Beechcraft Model 300 B300 Series King Air Contains Instructions For Continued Airworthines...

Страница 2: ...This page intentionally left blank...

Страница 3: ...n hereto provided that such electronic or printed copy of this manual or revision must contain the complete text of this copyright notice and provided further that any unauthorized commercial distribu...

Страница 4: ...cancer birth defects or reproductive harm This Notice is being provided in accordance with California s Proposition 65 If you have any questions or would like additional information please refer to ou...

Страница 5: ...TAWS A SUPPORT CONFIGURATION 3 24 3 11 TAWS A VOICE NO CALLOUT OPTION CONFIGURATION 3 25 3 12 TAWS A VOICE CALLOUT OPTION CONFIGURATION 3 26 3 13 ADF OPTION CONFIGURATION 3 27 3 14 DME OPTION CONFIGUR...

Страница 6: ...ING FANS OPERATIONAL CHECK 4 28 4 16 STANDBY BATTERY PERIODIC CHECKS 4 29 4 17 RUDDER BOOST OPERATIONAL CHECK 4 32 5 TROUBLESHOOTING 5 1 5 1 G1000 ALERTING SYSTEM 5 2 5 2 SYSTEM ANNUNCIATIONS 5 4 5 3...

Страница 7: ...CH ANNUNCIATOR PROP SYNCH AND STANDBY BATTERY 6 9 6 24 EMERGENCY FREQUENCY SWITCH ANNUNCIATOR 6 9 6 25 STANDBY BATTERY 6 10 6 26 STANDBY AIRSPEED INDICATOR 6 10 6 27 STANDBY ALTIMETER 6 10 6 28 STANDB...

Страница 8: ...FUNCTIONAL CHECK 7 42 7 21 DME FUNCTIONAL CHECK 7 43 7 22 ADF FUNCTIONAL CHECK 7 44 7 23 RADIO ALTIMETER CHECK 7 44 7 24 WEIGHT ON WHEELS AND LOW SPEED AWARENESS BAND CHECK 7 45 7 25 RVSM CHECKS 7 46...

Страница 9: ...ure 3 2 GDU 1500 Control Interface 3 2 Figure 3 3 G1000 Softkeys 3 2 Figure 3 4 MFD Controls GCU 477 shown 3 3 Figure 3 5 AFCS Controls GMC 710 shown 3 3 Figure 3 6 GMA 1347D Controls 3 4 Figure 3 7 N...

Страница 10: ...5 1 Figure 5 2 Alerts Annunciations 5 2 Figure 5 3 ADVISORY Softkey Annunciation 5 2 Figure 5 4 System Annunciations 5 4 Figure 5 5 AFCS Annunciation Field 5 28 Figure 5 6 GFC Status Page 5 31 Figure...

Страница 11: ...7 8 GTS 8XX GND TEST softkey 7 31 Figure 7 9 Low Speed Awareness Band Symbolization 7 45 Figure 7 10 Static Port Measurement 7 46 Figure 7 11 RVSM Critical Region 7 47 Figure 7 12 Dial Indicator 7 48...

Страница 12: ...Procedure 4 13 Table 4 8 Rear Fuselage and Empennage Visual Inspection Procedure 4 14 Table 4 9 Lightning Strike Inspection Procedure 4 15 Table 4 10 Measured Torque 4 21 Table 4 11 Standby Battery R...

Страница 13: ...STC have been shown to qualify for operation in Reduced Vertical Separation Minimum RVSM airspace as a group aircraft in accordance with Title 14 of the Code of Federal Regulations 14 CFR Part 91 App...

Страница 14: ...n number The airframe configuration is shown in the AIRFRAME field and the system software version number is shown in the following format SYS SOFTWARE VERSION XXXX XX It correlates to the software im...

Страница 15: ...s Basic G1000 Configuration Mode operation is also described Section 4 Instructions for Continued Airworthiness Provides maintenance instructions for continued airworthiness of the G1000 and GFC 700 s...

Страница 16: ...tection GPS Global Positioning System GPWS Ground Proximity Warning System HSDB High Speed Data Bus Ethernet IAU Integrated Avionics Unit ICS Inter Com System ITT Interstage Turbine Temperature LRU Li...

Страница 17: ...nstall Tail Shelf King Air 300 B300 005 00629 54 Wire Harness Installation Nose King Air 300 B300 005 00629 55 Wire Harness Installation Cabin King Air 300 B300 005 00629 56 Wire Harness Installation...

Страница 18: ...GSM9100 Installation Manual 190 00313 63 GMU 44 Installation Location Magnetic Interference Survey Procedure Generic installation manuals for individual Garmin LRUs are also available through the Dea...

Страница 19: ...above the MFD and a GCU 477 is installed in the pedestal The GCU 477 provides the control interface for the MFD The GDU 1500 communicates with the GDU 1040A units GDL 69A datalink GWX68 weather radar...

Страница 20: ...Avionics Units IAUs Electrical power to GMA 1 is provided from No 1 Triple Fed Bus Electrical power to GMA 2 is provided from Left Gen Avionics Bus GMA 1 will be powered immediately with external or...

Страница 21: ...iscussed in the G1000 Cockpit Reference Guide Figure 2 4 FMS Controller 2 1 5 GTX 33 Extended Squitter Transponder 2 The Garmin GTX 33 transponders communicates with the on side GIA 63W through RS 232...

Страница 22: ...No 3 Triple Fed Bus The GIA 1 s COMM power supply COMM 1 is provided by No 1 Triple Fed Bus GIA 2 s COMM power supply COMM 2 is provided by Left Gen Avionics Bus Therefore both GIAs power up immediate...

Страница 23: ...played on PFD 1 and or PFD 2 using display reversion The GEAs are located behind the instrument panel and is mounted in a vertical orientation Electrical power to GEA 1 is provided from No 1 Triple Fe...

Страница 24: ...Triple Fed Bus and a secondary power supply from Center Bus GDC 2 receives power from No 3 Triple Fed Bus GDC 1 and GDC 2 connect to existing pitot static ports Refer to Figure 2 22 for a schematic o...

Страница 25: ...GIA 63Ws The GRS 77 interfaces with and provides power to the GMU 44 Magnetometer The GRS 77 supplies attitude and heading information directly to the PFDs MFD and GIAs GRS 1 receives primary electri...

Страница 26: ...with the GDL 69A Installation of the GRC 10 and GRT 10 is in accordance with Garmin STC SA01487SE or other approved data Refer to the approved Instructions for Continued Airworthiness information for...

Страница 27: ...ts to support third party systems such as Flight Data Recorders The GSD 41 is located on the avionics shelf in the tail area The GSD 41 is powered from No 2 Triple Fed Bus Figure 2 15 GSD 41 Data Conc...

Страница 28: ...700 AFCS uses GSA 80 high torque servos to control aircraft pitch pitch trim and roll The pitch trim variant of the GSA 80 is a high speed servo actuator The GSA 80 contains a motor control and monito...

Страница 29: ...292 4 This unit converts the signals from the engine sensors to a signal usable by the GEA 71 These units are installed behind the instrument panel Electrical power to the No 1 Engine Signal Condition...

Страница 30: ...r source for the following items standby attitude indicator operation and internal lighting standby altimeter vibrator and internal lighting standby airspeed indicator lighting only pilot side glaresh...

Страница 31: ...or Bus via the Avionics No 1 relay The Right Gen Avionics Bus is powered from the Right Generator Bus via the Avionics No 2 relay The Triple Fed Avionics Bus is powered from the Triple Fed bus via the...

Страница 32: ...Page 2 14 G1000 GFC 700 System Maintenance Manual 300 B300 Series King Air Revision 1 190 00716 01 Figure 2 20 300 B300 Electrical Distribution Post G1000 STC...

Страница 33: ...G1000 GFC 700 System Maintenance Manual 300 B300 Series King Air Page 2 15 190 00716 01 Revision 1 Figure 2 21 G1000 Component Power Sources...

Страница 34: ...installation DRAIN FORWARD PRESSURE BULKHEAD R H PITOT MAST L H PITOT MAST 1 AIR DATA COMPUTER 2 AIR DATA COMPUTER STANDBY ALTIMETER STANDBY AIRSPEED AFT PRESSURE BULKHEAD TOP BOTTOM R H STATIC PORTS...

Страница 35: ...to provide necessary ground reference to wire shielding and or transducers The shield block termination method allows multiple grounds to be terminated directly to a block mounted to the connector bac...

Страница 36: ...Page 2 18 G1000 GFC 700 System Maintenance Manual 300 B300 Series King Air Revision 1 190 00716 01 This page intentionally left blank...

Страница 37: ...equipment as normally used in flight occurs through the PFDs MFD GMC 710 GCU 477 and GMA 1347D audio panel Figure 3 1 through Figure 3 6 identify various interface buttons for these units 3 1 GDU 1040...

Страница 38: ...e FMS knob is the primary control for the G1000 system Operation is similar to the Garmin 400 500 Series units To cycle through different configuration screens To change page groups Rotate the large F...

Страница 39: ...also be used to cancel a selection or deactivate the cursor 3 2 GCU 477 MFD Controller The MFD controls are located on the GCU 477 as show in Figure 3 4 Figure 3 4 MFD Controls GCU 477 shown 3 3 GMC 7...

Страница 40: ...nel controls Transceiver Audio Telephone Speaker Marker Beacon Signal Sensitivity Transceiver Audio Passenger Address Music Marker Beacon Mute Transmitters Digital Recording Playback Cabin Intercom Ma...

Страница 41: ...is powered GMA 1347D Digital Audio Panel 2 GDL 69A Datalink Unit GWX 68 Weather Radar Unit GTS 8XX Traffic System Optional GTX 33 Mode S Transponders Optional GDL 59 GSR 56 Wi Fi Satellite Optional T...

Страница 42: ...s the operator to force the pilot or copilot s PFD into reversionary mode by pressing the large red button labeled DISPLAY BACKUP on the respective GMA 1347D audio panel NOTE When the DISPLAY BACKUP b...

Страница 43: ...MFD 7 Press and hold the ENT key on PFD1 pilot while applying power using the PFD1 PRI and PFD1 SEC circuit breakers 8 Release the ENT key after INITIALIZING SYSTEM appears in the upper left corner of...

Страница 44: ...s CAUTION The ACTV SET softkey must be used with caution If an improperly configured unit is installed this softkey causes the wrong configuration to replace the correct aircraft configuration In the...

Страница 45: ...cation 3 7 2 Configuration Prompts When configuration settings are changed the technician receives on screen prompts and or confirmations such as those shown in Figure 3 12 Section 7 shows other promp...

Страница 46: ...st 6 Video Test 9 TAWS Configuration GIA Page Group 1 Serial Configuration 3 GIA I O Configuration 5 GIA Status Page 2 GIA RS 485 Configuration 4 GIA COM Setup 6 GIA CAN Configuration GSD Page Group 1...

Страница 47: ...ing a software loader card The installer shall create this software loader card by downloading the approved software image in accordance with section 3 8 2 NOTE Only SanDisk and Toshiba brand SD cards...

Страница 48: ...rvice center to gain access to the necessary data via the Garmin website 1 Go to www garmin com and click on the Dealer Resource Center link in the lower portion of the home page Enter username and pa...

Страница 49: ...ure that there is an empty SD card in the card reader and then click Setup NOTE When the extraction begins the program automatically deletes all current files on the SD card and copies the selected fi...

Страница 50: ...nance Manual 300 B300 Series King Air Revision 1 190 00716 01 8 Ensure the card and correct drive letter is used and click next 9 A window will pop up onto the screen to indicate file progress Select...

Страница 51: ...Configuration Mode The SYSTEM STATUS page SYSTEM page group reports more detailed LRU information including software version part number and LRU status Software files are loaded to LRUs from the SYST...

Страница 52: ...les of PFD configuration memory PFD cross checks these backup files against files contained with PFD memory PFD self configures to match master configuration module GMA 1347D Contains ACTIVE GMA setti...

Страница 53: ...ocedures GDC 7400 Config Module located in GDC backshell connector Stores a copy of the GDC 7400 configuration file GRS 77 AHRS The GRS stores calibration data internally The GRS 77 also stores factor...

Страница 54: ...n the aircraft In sections of this manual where software is required to be reloaded these sections will make reference back to this Section for instructions The technician should use proper judgment r...

Страница 55: ...sofkey labeled YES to acknowledge the following prompt see also note below for MFD NOTE For the MFD use the far right soft key on the MFD in lieu of the ENT key where called out in Steps 3 through 6...

Страница 56: ...d otherwise 1 Ensure loader card is inserted into top card slot of PFD1 and PFD1 is in configuration mode On PFD1 select the System Upload page using the PFD1 small FMS knob 2 Activate the cursor and...

Страница 57: ...ars all selections LOAD Starts the software loading process NOTE When loading a new software image or re loading software to a particular LRU it may not be necessary to reload all software and configu...

Страница 58: ...roll through the list in the window and verify that the software part number and version displayed in the DATA window matches the information in General Arrangement drawing listed in Table 1 2 Record...

Страница 59: ...GIA1 AUDIO GSA PTCH TRM M GDC1 GIA2 GSA ROLL CTL GDC1 FPGA GIA2 AUDIO GSA ROLL MON GDC2 GMA1 GSA YAW CTL GDC2 FPGA GMA2 GSA YAW MON GDL69 GMC GWX GEA1 GMU1 GWX FPGA GEA2 GMU1 FPGA MFD1 GFC CERT GIA1 G...

Страница 60: ...FD1 in configuration mode select the SYSTEM UPLOAD page using the small FMS knob on PFD1 2 Activate cursor and rotate the small FMS knob to display drop down menu Highlight King Air Options and press...

Страница 61: ...ge using the small FMS knob on PFD1 2 Activate cursor and rotate the small FMS knob to display drop down menu Highlight King Air Options and press ENT key on PFD1 3 Rotate the small FMS knob to highli...

Страница 62: ...PFD1 in configuration mode select the SYSTEM UPLOAD page using the small FMS knob on PFD1 2 Activate cursor and rotate the small FMS knob to display drop down menu Highlight King Air Options and press...

Страница 63: ...sor and rotate the small FMS knob to display drop down menu Highlight King Air Options and press ENT key on PFD1 3 Rotate the small FMS knob to highlight ADF Option Press ENT key on PFD1 4 Verify the...

Страница 64: ...cursor and rotate the small FMS knob to display drop down menu Highlight King Air Options and press ENT key on PFD1 3 Rotate the small FMS knob to highlight DME Option Press ENT key on PFD1 4 Verify...

Страница 65: ...D1 2 Activate cursor and rotate the small FMS knob to display drop down menu Highlight King Air Options and press ENT key on PFD1 3 Rotate the small FMS knob to highlight RAD ALT Option Press ENT key...

Страница 66: ...eck 1 With the loader card in the top slot of PFD1 and PFD1 in configuration mode select the System Upload page on PFD1 using the small FMS knob 2 Activate cursor and rotate the small FMS knob to disp...

Страница 67: ...ard in the top slot of PFD1 and PFD1 in configuration mode select the System Upload page on PFD1 using the small FMS knob 2 Activate cursor and rotate the small FMS knob to display drop down menu High...

Страница 68: ...f PFD1 and PFD1 in configuration mode select the System Upload page on PFD1 using the small FMS knob 2 Activate cursor and rotate the small FMS knob to display drop down menu Highlight King Air Option...

Страница 69: ...sor and rotate the small FMS knob to display drop down menu Highlight King Air Options and press ENT key on PFD1 3 Rotate the small FMS knob to highlight Lightning System Option Press ENT key on PFD1...

Страница 70: ...Configuration Page 2 Activate the cursor to highlight the DATA field Use the small FMS knob to open the drop down menu then select Config and press ENT key on the PFD1 Figure 3 32 Stormscope Configur...

Страница 71: ...y drop down menu Highlight King Air Options and press ENT key on PFD1 3 Rotate the small FMS knob to highlight GTX 33ES Press ENT key on PFD1 4 Verify GTX 33ES is displayed in the Item window Press LO...

Страница 72: ...nfiguration mode select the SYSTEM UPLOAD page using the small FMS knob on PFD1 2 Activate cursor and rotate the small FMS knob to display drop down menu Highlight King Air Options and press ENT key o...

Страница 73: ...g Air Options and press ENT key on PFD1 3 Rotate the small FMS knob to highlight GDL 59 Press ENT key on PFD1 4 Verify GDL 59 is displayed in the Item window Press LOAD Figure 3 35 GDL 59 Configuratio...

Страница 74: ...LOAD Figure 3 36 GSR 56 Configuration 5 Monitor load progress Verify software load completes without errors as indicated by the following Green PASS in Configuration column for AIRFRAME GDL 59 and ECT...

Страница 75: ...equency Ice Detection Pitch Attitude DME Distance Engine Warning Overtemp Roll Attitude Air Ground Sensor Engine Warning Oil Pressure Low Manual Radio Transmitter Keying Ground Proximity Warning Syste...

Страница 76: ...ion Press ENT key on PFD1 4 Verify FDR Option is displayed in the Item window Press LOAD Figure 3 37 FDR Configuration 5 Monitor load progress Verify software load completes without errors as indicate...

Страница 77: ...ard as specified in 005 00629 02 General Arrangement Drawing King Air 300 B300 will be required for this procedure NOTE The required ChartView databases are subscription based and are to be procured b...

Страница 78: ...in the technician should verify the card part number prior to use 1 With the TAWS B Enable card in the top slot of PFD1 and PFD1 in configuration mode select the SYSTEM UPLOAD page using the small FMS...

Страница 79: ...ion has been loaded per Section 3 15 1 With the TAWS A Enable card in the top slot of PFD1 and PFD1 in configuration mode select the SYSTEM UPLOAD page using the small FMS knob on PFD1 2 Activate curs...

Страница 80: ...curred on the current power cycle Figure 3 41 Supplemental Database Synchronization 7 If an error occurs during synchronization one of the following messages will be displayed followed by the affected...

Страница 81: ...em ID to the physical card and locks the files to this unique ID This prevents the SVS Pathways unlock card from ever being used to activate the SVS Pathway feature in other G1000 systems The unlock c...

Страница 82: ...e technician should verify the card part number prior to use 1 With the Enhanced AFCS Unlock card in the top slot of PFD1 and PFD1 in configuration mode select the SYSTEM UPLOAD page using the small F...

Страница 83: ...d Use the small large FMS knobs to enter the US aircraft registration number or other Mode S registration number Figure 3 44 Aircraft Registration 4 For US registered aircraft the FLIGHT ID TYPE field...

Страница 84: ...29 43 1 With PFD1 in configuration mode select the GDL69 page 2 Press the GDU softkeys in the numerical sequence of 12 9 6 3 to activate the cursor 1 2 3 4 5 6 7 8 9 10 11 12 3 Highlight the CABLE LOS...

Страница 85: ...n the upper slot of PFD2 4 Apply power to PFD2 5 When prompted to update system files press the NO softkey 6 When prompted to update splash screen files press the YES softkey 7 Remove the loader card...

Страница 86: ...atest cycle Jeppesen navigation database data supplied by Jeppesen into the top slot of the MFD 3 Apply power to the PFD1 PFD2 and MFD A prompt similar to the following will be displayed on the MFD 4...

Страница 87: ...leting Err displayed for all other errors Note that a power cycle is required to restart synchronization when Err No Space or Err is shown 9 When the synchronization is complete the status is shown as...

Страница 88: ...d use the GCU FMS knob to make the following selections TRAFFIC MODE ALL TRAFFIC TRAFFIC SMBL 300NM TRAFFIC LBL 300NM 6 Return to the Map Page by pressing the GCU FMS knob or momentarily pressing and...

Страница 89: ......

Страница 90: ...ailures The information in this document should always be combined with common sense and a thorough knowledge of the system Use sound avionics maintenance practices when working around or on G1000 equ...

Страница 91: ...upplying 28 Vdc Calibrated Flight Control Cable Tension Meter or equivalent Servo Gearbox Slip Clutch Adjustment Tool Garmin P N T10 00110 01 and a 2 Amp 24 V DC Power Supply Calibrated torque wrench...

Страница 92: ...ated in Table 4 1 IMPORTANT As allowed in the Super King Air 300 or B300 Maintenance Manual a tolerance of 20 hours for all phase inspections Special Inspection Items Calendar limited inspections have...

Страница 93: ...on Check 7 2 3 Phase 2 and 4 GIA 63W IAU Qty 2 Removal Replacement 6 3 On Condition GEA 71 EAU Qty 2 6 4 GTX 33 Transponder Qty 2 Removal Replacement 6 5 On Condition Special Inspection Perform GTX 33...

Страница 94: ...ADC1 and MFD and between GRS1 and MFD Verify DISPLAY BACKUP button function 4 10 Phase 1 2 3 4 Engine Data Check GIA 1 or 2 Inoperative Verify engine data is available and accurate with GIA 1 or GIA...

Страница 95: ...status logic 7 24 Phase 1 2 3 4 Exterior skin inspection around antennas Inspect the exterior skin around antennas for cracks and loose and missing fasteners per the Super King Air 300 300LW Maintenan...

Страница 96: ...g to 14 CFR 91 411 and Part 43 Appendix E N A 24 Calendar Months Standby Altimeter Removal Replacement 6 27 On Condition Test according to 14 CFR 91 411 and Part 43 Appendix E N A 24 Calendar Months S...

Страница 97: ...Discontinued Maintenance Intervals Item Description Procedure Manual Interval AC Inverter if removed Operational Check Phase Inspections Phases 1 2 3 4 IMPORTANT For installed equipment not listed in...

Страница 98: ...llowing Inspection GRS 77 Qty 2 a Inspect the GRS 77 units racks and connectors for corrosion or other defects Check the integrity of the SHIELD BLOCK ground attachments to the harness connector assem...

Страница 99: ...ving the PFDs and MFD see below Gain access to circuit breaker panels by removing the screws which fasten the edgelit overlays to the panels GDU 1040A PFD Qty 2 GDU 1500 MFD a Inspect the PFDs and MFD...

Страница 100: ...fects Check the integrity of the harness connector assembly in accordance with AC 43 13 1B Chapter 11 Section 8 Paragraphs 11 96 and 11 100 and the Cabin Wire Harness Routing drawing listed in Table 1...

Страница 101: ...anually move the aileron control surfaces from stop to stop and visually observe the servo and control cabling chain Ensure there is no binding in the control cabling or chain and that the capstan spr...

Страница 102: ...no corrosion chaffing cracks or other defects exist b For pitch and pitch trim GSM 86 servo gearboxes check that the retaining bolt for the slip clutch cartridge is not damaged or loose c For the GSM...

Страница 103: ...rocedures in Sections 4 5 3 and 4 5 4 as required and in accordance with the Super King Air 300 or B300 Maintenance Manual It is recommended that these tests are conducted after visual inspection of t...

Страница 104: ...se __________ milli volts Engine Signal Conditioner 2 near mounting holes of case __________ milli volts PFD1 Cooling fan metal base __________ milli volts PFD2 Cooling fan metal base __________ milli...

Страница 105: ...om the engine grounding bracket step 1 to each of the following points and record the voltage Perform Step 2 at each point to ensure that 1 amp 100 milli amp is present before measuring Nose Section G...

Страница 106: ...ce every five years The update is expected to be available from Garmin in each of the following years 2010 2015 and every five years thereafter as long as the GRS 77 remains a Garmin supported product...

Страница 107: ...nd FLAP RETRACT show an invalid condition 2 Extend the flaps down While the flaps are traveling down check that the DATA indicator of the discrete input labeled FLAP EXTEND changes to a valid conditio...

Страница 108: ...120 F 3 Use the FMS knob to select the desired servo Pitch Roll or Pitch Trim Yaw is not tested 4 Verify that the PFT status field shows PASSED 5 Verify that the aircraft control surface to be checke...

Страница 109: ...fixture capstan Adjust the wrench support fixture so that it contacts the handle in the appropriate location 4 Connect a 2 Amp 24 V DC power supply to the fixture 5 Place the solenoid switch to on and...

Страница 110: ...nect a ground power unit to the external power receptacle and turn on the ground power unit 2 Set the BAT EXT PWR and AVIONICS MASTER PWR switches to ON 3 With the G1000 system in normal mode pull the...

Страница 111: ...With PFD2 selected in the SELECT UNIT window verify the ARINC 429 IN1 GRS77 2 and ARINC 429 IN2 GDC74 2 indicators are green Ref Section 5 2 1 1 11 Restart the G1000 in normal mode C PFD and MFD Ether...

Страница 112: ...5 Verify the following NAV2 and COMM2 tuning fields on PFD 1 and PFD 2 are invalid red X L R engine data remains valid XPDR2 is Inoperative GMA2 Is Inoperative AHRS2 is using backup GPS source AHRS1...

Страница 113: ...PTRM annunciation from both GIA 1 and GIA 2 and the mis trim AFCS status alerts 1 Ensure the G1000 is in normal mode autopilot is not engaged and the mode controller XFR key is selected to the pilot s...

Страница 114: ...wheel to move freely Verify that the amber ELE annunciator is displayed on both PFD 1 and PFD 2 23 Disengage the autopilot NOTE If the ELE annunciation appears during any of the following steps reset...

Страница 115: ...ADC2 Verify the autopilot does not disconnect and amber comparator window text IAS MISCOMP is displayed on PFD 1 and PFD2 9 Use the pitot static test set to simulate an airspeed of 55 kts for ADC1 and...

Страница 116: ...2 GIA units The fan speed monitoring circuits and annunciations are checked by the G1000 Cooling Fan Fail Annunciation Check in Section 8 1 4 and a Visual Inspection of the fans and hoses is accomplis...

Страница 117: ...TEST SWITCH Figure 4 4 Item 4 into TEST position for 5 seconds The PS 835 indicates that it is adequately charged when the VOLTAGE LEVEL 24Vdc LED Figure 4 4 Item 2 illuminates momentarily AND the 20V...

Страница 118: ...re 2 If OUTPUT VOLTAGE MONITOR LED s do not come on check fuses at bracket next to battery and replace if blown Perform Cell Isolation Test if no fuses are blown B Discharge Test Load Resistor 1 Prepa...

Страница 119: ...ompletion of the discharge test Return the unit into service 4 16 3 Cell Isolation Test NOTE No power should be applied to PS 835 Emergency Power Supply during test This test is performed with the bat...

Страница 120: ...RUD BOOST OFF annunciator extinguishes 7 Pull the AFCS SERVO circuit breaker Verify RUD BOOST OFF annunciator illuminates 8 Reset AFCS SERVO circuit breaker Verify RUD BOOST OFF annunciator extinguish...

Страница 121: ...dition A course of action should be determined based on the information presented on the display This section shows possible scenarios likely to be encountered during normal operation and gives troubl...

Страница 122: ...removes the Alerts window from the display Softkey Annunciation When the G1000 Alerting System issues an alert the ALERTS softkey is used as a flashing annunciation to accompany the alert During the a...

Страница 123: ...PWS mode 4B Flight into terrain flaps not extended Sink Rate voice TAWS Caution alert GPWS mode 1 Excessive Descent Rate Pull Up voice TAWS Warning alert GPWS mode 1 or 2 Excessive Descent Rate Or Exc...

Страница 124: ...are checked are listed on these pages in config mode 1 GDU RS 232 ARINC 429 CONFIG PFD1 2 and MFD 2 GIA RS 232 ARINC 429 CONFIG GIA1 and GIA2 3 GIA CAN RS 485 CONFIGURATION GIA1 and GIA2 IMPORTANT On...

Страница 125: ...ify GMC710 is powered on o If GMC 710 will not power on remove unit and verify power and ground are present at the GMC connector If power or ground is not present troubleshoot aircraft wiring for faul...

Страница 126: ...Swap GRS1 and GRS2 no reconfiguration required to confirm if the problem is in the original GRS1 o Replace original GRS1 if box turns green after swapping units Check the PFD1 GRS 77 1 interconnect wi...

Страница 127: ...and verify power and ground are present at the GMC connector If power or ground is not present troubleshoot aircraft wiring for faults If power and ground are present replace GMC 710 Load PFD2 and GM...

Страница 128: ...wap GRS1 and GRS2 no reconfiguration required to confirm if the problem is in the original GRS1 o Replace original GRS1 if box turns green after swapping units Check the PFD2 GRS 77 2 interconnect wir...

Страница 129: ...GCU 477 is powered on o If GCU 477 will not power on remove unit and verify power and ground are present at the GCU connector If power or ground is not present troubleshoot aircraft wiring for faults...

Страница 130: ...for faults Replace GDC 7400 1 if problem remains Amber GIA1 GDC 7400 1 data path functionality is unknown Reload GIA1 configuration files CHNL 2 GRS 77 2 output only White N A GIA1 GRS 77 2 output dat...

Страница 131: ...the GIA1 GRS 77 1 interconnect wiring for faults Amber GIA1 GRS 77 1 data path functionality is unknown Reload GIA1 configuration files CHNL 7 GMA 1347 1 Green GIA1 GMA 1347D 1 data path is functioni...

Страница 132: ...lem remains Amber GIA1 GDC 7400 1 data path functionality is unknown Reload GIA1 configuration files IN 6 GRS 77 1 Green GIA1 GRS 77 1 data path is functioning correctly Red GIA1 GRS 77 1 data path is...

Страница 133: ...C 7400 2 if problem remains Amber GIA2 GDC 7400 2 data path functionality is unknown Reload GIA2 configuration files CHNL 2 GRS 77 1 output only White N A GIA2 GRS 77 1 output data path is not monitor...

Страница 134: ...the GIA2 GRS 77 2 interconnect wiring for faults Amber GIA2 GRS 77 2 data path functionality is unknown Reload GIA2 configuration files CHNL 7 GMA 1347D 2 Green GIA2 GMA 1347D 2 data path is function...

Страница 135: ...ace GDC 7400 2 if problem remains Amber GIA2 GDC 7400 2 data path functionality is unknown Reload GIA2 configuration files IN 6 GRS 77 2 Green GIA2 GRS 77 2 data path is functioning correctly Red GIA2...

Страница 136: ...es CHNL 2 GEA2 Green GIA1 GEA2 data path is functioning correctly Red GIA1 GEA2 data path is not functioning correctly Verify GEA2 is powered on using the GEA Status page Load GIA1 and GEA2 configurat...

Страница 137: ...GIA2 GEA2 data path is functioning correctly Red GIA2 GEA2 data path is not functioning correctly Verify GEA2 is powered on using the GEA Status page Load GIA2 and GEA2 configuration files Swap GIA2 a...

Страница 138: ...en the GIAs and aircraft squat switch system Low Speed Awareness Band permanently inhibited GDU With aircraft weight on wheels and the G1000 in Configuration Mode check that the RH GEAR ON GROUND Disc...

Страница 139: ...nfiguration settings for GIA1 and GIA2 Check GTX 33D GIA1 interconnect Check GTX 33D GIA2 interconnect Perform a SET ACTV configuration reset on the GTX Config page for each GTX and verify the aircraf...

Страница 140: ...ng rack hardware to the airframe shelf or the aircraft will need to be re leveled and the PITCH ROLL OFFSET procedure performed Ensure GPS has acquired at least four satellites has a 3D navigation sol...

Страница 141: ...the source of the interference Allow up to five minutes for the heading to reinitialize Perform a Magnetometer Interference Test to check for interference from onboard electrical system components e...

Страница 142: ...e or configuration errors by reloading software or configuration as noted Verify GEA internal power supply configuration and calibration status in configuration mode 9 The internal power supply config...

Страница 143: ...place thermocouple cable Replace GEA 71 Torque Check torque transmitter GEA wiring Check power input to torque transmitter Replace torque transmitter Replace GEA 71 Prop RPM Check prop tachometer Sign...

Страница 144: ...ad the ADF option configurations Check for proper operation of the ADF receiver Ensure that the receiver is receiving power Check ADF GIA2 interconnect For other failures of the ADF system refer to Su...

Страница 145: ...cuit breakers are closed Check cooling fan wiring Refer to G1000 GFC 700 Wiring Diagram listed in Table 1 2 Replace cooling fan Refer to Sections 6 29 and 6 30 AVN 2 FAN FAIL Avionics cooling fan 2 is...

Страница 146: ...ure a database or GDU SW mismatch has not occurred 9 If a mismatch has occurred load correct database software files or replace the terrain card TAWS system is currently being tested N A Test will be...

Страница 147: ...data are valid on the PFD Verify that a valid GPS 3D position solution is being received Troubleshoot these systems in accordance with sections 5 10 4 and 5 15 If a terrain database update has just b...

Страница 148: ...untered during the operation of the GFC 700 the pilot and technician should first evaluate the overall status and condition of the G1000 system at the AUX System Status page on MFD Any alert messages...

Страница 149: ...for additional GFC 700 system information Review the fault and assert logs for the GIAs and servos see Section 5 6 3 Isolate the fault to an LRU Replace this LRU and confirm the resolution of the annu...

Страница 150: ...r King Air 300 or B300 Maintenance Manual Check aircraft control cables for proper tension per the Super King Air 300 or B300 Maintenance Manual AP DISC Problems For intermittent nuisance disconnects...

Страница 151: ...3 Servo program discretes are used to determine the HW strapping for each GSA to define the servo type This information can be cross referenced against the system interconnects to verify proper servo...

Страница 152: ...nance Log and not in the Servo Maintenance Logs unless the GIA log fault identifies a servo problem NOTE Thoroughly understanding the operation of the G1000 system in Configuration mode is recommended...

Страница 153: ...alues for STEP on the failed GIA and corrective actions PFT FAIL STEP Pre flight has failed because the step specified has failed See the GIA pre flight test steps for a description of the possible va...

Страница 154: ...g by checking for Servo product data in configuration mode PFT step 1 System initialization verify GIA audio is valid This step is checking to make sure that the GIA audio region has been loaded and c...

Страница 155: ...p 7 Verify servo type This step is checking to make sure the Servos are the correct type torque and speed If this step fails make sure the Servo configuration on the GFC configuration page matches the...

Страница 156: ...all the Servos are up and communicating with valid data to the GIA in TDM mode If this step fails then make sure all Servos are turned on and communicating by checking for green boxes on the GFC conf...

Страница 157: ...rocessor contains the logs that are found in these processors 2 Pitch Servo 4 Roll Servo 6 Yaw 8 Pitch Trim Servo There are two main groupings of faults that can occur in the monitor processor The fir...

Страница 158: ...PWR FAIL Check unit power and AP Disconnect power CERT DATA UNINSTALLED Upload the certification gain file to the Monitor board STRAP CODE MISMATCH Check the connector strap inputs to the unit Normal...

Страница 159: ...by the technician Any faults that are not listed here indicate an internal problem requiring replacement of the servo If the items in the Notes column check out ok replace the servo PFT Faults CONTROL...

Страница 160: ...Disconnect power into the unit HOST DATA DIF Check the AHRS wiring to the system HOST DATA INV Check the AHRS wiring to the system SVO PWR INV Check unit power and AP Disconnect power STRP CODE CHNG...

Страница 161: ...een pressing any key will not continue disregard the text instruction you to do so Continue to scroll through all the OUTPUT data until you see the text End of Fault Log 7 Move the curser back to the...

Страница 162: ...G1000 System and remove the SD card 14 Insert the SD card in the card reader of a laptop or desktop computer and open the diag_buf_log txt file from the SD card using the WordPad program Verify that a...

Страница 163: ...EA 71 GTX 33 D and GMA 1347D each have two redundant serial communication paths for the same purpose See Figure 2 23 for a basic G1000 block diagram depicting this architecture Several other diagrams...

Страница 164: ...nnector If necessary straighten them before reseating connector Ensure GDU is receiving power If a circuit breaker is tripped determine source of short before resetting breaker Ensure circuit breakers...

Страница 165: ...fetaxi does not display Ensure supplemental data cards are inserted correctly in the lower slots of all three GDU s Allow the system to verify the data on the cards for approximately five minutes afte...

Страница 166: ...oftware mismatch Communication Halted The system has detected an incorrect software version loaded in MFD CNFG MODULE PFD 1 configuration module is inoperative The PFD master configuration module has...

Страница 167: ...guration module 9 If message persists check PFD1 config module wiring for faults and replace if necessary 9 If issue continues replace PFD1 master configuration module 9 If problem persists replace th...

Страница 168: ...inserted fully Reload the database or replace the supplemental datacard Contact Garmin product Support for further assistance if needed PFD 1 DB ERR PFD 1 obstacle database error exists The specified...

Страница 169: ...COOLING has poor cooling Reducing power usage MFD1 has exceeded its operating temperature range Check cooling fan and wiring for proper operation if applicable 9 Replace cooling fan if unable to dete...

Страница 170: ...mined a key is stuck on the PFD 2 5 9 5 Miscellaneous Alerts Failure Message Cause Solution XTALK ERROR A flight display cross talk error has occurred A communication error has occurred between the MF...

Страница 171: ...r The G1000 has determined the specified PFD needs service Ensure the PFD connector is fully seated and locked If the unit was started in a very dark environment the photocells may not have enough lig...

Страница 172: ...ble external sources of noise are eliminated Buttons Do Not Work Some buttons are disabled in the GMA CONFIGURATION page by default This is to remove potential sources of audio noise for inputs that a...

Страница 173: ...tected an incorrect software version loaded in the specified GMA 1347D Load the correct unit software See Section 3 9 for the Software Loading procedure MANIFEST GMA2 software mismatch Communication H...

Страница 174: ...nd GIA2 to verify location of problem 9 If problem follows unit replace GIA 9 If problem persists replace GMA1 with a known good unit 9 If problem persists reinstall original GMA1 and replace GMA2 5 1...

Страница 175: ...S almanac by performing the following steps o Using the PFD in config mode go to the GIA RS 232 ARNIC 429 Config Page o At the top of the screen select the GIA that can not acquire satellites GIA1 or...

Страница 176: ...gain to cycle its operation Check push to talk switch s and wiring Check GIA1 GMA 1347D 1 interconnect Switch GIA1 and GIA2 to identify whether the unit or connectors wiring is at fault Both GIAs must...

Страница 177: ...xternal remote transfer switch is stuck in the enabled or pressed state Press the COM2 external remote transfer switch again to cycle its operation Check COM2 external remote transfer switch and wirin...

Страница 178: ...1 remote transfer switch and wiring Switch GIA1 and GIA2 to identify whether the unit or connectors wiring is at fault Both GIAs must be configured when swapped see Section 3 9 9 If problem follows un...

Страница 179: ...5 11 4 GPS Alerts NOTE Before troubleshooting ensure that no cell phones or devices using cell phone technology are turned on even in a monitoring state in the cabin Failure Message Cause Solution MA...

Страница 180: ...notices posted Using the MFD AUX GPS Status page verify the signal strength bars are not erratic If so this indicates outside interference is affecting the GPS receivers Find and remove the source of...

Страница 181: ...ture GIA1 has exceeded its operating temperature range Check fan wiring and air tubing for proper operation if applicable Replace cooling fan if unable to determine if operating correctly Replace GIA1...

Страница 182: ...aced this message appears Load the configuration files for that GIA See Section 3 9 for GIA 63 Configuration Loading procedure If problem persists replace master configuration module check config modu...

Страница 183: ...system has detected a configuration mismatch in the specified GEA 71 Load GEA configuration files See Section 3 9 for GEA 71 Configuration Procedure If problem persists replace master configuration mo...

Страница 184: ...from a loader card 9 If problem persists replace master configuration module check config module harness for faults and replace if necessary NOTE New Terrain Obstacle cards Jeppesen Aviation Database...

Страница 185: ...umber is 2 or 3 If it is 0 or 1 check the GDL 69 69A antenna and cabling for faults 9Reseat the GDL 69 69A to verify the coax connector is fully seated 9 If unit is not active contact XM Customer serv...

Страница 186: ...If problem persists replace master configuration module check config module harness for faults and replace if necessary NOTE New Terrain Obstacle cards Jeppesen Aviation Database and other optional f...

Страница 187: ...pins 9 If no damage can be found replace GRS 77 configuration module 9 If problem persists replace the GRS 77 Attitude appears unstable Ensure that a cell phone or a device using cell phone technology...

Страница 188: ...one technology is not turned on even in a monitoring state in the cabin Check GPS status for GIA 1 and 2 on MFD AUX GPS STATUS page If one or both GPS receivers cannot acquire a position lock see GPS...

Страница 189: ...tion 5 15 4 to check for magnetic interference in the aircraft 5 15 3 GMU Alerts Failure Message Cause Solutions MANIFEST GMU1 software mismatch Communication halted The system has detected an incorre...

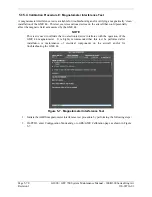
Страница 190: ...affect the magnetic field as measured by the GMU 44 NOTE This test is used to validate that no electronic device interferes with the operation of the GMU 44 magnetometer It is highly recommended that...

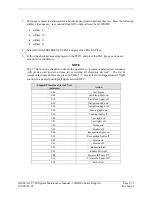
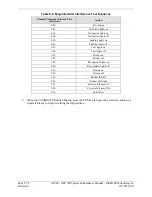
Страница 191: ...e a detailed test sequence with precise start and stop times for exercising all electronic devices The list of relevant electronic devices are given in Table 5 5 Begin test with flaps retracted flight...

Страница 192: ...on lights off 0 30 Landing lights on 0 40 Landing lights off 0 50 Taxi lights on 1 00 Taxi lights off 1 20 Strobes on 1 40 Strobes off 1 50 Recognition lights on 2 00 Recognition lights off 2 10 Beaco...

Страница 193: ...ction is required for this test If the test fails the installation should be considered unreliable until the source of magnetic interference is identified and remedied When the magnetometer interferen...

Страница 194: ...ence in altitude Do not return the GDC to Garmin for service if not outside limits Note The GDC 7400 software for the 300 B300 contains error correction at 19 000 feet and above The standby altimeter...

Страница 195: ...eck config module wiring for faults and replace if necessary NOTE New Terrain Obstacle cards Jeppesen Aviation Database and other optional features i e TAWS unlock card will need to be replaced if the...

Страница 196: ...Database and other optional features i e TAWS unlock card will need to be replaced if the master configuration module is changed The G1000 System ID number will change to a new number when installing...

Страница 197: ...ion Database and other optional features i e TAWS unlock card will need to be replaced if the master configuration module is changed The G1000 System ID number will change to a new number when install...

Страница 198: ...LRU Configuration file load fails Ensure that the criteria listed in Section 5 20 1 are fulfilled for the applicable situation Ensure that LRU is reporting data on System Status page LRU is ONLINE Che...

Страница 199: ...n top slot of PFD 1 PFD 1 and MFD must be powered on PFD 1 and MFD must have correct software Load Software Configuration files to GIA 63Ws SW Loader Card must be inserted in top slot of PFD 1 G1000 s...

Страница 200: ...39 40 41 42 43 44 45 46 47 48 49 50 51 52 53 54 55 56 57 58 59 60 61 62 63 64 65 66 67 68 69 70 71 72 73 74 75 76 77 78 1 2 3 4 5 6 7 8 9 10 11 12 13 14 15 16 17 18 19 20 21 22 23 24 25 26 27 28 29 30...

Страница 201: ...40 41 42 43 44 45 46 47 48 49 50 51 52 53 54 55 56 57 58 59 60 61 62 63 64 65 66 67 68 69 70 71 72 73 74 75 76 77 78 P13471 P13472 1 2 3 4 5 6 7 8 9 10 11 12 13 14 15 16 1718 19 20 21 22 2324 25 26 2...

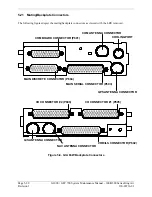
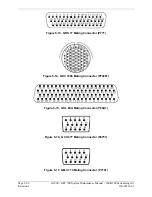
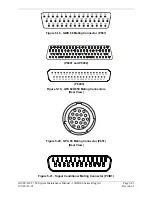
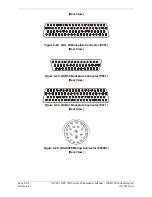
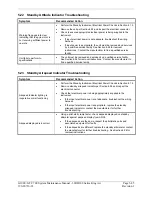
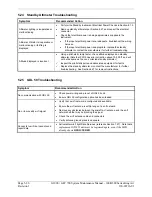
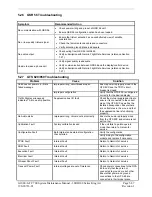
Страница 202: ...0 Series King Air Revision 1 190 00716 01 Figure 5 13 GRS 77 Mating Connector P771 Figure 5 14 GDC 7400 Mating Connector P74001 Figure 5 15 GDL 69A Mating Connector P69A1 Figure 5 16 GCU 477 Mating Co...

Страница 203: ...32 33 34 35 36 37 38 39 40 41 42 43 44 45 46 47 48 49 50 51 52 53 54 55 56 57 58 59 60 61 62 63 64 65 66 67 68 69 70 71 72 73 74 75 76 77 78 P8001 and P8002 1 4 6 2 3 8 10 9 5 7 11 12 13 14 15 16 17...

Страница 204: ...59 Backplate Connector P591 Rear View 1 2 3 4 5 6 7 8 9 10 11 12 13 14 15 16 17 18 19 20 21 22 23 24 25 26 27 28 29 30 31 32 33 34 35 36 37 38 39 40 41 42 43 44 Figure 5 23 GSR 56 Backplate Connector...

Страница 205: ...Section 6 28 for removal instructions Contact the manufacturer to find a qualified service facility 5 23 Standby Airspeed Indicator Troubleshooting Symptom Recommended Action Airspeed Indicator lighti...

Страница 206: ...e that PFD2 has error correction above 19 000 ft and will not be the same as the non corrected standby altimeter 9 Inspect the pitot static ports and associated equipment for faults 9 Replace the stan...

Страница 207: ...he desired display Traffic Display erroneously indicates TA at own ship position Suppression bus I O fault Check the mutual suppression line to ensure it is connected to the correct pins at the GTS 8X...

Страница 208: ...ude Fault Baro Altimeter is not powered on or improper wiring Verify that the baro altimeter has power and is properly wired Improper configuration settings Verify the configuration correct Temperatur...

Страница 209: ...is off Unplug any auxiliary power supplies Before performing maintenance it is required that the technician verify the LRU software part number and version number matches the software configuration l...

Страница 210: ...onding holes 3 Seat the display in the panel cutout Do not use excessive force while inserting the display 4 Once seated rotate all four turn fasteners clockwise to lock the display to the panel 5 Con...

Страница 211: ...Lock the handle to the GIA 63W body using the Philips screw 5 Configure and test the GIA 63W s according to Section 7 3 6 4 GEA 71 Engine Airframe Unit Removal 1 Gain access by removing the appropriat...

Страница 212: ...ess by removing the appropriate GDU 1040A display unit see Section 6 1 2 Disconnect the pitot static plumbing from the rear of the unit Disconnect the single connector 3 Loosen each thumbscrew on the...

Страница 213: ...aft mounting bracket using a non magnetic Phillips screwdriver 3 Remove the cable tie attaching the magnetometer pigtail harness to the shelf Reinstallation 1 Visually inspect the connectors to ensure...

Страница 214: ...move all of the grease from the output gear only the excess grease DO NOT USE SOLVENTS TO CLEAN THE OUTPUT GEAR c Using a brush or other applicator apply a thin coat of Aeroshell 33MS Lithium complex...

Страница 215: ...tion pins are oriented correctly Follow the installation instructions provided in the respective servo installation drawing s listed in Table 1 2 2 If no other maintenance is to be performed reinstall...

Страница 216: ...l position 4 Use a 3 32 hex drive tool to turn each of the four locking sockets turn clockwise This may require applying a small amount of forward pressure to engage the turn sockets 5 Configure and t...

Страница 217: ...n Module Kit 011 00979 00 or 03 Item Description Qty Needed Garmin Part Number 1 Configuration Module PCB Board Assembly w EEPROM Temp Sensor 1 012 00605 00 or 02 2 Spacer Config Module 1 213 00043 00...

Страница 218: ...n Upload Page on PFD 1 3 Press the UPDT CFG softkey and press ENT If both PFD 1 and Master Configuration Module are replaced NOTE New Terrain Obstacle cards Jeppesen Aviation Database and other option...

Страница 219: ...temperature probe errors resulting from the dissimilar metals at the pin contacts Figure 6 4 GEA Backshell Thermocouple Table 6 2 Thermocouple Kit 011 00981 00 Item Description Qty Needed Garmin Part...

Страница 220: ...ing the cabin interior ceiling panel Refer to the Antenna Install drawing listed in Table 1 2 2 Disconnect the antenna coaxial cable 3 Remove the antenna mounting screws 4 Remove antenna Reinstallatio...

Страница 221: ...l cable connector by opening the tail access door behind the aft pressure bulkhead Refer to the Antenna Install drawing listed in Table 1 2 2 Disconnect the antenna coaxial cable 3 Remove the antenna...

Страница 222: ...until the switch is free to come out 5 Remove the mounting sleeve and switch from the instrument panel Reinstallation 1 Reinstallation of the Prop Synch and Standby Battery switches is the reverse of...

Страница 223: ...nce with the Electrical Equipment Install Nose Bay drawing refer to Master Drawing List listed in Table 1 2 for specific drawing number Refer to the Super King Air 300 or B300 Maintenance Manual liste...

Страница 224: ...e the standby attitude indicator gyro is not spinning this may take 10 minutes or longer after the unit has been turned off This unit is very delicate handle with care Refer to the 4200 Series Attitud...

Страница 225: ...screws from the cooling fan 4 Remove the cooling fan Reinstallation 1 Reinstallation of the Sandia GDU cooling fan is the reverse of the removal Reference the Main Instrument Panel Installation drawin...

Страница 226: ...ackets reusing existing hardware 3 Connect the eight coax connectors Note the color coded bands which match the mating connectors on the unit 4 Reconnect the electrical connector pigtail 5 Ensure that...

Страница 227: ...e hole carefully to avoid cross threading Do not apply torque in excess of 14 in lbs to the handle screw The application of torque exceeding 14 in lbs to this screw will damage the LRU case and or ret...

Страница 228: ...Visually inspect the connectors to ensure there are no bent or damaged pins Repair any damage 2 Insert the unit into the installation rack CAUTION Do not use excessive force when inserting the GSD 41...

Страница 229: ...ft batteries to prevent loss of power during the software loading process DO NOT ALLOW POWER TO BE REMOVED FROM THE SYSTEM WHEN LOADING SOFTWARE Remove power only when told to do so by the following p...

Страница 230: ...displays enter reversion mode MFD should have valid altitude airspeed vertical speed COMM1 COMM2 NAV1 NAV2 and engine instruments 8 De activate pilot side reversion mode by pushing the DISPLAY BACKUP...

Страница 231: ...t the MAN SQ key is off no light 2 Adjust GMA1 and GMA2 ICS volume to a comfortable level 3 Plug in a headset at each COCKPIT ICS position One at a time plug a headset into each left and right CABIN I...

Страница 232: ...ver the headphones All volume control for the COM audio should be through the PFD volume control Verify proper operation of COM 1 using the failsafe operation 3 Close the AUDIO NO 1 circuit breaker to...

Страница 233: ...anding gear before proceeding 1 Jack aircraft to allow operation of landing gear reference Super King Air 300 or B300 Maintenance Manual Chapter 7 00 00 2 Ensure both left and right throttles are at I...

Страница 234: ...See Section 3 9 and then continue to the GIA 63W Test Section 7 3 1 New Repaired or Exchange GIA 63W s Installed If a new repaired or exchange GIA 63 is installed the correct software and configuratio...

Страница 235: ...ution on the MFD 7 Repeat steps 5 and 6 and re transmit while monitoring GPS 2 signal levels on the MFD 8 Repeat steps 4 through 7 for each of the following frequencies 121 175 MHz 121 200 MHz 131 250...

Страница 236: ...aircraft heading 5 Engage the autopilot and press the NAV key on the AFCS mode controller Using the CRS1 knob alter course by 10 to the right Verify the flight director and aircraft controls respond b...

Страница 237: ...t Section 7 4 1 New Repaired or Exchange GEA 71 Installed If a new repaired or exchange GEA 71 is installed the correct software and configuration files must be loaded to the unit See Section 3 9 and...

Страница 238: ...ipment Name Requirement Decade Box 0 1k ohms Signal Generator 0 10Vdc 0 1k Hz The following steps are required to be completed on both engines as necessary 1 Remove the engine cowling Ref Hawker Beech...

Страница 239: ...e required to be completed on both engines as necessary 1 Remove the engine cowling Ref Hawker Beechcraft King Air 300 300LW or B300 B300C Maintenance Manual Chapter 71 10 00 to gain access to the eng...

Страница 240: ...e unit per Section 3 9 Continue to Transponder Configuration Section 7 5 1 7 5 1 Transponder Configuration 1 If not applied apply power to the G1000 system 2 With PFD1 in configuration mode select the...

Страница 241: ...be put on jacks to simulate an in air condition in order to test the Mode S diversity transmission channel isolation If no other service is to be performed continue to the return to service checks in...

Страница 242: ...300 Maintenance Manual 34 00 00 with the following changes a For the pitot leak check set the air data test unit to an indicated airspeed of 200 knots with the static system vented to ambient pressure...

Страница 243: ...al 0 0 0 20 20 2 2 0 99 0 20 20 2 2 0 132 0 20 20 2 2 0 198 0 20 20 2 2 1000 50 1000 20 20 2 2 2000 50 2000 25 25 2 2 4000 80 4000 25 25 2 2 8000 80 8000 30 30 2 2 8000 260 8000 30 30 2 2 10000 120 10...

Страница 244: ...87 87 2 2 35000 147 34961 87 87 2 2 35000 164 34946 87 87 2 2 35000 171 34939 87 87 2 2 35000 185 34925 87 87 2 2 Aircraft S N _____________________ Date __________________ Operator _________________...

Страница 245: ...Table 7 6 Table 7 6 Vertical Speed Table Vertical Speed feet minute Allowed tolerance feet minute 2000 100 1000 50 500 45 200 45 0 N A No VS Display 200 45 500 45 1000 50 2000 100 7 6 3 OAT Probe Che...

Страница 246: ...Continue to Section 3 9 for software loading then proceed as follows If the GRS rack s was not removed or loosened continue to the GRS GMU Test Section 7 7 6 If the GRS rack s was removed or loosened...

Страница 247: ...the GRS GMU CALIBRATION page Note that the CALIBRATE command cannot be selected and activated until the installer acknowledges all required steps have been carried out by pressing the ENT key on each...

Страница 248: ...age at the PFD This page is protected and the following softkey password must be entered at the PFD to continue 9 10 11 12 Far Right softkey 4 Ensure that the No 1 GRS 77 is selected in the SELECT GRS...

Страница 249: ...2 can be used to evaluate a candidate site for magnetic disturbances and determine whether it is a suitable location to perform the magnetometer calibration procedure The magnetometer calibration pro...

Страница 250: ...ronmental magnetic disturbances Attempting to carry out this maneuver on a typical ramp area may not yield a successful calibration The accuracy of the AHRS cannot be guaranteed if this calibration is...

Страница 251: ...es the operator to dwell at multiple headings around a complete circle NOTE Due to high winds or excessive airframe vibration the operator may encounter a condition where the PFD restarts the 18 secon...

Страница 252: ...E field is not blinking 2 Initiate the AHRS engine run up vibration test procedure by performing the following steps a Select the ENGINE RUN UP TEST procedure and press the ENT key b Follow the checkl...

Страница 253: ...dware for GRS77 and or GMU44 not firmly attached c GRS77 connector not firmly attached to unit d Cabling leading to GRS77 or GMU44 not firmly secured to supporting structure e An engine propeller that...

Страница 254: ...le 1 2 for details on XM Radio weather and music operation If the GDL 69A is replaced new unit the owner must re activate the subscription using the new GDL 69A s Radio ID number s Refer to the GDL 69...

Страница 255: ...erify the map display zooms in 6 Press the RANGE knob to get the pointer on the map display 7 Move the RANGE knob to the left and verify the pointer moves to the left 8 Move the pointer up right and d...

Страница 256: ...ound the NAV 2 frequency on PFD1 27 Using GCU477 keypad enter in a frequency of 108 00 Verify NAV1 frequency changes as entered 28 Press the XPDR key until the light to the left of the button is lit V...

Страница 257: ...ilot is operational 2 Press the FD key a few times verify the Flight Director display on PFD1 toggles on and off Leave the flight director displayed 3 Press the XFR key and verify the white illuminate...

Страница 258: ...he Map Page Group then turn the small FMS knob to select the Weather Radar page 2 Select the MODE softkey 3 Select the STANDBY softkey to initiate the one minute warm up period Verify the radar enters...

Страница 259: ...in Ground Test mode 1 On the MAP TRAFFIC MAP page of the MFD press the OPERATE softkey A self test of the antenna circuit is initialized If the MFD displays FAILURE at the upper left corner of the tr...

Страница 260: ...same color on both ends of coax cables QMA and TNC connectors are correctly installed on coax cables 7 13 2 Ramp Test The following test provides a scenario that will converge and intercept the GTS 8X...

Страница 261: ...symbol 5 Press the OPERATE soft key and verify that OPERATING is displayed in the upper left corner of the traffic map 6 Press the STANDBY soft key and verify that STANDBY is displayed in the upper le...

Страница 262: ...of the traffic map 4 Verify that NO DATA is not displayed in the center of the traffic map over the aircraft symbol 5 Press the TFC STBY softkey and verify that STANDBY is displayed in the upper left...

Страница 263: ...e DME XPDR 1 XPDR 2 and weather radar Verify these systems do not cause strike data to appear on the MFD 5 Connect the WX PA cable to the WX PA antenna 6 Position the WX PA antenna on the WX 500 anten...

Страница 264: ...MENU ENTER to start the test Verify the WX 500 plots discharge points at approximately 60 NM 22 Observe the MFD to ensure the proper positioning of the test strikes Verify the strikes are within 10 de...

Страница 265: ...u and press ENT on the GCU Verify the TAWS INH annunciation on the PFDs has extinguished 7 With a GPS position acquired shield or disconnect the GPS antennas to remove the GPS signal Verify LOI shows...

Страница 266: ...select Inhibit GPWS from the pop up menu and press ENT on the GCU Verify GPWS INH is displayed on PFD 1 and PFD 2 8 Press the GCU MENU button again and select Enable GPWS from the pop up menu and pre...

Страница 267: ...ks Ref Super King Air 300 or B300 Maintenance Manual Chapter 7 00 00 with the wheels clear of the ground 19 Ensure all equipment and personnel are clear of the flaps and landing gear Place the flaps a...

Страница 268: ...djacent to CHART 4 Verify the FliteCharts database cycle number is displayed in blue text and the FliteCharts database is current 5 Deactivate the cursor and use the GCU large FMS knob to select the N...

Страница 269: ...select MFD1 DB softkey 2 Use the small FMS knob to scroll to CHART 3 Verify ChartView is displayed in blue text adjacent to CHART 4 Verify the ChartView database cycle number is displayed in blue tex...

Страница 270: ...R Information Page User Waypoint Information Page Trip Planning Page Nearest Pages 1 Use the FMS knob on the GCU to select the AUX System Status page and select DBASE softkey Use the small FMS knob to...

Страница 271: ...AV2 frequencies to 108 00 and 117 00 respectively 5 On PFD1 and PFD2 select the DME NAV1 mode Verify that the DME window display is set to the NAV1 frequency of 108 00 6 On PFD1 and PFD2 select the DM...

Страница 272: ...ses and decreases appropriately over pilots and copilots headset and cockpit speaker If no other service is to be performed continue to the return to service checks in Section 8 7 23 Radio Altimeter C...

Страница 273: ...essages 4 Verify the Low Speed Awareness band red band is NOT displayed on the PFD1 and PFD2 airspeed tapes see Figure 7 9 NOTE This portion of the check can be accomplished in conjunction with the La...

Страница 274: ...angement drawing listed in Table 1 2 Record the results in Figure 7 10 DESCRIPTION PART NUMBER DESCRIPTION PART NUMBER VER MAIN SUB SYSTEM GIA1 AUDIO GIA1 AUDIO GPS WAAS ENGINE GPS1 COMMUNICATION COM1...

Страница 275: ...ed Locations of existing protruding head rivets in frames and skin laps are acceptable 2 The paint including stripes must be uniform and smooth Remove any paint blisters or flaking and sand smooth Any...

Страница 276: ...or to set the large needle at 0 as shown in Figure 7 12 DIAL INDICATOR Figure 7 12 Dial Indicator The static port measurements are obtained at four locations on each static port as shown in Figure 7 1...

Страница 277: ...4 Record the AVERAGE in the measurement log Figure 7 15 5 Ensure the AVERAGE for each static port is within tolerance 0 045 to 0 085 inch If it is not remove and reinstall the static ports as necessa...

Страница 278: ...System Check Perform the Air Data Test per Section 7 6 1 If either the pilot or copilot air data system does not meet the tolerances specified have maintenance checks performed on the air data system...

Страница 279: ...onditions 2 Record the data from the primary cockpit displays as specified by Table 7 8 every 5 minutes for a minimum flight segment of 30 minutes in length The maximum altitude deviation shown on the...

Страница 280: ...FD AFCS Mode Controller GCU alert messages or monitor flags HDG MISCOMP etc are present on PFD1 or PFD2 4 On initial power up verify that the MFD splash screen includes the following graphic 5 On the...

Страница 281: ...is DISABLED 15 Verify on PFD 1 and PFD 2 the ESP Roll Indices are not displayed at 45 on the roll indicator on the Attitude Display 16 Verify on PFD 1 and PFD 2 that there is an ESP OFF alert message...

Страница 282: ...atus is ENABLED 26 Verify on PFD 1 and PFD 2 that there are no ESP FAIL or ESP OFF alert messages 27 On the GMC 710 couple the Flight Director to the right side by pressing the XFR button The arrow th...

Страница 283: ...raft tail number serial number manufacturer and model o G1000 system ID number If activating services for a GDL 59 and GSR 56 installation o Aircraft tail number serial number manufacturer and model o...

Страница 284: ...wing steps 1 Connect to an available network reference Section 7 28 for details 2 Using the large FMS knob select the AUX page group on the MFD Using the small FMS knob select the AUX REPORT STATUS pa...

Страница 285: ...knob on the GCU to activate the cursor and rotate the small FMS knob to highlight the desired network in the AVAILABLE NETWORKS field 6 Press the CONNECT softkey on the MFD to connect to the network S...

Страница 286: ...Normal Mode 5 Using the large FMS knob select the AUX page group on the MFD Using the small FMS knob select the AUX TELEPHONE page 6 Ensure the system is showing Iridium signal strength best if aircra...

Страница 287: ...tem Return to Service Procedure After reinstalling any G1000 LRU verify the correct LRU software part numbers and versions against the numbers listed on the General Arrangement drawing listed in Table...

Страница 288: ...e following shall remain valid on the PFD throughout the procedure Attitude and Heading from AHRS Airspeed Altitude Vertical Speed and OAT from Air Data Computer GPS Course Deviation Indicator For a G...

Страница 289: ...2 Verify desired results 3 Close GIA 2 CB Allow system to re acquire satellites and return to normal display modes For a GIA 2 failure condition the following shall occur NAV2 and COMM2 tuning fields...

Страница 290: ...wing shall occur PFD2 goes blank PFD1 and MFD remain in normal display formats The following illuminate on PFD1 HDG NO COMP illuminates on PFD1 ROLL NO COMP illuminates on PFD1 PIT NO COMP illuminates...

Страница 291: ...IL PFD 2 cooling fan is inoperative MFD FAN FAIL MFD cooling fan is inoperative Fan Failure reset and acknowledgement 1 Reset all cooling fan circuit breakers 2 Acknowledge alerts by pressing the ALER...

Страница 292: ...ould be fully illuminated green on the STANDBY BATTERY switch The STBY attitude STBY altimeter and STBY airspeed instrument lighting reverts to the aircraft settings The STBY attitude motor and STBY a...

Страница 293: ...the channels are receiving data as shown below Figure 8 1 GDU Data Verification ARINC 429 5 On PFD1 activate the cursor and select PFD2 in the SELECT UNIT field and press the ENT key 6 Repeat Steps 5...

Страница 294: ...00716 01 12 Verify all DATA indicators are GREEN indicating the channels are receiving data as shown in the following image Figure 8 2 GIA Data Verification ARINC429 RS 232 13 Activate the cursor and...

Страница 295: ...16 Verify that GIA1 is selected in the SELECT UNIT field 17 Observe the data indicators for all configured RS 485 channels 18 Verify all DATA indicators are GREEN indicating the channels are receiving...

Страница 296: ...VIONICS MASTER PWR and EXT PWR switches to OFF After 30 seconds set the EXP PWR and AVIONICS MASTER PWR switches to ON Verify the GFC 700 begins an automatic pre flight test after AHRS and ADC paramet...

Страница 297: ...accompanied by an aural alert Verify that the control wheel is free in pitch and roll axes 7 Engage the autopilot again by pressing the AP key on the AFCS mode controller Open AFCS SERVOS circuit bre...

Страница 298: ...ble 1 2 as applicable 3 Actuate and hold PITCH TRIM switch in either the NOSE UP or NOSE DOWN direction to disconnect the autopilot While the trim is running restrain the aircraft pitch trim wheel and...

Страница 299: ...tance to get aft control stick movement 5 While holding the control wheel firmly press and hold the CWS button to re synchronize the pitch reference Re center the control wheel to wings level and mid...

Страница 300: ...ss the NAV key on the AFCS mode controller Using the CRS1 knob alter course by 10 to the right Verify the flight director and aircraft controls respond by flying to the VOR course Repeat to the left 6...

Страница 301: ...ted in Table 1 2 the aircraft may be returned to service Record the following information in appropriate aircraft maintenance logs Part number of the G1000 software loader card used to perform softwar...

Страница 302: ...Page 8 16 G1000 GFC 700 System Maintenance Manual 300 B300 Series King Air Revision 1 190 00716 01 This page intentionally left blank...

Отзывы: