background image

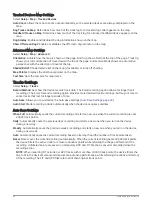
Routing Settings

The available routing settings vary based on whether Direct Routing is enabled or disabled.
Select Setup > Routing.
Direct Routing: Enables or disables direct routing. Direct routing calculates the most direct route possible to 

the destination.

Activity: Sets an activity while routing. The device calculates routes optimized for the type of activity you are 

doing.

Calculation Method: Sets the method used to calculate your route.
Lock On Road: Locks the blue triangle, which represents your position on the map, onto the nearest road. This 

is most useful when driving or navigating on roads.

Off Route Recalculation: Sets recalculation preferences when navigating away from an active route.
Avoidance Setup: Sets the types of roads, terrain, and transportation methods to avoid while navigating.
Route Transitions: Sets how the device routes from one point on the route to the next. This setting is available 

only for some activities. The Distance option routes you to the next point on the route when you are within a 
specified distance of your current point.

Sensors Settings

Select Setup > Sensors.
Tempe Sensor: Allows you to pair a tempe

 sensor and turn a paired tempe sensor on and off.

Xero: Allows you to enable or disable your sharing status and make sharing public or private.

NOTE: You can share your location from a compatible Xero

®

 device.

Changing the Units of Measure

You can customize units of measure for distance and speed, elevation, and temperature.
Select Setup > System > Units.
Select a measurement type.
Select a unit of measure for the setting.

Position Format Settings

NOTE: You should not change the position format or the map datum coordinate system unless you are using a 
map or chart that specifies a different position format.
Select Setup > System > Units > Position Format.
Position Format: Sets the position format in which a location reading appears.
Map Datum: Sets the coordinate system on which the map is structured.
Map Spheroid: Shows the coordinate system the device is using. The default coordinate system is WGS 84.

Device Information

Viewing E-label Regulatory and Compliance Information

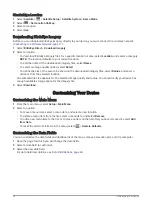
The label for this device is provided electronically. The e-label may provide regulatory information, such as 
identification numbers provided by the FCC or regional compliance markings, as well as applicable product and 
licensing information.
Select Setup.
Select About.

Device Information

31

Содержание Alpha 200

Страница 1: ...Alpha 200withTraining Owner sManual...

Страница 2: ...rmin Ltd or its subsidiaries registered in the USA and other countries BaseCamp Garmin Explore Garmin Express Garmin HuntView tempe and TT are trademarks of Garmin Ltd or its subsidiaries These tradem...

Страница 3: ...e Map 12 Dog Status Icons 12 Dog Tracking Compass 13 Navigating to Your Dog 13 Changing the Length of the Dog s Track 13 Location Alerts 13 Setting Location Alerts 14 Editing Location Alerts 14 Disabl...

Страница 4: ...by Name 25 Navigating with Sight N Go 26 Elevation Plot 26 Calibrating the Barometric Altimeter 26 Navigating to a Point on the Plot 26 Changing the Plot Type 26 Resetting the Elevation Plot 26 Trip...

Страница 5: ...r to a Computer 37 Transferring Dog Tracks to BaseCamp 37 Deleting Files 37 Disconnecting the USB Cable 37 Resetting Data and Settings 37 Appendix 38 Accessories and Replacement Parts 38 Purchasing Ac...

Страница 6: ......

Страница 7: ...ndheld device Charging the Handheld Device page 5 2 Charge the dog collar device Charging the Dog Collar Device page 6 3 Turn on the devices Turning On the Device page 6 4 Select a language Selecting...

Страница 8: ...greater than 5 W in close proximity to the handheld device It may cause irreversible damage to the handheld device Satellite antenna VHF radio antenna Mounting spine microSD memory card slot under ba...

Страница 9: ...Alpha Device Keys Power key Customizable training keys Training up Training down Training enter Getting Started 3...

Страница 10: ...Dog Collar Device NOTE Your dog collar device may look different than the device pictured VHF antenna GPS antenna Power key Contact points Status LED and flashing beacon LEDs 4 Getting Started...

Страница 11: ...er cap and the surrounding area before charging or connecting to a computer NOTE The device does not charge when it is outside the approved temperature range Alpha Handheld Device Specifications page...

Страница 12: ...ice On the handheld device press the power key On the dog collar device hold the power key until the status LED flashes and the collar beeps Turning Off the Device On the handheld device hold the powe...

Страница 13: ...to leaving for the hunt Adding a Dog to the Alpha Handheld Using Wireless Pairing page 8 Entering the track and control codes Allows you to add a dog collar device that you do not own and that is not...

Страница 14: ...t Track Only To allow the other person to track your dog and correct your dog s behavior select Track and Train To successfully share the dog collar device the other handheld device must be receiving...

Страница 15: ...ect Activate Group To deactivate the group select Deactivate Group To add a device to the group select Manage Group Add Device To rename the group select Rename and enter a new name To delete the grou...

Страница 16: ...that is applied to the dog is completely dry before placing the collar on the dog Small amounts of harsh chemicals can damage the plastic components and collar laminate In order to effectively train t...

Страница 17: ...e handheld device the dog collar device can be put into sleep mode to conserve the battery when you are not actively tracking your dog 1 Select Dog List 2 Select a dog 3 Select Adjust Collar Sleep Mod...

Страница 18: ...1 From the home screen select 2 If necessary select and to zoom in and out of the map TIP You can select to track the dog using the dog tracking compass Dog Tracking Compass page 13 Dog Status Icons...

Страница 19: ...2 Select the dog 3 Select Go 4 Follow the colored line to the dog Changing the Length of the Dog s Track You can adjust the length of time the dog track appears on the map Reducing the duration of the...

Страница 20: ...eld device broadcasts dog data to compatible devices You can disable data broadcasting to keep your data from being seen on other compatible devices See the owner s manual for your compatible device f...

Страница 21: ...e you press the training key for a maximum of 8 seconds Your stimulations should typically be much shorter than 8 seconds Tone Activates an audible tone the entire time you press the training key Vibr...

Страница 22: ...se this feature you must customize your training keys with dog training commands Customizing the Training Keys page 16 You can access and adjust training commands using the device s hard keys 1 From a...

Страница 23: ...u need to repeat a command because the dog did not obey the first one As the dog becomes better trained you can decrease the use of collar training Continue to have the dog wear the collar until you f...

Страница 24: ...ID Allows you to add a handheld device contact that is not in the area This method requires the contact to find and communicate their handheld device code to the person adding the device contact This...

Страница 25: ...indicating that your contact has started navigating to your location After receiving the alert your contacts can navigate to your location Sending a Message to Your Contacts Before you can send a mess...

Страница 26: ...of the truck so you can navigate back to your truck after the hunt 1 Select Mark Waypoint Truck 2 Select Save Marking a Covey You can mark a covey location and enter the estimated number of birds flus...

Страница 27: ...device Waypoints can mark where you are where you are going or where you have been You can add details about the location such as name elevation and depth You can add a gpx file that contains waypoint...

Страница 28: ...rovide more accuracy 1 Select Waypoint Manager 2 Select a waypoint 3 Select Average Location 4 Move to the waypoint location 5 Select Start 6 Follow the on screen instructions 7 When the confidence st...

Страница 29: ...view the point on the map select Review To change the order of the points on the route select Move Up or Move Down To insert an additional point on the route select Insert The additional point is ins...

Страница 30: ...inning and the end of the track are marked by flags 4 Select the information bar along the top of the screen Information about the track is listed Viewing the Elevation Plot of a Track 1 Select Track...

Страница 31: ...e has a 3 axis tilt compensated compass You can use a bearing pointer or a course pointer to navigate to your destination Calibrating the Compass NOTICE Calibrate the electronic compass outdoors To im...

Страница 32: ...t on the plot 3 Select View Map 4 Select Go Changing the Plot Type You can change the elevation plot to display pressure and elevation over time or distance 1 Select Track Manager My Track Altimeter S...

Страница 33: ...Alarm 1 Select Alarm Clock 2 Select and to set the time 3 Select Turn Alarm On The alarm sounds at the selected time If the device is off at the alarm time the device turns on and sounds the alarm Usi...

Страница 34: ...selected location An estimated file size appears for the selected image quality and radius You should verify your device has enough available storage space for the imagery file 3 Select Download Cust...

Страница 35: ...o save the image on the device screen Accessibility Adds or changes device features to make your device more accessible Accessibility Settings page 29 Accessibility Settings Select Setup Display Acces...

Страница 36: ...led track recordings but may not record entire tracks that last for longer periods of time Auto Save Allows you to customize the Auto Save settings Auto Save Settings page 30 Auto Start Starts recordi...

Страница 37: ...mpe Sensor Allows you to pair a tempe sensor and turn a paired tempe sensor on and off Xero Allows you to enable or disable your sharing status and make sharing public or private NOTE You can share yo...

Страница 38: ...leaners solvents and insect repellents that can damage plastic components and finishes Secure the weather cap tightly to prevent damage to the USB port Avoid extreme shock and harsh treatment because...

Страница 39: ...temperature range From 0 to 40 C from 32 to 104 F ANT wireless range Up to 10 m 32 8 ft VHF radio range Up to 14 48 km 9 mi Wireless frequencies protocols 152 155 MHz 31 6 dBm maximum 2 4 GHz 23 1 dBm...

Страница 40: ...collar should be fully recharged before use Maximizing the Battery Life You can do several things to extend the life of the batteries in the handheld device and collar Reduce the backlight brightness...

Страница 41: ...Battery Save On When in battery save mode the screen shuts off when the backlight times out Saving Energy While Charging the Device You can turn off the device display and all other features while ch...

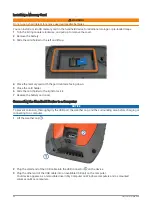
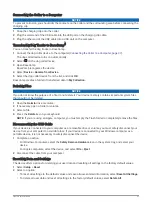
Страница 42: ...e the card holder 6 Slide the card holder to the right to lock it 7 Replace the battery and cover Connecting the Handheld Device to a Computer NOTICE To prevent corrosion thoroughly dry the USB port t...

Страница 43: ...ed 1 Open the Garmin drive or volume 2 If necessary open a folder or volume 3 Select a file 4 Press the Delete key on your keyboard NOTE If you are using an Apple computer you must empty the Trash fol...

Страница 44: ...nsistent source of accurate temperature data You must pair the tempe with your device to display temperature data from the tempe Tips for Pairing ANT Accessories with Your Garmin Device Verify that th...

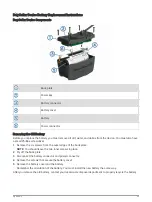
Страница 45: ...screwdriver 1 Remove the six screws from the outer edges of the back plate NOTE You should leave the two inner screws in place 2 Pry off the back plate 3 Disconnect the battery connector and power con...

Страница 46: ...ard the side with the charging clip contacts 2 Replace the battery cover 3 Replace the screws to secure the battery cover 4 Connect the battery connector and power connector You may need to use a flat...

Страница 47: ...front enclosure with the label side of the battery facing up and the leading edge of the battery placed under the charging contact ledge of the device 11 Replace the battery plate and replace and tigh...

Страница 48: ...ewdriver 1 Remove the 4 screws from the L shaped cover over the VHF antenna NOTE You should note the location of the one short screw 2 Pry off the L shaped cover 3 Remove the screw securing the VHF an...

Страница 49: ...n your vehicle you may need to replace the fuse located at the tip of the vehicle adapter 1 Rotate the end piece counter clockwise to unlock it TIP You may need to use a coin to remove the end piece 2...

Страница 50: ...per minute or meters per minute since the last reset Descent Total The total elevation distance descended since the last reset Distance to Dest The remaining distance to the final destination You must...

Страница 51: ...ent rate of travel Speed Limit The reported speed limit for the road Not available in all maps and in all areas Always rely on posted road signs for actual speed limits Speed Maximum The highest speed...

Страница 52: ...istance between your current position and the next waypoint in the route You must be navigating for this data to appear Vertical Speed The rate of ascent or descent over time Vertical Speed to Dest Th...

Страница 53: ...18 hunter 18 I icons 12 initial setup 6 intensity level choosing 15 K keys 2 3 training 16 L line of sight radio communication 11 M main menu customizing 28 maps 21 24 BirdsEye imagery 28 measuring d...

Страница 54: ...support garmin com GUID 7936C255 EDC9 4713 AA2B 26476A140DA6 v1 September 2021...

Страница 55: ...IMPORTANTSAFETYANDPRODUCT INFORMATION 2014 Garmin Ltd or its subsidiaries GUID 4448A574 ABF0 41E5 B9F2 67CCDB87475F v5 July 2021...

Страница 56: ...angrijke veiligheids en productinformatie 28 Vigtige produkt og sikkerhedinformationer 32 T rkeit turvallisuus ja tuotetietoja 36 Viktig sikkerhets og produktinformasjon 40 Guiden Viktig s kerhets och...

Страница 57: ...l to the dog and risk fire or explosion Device Warnings Do not immerse the device or batteries in water or other liquids Do not leave the device exposed to a heat source or in a high temperature locat...

Страница 58: ...ireless radios may interfere with some hearing aids In the event of such interference you may want to consult your hearing aid manufacturer to discuss alternatives Posted Facilities Turn your radio OF...

Страница 59: ...terference by one of the following measures Reorient or relocate the receiving antenna Increase the separation between the equipment and the receiver Connect the equipment into an outlet on a circuit...

Страница 60: ...D GARMIN EXPRESSLY DISCLAIMS ALL OTHER WARRANTIES AND REMEDIES WHETHER EXPRESS IMPLIED STATUTORY OR OTHERWISE INCLUDING WITHOUT LIMITATION ANY IMPLIED WARRANTY OF MERCHANTABILITY OR FITNESS FOR A PART...

Страница 61: ...ce missing components from any package purchased through an online auction International Purchases A separate warranty may be provided by international distributors for devices purchased outside the U...

Отзывы: