0662V Rev 08/14
38-221, 38-524
Orchard Rack
Years ago, people stored “keeper” crops such as apples, winter squash, onions and potatoes on rustic wooden racks just like
this one. The drawers are slatted to ensure good air circulation and they slide out for easy access. For best results, put the rack in
a cool, dark cellar or outbuilding. It’s good for drying herbs, too. These instructions are for use with the 6-drawer and 9-drawer
Orchard Rack.
Tools Needed
Drill with bits
Phillips screwdriver
Note:
Assembly is easier with a second person to help.
Tip:
Drill pilot holes before inserting screws to prevent wood
from splitting.
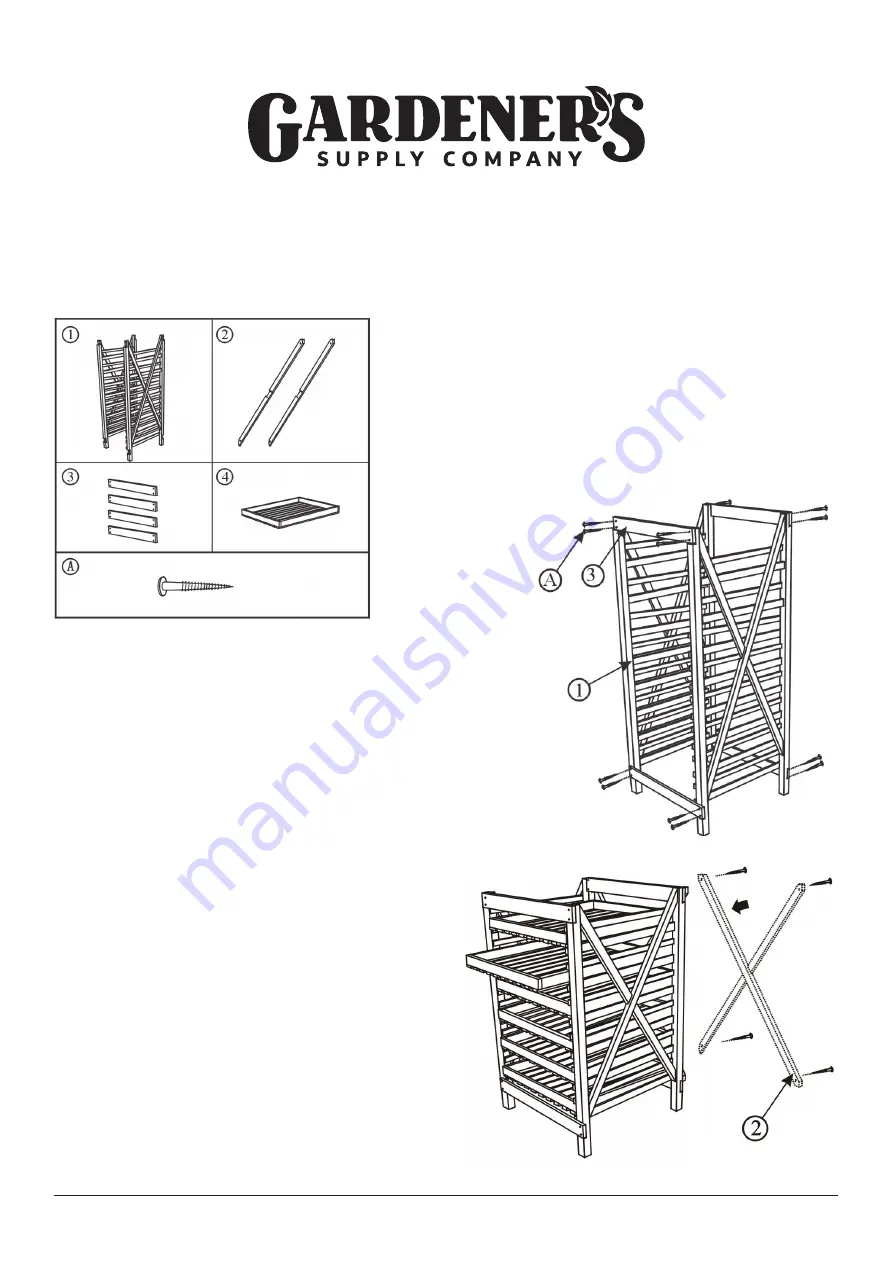
Parts Included
Crossbars
Drawers
Bracing
Slats
Sides
Screws, includes extra
Figure 1
Assembly
Identify and organize all parts of the Harvest Rack on a hard
and level surface.
Tip:
Cut open the shipping box and use it as a
cushioned work surface to protect the wood during assembly.
Step 1.
Position the Sides (Part 1) upright with the legs on the
ground.
Note:
If assembling without a helper, it may be
easier to assemble the Orchard Rack with it lying on its back
or front for this step. Attach the Bracing Slats (Part 3) to the
top and bottom of each Side as shown in Figure 1.
Tip:
Drill
pilot holes before inserting screws to prevent wood from
splitting. Place the screws through the predrilled holes in the
Slats. Do not fully tighten. Be sure the top Bracing Slats are
flush with the top of the Sides.
Step 2.
Slide a drawer into each compartment (Figure 2). This
will help to square up the Rack and keep it stable for the next
step.
Step 3.
Stand the Rack up on its feet, if necessary. Adjust
the entire Rack to make sure it’s square. Connect the two
Crossbars (Part 2) to form an "X." Attach the end of each
Crossbar to the upper and lower corners at the back of the
Rack (Figure 2). Fully tighten all screws on the Crossbars and
the Rack.
Important:
Do not overtighten the screws. Over
tightening the screws may cause the wood to split. The
assembly is now finished.
Figure 2


