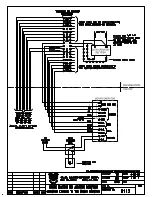
Doc. No.:CONVERT MOM/MOH TO MOVFR
1 OF 1
G.A.L. Manufacturing Corporation
50 East 153
rd
Street, Bronx, N.Y. 10451
Phone (718) 292-9000 Fax (718) 292-2034 8/31/01
HOW TO CONNECT THE G.A.L. MOVFR OPERATOR
IN PLACE OF THE G.A.L. MOM/MOH OPERATOR
The MOVFR door operator requires a minimum of 4 and a maximum of 6 input wires (two 220 volt power supply
input wires and 2 to 4 input signal wires depending on the type of input signals used).
The MOM and MOH operators require from 10 to 16 wires. Seven wires may be reused by reconnecting them to
the machine room controller and the MOVFR operator.
Use the following instructions along with wiring diagram no. 8112:
1. Disconnect the machine room power.
2. Machine room wires
(
+
)
and
(
-
)
can be used to provide the 220 volt AC power to the operator. To do this,
remove these wires from their present machine room terminals and tape them up. Run two new wires from
the
(
+
)
and
(
-
)
terminals to the AC side of the machine room door operator rectifier making sure that you can
measures 200 to 230 volts AC across the two wires. The corresponding car top wires will connect to the 230
VAC LINE terminals on the MOVFR as explained below.
3. On top of the car, remove and label all wires from the existing operator.
4. Tape-up the following wires which will not be used:
ST, RN, LO, OP, A2
5. Tape-up the following wires (if provided) which will not be used:
FSA, FSC, ATC, SD2
6. Tape-up the following wires if the existing operator did not have nudging:
CL, SDA .
If the existing operator had nudging, CL and SDA were originally connected to the existing nudging relay
contact and will be re-used to power the new operator nudging input. In that event, connect CL to F1.
7. Connect
(
+
),
F1 and CL together (see step 6 above for explanation of CL).
8. Remove the existing operator and Install the new operator.
9. Flip the operator power switch to the OFF position.
10. Connect these existing wires as follows:
Existing car top wires
Connect to the new operator terminals
(
++++
)
One side of 230 VAC LINE
(-)
Other side of 230 VAC LINE
and to the input terminal COM
LC Input
CLOSE
A1 Input
OPEN
For nudging: SDA
Input NUDG
11. Connect all other functions (door open limit, door close limit, gate contact) exactly as they were with the
existing operator. CAUTION! : If the open and close limits were originally connected to either F1 or ST then
the limit wires must be reconnected to some other source of DC power such as the DC side of the door
operator rectifier.
12. The REOPEN terminals can be connected directly to the electric eye contact on the car top. If these terminals
are connected across the electric eye contact, the door will reopen automatically if it encounters an
obstruction that does not activate the electric eye.
13. Flip the AUTO-MAN toggle switch to the MAN position.
14. Turn power on.
15. Operate the OPEN-CLOSE toggle switch and check that the door opens and closes properly.
16. Operate the machine room door open relay and observe that the car top OPEN input board LED turns on.
Open the door with the toggle switch all the way and observe that the input board LED turns off when the
open limit LED turns on.
17. Operate the machine room door close relay and observe that the car top CLOSE input board LED turns on.
Close the door with the toggle switch all the way and observe that the input board LED turns off when the
close limit LED turns on.
18. Now flip the toggle switch to AUTO, operate the machine room relays and observe that the door operates
correctly under power including nudging speed, if provided.
Содержание MOM
Страница 2: ......


